Table of Contents >> Show >> Hide
- Before You Touch a Screw: The 5-Minute Vanity Reality Check
- 19 DIY Bathroom Vanity Ideas for Custom Storage and Style
- 1) Thrifted Dresser Vanity (The “Old-School Charm, New-School Function” Move)
- 2) Repurposed Cabinet Vanity (Fast Track to “Looks Custom”)
- 3) Floating Vanity (A Small Bathroom’s Best Friend)
- 4) Cedar Wrap for a Wall-Mount Sink (Minimal Vanity, Maximum Warmth)
- 5) Farmhouse Console Vanity (Open Shelf, Closed Budget)
- 6) IKEA-Style Hack Vanity (Affordable + Shockingly Good-Looking)
- 7) Industrial Pipe + Wood Vanity (For People Who Own at Least One Flannel)
- 8) Built-In Look Using Stock Base Cabinets (The “Why Not Both?” Strategy)
- 9) Shallow-Depth Vanity for Tight Bathrooms (Because Not Everyone Has a Mansion)
- 10) Vanity with Tilt-Out Trays (Small Feature, Big Daily Joy)
- 11) Toe-Kick Drawer (The Secret Storage Compartment Your Bathroom Deserves)
- 12) Pull-Out Hamper Drawer (Laundry: Now Slightly Less Annoying)
- 13) Double Vanity with a Center Tower (Stop Fighting Over Drawer Space)
- 14) Open Cubbies for Towels (Hotel Energy on a DIY Budget)
- 15) Cane/Webbing Door Fronts (Instant Texture Upgrade)
- 16) Painted Vanity Makeover + New Hardware (The Easiest “Before & After”)
- 17) Concrete-Look Countertop (Modern Style Without Marble Prices)
- 18) Tile-Wrapped Vanity Base (The “Yes, I’m Extra” Option)
- 19) Rolling Cart Vanity for Renters (No Commitment, All Function)
- Finishing Touches That Make DIY Vanities Look Custom
- Conclusion: Build the Vanity Your Bathroom Has Been Begging For
- Experience Section: What DIYers Learn the Hard Way (So You Don’t Have To)
Your bathroom vanity is basically the kitchen junk drawer of the bathroom. It holds the toothpaste you swear you’ll start using “correctly,” the hair tools with mysterious cords, the skincare lineup that could qualify as a chemistry minor, andsomehowexactly one (1) rogue bobby pin from 2019.
So if your current setup is a wobbly pedestal sink with the storage capacity of a postcard, it might be time to upgrade. The good news: you don’t need a custom cabinet quote that makes you consider moving to a studio apartment. With the right DIY bathroom vanity idea, you can build (or transform) a vanity that looks custom, boosts bathroom storage, and fits your stylewhether that style is “modern spa” or “I found this dresser on the curb and now it’s fancy.”
This guide walks you through 19 DIY bathroom vanity ideas that range from beginner-friendly makeovers to full-on weekend woodworking adventureseach one designed to improve custom storage and add serious personality.
Before You Touch a Screw: The 5-Minute Vanity Reality Check
- Measure twice, cry zero times: Width, depth, height, and door swing matter. Don’t forget baseboard bumps and trim.
- Know your plumbing: Drain location + supply lines will dictate drawer placement and cutouts.
- Choose your sink early: Undermount, drop-in, vesseleach changes countertop and cabinet design.
- Moisture-proof like you mean it: Bathrooms are basically steam rooms with a mirror. Seal wood and protect edges.
- Be honest about your skill level: Painting is DIY. Re-routing plumbing is “DIY… with a licensed plumber.”
19 DIY Bathroom Vanity Ideas for Custom Storage and Style
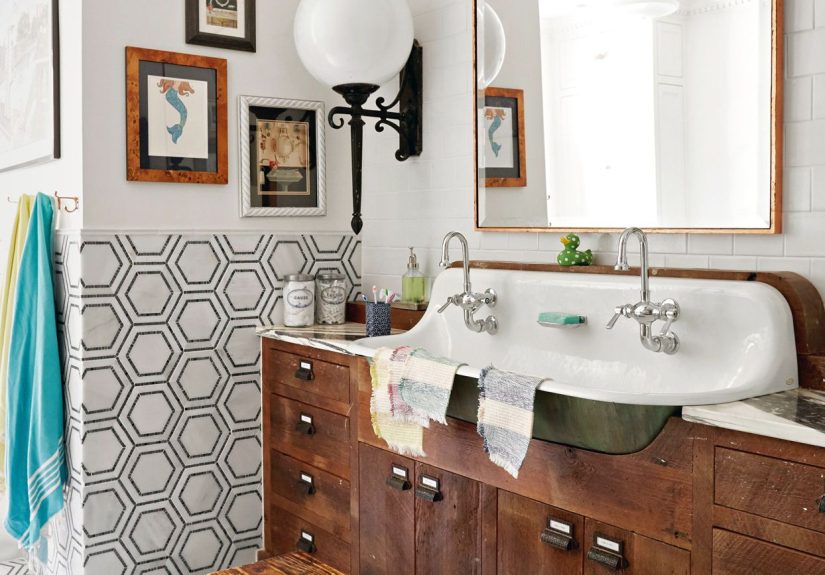
1) Thrifted Dresser Vanity (The “Old-School Charm, New-School Function” Move)
Turn a vintage dresser into a one-of-a-kind bathroom vanity by modifying the top, cutting plumbing access, and sealing everything for moisture. The secret sauce is keeping the front drawer faces for that built-in look while sacrificing the back of the drawers for pipes.
- Storage win: Deep drawers for towels, hair tools, and backup toiletries.
- Style win: Vintage details you can’t fake with flat-pack furniture.
- Watch-out: Reinforce the top if you’re adding a heavy countertop.
2) Repurposed Cabinet Vanity (Fast Track to “Looks Custom”)
Got a sturdy cabinet, buffet, or media console? With the right cutouts and a sink-friendly top, it can become a bathroom vanity that looks like it came from a boutique showroom. Add adjustable shelves inside for flexible storage.
Pro tip: Use a shallow cabinet for tight powder roomsyour knees will thank you.
3) Floating Vanity (A Small Bathroom’s Best Friend)
Wall-mounted vanities visually open up the room and make cleaning the floor way less annoying. You can build a floating box cabinet or adapt a ready-made unit by reinforcing wall mounting points and adding a custom face frame.
- Storage win: Add drawers instead of doors for easier access.
- Style win: Modern, “spa hotel” vibes without the spa hotel bill.
- Watch-out: Hit studs or use proper blockinggravity has no chill.
4) Cedar Wrap for a Wall-Mount Sink (Minimal Vanity, Maximum Warmth)
If you like the airy look of a wall-mount sink but want storage, build a cedar (or other rot-resistant wood) surround that hides plumbing and adds shelf space. It’s a smart compromise between sleek and practical.
5) Farmhouse Console Vanity (Open Shelf, Closed Budget)
Build a console table-style vanity with a lower shelf for baskets. It’s perfect when you want storage without the visual heaviness of full cabinetry. Pair it with a vessel sink for extra style points.
- Storage win: Two or three labeled baskets = instant organization.
- Style win: Farmhouse, coastal, or modern rustic depending on stain and hardware.
6) IKEA-Style Hack Vanity (Affordable + Shockingly Good-Looking)
DIYers love hacking modular furniture into vanities because the sizes are predictable and the styling is clean. Upgrade with a real wood top, better hardware, and a water-resistant finish so it survives actual bathroom life.
Keep it realistic: Not all particleboard loves humidityseal edges and avoid puddle-prone areas.
7) Industrial Pipe + Wood Vanity (For People Who Own at Least One Flannel)
Combine black pipe legs with a thick wood top and open shelving. This look is great in guest baths and powder rooms where you want personality without bulky cabinets. Add a towel bar under the top for bonus function.
8) Built-In Look Using Stock Base Cabinets (The “Why Not Both?” Strategy)
Use stock kitchen or bathroom base cabinets as your foundation, then customize with a toe kick, side panels, and trim so it looks fully built-in. Finish it off with a countertop and sink of your choice.
- Storage win: Real cabinet storage with predictable sizing.
- Style win: Trim details can make basic cabinets look high-end.
9) Shallow-Depth Vanity for Tight Bathrooms (Because Not Everyone Has a Mansion)
Standard vanities can eat up walkway space. A shallow-depth DIY vanity (often 16–18 inches deep, depending on sink choice) keeps the room functional. Use a compact sink and prioritize drawers for vertical storage.
10) Vanity with Tilt-Out Trays (Small Feature, Big Daily Joy)
Add tilt-out trays at the sink front for toothbrushes and small items. It’s the kind of feature you don’t know you need until you have itthen you feel mildly superior to your past self.
11) Toe-Kick Drawer (The Secret Storage Compartment Your Bathroom Deserves)
The toe kick is wasted space unless you turn it into a shallow drawer. It’s perfect for spare razors, travel-size toiletries, or extra hand towels. Yes, it’s a little magical.
12) Pull-Out Hamper Drawer (Laundry: Now Slightly Less Annoying)
Build one deep pull-out behind a cabinet door for a hidden laundry bin. It keeps clothes off the floor and makes your bathroom look like you have your life together.
13) Double Vanity with a Center Tower (Stop Fighting Over Drawer Space)
If you’re building for two, add a tall center tower with drawers or adjustable shelves. It creates “zones” so each person has their own storageand fewer arguments about whose stuff is whose.
14) Open Cubbies for Towels (Hotel Energy on a DIY Budget)
Incorporate towel cubbies into the side of a vanity or below the counter. Rolled towels look intentional, even if the rest of your life is chaos.
15) Cane/Webbing Door Fronts (Instant Texture Upgrade)
Refresh a plain vanity by swapping solid door panels for cane or webbing inserts. It adds warmth and texture and works especially well in boho, coastal, or vintage-inspired bathrooms.
Moisture note: Seal the surrounding wood well and keep ventilation decent.
16) Painted Vanity Makeover + New Hardware (The Easiest “Before & After”)
If your vanity is structurally fine but visually tragic, paint it. Then swap the hardware. That’s it. That’s the glow-up. Use cabinet-appropriate paint and a durable topcoat, and you’ll get a finish that stands up to humidity and daily use.
17) Concrete-Look Countertop (Modern Style Without Marble Prices)
Concrete-style countertops (true concrete or a microcement overlay) give a modern, minimalist vibe. Pair with warm wood or flat-panel doors to keep it from feeling too cold. Seal it well to resist stains and moisture.
18) Tile-Wrapped Vanity Base (The “Yes, I’m Extra” Option)
A tiled vanity base can look like custom architectureespecially with zellige-style tile, terrazzo look, or bold patterns. It’s labor-intensive, but the payoff is huge.
- Storage win: Design niches and shelves right into the structure.
- Style win: Looks like it belongs in a design magazine.
19) Rolling Cart Vanity for Renters (No Commitment, All Function)
If you can’t do a full install, use a slim rolling cart or small cabinet as a “vanity sidekick.” Store daily items, towels, and cleaning supplies, and roll it away when you need space. It’s not traditional, but it’s practicaland renters deserve nice things too.
Finishing Touches That Make DIY Vanities Look Custom
Pick hardware like you mean it
Oversized pulls, warm brass, matte black, or polished nickel can completely change the vibe. Hardware is the jewelry of cabinetryexcept you don’t lose it in couch cushions.
Add lighting that isn’t “interrogation chic”
Good vanity lighting instantly elevates the whole setup. Consider sconces at eye level or a quality bar light that doesn’t cast weird shadows on your face (because the mirror is supposed to help, not emotionally damage you).
Make storage feel intentional
Use drawer dividers, labeled bins, and stackable organizers. The goal is “I can find floss in under three seconds,” not “archaeological dig.”
Conclusion: Build the Vanity Your Bathroom Has Been Begging For
A DIY bathroom vanity can be as simple as paint and hardware or as ambitious as a floating cabinet with custom drawers. Either way, the best projects do two things: solve real storage problems and fit your style. Pick the idea that matches your space, your tools, and your patience level, then build something that makes mornings smoother and your bathroom a little more you.
Experience Section: What DIYers Learn the Hard Way (So You Don’t Have To)
Let’s talk about the part of DIY vanity projects that doesn’t show up in the pretty reveal photo: the middle. The middle is where confidence meets plumbing reality, where you discover your floor isn’t level, and where you briefly consider living in the woods because modern life has too many pipe fittings.
Here are the most common, real-world lessons DIYers tend to report after tackling a bathroom vanity makeover or build:
1) The wall is never as straight as you think it is
That clean, snug fit you imagined? Dry-fit your vanity, then prepare to scribe trim, shim like a professional, or both. Even newer homes can have small variances that turn “just slide it in” into “why is there a gap big enough to mail a letter through?” Shims are not a sign of failure. They’re a sign you live in a three-dimensional world.
2) Plumbing cutouts are a game of millimeters
Cutting the back of a drawer for plumbing is doable, but it’s one of those tasks where “close enough” is not actually close enough. The best approach is to mark everything with the vanity in place, double-check measurements, and cut conservativelythen widen as needed. Many DIYers find that planning drawers around the trap and supply lines is easier than forcing plumbing to behave like a polite houseguest.
3) Moisture protection is not optional
Bathrooms are humid, splashy, and occasionally chaotic. Wood needs sealing. Particleboard needs extra caution. Painted surfaces need curing time. A common regret is rushing the finishbecause it looks dry doesn’t mean it’s ready for daily water exposure. If DIYers could go back in time, many would give themselves one extra day just for curing and sealing. Future-you will appreciate not having bubbled paint around the sink after two weeks.
4) Storage decisions matter more than style decisions (and that’s saying something)
People rarely regret choosing the “wrong” stain color. They do regret building a cabinet with one giant cavern and no organization. The most loved vanities tend to include at least one of the following: drawers (not just doors), a dedicated spot for hair tools, a section for tall bottles, and a place for “daily” items that isn’t the countertop. One clever divider can save you from years of digging through a pile of skincare like you’re searching for buried treasure.
5) The best DIY vanities are designed around routines
DIYers who feel happiest with their finished vanity often started by asking: “What do I do here every day?” If you do makeup, you want good lighting and shallow organizers. If you shave, you want easy-to-clean surfaces and accessible storage. If the bathroom is shared, you want zones. Designing around habits makes the vanity feel customeven if the base started life as a thrift-store dresser with questionable drawer smells.
The bottom line: DIY vanity projects are absolutely worth it, not just for the savings, but because you end up with storage that fits your life. Plan carefully, seal thoroughly, measure obsessively, and rememberif you have to redo one cut, you’re not alone. You’re just officially part of the DIY club.