Table of Contents >> Show >> Hide
- Before You Build: A Quick Reality Check (The Fun-Killing Part That Saves the Day)
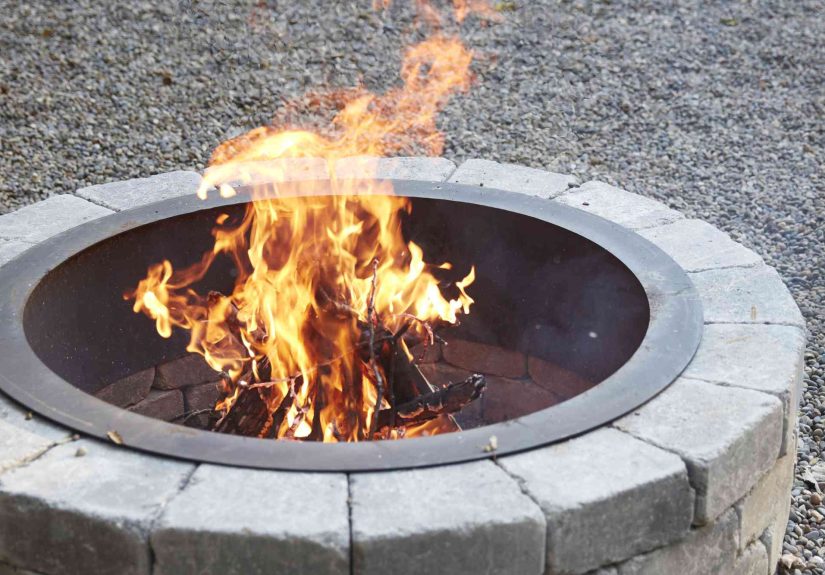
- 21 Rustic Stone Fire Pit Ideas
- 1) Dry-Stacked Fieldstone Ring
- 2) Mortared Stone Circle with a Chunky Cap
- 3) Flagstone Patio + Matching Stone Pit
- 4) River Rock “Moat” Border (Not Inside the Flame Zone)
- 5) Boulders as Natural Backrests
- 6) A Low Stone Pit for a “Campfire” Feel
- 7) A Raised Stone Pit for Warmth (and Fewer Bent Knees)
- 8) Stone Pit + Curved Seating Wall
- 9) Sunken “Conversation Pit” with Stone Steps
- 10) Split-Face Stone Veneer for Cabin Texture
- 11) Stacked Stone + Built-In Wood Storage Niche
- 12) Granite or Bluestone Cap for a Subtle Upgrade
- 13) Rustic Stone Pit on Pea Gravel (The Easy Maintenance Combo)
- 14) Stone Fire Pit with a Smokeless Insert
- 15) Two-Tone Stone: Rough Wall + Smooth Cap
- 16) Rustic “Stone + Steel” Hybrid
- 17) Stone Pit Anchored into a Retaining Wall Terrace
- 18) “Farmhouse Rustic” with Limestone-Look Surround (and a Liner Inside)
- 19) Fire Pit + Stone “Spill Zone” for Cooking
- 20) Rustic Stone Pit with a Stone Path Approach
- 21) The “Found Stone” Look with Mixed Sizes
- Design Notes That Make Rustic Look Intentional (Not Accidental)
- Real-World Experiences: What People Usually Learn After Building a Stone Fire Pit (The 500-Word “Wish I Knew” Section)
- Conclusion
A stone fire pit is basically the outdoor equivalent of a “group chat”people drift in, snacks appear, and somehow everyone ends up sharing stories they swore they’d keep private. The best part? Stone looks like it belongs outside. It weathers gracefully, adds texture, and instantly gives your yard that rustic “weekend cabin energy” even if your nearest forest is a Home Depot parking lot.
In this guide, you’ll find 21 stone fire pit ideas that lean rustic in all the right waysnatural materials, cozy layouts, and smart design details that make the whole space feel intentional. You’ll also get practical build notes (because “rustic” should never mean “wobbly”) and real-world experience tips at the end to help you avoid the classic fire pit pitfalls.
Before You Build: A Quick Reality Check (The Fun-Killing Part That Saves the Day)
Fire pits are simple, but local rules can be… not. Many fire departments and city codes specify minimum clearances from structures and property lines, and some places limit recreational fire size. Also, burn bans and windy nights can turn your cozy plan into a “why is my neighbor filming this?” moment.
- Location matters: Choose a level spot on a noncombustible surface (gravel, stone, or pavers). Keep it well away from anything that burns.
- Plan for drainage: Water pooling inside a pit is a common rookie mistake. A gravel base helps.
- Protect the “hot face”: The inner ring takes the heat. Consider a metal fire ring insert and/or a firebrick lining to reduce cracking and extend lifespan.
- Use the right stone in the right place: Dense stone works better; porous or moisture-holding rocks can crack when heated. When in doubt, keep “pretty rock” on the outside, and use a liner inside.
21 Rustic Stone Fire Pit Ideas
Think of these as menu options. You can mix and match: one idea for the pit, another for the seating, another for the base. The rustic vibe comes from texture, imperfection, and materials that look like they’ve been there awhile (even if they arrived yesterday on a pallet).
1) Dry-Stacked Fieldstone Ring
Fieldstone is peak rusticuneven shapes, natural color variation, and that “found it on the property” look. Dry-stacking (no mortar) keeps it casual and repair-friendly. For safety and durability, add a steel fire ring insert on the inside so flames aren’t licking directly at the stone edges.
2) Mortared Stone Circle with a Chunky Cap
Want rustic, but also “stays put when someone leans back with a s’more”? Use mortar for the wall and finish with thick capstones. Caps make the pit look finished and double as a perch for hot chocolate (or the world’s most nervous marshmallow).
3) Flagstone Patio + Matching Stone Pit
Build the pit as the centerpiece of a flagstone patio. The trick is repetition: the same stone family shows up in both the floor and the pit, so it feels designed, not dropped. Add gravel between flagstones for a more rugged, cottage-y finish.
4) River Rock “Moat” Border (Not Inside the Flame Zone)
River rock looks incredible in rustic landscapes, especially as a border band around a pit or as a “moat” between the pit and seating. Keep most river rock outside the hottest interior area; pair it with a steel insert and/or firebrick inside for the heat-facing layer.
5) Boulders as Natural Backrests
Place a few large boulders around part of the circle so they act like sculptural seating or backrests behind chairs. It’s rugged, it’s photogenic, and it quietly says, “Yes, I have a landscaping plan. No, you may not ask how much it cost.”
6) A Low Stone Pit for a “Campfire” Feel
Keep the wall height low so it feels like a classic campfire ringgreat for roasting and conversation. Pair it with Adirondack chairs and crushed gravel underfoot for that casual weekend-at-the-lake vibe.
7) A Raised Stone Pit for Warmth (and Fewer Bent Knees)
Raising the pit wall a bit helps radiate warmth at seated height and makes tending the fire easier. Rustic doesn’t have to mean “my back hurts.” Add a wide stone cap for a stout, lodge-style silhouette.
8) Stone Pit + Curved Seating Wall
A curved stone seat wall behind the chairs makes the whole area feel like an outdoor room. Use the same stone or a complementary one (e.g., rough wall stone with smoother capstone).
9) Sunken “Conversation Pit” with Stone Steps
If your yard allows it, a slightly sunken fire area is dramatic and wind-friendly. Add stone steps and a gravel base for drainage. The result feels like a rustic amphitheater for telling stories you’ll pretend are true.
10) Split-Face Stone Veneer for Cabin Texture
Use a stone veneer (or veneer-look masonry) to get that stacked ledge texture without wrestling enormous stones. It’s a good option when you want a rugged look with more predictable shapes and faster installation.
11) Stacked Stone + Built-In Wood Storage Niche
Leave a small alcove in the base or nearby retaining wall for firewood. It’s practical, it looks intentional, and it keeps you from doing the “half-jog back to the shed” mid-story.
12) Granite or Bluestone Cap for a Subtle Upgrade
A dense, clean-edged cap (granite or bluestone) adds polish without losing rustic charm. It’s like brushing your hair before a casual photo: still you, just slightly more “put together.”
13) Rustic Stone Pit on Pea Gravel (The Easy Maintenance Combo)
Surround the pit with pea gravel and a simple stone edge. Gravel drains well, reduces mud, and feels relaxed. Use stepping stones to create paths so everyone’s shoes don’t become unintentional “garden art.”
14) Stone Fire Pit with a Smokeless Insert
Love the look of stone but want less smoke drama? Build a stone surround around a smokeless fire pit insert. You get the rustic aesthetic and a cleaner burngreat if your outdoor space is close to neighbors.
15) Two-Tone Stone: Rough Wall + Smooth Cap
Mix textures: rugged, irregular stone for the vertical wall and flatter, smoother stone on top. The contrast looks deliberate and helps make the pit comfortable to sit near.
16) Rustic “Stone + Steel” Hybrid
Use a steel fire ring and build a thick, rough stone wrap around it. The steel handles the heat; the stone delivers the look. This is one of the best ways to keep rustic style while improving longevity.
17) Stone Pit Anchored into a Retaining Wall Terrace
If your yard has a slope, tuck the pit into a terrace and use retaining wall stone as part of the design. Add stone steps and lighting for a cozy, layered backyard that feels like a mountain lodge patio.
18) “Farmhouse Rustic” with Limestone-Look Surround (and a Liner Inside)
Light-toned stone can look beautifully rusticthink farmhouse courtyard. If you use more porous stone, protect the interior heat zone with a metal ring insert and/or firebrick lining so the visible stone stays happier over time.
19) Fire Pit + Stone “Spill Zone” for Cooking
Add a flat stone landing beside the pit: a place for skewers, trays, or a cast-iron pan. It’s a small detail that makes the setup feel purposeful (and reduces the number of times someone sets tongs on a chair).
20) Rustic Stone Pit with a Stone Path Approach
Make the fire pit feel like a destination. Add a stepping-stone or flagstone path leading to it, edged with gravel or low planting. The walk-in moment makes the space feel designed, even if your “design software” was just you pointing and nodding.
21) The “Found Stone” Look with Mixed Sizes
For maximum rustic character, mix stone sizes and shapes (while keeping the structure stable). Pair the wild outer look with a dependable inner liner. The vibe is “natural,” the performance is “engineered,” and you get the best of both worlds.
Design Notes That Make Rustic Look Intentional (Not Accidental)
Pick a scale that fits your hangout style
A cozy pit for four chairs is different from a “crowd magnet” pit for ten. Many local guidelines for recreational fires keep the fuel area modest, so a common sweet spot is a pit around 36–44 inches in diameter with comfortable spacing for seating.
Build the base like you mean it
A stable, draining base matters more than fancy stone. A compacted gravel base helps prevent shifting and discourages water pooling. If your pit is even slightly off-level, everyone will notice when the capstones start looking like a tilted hat.
Rustic landscaping is your secret weapon
Surround stone with plants that look at home in a natural setting: ornamental grasses, low shrubs, herb planters, or native perennials. Add warm outdoor lighting to extend the season and keep the space usable after sunset.
Real-World Experiences: What People Usually Learn After Building a Stone Fire Pit (The 500-Word “Wish I Knew” Section)
Most stone fire pit projects don’t fail because of the stone. They fail because of the “small stuff” no one brags about on social media: drainage, seating layout, and that one slightly wobbly base layer you told yourself would “settle in.” Spoiler: it will settlein the least helpful way.
One of the most common experiences is realizing that comfort beats aesthetics after about 20 minutes. The pit can look like a luxury resort feature, but if the chairs are too far away, everyone leans forward like they’re in a suspense movie; too close, and it becomes a rotating routine of “hot face / cold back.” People who love their fire pit long-term usually create a clear ring: pit in the center, then a comfortable buffer for feet and sparks, then seating arranged so conversation doesn’t require yelling across a crater.
Another real-world lesson: smoke has opinions. You can pick the perfect spot in daylight and still discover that your evening breeze funnels smoke directly toward the one friend who already has watery eyes. Homeowners often end up rotating the seating seasonally, adding a small windbreak, or choosing a smokeless insert to reduce the nightly “musical chairs, but make it smoky” routine.
Then there’s the “mud halo” problem. A fire pit on bare soil looks rustic for about a weekuntil the first rain turns it into a squishy perimeter no one wants to walk across. That’s why gravel, stone dust, or pavers around the pit become a favorite upgrade. It keeps feet clean, improves drainage, and makes the whole space feel finished. Plus, it’s easier to sweep up the inevitable debris: char bits, snack crumbs, and the mysterious number of marshmallow fragments that appear even when nobody admits to dropping them.
People also discover that maintenance is mostly prevention. Covering the pit when it’s not in use helps keep water out and reduces freeze-thaw stress in colder regions. If you used natural stone on the outside, protecting the interior with a metal ring insert and/or firebrick liner can be the difference between “still gorgeous after five seasons” and “why does my pit look like it lost a boxing match?”
Finally, the happiest fire pit owners tend to embrace the small rituals: a dedicated ash bucket, a simple tool set (poker, tongs), a nearby water source or extinguisher, and a storage spot for wood that keeps it dry. The rustic look is what draws people in, but the easy-to-use setup is what keeps everyone coming backweeknight cocoa, weekend gatherings, and those quiet, oddly satisfying moments where you just sit and watch the flames do their thing.
Conclusion
Rustic stone fire pits work because they feel timeless: natural texture, warm light, and a built-in reason to slow down. Choose a design that fits your space and your habits, build a stable base, protect the heat-facing interior with a liner or insert, and finish the area with thoughtful seating and simple landscaping. Do that, and your backyard won’t just have a fire pitit’ll have a favorite place.