Table of Contents >> Show >> Hide
- A quick comfort rule before we start
- Way #1: The Hair Tie (or Rubber Band) Waist Extender
- Way #2: The Belly Band “Undercover Agent” (Cover + Support, No Sewing)
- Way #3: Sew a Stretch Panel (Turn Regular Pants into True Maternity Pants)
- Which method should you pick? A quick guide
- Comfort & safety tips (because your belly isn’t here for fashion pain)
- FAQ
- Conclusion
- Experiences: Real-life moments when these hacks save your day (and your mood)
Pregnancy has a funny way of turning your favorite pants into your worst enemy. One day your jeans are your ride-or-die. The next day the button is screaming, the zipper is negotiating, and your belly is filing a formal complaint. The good news: you don’t have to buy a whole new wardrobe just because your waistband is having a meltdown.
Below are three practical, bump-friendly ways to convert regular pants into “maternity pants” (or at least maternity-adjacent), with clear steps, real-life tips, and a few laughsbecause if your pants are going to be dramatic, you might as well be entertained.
A quick comfort rule before we start
Any hack that makes you feel pinched, numb, short of breath, or like you’re wearing a denim tourniquet is a no. Pregnancy comfort isn’t about “winning” against your jeansit’s about not spending your day thinking about your jeans. Do the “sit test,” the “car-seat test,” and the “after-lunch test.” If the waistband loses every round, change tactics.
Way #1: The Hair Tie (or Rubber Band) Waist Extender
This is the classic “I need one more inch of breathing room” trick. It’s quick, cheap, and perfect for early pregnancy bloat or the awkward phase where you’re not in full maternity clothes yet but your pants are already acting brand new.
Best for
- Jeans, trousers, and shorts with a button + buttonhole
- Early pregnancy, first/second trimester, or bloat-heavy days
- When you need a small amount of extra space (about 0.5–1.5 inches)
What you need
- One hair tie, thick rubber band, or small elastic loop
- Optional: a long top, cardigan, or belly band to cover the unzipped area
Step-by-step
- Button your pants as far as they’ll comfortably go (even if that’s “not at all”).
- Thread the hair tie through the buttonhole.
- Pull the hair tie ends through the loop so it “larks heads” onto the buttonhole (aka: it’s anchored, not slipping around).
- Wrap the hair tie around the button and hook it in place.
- Zip up as much as you can comfortably zip (sometimes you can; sometimes you can’tno shame).
How to make it look intentional (not like your pants are in crisis)
- Layer smart: Wear a longer tee, a flowy blouse, or an open cardigan that drapes over the waistband.
- Use a belly band: (More on that in Way #2.) It hides the unzipped gap and keeps everything smoother.
- Choose the right elastic: A thick hair tie is sturdier and less “cutty” than a thin rubber band.
Pros and cons
- Pros: Zero sewing, costs basically nothing, great for travel, great for “I’m not ready to switch pants today.”
- Cons: The zipper area may gape. It’s not the best for very fitted tops. And at some point, your belly will politely request a different plan.
Upgrade option: If you love this idea but want a cleaner look, consider a purpose-made waistband/button extender. They do the same job as the hair tie, but feel a bit more secure and less MacGyver.
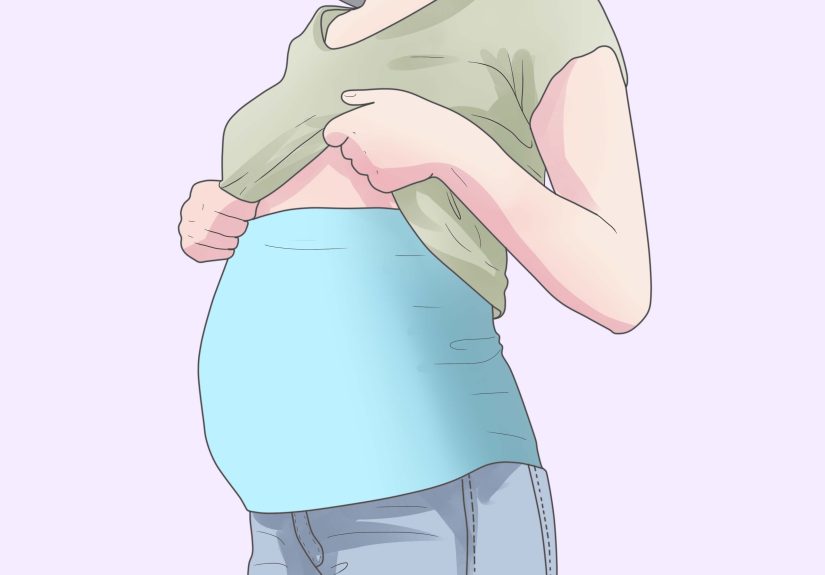
Way #2: The Belly Band “Undercover Agent” (Cover + Support, No Sewing)
Belly bands are stretchy, tube-like bands that sit over your midsection. Style-wise, they’re basically a secret agent: they cover your unbuttoned pants, hold them in place, and make it look like you’re fully put togetherwhen you’re actually running on snacks and determination.
Best for
- Keeping regular jeans/trousers in rotation without fully fastening them
- Creating a smooth look under longer tops or sweaters
- Second trimester and beyond, when the waistband drama gets louder
What you need
- A belly band (or even a long, snug camisole/tube top in a pinch)
- Your regular pants, slightly unbuttoned or using the hair tie trick
How to wear it (the no-fuss method)
- Put on your pants and leave them unbuttoned (or use the hair tie extender from Way #1).
- Pull the belly band down over the waistband area so it covers any gaps and the top of the zipper.
- Smooth the fabric so it lies flat and doesn’t roll. (A silicone-grip band can help reduce rolling.)
- Finish with a longer top, sweater, or layered look. You’re done. Go forth and sit down comfortably.
Belly band vs. support belt: what’s the difference?
A belly band for clothing is mostly about coverage and gentle hold. A pregnancy support belt is more about lifting and redistributing weight to reduce discomfort in your back/hips/pelvis. Some people use both: band for outfit coverage, belt for physical supportespecially on walking-heavy days.
Pros and cons
- Pros: No sewing, re-wearable with lots of outfits, helps your pants stay put, adds modesty coverage.
- Cons: Can roll up or down depending on fabric/fit; may feel warm; not every band feels great for every belly shape.
Pro tip: If your belly band keeps rolling, try sizing up, choosing a longer band, or wearing it over a thin camisole for friction. Also: the “tuck one side under your bra band” trick can help keep it anchored if your outfit allows it.
Way #3: Sew a Stretch Panel (Turn Regular Pants into True Maternity Pants)
If you want the most “real maternity pants” resultmeaning your pants actually adapt to your growing bellythis is the move. You’re basically swapping rigid waistband real estate for stretchy fabric so your pants expand without digging in. There are two popular versions: side panels (great for many jeans) and a full belly panel (maximum comfort).
Option A: Side stretch panels (classic maternity jeans style)
Side panels are excellent when your jeans still fit through the hips and legs but the waistband is the issue. You insert knit fabric on the sides so the waist can expand gradually.
What you need
- Stretch knit fabric (rib knit or jersey with good recovery)
- Seam ripper, fabric scissors, pins/clips
- Sewing machine (or a tailorno judgment)
- Optional: matching thread and a zigzag stitch setting for stretch
Steps (high-level but practical)
- Try on and mark: Put on the jeans and note where you need stretchusually side seams near the waistband.
- Open the sides: Use a seam ripper to open the waistband/side area (small at firstyou can always expand later).
- Cut your knit inserts: Make two mirrored pieces. Start modestly; stretch fabric goes farther than you think.
- Sew inserts in place: Pin with the knit slightly stretched so it hugs but doesn’t squeeze. Use a zigzag stitch for flexibility.
- Reinforce stress points: Backstitch at the top corners. Those corners work overtime when you sit down.
Fit tip: The goal is “supportive and flexible,” not “snug like a rubber gasket.” You want stretch that expands with movementespecially in the seated position.
Option B: Full belly panel (maximum comfort, late-pregnancy hero)
A full panel replaces the front waistband area with a taller stretch panel (often made from a knit tube or even a repurposed tee), so your belly has room to grow without the jeans cutting across it. This is the closest DIY equivalent to over-the-belly maternity jeans.
What you need
- Stretchy fabric (a rib knit tube, jersey, or the body of a soft T-shirt)
- Wide elastic (optional, for the top edge if you want it to stay up better)
- Scissors, pins/clips, sewing machine
Steps (the “doable weekend project” version)
- Decide your rise: Over-belly (covers the bump) or under-belly (sits below). Comfort varies person to person.
- Cut strategically: Many methods remove part of the front waistband area (and sometimes more) to make room for the panel.
- Create the panel: Make a stretchy tube that will wrap your belly. Double-layering can add support and prevent see-through.
- Sew the panel to the jeans: Match side seams and centers, pin evenly, then sew with a stretch stitch.
- Add optional elastic: If your panel slips, add elastic to the top edge so it stays put without squeezing.
Reality check: If sewing makes you break out in hives, a local tailor can often do a side-panel conversion for less than the cost of new maternity jeans. Bring inspiration photos and clearly explain whether you want an under-belly or over-belly finish.
Which method should you pick? A quick guide
- If you need a little extra room right now: Hair tie extender (Way #1).
- If you want coverage + an easy outfit fix: Belly band (Way #2), alone or combined with Way #1.
- If your waistband is officially done and you want a long-term solution: Sew a stretch panel (Way #3).
Comfort & safety tips (because your belly isn’t here for fashion pain)
- Avoid pressure points: If the waistband digs in when you sit, change methods or size up in your base pants.
- Watch circulation: Tingling, numbness, or deep red marks that linger = too tight.
- Breathability matters: Stretch knits and soft panels can feel dramatically better than rigid denim across the belly.
- Support isn’t the same as compression: A garment can feel supportive without squeezing your life force out.
- Keep a backup plan: Throw a belly band or extender in your bagpregnancy bodies change by the hour like they’re running software updates.
FAQ
Will these hacks hurt the baby?
Generally, clothing adjustments that simply reduce pressure and improve comfort are fine. The key is not restricting your belly. If anything feels painful, overly tight, or causes symptoms (numbness, dizziness, reflux flare-ups), switch methods and talk to your healthcare provider if needed.
Can I use these postpartum too?
Yesmany people use waistband extenders and belly bands postpartum while their body is shifting back. Just keep it comfortable and breathable, and avoid relying on tight compression as a “fix.” Support can be helpful; squeezing is not a personality trait you need in your wardrobe.
What about work pants or dress slacks?
The hair-tie method can work if there’s a button closure, but a belly band is often the most office-friendly “invisible” solution. For a longer-term fix, a tailor-installed stretch panel can preserve the professional look while making the waistband humane again.
Conclusion
Turning regular pants into maternity pants doesn’t have to be complicated. Use the hair tie extender when you need quick relief, the belly band when you want coverage and comfort without altering anything, and the stretch-panel sew-in when you’re ready for a true maternity upgrade that grows with you. Your pants can either support this season of lifeor they can retire with dignity.
Experiences: Real-life moments when these hacks save your day (and your mood)
The first time I used the hair-tie trick, it wasn’t even because my belly was “showing.” It was because my stomach had decided that “breakfast” meant “inflate like a balloon.” I stood in front of the mirror, holding my jeans like they’d personally offended me, and thought, “I am not buying maternity clothes because I ate toast.” Enter the humble hair tie: tiny, stretchy, and somehow more emotionally supportive than half the people I’ve met at baby showers.
The magic of the extender hack is that it buys you timetime to figure out what actually feels good, what your body is doing, and what kind of maternity fit you’ll eventually prefer. Some days you’ll want an over-the-belly feel. Other days, anything touching your belly feels like a personal attack. The hair tie trick is the low-commitment relationship of pregnancy fashion: “Let’s just see where this goes.”
Then there’s the belly band phase, which feels like you’ve unlocked a cheat code. The best part isn’t even the coverageit’s the confidence. You can leave your jeans unbuttoned, pull on the band, and suddenly your outfit looks intentional instead of “I lost a fight with a waistband.” It’s especially clutch for errands, casual office days, and those times when you’re meeting someone and you don’t want to spend the first ten minutes thinking about whether your zipper is plotting to reveal itself. With a belly band, you sit down without bracing. You breathe without bargaining. You eat lunch without fearing immediate denim consequences.
My most memorable belly-band moment was a long car ride. Normally, sitting for an hour in regular jeans would leave me doing that awkward post-drive waistband shimmy the second I got out of the car. With the band covering the top, I could loosen the jeans just enough to be comfortable and still look put-together when we stopped. It’s the kind of quiet win that feels small… until you realize how many small discomforts stack up during pregnancy. Reducing even one of them can change your whole day.
And finally, the sew-in panel. This is where you graduate from “hack” to “engineering.” When you sew a stretch panel into jeans you already love, it feels like you’ve reclaimed a piece of yourselfyour style, your fit preferences, your “I still want to feel like me” vibe. The first time you pull on converted jeans and realize they move with you instead of against you, it’s honestly a little emotional. (Yes, pants can do that. Hormones are powerful.)
The sew-in option is also surprisingly practical if you have a go-to pair you’d normally wear weeklyyour favorite denim, your reliable black pants, your “these make me feel confident” pair. Converting those means you’re not constantly buying new pieces to chase a moving target. You’re adapting what you already know works. It’s also easier on decision fatigue: when you’re tired, sore, and thinking about a million baby-related things, having one pair of pants that fits and stays comfortable feels like a gift from your past self.
The bottom line from experience: your needs will change. Some weeks, you’ll live in the hair-tie extender and feel triumphant. Other weeks, you’ll swear by the belly band and wonder why you didn’t try it sooner. And at some point, you may want the real-deal comfort of a stretch panel that keeps you from constantly adjusting. None of these choices are “right” forever. They’re just toolsuse what helps, ditch what doesn’t, and remember: you’re not failing at fashion. Your body is doing something extraordinary, and your pants are just trying to keep up.