Table of Contents >> Show >> Hide
- Before You Start: A Quick Safety Reality Check
- Way #1: Remove a Tempered Glass Screen Protector (Phone/Tablet)
- Way #2: Remove Tempered Glass from a Shower Door or Fixed Panel
- Way #3: Remove Tempered Glass (or an Insulated Glass Unit) from a Window/Door Frame
- FAQ: Tempered Glass Removal Questions People Actually Ask
- Real-World “Experiences” and Lessons Learned (So You Don’t Learn Them the Hard Way)
- Conclusion
Tempered glass is the tough kid on the block: strong, smooth, and usually installed in places where regular glass would be a bad idea (showers, doors, certain windows, tabletops, and yesphone screen protectors). The catch? When tempered glass breaks, it doesn’t crack politely like a movie villain. It “confetti-cannons” into lots of small pieces. Safer, sure… but still a mess you don’t want in your socks.
This guide covers three common, real-world situations where people need to remove tempered glass safely:
(1) a tempered glass screen protector,
(2) a tempered glass shower door/panel,
and (3) a tempered or insulated glass unit in a window/door frame.
Before You Start: A Quick Safety Reality Check
How to tell if it’s tempered glass
- Look for a small etching/“bug” in a corner (common on shower doors and many safety-glass installations).
- Think location: shower doors, glass panels near floors, and many patio doors often use safety glass.
- Know the rule: tempered glass generally can’t be cut or drilled after it’s been temperedso removal usually means replacement, not reshaping.
Safety gear and setup (non-negotiable)
- Safety glasses
- Cut-resistant gloves
- Closed-toe shoes (a.k.a. “not flip-flops”) and long sleeves
- Painter’s tape or duct tape (for an “X” on glass to help hold pieces together if it breaks)
- Drop cloth/cardboard to protect floors and catch debris
- A helper for anything bigger than a phone screen (because gravity never volunteers to help you)
Pro tip: If you’re dealing with a large panel (shower glass, patio door glass, or big window panes), plan your path, clear the area, and set a safe “landing zone” for the glass before you loosen a single screw.
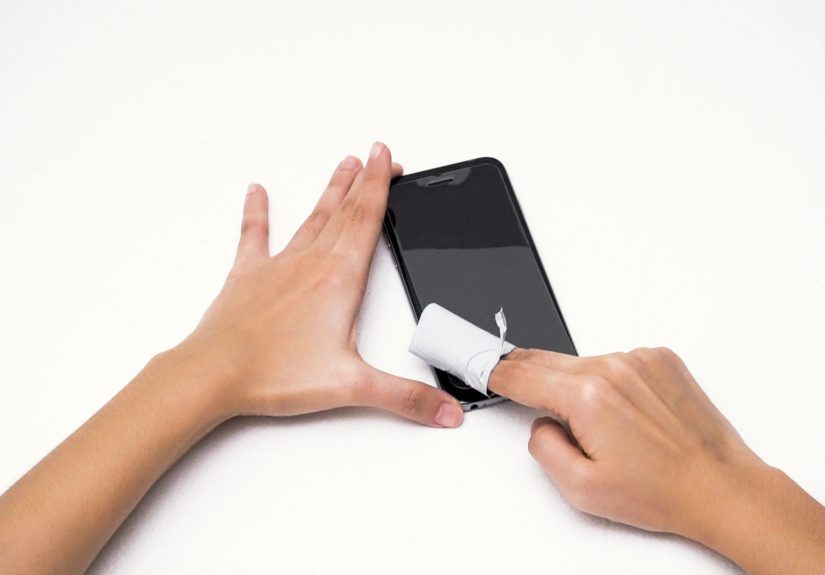
Way #1: Remove a Tempered Glass Screen Protector (Phone/Tablet)
Tempered glass screen protectors are designed to sacrifice themselves heroically. The goal is to remove the protector without scratching the screen underneathor giving yourself a tiny glass souvenir in your fingertip.
Tools you’ll want
- Hair dryer (or low-heat heat gun if you know how to behave with it)
- Plastic card (old credit/gift card) or plastic pick
- Clear packing tape (helpful if the protector is cracked)
- Microfiber cloth
- Isopropyl alcohol (for adhesive residue)
Step-by-step
-
Warm the protector. Use a hair dryer on low heat. Move it arounddon’t park it like you’re tanning the glass.
Aim for gentle warmth that softens the adhesive, not “toasty phone casserole.” - Lift a corner. Slide a plastic card under one corner. Go slowly. If it won’t budge, add a little more heat and try again.
- Peel gradually. Once a corner lifts, keep the card low and continue separating the protector from the screen. Work around the edges if needed.
- If it’s cracked: tape first. Press wide strips of clear tape over the cracked protector before lifting. This helps hold shards together while you remove it.
- Clean residue. Use a microfiber cloth with a small amount of isopropyl alcohol to wipe away adhesive. Don’t scrape with metal tools.
Troubleshooting
- It keeps snapping: Use more tape across the surface, then lift in smaller sections.
- Adhesive won’t come off: Alcohol + microfiber + patience. If you rub like you’re sanding wood, you’ll regret it.
- Protector seems “glued-glued” (UV/gel types): Use mild heat and work slowly. If you feel resistance that’s scary, stop and reassess before you damage your actual screen.
Way #2: Remove Tempered Glass from a Shower Door or Fixed Panel
Shower glass looks sleekuntil you have to remove it. Tempered shower glass is heavy, awkward, and always positioned at the exact angle your elbows don’t bend.
The safest move is to work with a helper and remove hardware while someone stabilizes the panel.
Know your shower type
- Sliding, framed doors: Glass rides in tracks with screws, rollers, and guides.
- Frameless hinged door: Glass is held by hinges and clamps/brackets. Usually sealed with silicone.
- Fixed panel (frameless): Often held with clips/brackets and silicone along edges.
Tools you’ll want
- Screwdriver or drill/driver
- Utility knife (fresh blade)
- Plastic scraper
- Painter’s tape/duct tape
- Optional: hair dryer (to soften silicone), caulk remover
Step-by-step for sliding framed shower doors
- Prep the area. Lay down a drop cloth. Tape an “X” on each glass panel as a precaution.
-
Remove the guide/stop. Many sliding systems have a center guide at the bottom or a stopper.
Remove screws holding it in place so the doors can lift out. - Lift out the doors. With a helper, lift each door up into the top track and swing the bottom out. Remove one at a time.
- Remove remaining frame screws. Take out screws securing the frame to walls and track.
-
Cut silicone/caulk. Use a utility knife to slice along caulked edges where metal meets tile/tub.
Keep the blade shallow to avoid scratching surfaces. - Remove frame pieces. Wiggle and gently tap pieces loose. Use a plastic scraper to prevent damage.
Step-by-step for frameless hinged doors or fixed panels
- Support the glass first. Have a helper hold the door/panel steady before you loosen hardware.
- Remove decorative caps. Many hinges/clamps hide screws under caps.
- Loosen screws slowly. Keep one hand (or helper’s hands) stabilizing the glass the entire time.
- Slice silicone seams. Use a utility knife to cut silicone where glass meets tile, curb, or wall channel.
- Lift and move to a safe spot. Carry the panel upright, set it on padded cardboard, and keep it away from hard edges.
Common mistakes to avoid
- Removing screws before supporting the panel: that’s how glass becomes a loud, expensive surprise.
- Using metal scrapers on tile/tub: scratches are forever.
- Rushing silicone removal: patience here prevents chipped tile, torn drywall, and very creative new swear words.
Way #3: Remove Tempered Glass (or an Insulated Glass Unit) from a Window/Door Frame
Many modern windows and patio doors use an insulated glass unit (IGU)two panes sealed togetheroften installed with glazing beads and adhesive systems.
The strategy depends on how the glass is held in place: snap-in beads, glazing tape, hot-melt sealant, or combinations of the above.
Tools you’ll want
- Safety glasses + cut-resistant gloves
- Stiff putty knife
- Slender putty knife or deglazing tool
- Utility knife
- Duct tape (for an “X” across the glass)
- Glass suction cups (highly recommended for large panes)
- Isopropyl alcohol + clean cloth
Step-by-step (vinyl window/door style with glazing beads)
- Stabilize and protect. Tape a big “X” on both sides of the glass. If possible, remove the sash and lay it on a flat, padded surface.
-
Label the glazing beads. Mark each bead so it goes back in the same spot. Many systems remove in a preferred order
(often top first, then sides, then bottom) to reduce stress and prevent the glass from dropping unexpectedly. -
Pry out the glazing beads carefully. Start at a corner seam, insert a stiff putty knife, and work along the bead until it releases.
Keep your free hand readyonce beads come out, the glass can shift. -
Identify the adhesion type.
- Tape-glazed: Use a deglazing tool or slender putty knife to cut the tape between glass and frame.
- Hot-melt or sealant-glazed: Expect more resistance. Make multiple careful passes with a deglazing tool to separate the seal.
-
Use lubrication if needed. A little soapy water can reduce friction for the tool as you work around the perimeter.
(The goal is smooth cutting, not “let’s fight this frame with brute force.”) - Remove the glass. With suction cups and a helper, tilt the unit out slowly and lift it free. Move it to a protected staging area immediately.
- Note the setting blocks. These small spacers help position the glass. Mark their locations before removal so the replacement sits correctly.
When you should stop and call a pro
- The pane is large (especially patio doors) and you don’t have suction cups or a helper.
- The frame shows signs of structural damage or warping.
- You suspect the unit is under warranty and DIY removal could void coverage.
- You see complex bonded systems you’re not comfortable cutting free.
Cleanup and disposal
- Wear gloves during cleanupsmall tempered pieces hide like they’re playing hide-and-seek for a trophy.
- Vacuum thoroughly, then vacuum again in a different direction.
- Dispose or recycle glass according to local rules. Many areas have specific handling guidance for construction glass.
FAQ: Tempered Glass Removal Questions People Actually Ask
Can I cut tempered glass to make removal easier?
Generally, no. Tempered glass typically can’t be cut or drilled after tempering. If it needs a different shape, it’s usually replacednot modified.
Why does tempered glass sometimes “explode” when stressed?
Tempered glass is under internal stress by design. Edge chips, impacts, or uneven pressure can trigger sudden breakage. That’s why careful handling,
padding, and avoiding hard-edge contact matter so much.
Do I really need a helper for shower doors and big window glass?
If the panel is large, yes. The glass can be heavy and awkward. Two people reduce the chance of dropping it, cracking tile, or injuring themselves.
Real-World “Experiences” and Lessons Learned (So You Don’t Learn Them the Hard Way)
Let’s talk about the part nobody puts on the box: the human factor. Removing tempered glass isn’t just a checklist of stepsit’s a mini drama where the
villain is usually overconfidence and the side character is gravity.
Experience #1: The screen protector that “came off easy”… until it didn’t.
A common scenario: someone warms a tempered glass screen protector for a few seconds, lifts a corner, and thinks, “I’ve got this.”
Then the protector cracks and the person switches to a metal tool because it “feels faster.” That’s how tiny glass chips end up on your countertop,
and how a perfectly fine phone screen earns its first scratch. The smarter play is boring but effective: keep the heat gentle, use a plastic card,
and if it’s cracked, tape it first so it comes off as one piece (or at least fewer pieces). If adhesive residue remains, alcohol on a microfiber cloth
works better than aggressive scraping. The big lesson: slow is smooth, smooth is fastespecially when glass is involved.
Experience #2: Shower door removal reveals the “hidden second job.”
People often start removing a shower door because they want a cleaner look, a new enclosure, or just to evict the grime living in the track.
The surprise is that the project is rarely just “remove door, done.” Silicone can be thicker than expected, the bottom track may be glued like it’s
holding back the ocean, and once the frame comes off you may discover screw holes, worn caulk lines, or minor wall damage that needs patching.
The best outcomes happen when you plan for cleanup from the start: have a plastic scraper, caulk remover if needed, and a plan for filling holes
(color-matched silicone or caps can help depending on the surface). Alsothis is a big onehaving a helper stabilizing the glass while you loosen
hardware makes the difference between “Saturday project” and “Saturday emergency room story.”
Experience #3: Window glass replacement is 80% prep and 20% actual removal.
The hardest part is rarely the moment the glass comes outit’s everything around it. Labeling glazing beads feels fussy until you’re staring at four
similar pieces wondering why one won’t snap back in. Taping an “X” across the pane sounds dramatic until you realize it can keep broken pieces from
spilling everywhere if the glass pops unexpectedly while you pry a bead loose. Suction cups feel like an optional purchase until you try to lift a
larger insulated glass unit and your hands immediately discover what “awkward leverage” means. Even measuring matters: if you don’t confirm thickness
and size before ordering replacement glass, you can end up with a unit that’s almost rightwhich is a special kind of wrong. The main takeaway:
treat window/door glass like a team lift, take photos, mark parts, and don’t rush the perimeter cut if the unit is tape-glazed or hot-melt sealed.
Experience #4: The “clean exit plan” is underrated.
Tempered glass cleanup is weirdly sneaky because the fragments are small and can scatter farther than you expect. A solid strategy is to work over
cardboard or a drop cloth, then fold it inward when you’re done to trap debris. Vacuum thoroughly, then vacuum again from a new direction because
small pieces can lodge in grout lines or textured floors. If you removed a shower door, expect hidden grime under the bottom railplan to clean it
before installing anything new. If you removed a window IGU, keep track of setting blocks and hardware so reassembly isn’t a scavenger hunt.
In other words, don’t just remove the glassfinish the job so your feet don’t find leftovers at 2 a.m.
Conclusion
Removing tempered glass is absolutely doable for many DIYersif you match the method to the application and treat safety like the main event.
Use controlled heat and plastic tools for screen protectors, stabilize and de-caulk carefully for shower doors, and take a methodical,
label-everything approach for window and door glass units. When the panel is large or the system is unfamiliar, bring in a helper (or a pro).
Your future selfand your floorswill thank you.