Table of Contents >> Show >> Hide
- What “wipe a computer” actually means (and why “Delete” is adorable but ineffective)
- Before you wipe: the “don’t cry later” checklist
- Way #1: Built-in factory reset with “clean data” (best for most people)
- Way #2: Overwrite wipe with dedicated wiping software (useful for many HDD scenarios)
- Way #3: Secure erase / sanitize at the drive-controller level (best for SSDs)
- Way #4: Cryptographic erase or physical destruction (for high-sensitivity situations)
- Which wipe method should you use? A simple decision guide
- Common “I wiped it!” mistakes (that aren’t wiping)
- After the wipe: quick verification steps
- Real-world experiences people report (and what you can learn from them)
Wiping a computer is like cleaning out your fridge before a move: you think you got everything,
and then you find a mystery container in the back that absolutely remembers your name.
If you’re selling, donating, recycling, handing a laptop to a cousin, or retiring an old work machine,
wiping it properly is what keeps your photos, passwords, tax documents, and “definitely-not-embarrassing” browser history
from becoming someone else’s weekend hobby.
In this guide, you’ll learn four practical ways to wipe a computer, when each method makes sense,
and what people commonly forget (spoiler: it’s almost always the accounts and licenses).
We’ll keep it thorough, readable, and just serious enough to keep your data out of the wild.
What “wipe a computer” actually means (and why “Delete” is adorable but ineffective)
When you delete files, your computer usually removes the “map” that points to the data, not the data itself.
Until that storage space is overwritten or securely erased, recovery tools can often bring back chunks of what you thought was gone.
So a real wipe is about making your old data unrecoverableor at least unrecoverable for the level of risk you care about.
The best method depends on your goals:
fresh start, safe resale, business-grade sanitization, or
high-sensitivity disposal. The good news: you don’t need a spy movie montage. You just need the right approach.
Before you wipe: the “don’t cry later” checklist
Spend 15 minutes here and you’ll save hours of regret. Wiping is easy. Forgetting what was on the computer is the hard part.
1) Back up what you actually want to keep
- Copy important files to an external drive or a trusted cloud service.
- Export passwords if you use a password manager (or at least confirm you can log in on your new device).
- Save browser bookmarks, photos, and any “one-of-one” documents (like scanned IDs or legal paperwork).
2) Sign out, deauthorize, and unlink accounts
- Sign out of Apple ID / iCloud, Microsoft account, Google account, and any work/school accounts.
- Deauthorize apps with device limits (Microsoft 365/Office, Adobe, some music/video apps, some VPNs).
- Unlink the device from services that list “trusted devices” (password managers, 2FA apps, cloud backups).
3) Know whether you’re wiping an SSD or HDD
This matters. Traditional overwrite wipes work well on many HDDs (spinning hard drives).
But SSDs use wear leveling and other internal tricks that can make simple overwriting less reliable.
For SSDs, controller-level secure erase or cryptographic erase is often the smarter play.
4) If encryption is on, find your recovery keys
Modern Windows devices may use BitLocker/device encryption, and Macs often use FileVault.
Encryption is great for securitybut it can also lock you out during reset if you don’t have recovery info.
Before wiping, confirm you can access your recovery key/password if prompted.
Way #1: Built-in factory reset with “clean data” (best for most people)
If you want the simplest, most “normal human” method, start here. Both Windows and macOS include reset tools designed for
wiping personal data and returning the system to a fresh setup state.
This is usually the right choice for selling or donating a personal computerespecially if you also enable the “clean” option.
How it works
A factory reset removes user accounts, apps, and files, then reinstalls the operating system.
On Windows, choosing options like Remove everything and Clean data helps make recovery harder.
On newer Macs, Erase All Content and Settings is the fast lane: it removes your data and signs you out cleanly.
Windows steps (high-level)
- Open Settings → System → Recovery.
- Select Reset this PC (or “Reset PC”).
- Choose Remove everything.
- Enable Clean data if you’re selling/donating (it takes longer, but is more secure).
- Choose Cloud download (fresh image) or Local reinstall (faster, uses local files).
Good to know: Consumer reset features are designed for everyday users. They’re a solid baseline,
but they’re not always considered “government/industry data erasure standard” level. For that level, look at Ways #3 or #4.
macOS steps (high-level)
On macOS Monterey and newer, many Macs have Erase All Content and Settings, which quickly removes your data,
settings, and apps while keeping the OS ready for the next owner.
- Open System Settings → General → Transfer or Reset.
- Select Erase All Content and Settings.
- Follow the prompts to sign out and confirm the erase.
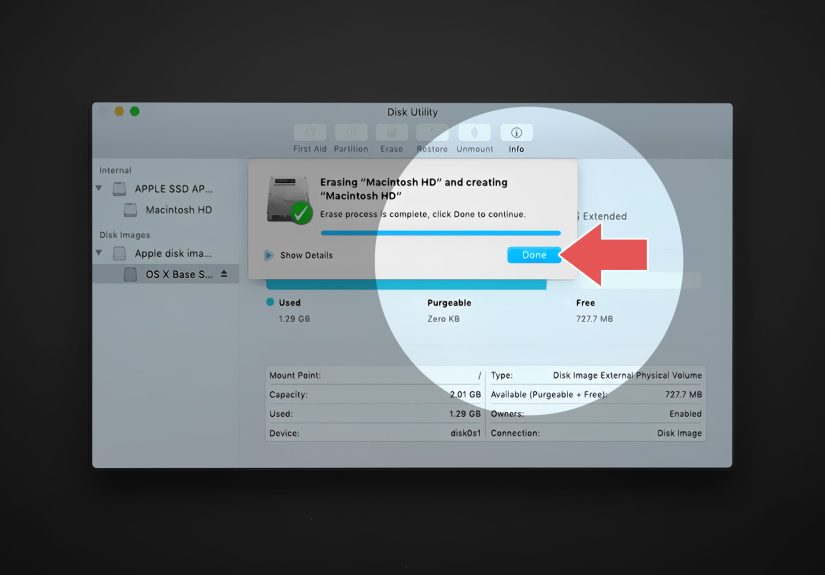
If you don’t see that option (often older Intel Macs or older macOS), you’ll typically use macOS Recovery and Disk Utility
to erase the startup disk and reinstall macOS. It’s still doableit just has more steps and more opportunities to forget something.
When Way #1 is the right choice
- You’re selling or donating a personal laptop/desktop and want a straightforward method.
- You want the device to boot to a “first-time setup” screen for the next owner.
- You don’t need formal documentation of sanitization.
When to consider a stronger option
- The computer stored highly sensitive business data.
- You’re required to meet a specific sanitization standard.
- The drive is an SSD and you want maximum confidence.
Way #2: Overwrite wipe with dedicated wiping software (useful for many HDD scenarios)
An overwrite wipe writes data patterns across the drive to replace old data. This is a classic approach that can be effective,
especially on many traditional HDDs. Think of it as painting over a wall instead of just taking the picture frame down.
The big advantage
When done correctly (and verified), overwriting can make deleted data very difficult to recover using typical tools.
It’s also OS-agnostic if you use a bootable wiping utility.
The big caution (especially for SSDs)
Overwriting isn’t always the best tool for SSDs. SSDs may store data in remapped blocks or reserved space, and wear leveling means
“write over this spot” doesn’t always mean “the same physical cells.” It can also cause unnecessary wear.
For SSDs, Way #3 is usually a better match.
When overwrite wiping makes sense
- You have a traditional HDD and want more assurance than a basic reset.
- You’re wiping a secondary/internal storage drive (not just resetting the OS).
- You have timebecause overwriting can be slow on large drives.
Practical tips to avoid mistakes
- Double-check the target drive (capacity and model) so you don’t wipe your backup drive by accident.
- Use reliable, maintained tools and follow their verification options if available.
- If it’s an SSD, seriously consider secure erase (Way #3) instead of multi-pass overwrite.
Way #3: Secure erase / sanitize at the drive-controller level (best for SSDs)
If your computer has an SSD (which most modern laptops do), this is often the sweet spot:
fast, thorough, and designed for the way SSDs actually work.
Instead of overwriting files from the operating system level, secure erase uses the drive’s own built-in commands
to reset storage cells and internal mapping.
Why this is the SSD-friendly method
SSDs are clever. They spread writes across the drive to extend lifespan (wear leveling), and they may keep spare blocks for performance.
That means OS-level overwriting may not reach everything the way you think it does.
Controller-level secure erase is designed to handle those internal realities.
Common secure erase routes
- Manufacturer utilities (often free): many SSD brands provide a tool that runs secure erase safely.
- BIOS/UEFI secure erase: some PCs include a built-in “Secure Erase” option in firmware settings.
- Drive command-based sanitize (more advanced): NVMe drives often support sanitize/format operations.
How to do it safely (without turning it into a weekend project)
- Keep the computer plugged in (power loss mid-wipe is the villain in this story).
- Confirm the exact drive you’re erasingespecially if the system has multiple drives.
- After secure erase, reinstall the OS (or use the computer’s recovery tools) so it’s usable again.
When Way #3 is the right choice
- The computer has an SSD and you want strong sanitization without physical destruction.
- You’re preparing a laptop for resale and want higher confidence than a standard reset.
- You want an approach aligned with modern storage behavior.
Way #4: Cryptographic erase or physical destruction (for high-sensitivity situations)
Sometimes you don’t want “pretty safe.” You want “this data does not get a second life.”
That’s when cryptographic erase (key destruction) or physical destruction enters the chat.
Option A: Cryptographic erase (fast, elegant, very effective when done right)
Cryptographic erase is the idea that if the drive is encrypted, the data is just scrambled noise without the key.
Destroy the encryption key properly, and recovery becomes infeasible.
This can be extremely fast compared to overwriting an entire multi-terabyte drive.
Practical examples include:
BitLocker/device encryption on Windows and FileVault on macOS.
If encryption is enabled and you ensure the keys are replaced or destroyed during the wipe/reset process,
you can get a very strong result with less waiting.
Option B: Physical destruction (when the drive is dead, or policy demands it)
If the drive won’t power on, you can’t reliably wipe it in software. And some organizations require destruction for certain data types.
Physical destruction can include shredding, pulverizing, or professionally managed destruction through certified e-waste or IT asset disposal services.
For everyday people: if you’re recycling a computer and you’re worried about what’s on the drive,
you can remove the drive and handle it separately (wipe if possible; destroy if not), then recycle the rest responsibly.
When Way #4 is the right choice
- You stored sensitive business/client information and must meet strict sanitization requirements.
- The drive is failing or inaccessible.
- You want the strongest possible assurance.
Which wipe method should you use? A simple decision guide
- Selling/donating a normal personal laptop? Start with Way #1. Prefer “clean data” options.
- Traditional HDD and you want extra assurance? Consider Way #2 (overwrite + verify).
- SSD and you want strong confidence? Use Way #3 (secure erase/sanitize) + reinstall OS.
- Highly sensitive data or dead drive? Use Way #4 (crypto erase or destruction).
Common “I wiped it!” mistakes (that aren’t wiping)
- Deleting files and emptying the recycle bin.
- Formatting quickly without a secure erase step (depending on OS/drive type).
- Resetting without unlinking accounts (Find My, Microsoft device list, password managers).
- Forgetting software deactivation (Microsoft 365, Adobe, paid VPNs, pro tools).
- Assuming SSD overwrites behave like HDD overwrites.
After the wipe: quick verification steps
- Confirm the computer boots to a “welcome/setup” screen, not your desktop.
- Check there are no remaining user accounts on the login screen.
- If you used a secure erase or overwrite tool, use its verification/report feature if available.
- Confirm the device is removed/unlinked from Apple ID/Microsoft account lists where applicable.
Real-world experiences people report (and what you can learn from them)
The internet is full of “I wiped my computer… I think?” stories. The patterns are consistent, and learning from them is cheaper than learning the hard way.
Here are practical, experience-based lessons that come up again and again when people wipe a computer for resale, donation, or recycling.
This isn’t about fearit’s about avoiding the most common facepalm moments.
Experience #1: The reset worked… but the account was still attached.
People often factory reset a laptop and assume it’s now a blank slate, only to discover later that the device is still listed in their Apple ID or Microsoft account device page.
This can matter for two reasons: (1) it can confuse the next owner during setup, and (2) it can leave lingering trust relationships, especially if you used “trusted device” approvals.
The fix is simple: before wiping, sign out of major accounts and unlink the device from your account dashboards afterward.
Experience #2: “Clean data” took foreverand someone panicked.
On Windows, enabling “clean data” (or “fully clean the drive”) can take a long time. Some users report staring at a black screen or a stuck percentage and deciding to hard-restart.
Unfortunately, interrupting a reset is one of the fastest ways to create a half-wiped, half-broken system that’s harder to recover or resell.
The lesson: start the process when you don’t need the computer for a while, keep it plugged in, and let it finisheven if it’s taking longer than your patience budget.
Experience #3: BitLocker or FileVault surprised them at the worst moment.
A common scenario: someone begins a reset, then gets prompted for an encryption recovery key they didn’t know existed.
This is especially common on newer Windows devices that enable device encryption automatically in certain setups.
The lesson: check whether encryption is enabled and confirm you can access recovery info before you wipe.
It turns a potential disaster into a routine step.
Experience #4: The “I forgot to deactivate Office/Adobe” tax.
Many paid apps limit how many devices can be active at once. People wipe an old computer and later realize they can’t activate software on the new device without first deactivating the old one.
Sometimes it’s easy (sign out remotely), sometimes it becomes a support-ticket adventure.
The lesson: if you pay for software, log out and deactivate before wipingespecially for subscription tools tied to work or school.
Experience #5: SSD wiping was “weird” compared to HDD wiping.
Users who try old-school overwrite tools on SSDs often learn two things: it can be slower than expected, and it’s not always the most reliable method for SSD internals.
Many end up switching to manufacturer secure erase tools or firmware secure erase options and are surprised at how quickly it completes.
The lesson: choose SSD-appropriate wiping methods (secure erase/sanitize or cryptographic erase) instead of defaulting to multi-pass overwrites.
Experience #6: Donation success storybecause they did the boring steps.
The best outcomes come from people who treat wiping like a mini-project: backup, sign out, deactivate, wipe, verify, and then hand over a device that boots to setup like it’s brand new.
The lesson: the wipe itself is only one chapter. The “boring” account and license steps are what make it truly clean for the next ownerand truly safe for you.