Table of Contents >> Show >> Hide
- Why Free Pumpkin Carving Stencils Are a Smart Decorating Shortcut
- How to Organize a 66-Stencil Collection for a More Personalized Porch
- Best Types of Pumpkin Carving Stencils for Porch Decor
- How to Carve Cleaner Pumpkins Without Losing Your Mind
- How to Style a Porch Around Carved Pumpkins
- Mistakes to Avoid With Free Pumpkin Carving Stencils
- No-Carve Options If You Love the Look but Hate the Mess
- Experiences From a Porch That Learned the Hard Way
- Conclusion
There are two kinds of fall porches: the ones that whisper, “Welcome to autumn,” and the ones that scream, “I blacked out at the craft store and now my front steps look haunted in a good way.” If you’re aiming for the second categoryor at least something charmingly in betweenfree pumpkin carving stencils are your secret weapon.
They take the pressure off freehand carving, save your pumpkin from becoming an accidental abstract sculpture, and make it much easier to create a porch display that feels coordinated instead of chaotic. Better yet, a big collection of printable patterns gives you options. You can go classic, spooky, cute, modern, rustic, elegant, or delightfully weird. One stencil becomes one pumpkin. A set of 66 becomes a full porch personality.
This guide walks through how to use free pumpkin carving stencils to build a personalized front porch setup that actually looks intentional. We’ll cover the best types of stencil designs, practical carving tips, styling ideas for your entryway, and real-life decorating experiences that prove no one’s porch masterpiece begins in a glamorous way. Usually, it begins with pumpkin guts on a sleeve and an overconfident marker sketch.
Why Free Pumpkin Carving Stencils Are a Smart Decorating Shortcut
Free pumpkin carving stencils are popular for one simple reason: they make complicated-looking porch decor feel doable. Instead of staring at a pumpkin and hoping inspiration arrives like a tiny orange lightning bolt, you start with a pattern that already gives you structure. That means cleaner lines, faster prep, and a better chance that your finished jack-o’-lantern looks like a ghost, cat, leaf, or monogram instead of a confused potato.
They also make it easier to decorate in a cohesive way. When your porch includes multiple pumpkins, the goal is not to make every one identical. The goal is to make them feel like they belong in the same visual family. Free stencil collections help with that because you can mix beginner and advanced designs while still staying inside one theme.
And let’s be honest: printable templates are also great for people who enjoy festive decor but do not enjoy improvising with sharp tools in low-light conditions while children ask, “Is it done yet?” every six minutes.
How to Organize a 66-Stencil Collection for a More Personalized Porch
If your title promises 66 free pumpkin carving stencils, don’t just think of that number as a giant pile of random templates. Think of it as a decorating toolkit. The best way to use a collection that size is to divide it into categories that help you tell a visual story on your porch.
A Simple 66-Stencil Breakdown
- 12 classic jack-o’-lantern faces for timeless Halloween energy
- 10 cute family-friendly designs like stars, moons, ghosts, and smiling animals
- 10 spooky silhouettes such as bats, haunted houses, ravens, and witches’ hats
- 8 monogram and lettering templates for initials, names, or house numbers
- 8 harvest-inspired patterns including leaves, acorns, florals, and vines
- 8 modern geometric or minimalist designs for a cleaner, more elevated look
- 10 accent designs that support the overall porch scene, like stars, cobwebs, tiny moons, or border patterns
Once you group your stencil ideas this way, it becomes much easier to plan a display. A family porch might lean into friendly faces, playful animals, and name pumpkins. A moodier porch might combine etched botanicals, raven silhouettes, and a few dramatic carved faces. A farmhouse-inspired setup might mix monograms, leaf motifs, and simple lantern-style pumpkins.
Best Types of Pumpkin Carving Stencils for Porch Decor
1. Classic Faces That Still Work Every Time
There’s a reason traditional jack-o’-lantern faces never leave the group chat. They glow beautifully, read clearly from the sidewalk, and instantly signal Halloween. If you’re decorating a front porch for trick-or-treaters, classic face stencils are your anchor pieces. Use them on the largest pumpkins in your display so the expressions are easy to see from a distance.
The trick is to vary the mood. Pair one goofy grin with one toothy monster face and one surprised little pumpkin expression. Suddenly the setup feels curated instead of cloned.
2. Monograms, Names, and House Numbers
If you want to personalize your porch decor, this is where the magic happens. Letter-based pumpkin stencils can turn a generic display into one that feels custom. Carve your family initial, spell out a short word like “Boo” or “Fall,” or use separate pumpkins to show your house number. This looks especially good when paired with mums, lanterns, or planters because the whole entry starts to feel designed rather than simply decorated.
Lettering works best on pumpkins with broad, smoother sides. Skinny, deeply ridged pumpkins may look adorable in a display, but they are not always your best friend when you’re trying to carve a neat serif capital.
3. Nature-Inspired Stencils for a Softer Fall Look
Not every pumpkin has to be spooky. Leaf patterns, acorns, branches, flowers, and vine motifs can give your porch a more elegant fall style while still feeling seasonal. These are especially useful if you decorate from late September through Halloween and want a look that doesn’t shout “haunted carnival” all month long.
Nature designs also pair well with white pumpkins, heirloom pumpkins, and muted porch palettes. If your style leans more cozy than creepy, these stencils are your sweet spot.
4. Cute and Family-Friendly Templates
Friendly ghosts, stars, owls, cats, moons, smiling bats, and playful faces are ideal when kids are part of the decorating crew. They feel festive without veering into nightmare fuel. This category is also helpful if your porch decor needs to appeal to a broader audienceneighbors, visitors, tiny trick-or-treaters, and the one family member who says every scary pumpkin is “a little much.”
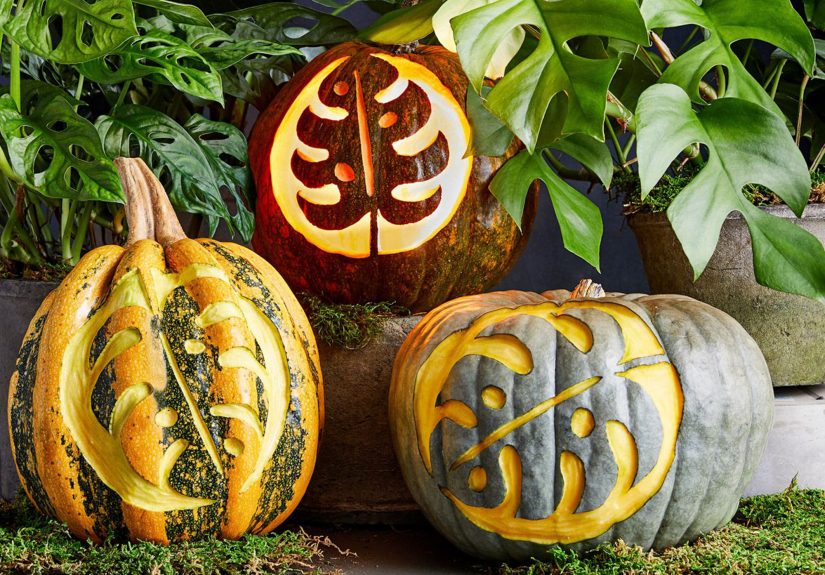
5. Etched and Layered Designs for Extra Detail
If you want your front porch pumpkins to look more custom, etched stencils are worth considering. Instead of cutting all the way through, you shave off part of the pumpkin skin to create contrast and texture. The result can look more polished, especially for florals, silhouettes, and decorative border patterns. Think of it as the difference between a doodle and a velvet blazer. Both are fun, but one clearly dressed for the occasion.
How to Carve Cleaner Pumpkins Without Losing Your Mind
A good stencil is only half the story. The other half is execution, and yes, that is a dramatic word for “please don’t butcher the pumpkin before the fun starts.” Here are a few practical ways to make the carving process smoother.
Choose the Right Pumpkin
For carving, look for pumpkins with a relatively flat surface, firm stems, and skin that isn’t already bruised or soft. Deep ridges can look gorgeous, but flatter areas are easier for transferring and cutting stencil patterns. If you’re doing lettering or detailed silhouettes, smoothness matters more than cuteness.
Prep Before You Carve
Wash and dry the pumpkin first. Then tape your stencil in place and transfer the design using a tracing method, poked outline, or removable marker. Taking five extra minutes here saves you from guessing later. Guessing is fun in game shows. It is less fun with a craft knife.
Match the Design to Your Skill Level
Big shapes, open eyes, and simple mouths are beginner-friendly. Tiny curves, delicate angles, and densely packed details are for people who enjoy a challenge and perhaps own stronger reading glasses than the rest of us. There is no shame in choosing an easier stencil. A crisp simple design will always look better than an ambitious one that collapses mid-cheekbone.
Use Light Safely
LED candles or battery-operated lights are the easiest choice for porch displays. They reduce heat, hold up better outdoors, and make it easier to keep the look neat and safe. Plus, no one wants a dramatic autumn ambiance to become a dramatic fire safety lesson.
Help Your Pumpkins Last Longer
Carved pumpkins are not built for a long career. They are seasonal stars with a limited contract. To stretch their good looks, wait to carve until closer to your display date, keep them cool when possible, and avoid placing them where they bake in direct afternoon sun. If one starts to droop, a refresh can sometimes buy you another night or two, but timing is still the real hero.
How to Style a Porch Around Carved Pumpkins
The carved pumpkin gets the attention, but the full porch display creates the mood. If you want your pumpkin porch decor to look elevated, think in layers.
Use Height and Grouping
Place larger pumpkins near the door, medium pumpkins on either side of the steps, and smaller accent pumpkins in clusters. Add crates, stools, hay bales, baskets, or planters to vary the height. A porch display that all sits in one flat line can feel underwhelming. Give the eye somewhere to travel.
Mix Colors and Textures
Orange pumpkins are classic, but mixing in white, green, or muted heirloom varieties can make the whole setup feel more styled. The contrast between smooth white pumpkins and rougher orange gourds can add richness without making your porch look overworked.
Repeat One or Two Motifs
If one pumpkin uses stars and another uses moons, echo those shapes elsewhere with a wreath, lantern cutouts, or doormat styling. Repetition makes the display feel intentional. Randomness makes it feel like your decor was chosen by a very enthusiastic raccoon.
Balance Cute and Dramatic
A front porch usually works best when it has one focal pumpkin and several supporting pumpkins. That focal piece might be your monogram stencil, your most detailed silhouette, or your biggest glowing jack-o’-lantern. The others should support it, not fight for custody of the spotlight.
Mistakes to Avoid With Free Pumpkin Carving Stencils
- Carving too early: A pumpkin carved far ahead of time can age faster than your enthusiasm.
- Choosing overly detailed patterns for tiny pumpkins: This is how optimism turns into frustration.
- Ignoring your porch palette: A stencil may be cute on its own and still feel wrong in the bigger setup.
- Using all “statement” pumpkins: Not every pumpkin needs main-character energy.
- Skipping the test layout: Set your pumpkins in place before lighting them so you can adjust spacing, height, and visibility.
No-Carve Options If You Love the Look but Hate the Mess
Let’s say you adore stencil-based pumpkin decor but would prefer not to spend the evening elbow-deep in pulp. Fair. You can still use free pumpkin stencil designs as inspiration for paint, etched outlines, marker art, or even push-in accessories. Tracing a stencil onto a pumpkin and filling it with paint pens or decorative pins can create a similar visual effect without the open cuts.
This is also a great option for households with younger kids, for longer-lasting displays, or for people who simply do not want their kitchen to smell like wet pumpkin ambition for two days straight.
Experiences From a Porch That Learned the Hard Way
The funniest thing about decorating with pumpkin carving stencils is that it always looks so calm in photos. A neatly styled porch, a few glowing pumpkins, maybe a plaid blanket tossed somewhere as if a woodland stylist just wandered by. Real life, however, is a little messierand honestly, that’s part of the charm.
One year, I decided I was going to make the porch look “editorial.” You know the vibe: layered heirloom pumpkins, coordinated stencil themes, softly glowing lanterns, maybe a mysterious sense that I had my life together. I printed a stack of free pumpkin carving stencils, sorted them by difficulty like a very organized autumn goblin, and felt unstoppable. Thirty minutes later, I had pumpkin strings on my sweater, tape stuck to my elbow, and one stencil that had somehow folded itself into a tiny paper accordion.
Still, once the first pumpkin was finished, everything changed. It wasn’t perfect, but it had personality. The second one was better. The third one had a leaf pattern that looked surprisingly fancy once lit from behind. Suddenly the porch had a story. One pumpkin was classic and cheerful. One was moody and dramatic. One had a letter cutout that made the whole setup feel personal. That’s the beauty of using a big stencil collection: even if a few designs go sideways, the group still looks great together.
Another lesson came from lighting. I used to think the carved shape was the whole show. It isn’t. The glow matters just as much. A pumpkin can look average in daylight and absolutely magical after sunset. Once I switched to LED lights and tested the layout at night, I understood why some porches feel flat and others feel cinematic. Light creates mood, depth, and a little neighborhood drama in the best way.
I also learned that people notice the personal details more than the fancy ones. Kids pointed out the silly face pumpkin. Neighbors commented on the monogram. Friends liked the pumpkin with tiny stars etched around the top because it looked different. The design I thought was “most impressive” got polite nods. The one with the crooked grin got actual delight. That was a useful reminder that porch decor is not a museum exhibit. It’s meant to feel welcoming, playful, and alive.
And yes, there were failures. One pumpkin softened early because I carved it too soon. Another had a design that was way too intricate for its shape and ended up looking like a haunted waffle. One windy evening rearranged half the display and taught me that symmetrical perfection is not always practical on real front steps. But even those misfires helped refine the look. The next time around, I chose smoother pumpkins, varied the heights more carefully, and stuck to a clearer stencil theme.
That’s why this kind of decorating works so well. It doesn’t require perfection. It rewards experimentation. A porch filled with carved pumpkins feels special because it’s handmade, a little unpredictable, and deeply seasonal. You remember the cold air, the smell of pumpkin, the moment the lights come on, and the tiny burst of pride when someone walking by slows down to look. That experience is the real decor. The stencils just help you shape it.
Conclusion
66 free pumpkin carving stencils might sound like a simple craft resource, but they can do much more than decorate a single jack-o’-lantern. Used thoughtfully, they help you create a personalized porch that feels festive, cohesive, and memorable. Whether you love classic Halloween faces, elegant fall botanicals, playful kid-friendly designs, or lettered pumpkins that make your entry feel custom, stencil-based carving gives you a roadmap without killing creativity.
The best porch displays are not necessarily the most complicated. They are the ones with balance, personality, and a little glow after dark. Pick a theme, match your stencil designs to your pumpkins, layer your porch with texture and height, and let the collection work together like a tiny orange design team. Your porch does not need to be perfect. It just needs enough personality to make people smile before they even ring the bell.