Table of Contents >> Show >> Hide
- What “Plug Ins” Mean in Modern Chrome
- How to Open Plug Ins in Chrome: 10 Steps
- Step 1: Open Google Chrome
- Step 2: Open the Chrome Menu
- Step 3: Go to Extensions and Open Manage Extensions
- Step 4: Turn an Extension On or Off
- Step 5: Pin the Extension to the Chrome Toolbar
- Step 6: Open Extension Details and Options
- Step 7: Review Extension Permissions Carefully
- Step 8: Add New Extensions from the Chrome Web Store
- Step 9: Open Site Permissions for Camera, Microphone, Notifications, and More
- Step 10: Troubleshoot Extensions and Plug-In Problems
- What Happened to chrome://plugins?
- Chrome Extensions vs. Site Permissions: What Is the Difference?
- Best Practices for Managing Chrome Plug Ins and Extensions
- Common Problems and Quick Fixes
- Experience Notes: What Users Usually Discover When Opening Chrome Plug Ins
- Conclusion
Once upon a time, opening plug-ins in Google Chrome meant visiting a tidy little page called chrome://plugins, checking a box, and feeling like a browser wizard. Then the modern web grew up, put on a security badge, and politely escorted old plug-ins like Flash, Java applets, Silverlight, and NPAPI-based extras out of the building.
Today, when most people ask how to open plug ins in Chrome, they usually mean one of three things: opening Chrome extensions, managing site permissions, or enabling browser features that a website needs to work properly. The good news? Chrome still gives you plenty of control. The slightly funny news? The word “plug-in” now behaves like a retired celebrity who still gets recognized at the grocery store.
This guide walks you through 10 practical steps to open, manage, enable, disable, and troubleshoot plug-ins in Chrome using the tools Chrome actually supports today. Whether you want to open an ad blocker, manage a PDF tool, allow a microphone for a meeting site, or figure out why your favorite extension is hiding like a cat at bath time, this step-by-step guide will help.
What “Plug Ins” Mean in Modern Chrome
Before jumping into the steps, it helps to clear up the language. In older browsers, plug-ins were separate software components that allowed websites to run special content. Adobe Flash Player was the famous example. Java and Silverlight were also common in the “please install this to continue” era of the internet.
Modern Chrome no longer works that way for most users. Old-style plug-ins were removed because they created security, performance, and stability problems. Adobe Flash Player reached end of life, and Chrome no longer supports the older NPAPI plug-in system. In plain English: if a website tells you to install Flash, Java, or some mysterious “video plug-in” to continue, treat that request with the suspicion you would give a sandwich found in a parking lot.
Instead, Chrome now relies on extensions, site permissions, built-in browser features, and web standards like HTML5. Extensions are small tools you install from the Chrome Web Store to add features to Chrome. Site permissions control whether individual websites can use your camera, microphone, location, notifications, pop-ups, JavaScript, and similar features.
How to Open Plug Ins in Chrome: 10 Steps
Step 1: Open Google Chrome
Start by opening Google Chrome on your computer. This guide focuses on desktop Chrome for Windows, macOS, ChromeOS, and Linux because extension management is most complete on desktop versions. Chrome on Android and iPhone has different rules, and traditional Chrome extensions generally are not managed the same way there.
For the cleanest experience, make sure Chrome is updated. Click the three-dot menu in the top-right corner, choose Help, then select About Google Chrome. Chrome will check for updates automatically. If an update is available, install it and relaunch the browser. Updating Chrome is not glamorous, but neither is discovering that your browser issue was caused by running a version old enough to remember disco.
Step 2: Open the Chrome Menu
Look at the top-right corner of the browser window and click the three vertical dots. This is Chrome’s main menu. From here, you can reach settings, extensions, privacy controls, downloads, history, and other important browser tools.
If you are trying to open a plug-in-like tool, the Chrome menu is usually the best place to start. Many users search for “Chrome plug-ins” because they expect a separate plug-ins page, but the modern path is through the extensions manager or privacy and security settings.
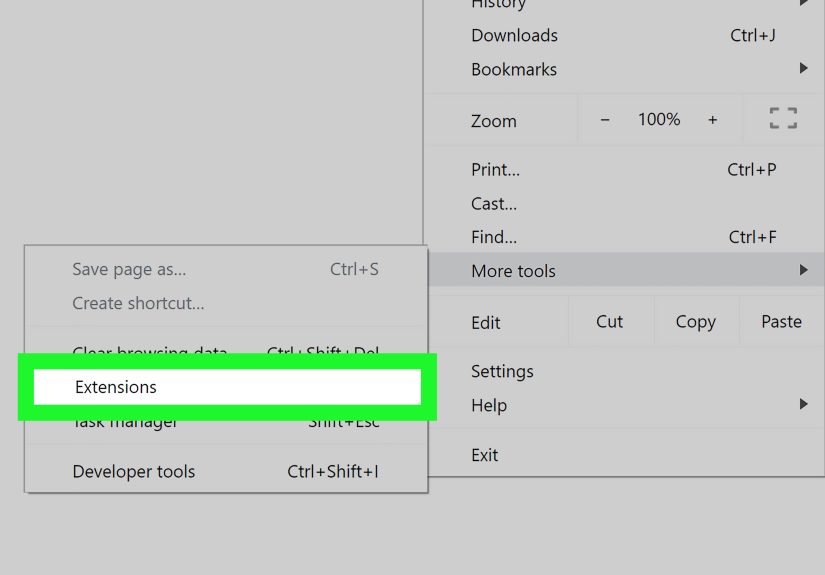
Step 3: Go to Extensions and Open Manage Extensions
In the Chrome menu, hover over or click Extensions, then choose Manage Extensions. This opens the main Chrome extensions page. You can also type the following directly into the address bar:
Press Enter, and Chrome will take you straight to the extensions dashboard. This is the closest modern replacement for the old plug-ins page. Here you can see every installed extension, including password managers, coupon tools, writing assistants, screenshot tools, PDF helpers, privacy blockers, productivity widgets, and anything else you have added to Chrome.
Step 4: Turn an Extension On or Off
On the Manage Extensions page, each extension appears in its own card. Look for the toggle switch on the card. If the switch is on, the extension is enabled. If it is off, the extension is disabled.
To open or activate a Chrome plug-in-style tool, turn the toggle on. To temporarily stop it, turn the toggle off. This is helpful when a website breaks, a page loads strangely, or your browser starts behaving as if it drank three energy drinks and forgot its manners.
For example, if a shopping site is not loading properly, you might temporarily disable a coupon extension or ad blocker. If a login page refuses to work, you might test whether a privacy extension is blocking a script the site needs. The goal is not to blame every extension, but to troubleshoot smartly.
Step 5: Pin the Extension to the Chrome Toolbar
After enabling an extension, you may want to open it from the toolbar. Click the puzzle-piece icon near the top-right corner of Chrome. This opens the extensions menu. Find the extension you want and click the pin icon beside it.
Once pinned, the extension’s icon appears directly on the toolbar. Clicking that icon opens the extension’s popup, menu, or control panel. This is useful for tools you use often, such as grammar checkers, screen recorders, password managers, translation tools, or note-taking extensions.
If the extension is enabled but you cannot see it, do not panic. It may simply be hiding inside the puzzle-piece menu. Chrome is not ignoring you; it is just keeping the toolbar from turning into a crowded airport terminal.
Step 6: Open Extension Details and Options
For deeper settings, return to chrome://extensions and click Details on the extension card. This page shows important controls, including permissions, site access, incognito access, file URL access, and extension options when available.
Some extensions also have a separate Extension options button. Click it to open the extension’s own settings page. This is where you might customize behavior, change shortcuts, connect an account, adjust privacy settings, or choose how the extension works on specific websites.
For example, a screenshot extension may let you choose image format and save location. A writing assistant may let you enable or disable suggestions on certain sites. A password manager may ask you to sign in before it works. Opening the details page is often the difference between “this extension is broken” and “oh, it just needed permission.”
Step 7: Review Extension Permissions Carefully
Permissions matter. Extensions can request access to specific websites, browser features, tabs, browsing data, clipboard actions, notifications, downloads, or page content. Some tools need broad permissions to work. A grammar checker, for instance, may need to read text fields on pages where you type. A screenshot tool may need access to the visible tab. A password manager may need access to login fields.
Still, you should review permissions before giving an extension the keys to your browsing kingdom. On the extension details page, look for Site access. Chrome may allow you to choose whether the extension can run on all sites, only specific sites, or only when you click it.
A good rule: give extensions the least access they need to do the job. If an extension for changing your new tab page asks to read and change data on every website you visit, pause and investigate. Not every warning means danger, but every warning deserves a glance.
Step 8: Add New Extensions from the Chrome Web Store
If the plug-in you want is not installed yet, open the Chrome Web Store. You can search for extensions by name or category. When you find one you trust, click Add to Chrome, review the permission prompt, and confirm the installation.
Choose extensions carefully. Look for a recognizable developer, a clear privacy policy, recent updates, strong ratings, and reviews that sound like real people wrote them. Be cautious with copycat extensions that use names similar to famous tools. The Chrome Web Store reviews extensions, but no app marketplace is a magical force field. A little caution goes a long way.
After installation, Chrome may show a message asking you to enable the extension. You can then pin it to your toolbar, open its options, and adjust its site permissions using the steps above.
Step 9: Open Site Permissions for Camera, Microphone, Notifications, and More
Sometimes “opening a plug-in” really means allowing a website to use a browser feature. For example, a video meeting site may need your camera and microphone. A map site may ask for location access. A document platform may need pop-ups for sign-in windows. A web app may need JavaScript to function properly.
To manage these permissions, click the three-dot menu, choose Settings, then open Privacy and security. Select Site settings. From there, you can manage permissions for camera, microphone, location, notifications, pop-ups and redirects, JavaScript, images, sound, automatic downloads, and other site behavior.
You can also manage permissions for one specific website. Visit the site, click the icon to the left of the address bar, and choose Site settings or adjust the visible permissions. This is useful when one website needs permission but you do not want to change your default settings for the entire browser.
Step 10: Troubleshoot Extensions and Plug-In Problems
If an extension will not open, first confirm that it is enabled in chrome://extensions. Next, check whether it needs permissions. Then reload the website, restart Chrome, and test again.
If the problem continues, try disabling other extensions one by one. Extension conflicts are common. Two tools may try to modify the same page, block the same script, or inject overlapping features. It is the browser version of two people trying to walk through the same doorway while both saying, “No, you first.”
You can also run Chrome’s Safety Check from Chrome settings. Safety Check helps review privacy and security issues, including unsafe or unsupported extensions. If an extension is marked unsupported, suspicious, or unnecessary, remove it and look for a better alternative.
To remove an extension, open chrome://extensions and click Remove on the extension card. If you are unsure, disable it first, browse normally for a while, and see whether you miss it. Many people discover they have extensions installed that they have not used since approximately the last time they cleaned behind their monitor.
What Happened to chrome://plugins?
If you found an old tutorial telling you to type chrome://plugins, you are not crazy. That page used to exist. It allowed users to manage older browser plug-ins. However, modern Chrome no longer uses that plug-in system for everyday browsing. The old approach was phased out as the web moved toward safer built-in technologies and extension-based features.
This is why old instructions about enabling Flash, Java, or Silverlight in Chrome no longer work. Flash Player is no longer supported, and major browsers moved away from it. If a site still requires Flash, the site itself is outdated. The safer answer is not to hunt for old browser builds or unofficial plug-in downloads. The safer answer is to use a modern version of the website, contact the site owner, or find an updated service.
Chrome Extensions vs. Site Permissions: What Is the Difference?
Extensions add new tools to Chrome. Site permissions control what websites can do inside Chrome. They are related, but they are not the same.
A Chrome extension might block ads, save passwords, translate pages, capture screenshots, organize tabs, or help you write more clearly. You manage it from the extensions page.
A site permission might allow a video call website to use your microphone, allow a mapping site to access your location, or block a news site from sending notifications every 12 seconds like an excited squirrel. You manage these from Site settings.
When troubleshooting, ask yourself: “Did I install a tool, or is a website asking to use a feature?” If you installed a tool, go to chrome://extensions. If a website needs access to camera, microphone, location, notifications, JavaScript, or pop-ups, go to Site settings.
Best Practices for Managing Chrome Plug Ins and Extensions
Install Only What You Actually Use
Every extension adds code to your browser. Most good extensions are helpful, but too many can slow Chrome down, clutter your toolbar, and increase privacy risk. Keep the essentials and remove the digital dust bunnies.
Check Permissions Before Installing
When Chrome shows a permission prompt, read it. You do not need to become a cybersecurity analyst with a wall of monitors, but you should understand what the extension wants to access. If the request seems unrelated to the extension’s purpose, look for another option.
Keep Chrome Updated
Chrome updates include security fixes, compatibility improvements, and changes that help extensions work safely. If an extension suddenly stops working, updating Chrome may solve the issue.
Use Profiles for Work, School, and Personal Browsing
Chrome profiles let you separate bookmarks, extensions, history, passwords, and settings. This is especially useful if you use different extensions for school, work, writing, shopping, or personal browsing. A clean work profile can prevent your recipe clipper, coupon finder, and tab organizer from joining your serious Monday morning meeting uninvited.
Be Careful on Managed Devices
If you use a school, workplace, or organization-managed computer, some extensions and site permissions may be controlled by an administrator. You may not be able to install, remove, or enable certain tools. In that case, the best move is to contact the IT department rather than wrestling Chrome settings like they owe you money.
Common Problems and Quick Fixes
The Extension Icon Is Missing
Click the puzzle-piece icon and pin the extension. If it still does not appear, check whether the extension is enabled at chrome://extensions.
The Extension Is Installed but Not Working
Open the extension details page and check site access. Some extensions run only on certain websites or only when clicked. Also check whether the website was loaded before the extension was enabled; reloading the tab can help.
A Website Says a Plug-In Is Blocked
The site may be using outdated language. Check site permissions first. If it asks for Flash, Java, or another old plug-in, the site is likely outdated and may not work in modern Chrome.
Chrome Says an Extension Is Unsupported
Chrome may disable extensions that do not meet current platform or security requirements. Remove unsupported extensions and look for actively maintained alternatives from trusted developers.
Chrome Feels Slow After Installing Extensions
Disable extensions one at a time and test performance. Keep only what you use. A browser packed with unused extensions is like a backpack full of bricks: technically portable, emotionally exhausting.
Experience Notes: What Users Usually Discover When Opening Chrome Plug Ins
In real-world use, the biggest challenge is not the actual clicking. Opening Chrome extensions takes only a few seconds. The confusing part is the terminology. Many users still say “plug-ins” because older tutorials, older websites, and older habits use that word. But once they learn that Chrome now puts most of these controls under Extensions and Site settings, everything becomes much easier.
One common experience is the “missing icon mystery.” A user installs an extension, sees the confirmation message, and then immediately wonders where it went. The extension is usually not broken; it is tucked inside the puzzle-piece menu. Pinning the icon solves the problem. This tiny step saves a surprising amount of frustration, especially for tools like password managers, translators, screen capture extensions, and grammar assistants.
Another common moment happens with video meeting sites. Someone joins a call, but the camera or microphone does not work. They search for “Chrome plug-in settings,” thinking they need to open a special plug-in. In reality, they need to open site permissions. Clicking the icon beside the address bar and allowing camera or microphone access usually fixes it. The lesson: if the issue involves a website using hardware or browser features, think permissions first.
Extensions can also create little detective stories. A page may stop loading correctly after a new privacy tool, coupon finder, or ad blocker is installed. The best troubleshooting method is simple: disable extensions one at a time, reload the page, and see what changes. It is not fancy, but it works. Most users quickly discover that fewer extensions often means fewer problems.
Security is another experience people learn the practical way. An extension may look useful, but if it asks for broad access to every site you visit, it deserves a closer look. Reviews, update history, developer reputation, and permission requests all matter. The safest Chrome setup is usually boring in the best possible way: a few trusted extensions, sensible site permissions, automatic updates, and no mysterious downloads from random pop-up windows.
Finally, users on school or work computers often discover that Chrome does not give them full control. Managed devices may block certain extensions, force-install required ones, or restrict permissions. That is not a Chrome bug. It usually means an administrator has set policies for security or productivity. In those situations, the smartest move is to ask the organization’s IT support team instead of trying to force settings that are intentionally locked.
The bottom line from everyday experience is this: opening plug-ins in Chrome is now less about old plug-in switches and more about knowing where modern controls live. Use chrome://extensions for installed tools. Use Site settings for website permissions. Use the puzzle-piece icon for quick access. And when something feels suspicious, outdated, or too demanding, trust your instincts. Chrome is powerful, but your judgment is still the best plug-in available.
Conclusion
Learning how to open plug ins in Chrome is really about learning how modern Chrome manages extensions and site permissions. The old plug-in era is mostly over, and that is a good thing for speed, security, and sanity. Instead of chasing outdated pages like chrome://plugins, use chrome://extensions to manage installed tools and Chrome’s Site settings to control what websites can access.
With the 10 steps above, you can enable extensions, pin them to the toolbar, open their options, review permissions, install new tools from the Chrome Web Store, and troubleshoot problems without needing a degree in browser archaeology. Keep your setup simple, remove extensions you do not use, stay alert to permission requests, and update Chrome regularly. Your browser will run cleaner, safer, and with fewer surprise appearances from digital gremlins.