Table of Contents >> Show >> Hide
- Why Corrugated Iron, Anyway?
- Is Galvanized Corrugated Metal Safe for Vegetables?
- Plan the Bed Like You’ve Already Learned the Hard Way
- Materials and Tools
- How to Build a Corrugated Iron Raised Garden Bed
- Filling the Bed: Soil That Grows Food, Not Regret
- Will Metal Beds Cook My Plants?
- What to Plant in Your New Bed (So It Feels Worth It)
- Common Mistakes (and How to Avoid Them)
- Conclusion: The “Another Bed” Advantage
- Real-World Experiences: Lessons From “Another” Corrugated Iron Bed (Extra Notes)
You know you’ve officially become a garden person when you say, out loud, with zero irony: “I’m building another raised bed.” Not “a raised bed.” Another one. Like they’re potato chips. You can’t stop at one. One bed turns into two, then four, then suddenly you’re pricing compost in bulk and speaking fluent “cubic yard.”
This guide is for that exact momentwhen your first corrugated iron (a.k.a. corrugated metal) raised garden bed worked so well you want a sequel. We’ll cover smart sizing, safety questions people actually Google at 1:00 a.m., a build approach that won’t bite you (literallythose edges), and soil strategies that won’t require a second mortgage. You’ll end up with a bed that’s sturdy, productive, and handsome enough to make your fence look underdressed.
Why Corrugated Iron, Anyway?
In the U.S., when people say “corrugated iron,” they usually mean corrugated steeloften galvanized (zinc-coated) to resist rust. The appeal is real:
- Long life: Metal doesn’t rot, warp, or become termite snacks.
- Clean look: Modern, tidy, and weirdly satisfying in a “farmhouse-but-not-trying-too-hard” way.
- Less maintenance: You’ll spend more time harvesting and less time replacing boards.
- Flexible design: Short beds, tall beds, long beds, L-shapesyour yard is the canvas.
The “another bed” version of the story usually comes down to one reason: your first bed produced more food with less drama. Fewer weeds, better soil control, easier watering, fewer back complaints, and fewer mysterious plant meltdowns caused by compacted ground.
Is Galvanized Corrugated Metal Safe for Vegetables?
This is the big questionespecially if you’re growing anything you plan to eat without fear. The short version: galvanized steel is widely considered safe for raised-bed gardening when used normally. The zinc coating can theoretically leach into soil, but practical concerns tend to show up under specific conditionsmost notably very acidic soil.
What to know (without spiraling)
- Soil pH matters: Most vegetables prefer slightly acidic to neutral soil (roughly pH 6–7), and that range also helps keep zinc relatively stable.
- Zinc is a plant nutrient: In small amounts, plants need it. In extremely high amounts, it can become a problembut that’s not what typical raised-bed use creates.
- If you want extra peace of mind: You can add a barrier (like a heavy-duty liner) between soil and metal. Many gardeners skip this; some do it just to sleep better. Either is fine.
A quick safety PSA about cutting and welding
If you’re cutting corrugated panels, use snips or an appropriate blade and wear gloves/eye protection. If you’re tempted to weld or heat galvanized metal: don’t do that casually. Heating galvanized coatings can create fumes that are hazardous to breathe. For a garden bed build, you don’t need welding anywayscrews and framing do the job beautifully.
Plan the Bed Like You’ve Already Learned the Hard Way
Since this is another corrugated bed, let’s design it like a person who has already discovered that “I can totally reach the middle” was an optimistic lie.
Best-practice dimensions
- Width: 3–4 feet is the sweet spot so you can reach the center without stepping in the soil.
- Length: Anything you want8 feet is classic because lumber and panels play nicely with it.
- Depth: 8–12 inches can work for many crops, but 12–18 inches is a comfortable “most vegetables” range, especially if your native soil is rough or you’re gardening over a hard surface.
Pick a location that won’t sabotage you
Aim for a spot with strong sun (many vegetables want 6+ hours), decent access to water, and enough working space around it. Leave room for a wheelbarrow to passbecause soil deliveries are not a “carry it all in your arms” hobby unless you’re training for a very specific competition.
Materials and Tools
You can build a corrugated iron raised garden bed with a wooden frame that holds metal panels in place. Here’s a practical checklist (adjust sizes to match your plan):
Materials
- Corrugated metal panels (galvanized) cut to your bed height
- Lumber for the frame (cedar is popular; other rot-resistant options work too)
- Corner posts (4×4 or doubled boards) for strength
- Exterior-grade screws (self-tapping screws can be handy for metal)
- Washers (help screws grip metal without tearing)
- Optional top cap board (makes a clean edge and a nice “garden bench” perch)
- Hardware cloth (if burrowing pests are an issue)
- Cardboard or paper (weed suppression layer)
Tools
- Drill/driver, tape measure, level, square
- Metal snips (or appropriate cutting tool), work gloves, eye protection
- Staple gun (for hardware cloth), and a decent bit set
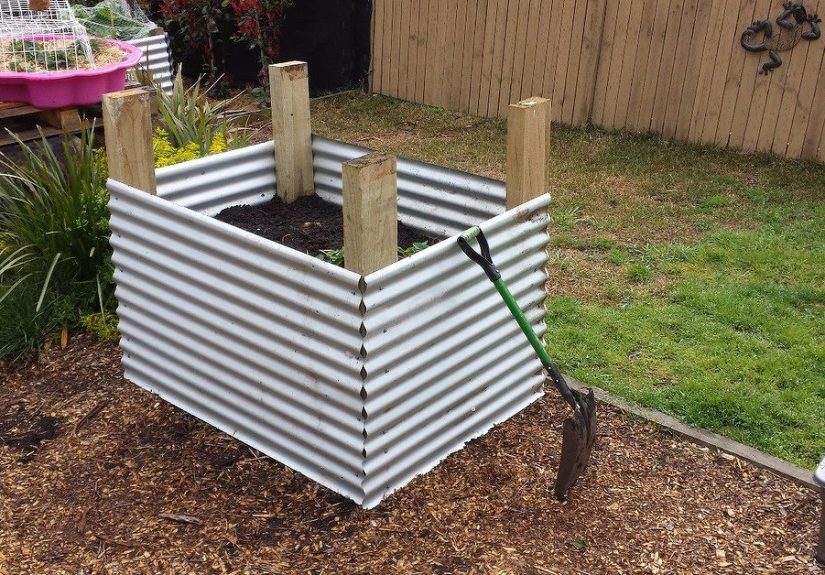
How to Build a Corrugated Iron Raised Garden Bed
There are a lot of ways to do this, but the most reliable approach is: build a wooden skeleton, then attach the corrugated panels like “armor plating,” then cap the top so it’s safe to brush against.
Step 1: Square up and level the site
Clear the area and level it as best you can. If the bed sits twisted, the panels fight you, the screws strip, and you start bargaining with inanimate objects. A flat base makes everything easier.
Step 2: Build the frame (your bed’s backbone)
Cut lumber for the long sides and short ends. Attach boards to corner posts so you get a rigid rectangle. Check for square by measuring diagonalsif they match, you’re square. If they don’t, gently persuade the frame until it does.
Step 3: Add supports for longer spans
If your bed is long (like 8 feet), add a mid-span brace or extra post so the sides don’t bow out once you add hundreds of pounds of damp soil. Soil is basically polite-looking weightlifting.
Step 4: Attach corrugated panels
Position panels against the outside of the frame. Pre-drill if needed, then screw through the metal into the wood. Use washers for a clean hold. Keep screw spacing consistentthis isn’t just pretty; it prevents rattles and flex.
Step 5: Make the top edge safe (and comfortable)
Corrugated metal edges can be sharp enough to slice gloves, sleeves, and your confidence. Add a wooden cap board around the top perimeter. This gives you:
- a smooth edge
- a place to lean or sit
- a more finished look
Step 6: Add a bottom barrier (optional but often worth it)
If gophers, voles, or other underground chaos gremlins live near you, staple hardware cloth to the bottom of the frame before filling. Overlap seams and secure it well. If pests aren’t an issue, you can skip this and keep the bed open to native soil for drainage and deeper rooting.
Filling the Bed: Soil That Grows Food, Not Regret
The best part of raised beds is that you control what roots live in. The worst part is realizing how much soil “control” costs. The good news: you can fill smartly.
A solid all-purpose soil strategy
Many extension-style recommendations lean toward a blend of quality soil and organic matter. Two practical options:
- Simple & effective: about 70% soil and 30% compost (good for structure + fertility).
- Raised-bed friendly mix: a 1:1 blend of compost and soilless growing mix, with some topsoil added if the bed is deep enough and you want more mineral structure.
Whatever recipe you choose, avoid going “all compost.” Compost is amazing, but too much can hold water oddly, settle dramatically, or create nutrient imbalances. Think of compost as seasoninggenerous seasoning, but not the entire meal.
Cut costs with layered filling (without being gross about it)
For deeper beds, you can use a “fill the bottom, save the budget” method:
- Weed suppression: Lay cardboard (remove tape) or thick paper to smother weeds.
- Bulk layer (optional): Logs, sticks, and coarse yard debris (a hugelkultur-style base) can reduce the amount of purchased soil, and it breaks down over time.
- Growing layer: Put your best soil mix in the top 10–12 inches where most feeder roots will live.
If you do use wood in the bottom, expect settling over time. That’s not failurethat’s the bed “breaking in.” Just top-dress with compost each season.
Will Metal Beds Cook My Plants?
Metal does heat up in sun, and soil near the sidewalls can run warmer than soil in the center. In many climates, this is manageableand sometimes helpful in shoulder seasons. The trick is to manage the edges.
Easy heat-management fixes
- Mulch (straw, shredded leaves) to buffer temperature swings
- Drip irrigation so moisture stays consistent
- Plant spacing so foliage shades soil as plants grow
- Afternoon shade (shade cloth) in very hot climates
What to Plant in Your New Bed (So It Feels Worth It)
The fun part of “another bed” is that you can stop cramming everything into one space like it’s garden Tetris. A few reliable raised-bed winners:
- Quick growers: lettuce, radishes, bush beans
- Root crops: carrots and beets (give them depth and loose soil)
- Big summer payoff: tomatoes, peppers, cucumbers (trellis cucumbers to save space)
- Pollinator helpers: marigolds, zinnias, herbs like basil and dill
If your bed is 12–18 inches deep, you’ll have plenty of flexibility. Deeper beds can be especially nice for tomatoes and squash family plantsjust remember: bigger plants also demand more water and nutrients.
Common Mistakes (and How to Avoid Them)
1) Building it too wide
If you can’t reach the middle without stepping in, you’ll compact the soil, damage roots, and invent new stretches you didn’t ask for. Keep width reachable.
2) Skipping reinforcement
Soil pushes outward. Add mid-span bracing or sturdier posts for long/tall beds so the sides don’t bulge.
3) Going cheap on fasteners
Outdoor moisture is relentless. Use exterior-grade screws and consider washers. Rusty, snapped fasteners are the garden equivalent of stepping on a Lego.
4) Filling with mystery dirt
Raised beds are supposed to be the “good soil zone.” If you fill with low-quality soil, you’ll still gardenbut you’ll do it angrily. Start with clean, plant-friendly materials and amend seasonally.
Conclusion: The “Another Bed” Advantage
A corrugated iron raised garden bed is a smart upgrade when you want durability, clean lines, and fewer battles with rot and weeds. Keep your bed reach-friendly, reinforce longer spans, protect yourself from sharp edges, and use a balanced soil mix that holds moisture while draining well. Then plant like a person who intends to harvest something other than disappointment.
And yesbuilding another one is completely normal. Questionable? Possibly. But normal.
Real-World Experiences: Lessons From “Another” Corrugated Iron Bed (Extra Notes)
The funny thing about building a second (or third) corrugated iron raised bed is how quickly you develop opinions. The first bed is optimism: “This will be quick!” The next bed is wisdom: “I am wearing gloves from the moment I touch that metal.” If you’re in the “another bed” era, here are the real-world lessons gardeners tend to share after the honeymoon phase.
First: pre-drilling can save your sanity. Corrugated panels are easy to underestimatethin enough to cut, but stiff enough to fight alignment. A quick pre-drill (or careful use of self-tapping screws) reduces wandering screws and keeps the panel from flexing while you’re trying to hold it in place with one hand and your dignity with the other.
Second: the top cap board is not just “nice”it changes how you use the bed. Without a cap, you avoid leaning, resting tools, or bumping into the edge. With a cap, the bed becomes a work surface. You’ll perch there to weed. You’ll set seed trays there. You’ll accidentally leave pruners there and spend 20 minutes looking for them while they sit in plain sight. It’s a lifestyle upgrade.
Third: soil settling is real, and it’s not a moral failure. If you layer the bottom with sticks or wood (or even just use a fluffy mix), it will compress over weeks and monthsespecially after the first few thorough waterings. Seasoned gardeners plan for this by leaving a little headspace and topping off with compost later. That top-dressing habit becomes the secret sauce: your bed improves each year instead of getting tired.
Fourth: metal beds teach you about microclimates. On hot days, the soil near the edge can run warmer than the center, and plants closest to the side sometimes look thirstier first. The fix is usually simple: mulch the surface, water consistently, and avoid planting the most heat-sensitive crops right against the metal in the hottest part of summer. Many gardeners reserve edge space for herbs, marigolds, or sturdy greens and keep the diva crops (like certain lettuces) a little more central or shaded.
Fifth: your second bed is when you start designing for your future self. Taller sides mean less bending. Wider paths mean fewer ankle turns while hauling a watering can. A slightly different orientation can mean better morning sun and fewer afternoon scorch sessions. “Another bed” is where the garden stops being a project and starts being a system.
Finally, there’s the emotional experience: the moment you plant your new bed and realize you’ve created more growing space than you currently have seedlings for. This is the part where gardeners do one of two things: (1) calmly adjust their plan, or (2) buy more seeds and justify it as “succession planting,” which is technically true and therefore not impulsive at all. Either way, the bed gets usedand by mid-season, you’ll wonder how you ever gardened without it.