Table of Contents >> Show >> Hide
- The short answer: Yeshere are your best make-ahead options
- Make-ahead timeline: how far ahead can you prep pie dough?
- Option 1: Make pie dough ahead and refrigerate it (best for 1–3 days)
- Option 2: Freeze pie dough (best for weeks to months)
- Option 3: Roll it out first, then freeze it in the pie plate (the “future me is a genius” method)
- Option 4: Blind-bake or par-bake the crust ahead of time
- Can you assemble the whole pie ahead of time?
- Troubleshooting: what can go wrong (and how to fix it)
- Food safety basics (quick, not scary)
- So… what’s the best method?
- of Real-Life Pie Crust Make-Ahead Experiences
Absolutelyand once you do it, you’ll wonder why you ever made pie crust on “pie day” like it’s an extreme sport. Making pie crust ahead of time is one of the easiest ways to get a flakier crust with less stress. It gives the dough time to chill, lets the flour fully hydrate, relaxes gluten, and keeps the butter cold (which is basically the entire pie-crust religion).
Below you’ll find the best make-ahead options (from “I can do this tonight” to “I’m freezing crusts like a squirrel hoarding acorns”), plus realistic timelines, storage tips, and how to thaw and bake without ending up with a tough, shrunken, or soggy situation.
The short answer: Yeshere are your best make-ahead options
You can make pie crust ahead of time at multiple stages. Which one is “best” depends on your schedule and how much you want Future You to do.
- Make the dough, chill it: best for 1–3 days ahead.
- Freeze the dough: best for weeks to a few months ahead.
- Roll it out and freeze it in the pie plate: maximum convenience on bake day.
- Blind-bake (or par-bake) the shell ahead: great for custard pies, cream pies, and anything that hates sogginess.
Make-ahead timeline: how far ahead can you prep pie dough?
Storage time varies by recipe and how well it’s wrapped, but these ranges are widely used by test kitchens and experienced bakers.
| Stage | Fridge | Freezer (best quality) | Best for |
|---|---|---|---|
| Dough disk (unrolled) | Up to 2–3 days | About 1–3 months (sometimes longer) | General make-ahead pie crust |
| Rolled + in pie plate (unbaked) | Up to a few days (covered) | Up to ~1–3 months | Fastest “fill and bake” workflow |
| Blind-baked shell | Short-term (varies) | About 1 month (quality-focused) | Cream pies, custards, juicy fillings |
One important nuance: freezing keeps food safe for a very long time if your freezer is cold enough, but quality still drops over timemostly from dryness and picking up “freezer perfume” from whatever else is living in there (hello, frozen salmon).
Option 1: Make pie dough ahead and refrigerate it (best for 1–3 days)
Why it works
Resting chilled dough improves handling and texture. The flour absorbs moisture more evenly, gluten relaxes, and the butter stays firmso rolling is easier and the crust bakes up tender and flaky instead of springy and stubborn.
How to do it
- Make your dough and divide it into disks (one disk per crust).
- Wrap each disk tightly in plastic wrap. Press out air pockets.
- Refrigerate until firm (at least 1 hour is great; overnight is even better).
- When ready to roll, let it sit at room temperature briefly so it’s pliable, not cracked.
Pro tip for less cracking
If your dough cracks at the edges while rolling, it’s usually too cold. Give it a few minutes on the counter, then try again. If it gets sticky, it’s too warmpop it back in the fridge for a short chill. Pie dough is basically a temperature mood ring.
Option 2: Freeze pie dough (best for weeks to months)
Freezing pie dough is a lifesaver for holidays, surprise dinner invites, and moments when you want pie without also wanting to wash three bowls and a pastry cutter.
How to wrap pie dough so it doesn’t taste like your freezer
- Flatten the dough into a disk (about 1-inch thick) so it freezes and thaws evenly.
- Wrap tightly in plastic wraptwo layers if you can.
- Add a second barrier: foil or place the wrapped disk in a freezer bag and press out the air.
- Label it with the date and what it is (because “mystery disk” is how freezer archaeology begins).
How long does frozen pie dough last?
Many bakers aim to use frozen pie dough within about 3 months for best quality, but some guidance allows longer if it stays tightly wrapped. If you push past a few months, you may notice the dough needs a touch more water to come together or feels slightly drierstill usable, just not at peak flake.
How to thaw pie dough correctly
- Best method: thaw overnight in the refrigerator.
- Then: let it sit at room temperature just long enough to roll without cracking.
- Avoid: microwaving to thaw. It melts butter unevenly, and melted butter is basically flake sabotage.
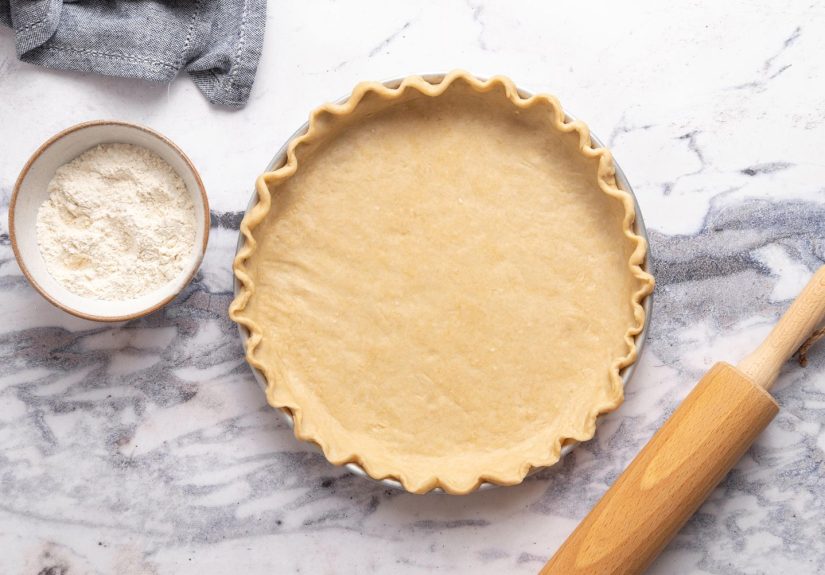
Option 3: Roll it out first, then freeze it in the pie plate (the “future me is a genius” method)
If you want the easiest bake day, freeze your pie crust already rolled out and fitted into the pie pan. This skips the thaw-roll-transfer stepoften the messiest part.
Why this method is so good
- You handle the dough once, when you have time.
- The crust is already shaped and ready to fill.
- Baking from very cold dough can help prevent shrinkage and slumping.
Steps
- Roll out the dough and fit it into your pie plate.
- Trim and crimp the edges.
- Freeze uncovered until firm.
- Wrap the whole pie plate tightly (plastic wrap + foil is a great combo).
- Freeze until needed.
On bake day, many pies can be filled and baked straight from frozen (or with minimal thaw time), depending on the recipe. If your filling is very wet, starting with a thoroughly chilled crust is a nice defense against sogginess.
Option 4: Blind-bake or par-bake the crust ahead of time
For pies with custard fillings (pumpkin, pecan, chess) or no-bake fillings (banana cream, chocolate silk), blind baking is your best friend. It helps keep the crust crisp and structured instead of turning into a sad, pale sponge.
Quick refresher: blind bake vs. par-bake
- Par-bake: partially bake the crust so it starts setting and browning, then finish baking with filling.
- Blind bake: fully bake the crust, usually for no-bake fillings.
Make-ahead strategy that actually works
- Fit dough into the pan and chill well (cold dough behaves better in the oven).
- Line with parchment or foil and add pie weights (or dry sugar/beans/rice).
- Bake until the edges set, then remove weights and continue as your recipe instructs.
- Cool completely before storing.
If you’re storing a baked shell, wrap it carefully once fully cool. Short-term room-temp storage can work for some shells, but for longer storage, freezing is the safer bet for texture. To refresh crispness, a short warm-up in the oven can bring it back to life before filling.
Can you assemble the whole pie ahead of time?
Sometimes. But if your pie has a very juicy filling (hello, apple and berry), letting an unbaked assembled pie sit too long can make the bottom crust soggy. A smarter approach is usually to prep components:
- Make-ahead pie dough (refrigerated or frozen)
- Make-ahead filling (stored separately)
- Assemble close to bake time
If you want a fully make-ahead dessert, consider baking the entire pie in advance and reheating or serving at room temperature, depending on the pie style. That’s often easier than trying to keep an unbaked crust crisp in a humid refrigerator environment.
Troubleshooting: what can go wrong (and how to fix it)
“My dough is gray-ish and smells like the freezer.”
That’s odor absorption. Next time, wrap tighter (plastic + foil + freezer bag), store away from pungent foods, and aim to use within a quality-focused window.
“My crust shrank!”
Shrinkage often comes from warm dough, overstretched dough, or not enough chill time. Chill the shaped crust before baking, and use pie weights generously during blind baking.
“My crust is tough.”
Usually too much mixing (gluten development) or too much flour worked in while rolling. Mix only until the dough holds together, and flour the surface just enough to prevent sticking.
“Soggy bottomsend help.”
For very wet fillings, consider par-baking, baking on a lower rack, using a metal pie plate for better heat transfer, or brushing the crust with egg wash to create a bit of a moisture barrier.
Food safety basics (quick, not scary)
Keep pie dough properly chilled: a refrigerator should be at or below 40°F, and a freezer should be at 0°F or below. (This also helps your butter stay solid, which helps your crust stay flakyso safety and deliciousness are finally on the same team.)
So… what’s the best method?
If you’re making pie crust ahead of time for a holiday or a busy weekend, here’s a simple rule:
- Making pie within 1–3 days? Refrigerate dough disks.
- Making pie within 1–3 months? Freeze dough (or better: freeze it rolled in the pan).
- Making custard or cream pie? Par-bake or blind bake ahead for maximum crispness.
The goal is to keep the fat cold, the dough relaxed, and bake day calm enough that you can actually enjoy the pie instead of muttering at your rolling pin like it personally betrayed you.
of Real-Life Pie Crust Make-Ahead Experiences
The first time I made pie crust ahead of time, it felt like cheatinglike I’d discovered a secret trapdoor in the floor of the baking world. It was the Wednesday before a big family dinner, the kind where someone always “forgets” they offered to bring dessert, and then suddenly it’s your problem. Instead of doing the full dough routine on the day-of, I made two dough disks after dinner, wrapped them like little buttery birthday presents, and tucked them into the fridge. The next day, rolling the dough took half the time because it wasn’t fighting me. No sticky counter crisis. No frantic flour blizzards. It just… rolled. I remember standing there thinking, “Wait, is this what organized people feel like?”
My favorite make-ahead move now is freezing the crust in the pie plate. It’s a game-changer when you’re making more than one pieespecially around Thanksgiving, when your refrigerator is already hosting a party for a turkey, three casseroles, and a container of “mystery leftovers” that nobody claims. I’ll roll and crimp crusts a week or two before, freeze them until firm, then wrap each plate tightly. On pie day, I line them up like a tiny pie-crust army. Fill, bake, repeat. The best part is skipping the transfer step (you know, when the dough tears and you pretend it was “rustic”).
One year, I froze dough disks for a full month and learned a valuable lesson: label everything. I had two identical disks in the freezerone was sweet pie dough, one was a savory crust for pot pie. Guess which one I used for apple pie? Yep. The apple pie was… confusing. Not inedible, just oddly “chicken-adjacent” in vibe. Now I write on the wrap like a bakery librarian: “All-butter pie crust, sweet, date, 1 crust.” Future Me deserves clarity.
I’ve also had great luck par-baking shells ahead for custard pies. When you’re making pumpkin pie, the filling is heavy and the oven time is longtwo things that can conspire against a crisp bottom. Par-baking gives the crust a head start, and if you’re prepping for guests, it spreads out the work. I’ll par-bake the shell the day before, let it cool, then cover it and leave it ready. On baking day, it’s basically: pour filling, bake, accept compliments.
The biggest emotional benefit of making pie crust ahead of time is not just timeit’s confidence. When dough is chilled, rested, and waiting for you, baking feels less like a high-stakes audition and more like a fun plan. You can focus on flavor, not panic. And if something does go sideways? You’re calmer, so you patch a tear, crimp a little extra, and move on. Because at the end of the day, even a slightly wonky pie crust still leads to pie, and pie is extremely forgiving.