Table of Contents >> Show >> Hide
- The short answer (with minimal drama)
- Why cooking spray can make a nonstick pan… sticky
- Not all nonstick is the same: PTFE vs. ceramic
- So… can you ever use cooking spray on a nonstick pan?
- Better alternatives to cooking spray for nonstick pans
- What if you already used cooking spray on your nonstick pan?
- Nonstick pan care rules that matter more than cooking spray
- FAQ: quick answers to common questions
- Real-world experiences: what cooks notice over time (about )
- SEO tags
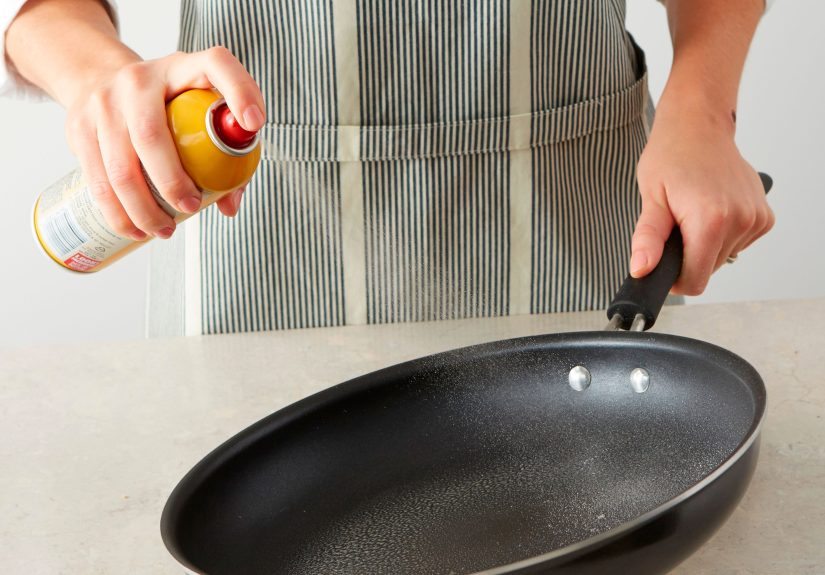
Cooking spray feels like kitchen magic: press a button, get a perfect, even coating, and suddenly your omelet slides around like it’s auditioning for a
figure-skating team. So… why do so many cookware brands and food pros act like aerosol cooking spray is the villain in a nonstick pan’s origin story?
Here’s the truth: you can use cooking spray on nonstick pans, but for many pans it’s a “can” in the same way you can wear white
sneakers to a barbecue. You’ll survive, but you might regret it. The bigger issue isn’t instant catastropheit’s what repeated spraying can do over time:
sticky buildup, reduced nonstick performance, and (sometimes) warranty headaches.
The short answer (with minimal drama)
If your pan manufacturer says “don’t use aerosol cooking spray,” listen. Many do. In practice, the common guidance is:
- Aerosol cooking sprays: Often not recommended for nonstick pans because they can leave a residue that’s hard to remove and can reduce nonstick performance over time.
- Non-aerosol oil misters/pump sprays: Usually a better choice (especially if the ingredient list is just oil), but still use lightly and clean well.
- The simplest option: Use a small amount of oil or butter and spread it with a paper towel or silicone brush.
Think of it this way: a nonstick pan already has a low-friction coating. If you’re adding “extra nonstick” on top, the only thing you’re really
super-sizing is the cleanup.
Why cooking spray can make a nonstick pan… sticky
It’s not just oilit’s the “supporting cast”
Most cooking sprays aren’t pure oil in a can. Many include emulsifiers (like lecithin), anti-foaming agents, and
propellants. Those extras help the spray mist nicely and behave consistently in the can. But on a hot pan, they can also behave like a
clingy houseguest: they show up, make themselves comfortable, and refuse to leave.
Over time, that residue can build up into a thin film. Your pan may look fine, but it starts cooking like it’s wearing a sticky sweater: eggs grab,
pancakes tear, and suddenly “nonstick” feels like a marketing suggestion.
Heat can turn residue into “kitchen varnish”
When oils (and additives) repeatedly heat and cool on the pan surface, they can form a stubborn layer that’s harder to wash away with gentle dish soap.
Some experts describe it as polymerized residuebasically a thin, baked-on coating you didn’t ask for.
That’s the irony: many nonstick pans need gentle cleaning to stay in good shape, but the spray residue often needs more aggressive cleaning to
removecreating a frustrating loop where you either live with stickiness or risk scrubbing too hard.
Not all nonstick is the same: PTFE vs. ceramic
PTFE (Teflon-style) nonstick coatings
Many classic nonstick skillets use a PTFE-based coating. These pans perform best at low to medium heat and with gentle tools (think
silicone, wood, nylon). The main enemies are usually overheating, metal utensils, and abrasive scrubbersnot because the pan is delicate like a soap
bubble, but because the coating is designed for easy release, not for gladiator battles.
With PTFE pans, the cooking-spray issue is typically performance: sticky buildup can make the pan less slippery over time, even if the coating itself
isn’t immediately “destroyed” in one use.
Ceramic nonstick coatings
Ceramic-coated cookware is often marketed as a “natural” nonstick alternative. It can perform beautifullyespecially when newbut it can also be more
prone to losing slickness if it accumulates residue or is used at high heat regularly. Many care guides for ceramic nonstick also caution against cooking
sprays because they can leave a sticky film that’s tough to remove.
Translation: ceramic pans don’t get a free pass. If anything, they’re even more likely to punish you for residue buildup by becoming
noticeably stickier.
So… can you ever use cooking spray on a nonstick pan?
Yes, but the safest version is: use less, choose better, and clean promptly.
If you really want the convenience, pick your spray carefully
- Check the ingredients: The fewer, the better. If it’s basically “oil,” you’re in a better place than a long list of additives.
- Prefer non-aerosol misters: A refillable oil mister lets you use your own oil with no propellant and full control.
- Spray away from the pan (when possible): Spraying directly into a hot pan can create more localized buildup (and a slippery countertop cameo).
Use spray on the food instead of the pan
Here’s a sneaky trick: for foods that tend to stick (hello, tofu and lean proteins), lightly oil the food instead of the pan. You’ll
still get better browning and release, but you’re less likely to coat the pan in a fine mist that bakes on around the edges.
Use cooking spray where it shines
Cooking spray is often most useful for:
- Baking pans (especially intricate cake pans)
- Grids and waffle irons (when manufacturer instructions allow)
- Parchment paper (a quick spritz can help cookies release cleanly)
In other words, it’s great when you need coverage in nooks and crannies. A smooth nonstick skillet is not a nook-and-cranny environmentit’s more like a
skating rink.
Better alternatives to cooking spray for nonstick pans
1) The teaspoon method (simple, cheap, effective)
Add about 1 teaspoon of oil (or a small pat of butter) to a cool or gently warmed pan. Then spread it thinly with:
- a folded paper towel (held with tongs if you’re fancy),
- a silicone brush, or
- a spatula plus patience.
You get an even coat with less chance of residue buildupand you won’t accidentally perfume your kitchen with aerosolized “buttery flavor.”
2) Use a refillable oil mister
If you love the spray format, a refillable mister is the compromise: you get a fine mist, but you control the oil and avoid many aerosol additives.
Pro-tip: don’t expect a $6 mister to behave like an industrial fog machinemisting is gentler than blasting.
3) Choose fats that match your cooking
If you’re cooking eggs, a little butter can improve flavor and release. For higher-heat sautéing (still not “rip-roaring sear” heat), neutral oils like
canola, avocado, or grapeseed are popular. The goal isn’t to drown the panit’s to add just enough fat for flavor and heat transfer.
What if you already used cooking spray on your nonstick pan?
Don’t panic. One or two uses usually won’t instantly ruin a pan. The key is to remove any developing film before it becomes a permanent roommate.
How to remove sticky cooking spray buildup (gentle-first approach)
- Wash with warm, soapy water and a non-abrasive sponge after the pan cools.
- Try a baking soda paste: Mix baking soda with a little water to form a paste. Rub lightly over the sticky areas with a soft sponge,
then rinse and wash again. - Simmer-and-wipe option: Add a little water to the pan, warm it gently (do not boil it dry), then wipe and wash with dish soap.
- Avoid harsh scrubbers: Steel wool and abrasive powders can scratch or dull the coating, which is the opposite of what we’re trying to accomplish.
If the pan still feels tacky after cleaning, that’s a sign the residue has built up. At that point, repeated gentle cleaning is usually safer than one
aggressive scrubbing session.
Nonstick pan care rules that matter more than cooking spray
Cooking spray gets all the blame, but nonstick pans have a few bigger “please don’t do that” moments:
- Keep heat moderate: Nonstick is happiest on low to medium heat for most cooking.
- Don’t preheat empty on high: A dry nonstick pan can overheat quickly.
- Use the right tools: Silicone, nylon, or wood protects the coating.
- Skip abrasive cleaners: Gentle dish soap and a soft sponge are usually enough.
- Hand-wash when possible: Dishwashers can be tough on cookware finishes, even when labeled “dishwasher safe.”
- Store smart: If you stack pans, add a soft liner or towel between them.
If you follow these basics, you’ll get better performance, longer life, and fewer “why are my eggs glued to this?” mornings.
FAQ: quick answers to common questions
Is cooking spray unsafe to use on nonstick pans?
The common concern is usually performance and residue, not immediate safety. That said, avoid overheating nonstick cookware in general
and follow the pan’s care instructions. If your spray has a low smoke point and you blast it on high heat, you may get off flavors and smokeneither of
which improves dinner.
What about “propellant-free” cooking spray?
Propellant-free can be better, but it depends on the full ingredient list. If it still contains emulsifiers that tend to leave residue, it may still
contribute to buildup over time. “Propellant-free” is a helpful clue, not a guarantee.
My pan is stickydoes that mean the coating is ruined?
Not necessarily. Sticky residue can mimic coating failure. Try thorough gentle cleaning first. If the pan still sticks badly, the coating may be worn,
scratched, or degraded from heat/abrasion. Once a nonstick coating is damaged, it can’t be “re-coated” at home in a reliable way.
Do I need to “season” a nonstick pan?
Some manufacturers suggest lightly oiling the surface occasionally to help maintain performance, especially if it seems less slick. This is not the same
as cast-iron seasoning (no dramatic layers, no smoke signals). Think of it as a quick conditioning step, not a weekend project.
Real-world experiences: what cooks notice over time (about )
If you ask a group of home cooks about cooking spray on nonstick pans, you’ll hear a pattern that sounds suspiciously like a sitcom plot: it starts with
convenience and ends with confusion. Early on, everything seems fineespecially if the pan is new. Someone sprays, cracks in an egg, and watches it slide
around like it’s on a tiny buttered skateboard. The conclusion? “Cooking spray is amazing, and I am a genius.” (Relatable.)
Then a few weeks later, the same person notices a strange change: the eggs still release, but not as cleanly. A thin ring forms near the sides of the
pan where the spray mist lands and cooks off. Pancakes begin to stick at the edges. The pan looks normal under kitchen lighting, but when you tilt it
toward a window, you can see a faint sheen that doesn’t match the rest of the surfacelike the pan has a secret second finish.
Many cooks describe the next phase as “the scrub spiral.” They try normal dish soap and a sponge. The tacky feeling remains. They scrub harder. The pan
gets cleaner… but now they’re worried they’re scrubbing the coating itself. That’s usually when people switch strategies: baking soda paste, gentle
simmer-and-wipe, or a dedicated nonstick-safe scrubby that’s firm enough to lift residue without acting like sandpaper.
Another common experience: spray habits spread. Someone uses cooking spray for eggs, then for grilled cheese, then for sautéed veggies,
then for everythingbecause it’s easy. But nonstick pans don’t need much help, and repeated spraying increases the chance of buildup. Eventually, the pan
that once handled a delicate omelet starts failing at the easiest job in the kitchen: reheating a tortilla without turning it into a stuck-on sticker.
Cooks who switch away from aerosol spray often report a surprisingly quick improvement. Using a teaspoon of oil and wiping it thinly feels “old-school,”
but it restores control. You can choose a higher-smoke-point oil for sautéing, butter for flavor, or a tiny dab of oil for eggs. And because you’re
applying fat directly (instead of misting it everywhere), cleanup stays predictableno mystery film.
The biggest takeaway from these real-life stories is boring but powerful: nonstick performance is as much about maintenance as materials.
A well-treated mid-priced nonstick pan often outperforms a neglected expensive one. If you love sprays, a refillable mister tends to feel like the “best
of both worlds.” But if you want the simplest, most reliable approach, the crowd favorite is still the same: a little oil, spread thin, cook at moderate
heat, and wash gently. Your eggsand your future selfwill thank you.