Table of Contents >> Show >> Hide
- Jump to
- What Makes a Doberge “Doberge”?
- Doberge Timeline (So You Don’t Lose Your Weekend)
- Ingredients
- Equipment
- Step-by-Step Recipe
- Classic Poured Fondant Glaze
- Troubleshooting & Pro Tips
- Flavor Variations
- Storage & Make-Ahead
- FAQ
- of Real-Life Doberge Experience (a.k.a. What Nobody Tells You)
- Conclusion
If New Orleans had an official love language, it would be “bring a cake with at least six layers.” And if that cake could also be filled with custard, frosted with buttercream, and dressed in a shiny poured glaze like it’s heading to Mardi Gras? Even better. Enter the Doberge cakea local legend that laughs in the face of “just one more slice.”
This guide gives you a classic Doberge cake recipe with the signature thin layers and custard filling, plus a practical home-baker approach so you don’t need a commercial bakery or a second refrigerator the size of a shed. We’ll cover the why (so it tastes like the real deal), the how (so it doesn’t slide into a custard landslide), and the little pro tricks that make it look like you definitely didn’t panic at minute 47.
What Makes a Doberge “Doberge”?
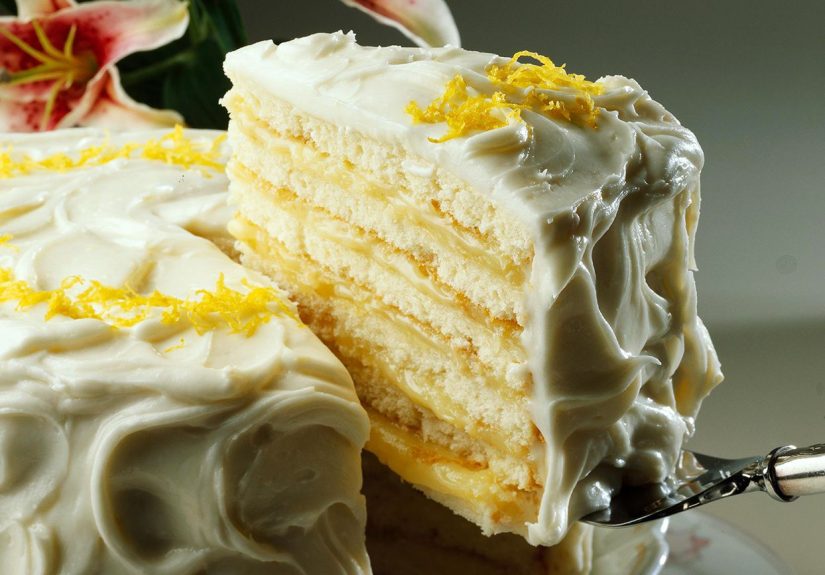
A classic New Orleans Doberge cake is a study in delicious overachieving: multiple thin cake layers (often six or more), custard or pudding filling between those layers, a thin buttercream coat to smooth the outside, and a poured fondant or glaze that sets into a glossy shell.
The famous “half-and-half” version is part chocolate and part lemontwo flavors living peacefully in the same cake like roommates who never fight about the thermostat. If you’ve seen a Doberge with one side dark and one side light, that’s the tell.
A quick, tasty history bite
The Doberge cake is widely credited to New Orleans baker Beulah Ledner, inspired by the Hungarian Dobos torte. The local adaptation swapped the heavier buttercream filling for a lighter cooked custardbecause New Orleans heat does not care about your European pastry plans.
Doberge Timeline (So You Don’t Lose Your Weekend)
- Day 1 (1–2 hours active): Bake cake layers, make custards, chill everything.
- Day 2 (1–2 hours active): Assemble, crumb coat, chill, glaze, slice, accept compliments gracefully.
Can you do it in one day? Sure. You can also run a marathon in flip-flops. This cake behaves best when fully chilled between steps.
Ingredients
For the cake layers (vanilla/butter cake style)
- 3 cups (360g) all-purpose flour
- 2 1/2 tsp baking powder
- 1/2 tsp fine salt
- 1 cup (227g) unsalted butter, room temperature
- 2 cups (400g) granulated sugar
- 4 large eggs, room temperature
- 1 tbsp vanilla extract
- 1 1/4 cups (300ml) whole milk, room temperature
For the custard filling (split into chocolate + lemon for “half-and-half”)
- 4 cups (960ml) whole milk
- 1 cup (200g) granulated sugar
- 1/3 cup (40g) cornstarch
- 1/2 tsp fine salt
- 6 large egg yolks
- 3 tbsp unsalted butter
- 2 tsp vanilla extract
- Chocolate half: 4 oz (113g) bittersweet or semisweet chocolate, chopped and/or 1/3 cup (30g) cocoa powder
- Lemon half: zest of 2 lemons + 1/3 cup (80ml) fresh lemon juice
For the buttercream “crumb coat”
- 1 1/2 cups (340g) unsalted butter, room temperature
- 5–6 cups (600–720g) powdered sugar, sifted
- 2 tsp vanilla extract
- 2–4 tbsp milk or heavy cream (as needed)
- Pinch of salt
For the poured fondant glaze (classic shell)
- 4 cups (480g) powdered sugar, sifted
- 1/4 cup (60ml) light corn syrup
- 1/4–1/3 cup (60–80ml) very hot water (adjust for pourable consistency)
- 1 tsp vanilla extract (clear vanilla if you want the glaze extra white)
- Optional chocolate glaze: 2–3 tbsp cocoa powder or 3 oz (85g) melted chocolate
Equipment
- Three 8-inch round cake pans (or two 8-inch pans + bake in batches)
- Parchment paper
- Stand mixer or hand mixer
- Saucepan + whisk
- Fine-mesh strainer (highly recommended for silky custard)
- Offset spatula
- Long serrated knife (or cake leveler)
- Cooling rack + sheet pan (for glazing)
- Instant-read thermometer (helpful for custard and glaze, not mandatory)
Step-by-Step Recipe
Step 1: Bake the cake layers
- Preheat oven to 350°F. Grease three 8-inch pans and line bottoms with parchment.
- Whisk flour, baking powder, and salt in a bowl.
- Cream butter and sugar until pale and fluffy (3–4 minutes). Add eggs one at a time, then vanilla.
- Add dry ingredients in 3 additions, alternating with milk (start and end with dry). Mix just until combined.
- Divide batter evenly among pans. Bake 18–22 minutes, or until a toothpick comes out clean.
- Cool 10 minutes in pans, then turn out onto racks and cool completely.
Classic Doberge move: You want thin layers. Once cooled, wrap and chill the cakes (at least 1 hour, or overnight). Cold cake is easier to slice without turning your kitchen into a vanilla snow globe.
Step 2: Make the custard filling (pastry-cream style)
- In a saucepan, whisk sugar, cornstarch, and salt. Add milk and whisk until smooth.
- Cook over medium heat, whisking constantly, until steaming and thickened (it should coat a spoon).
- In a bowl, whisk egg yolks. Slowly whisk in a ladle of hot milk mixture to temper, then pour yolks back into the saucepan.
- Cook 1–2 minutes more, whisking, until glossy and thick. Remove from heat; whisk in butter and vanilla.
- Strain into a bowl for ultra-smooth custard.
- Split the custard into two bowls for half-and-half (or keep it all chocolate, all lemonyour call).
- Chocolate bowl: whisk in chopped chocolate until melted (and/or cocoa powder to deepen flavor).
- Lemon bowl: whisk in lemon zest and juice. (Taste: it should be bright but not bitter.)
- Press plastic wrap directly onto the surface of each custard and chill until firm (at least 2 hours, preferably overnight).
Custard texture matters. Too loose and the layers slide. Too stiff and you’ll tear cake while spreading. If it’s overly thick after chilling, whisk briefly to smooth it out.
Step 3: Slice cakes into thin layers (6 total)
- Level each cake top if domed.
- Slice each cake horizontally into 2 even layers. You now have 6 thin layers.
If you’re nervous, mark the sides with toothpicks at equal height before slicing. It’s the cake version of drawing guidelines before eyeliner.
Step 4: Make the buttercream (for a thin crumb coat)
- Beat butter until smooth (2 minutes). Add powdered sugar gradually.
- Add vanilla and salt. Add milk/cream 1 tbsp at a time until spreadable but not loose.
- Beat 2–3 minutes until fluffy.
You’re not aiming for a thick frosting blanket here. The buttercream is the “primer” that helps the poured fondant glide on smoothly.
Step 5: Assemble the cake
- Place one cake layer on a board or plate. Spread an even layer of custard (about 1/3 cup) to the edges.
- Repeat with remaining layers, alternating custards if making half-and-half (see note below).
- Chill 20–30 minutes to firm up before frosting.
How to do “half-and-half” without chaos:
- Option A (easiest): Make the whole cake chocolate, then serve with lemon curd on the side. (Not traditional, but delicious.)
- Option B (most classic-looking): Fill all layers with chocolate custard, but glaze one side chocolate and one side vanilla/lemon-tinted.
- Option C (truest half-and-half): Alternate chocolate and lemon custard layers. This is delicious but requires very even spreading and chilling.
Step 6: Crumb coat + chill
- Apply a thin coat of buttercream over the entire cake to trap crumbs and smooth the sides.
- Chill until firm (at least 45 minutes). The colder the cake, the better the glaze behaves.
Classic Poured Fondant Glaze
Poured fondant is the signature finish that makes a Doberge look like it just got back from a spa day. The goal is a warm, pourable glaze that sets with a soft sheen.
Make the glaze
- In a bowl, whisk powdered sugar and corn syrup.
- Add very hot water a little at a time, whisking, until it flows like warm honey.
- Stir in vanilla.
- For chocolate glaze, whisk in cocoa powder or melted chocolate until smooth.
Glaze the cake
- Place the chilled cake on a wire rack set over a sheet pan (to catch drips).
- Pour glaze over the top, then gently nudge it to the edges so it drapes down the sides.
- Let it set 20–30 minutes. If you want a thicker shell, chill and do a second pour.
Temperature tip: If the glaze is too hot, it melts your buttercream and turns glossy elegance into a frosting mudslide. If it’s too cool, it won’t pourit will plop, and plop is not a Doberge vibe.
Troubleshooting & Pro Tips
1) My layers are sliding
- Your custard is too loose or too warm. Chill longer.
- You spread too thick. Thin, even layers are the Doberge way.
- Press gently after stacking and chill before frosting.
2) My custard is lumpy
- Strain it. No shame. This is why strainers exist.
- Whisk constantly over medium heatcustard hates distractions.
3) My glaze looks dull or grainy
- Powdered sugar wasn’t sifted (or it clumped in humidity). Sift next time.
- You didn’t add enough hot water. Adjust to a smooth pour.
4) Clean slices (the secret flex)
- Chill the cake 1 hour after glazing.
- Use a long knife dipped in hot water; wipe between cuts.
Flavor Variations
Once you’ve nailed the classic, you’ll notice something: Doberge is basically a “layer cake framework” that happily wears different outfits.
Popular spins you’ll see around Louisiana
- All-chocolate Doberge: chocolate custard + chocolate glaze for maximum drama.
- Lemon Doberge: bright custard, vanilla glaze (or lemon-tinted glaze).
- Caramel Doberge: swap in caramel pastry cream or salted caramel between layers.
- Red velvet Doberge: a modern favorite with a tangy custard twist.
Smart shortcuts (if you want “weeknight Doberge energy”)
- Use a high-quality chocolate pudding and a good lemon curd for filling.
- Use ganache instead of poured fondant if you prefer a softer finish.
Shortcuts are not “cheating.” They’re “strategic resource allocation,” which sounds fancy and also feels true when you’re washing your third whisk.
Storage & Make-Ahead
- Refrigerator: Store covered 3–4 days. Custard-based cakes like the fridge.
- Serve: Let slices sit 10–15 minutes at room temp for best flavor and texture.
- Make-ahead: Bake layers and make custards up to 2 days early. Assemble and glaze the day you serve.
FAQ
Is Doberge cake the same as Dobos torte?
They’re related but not identical. Dobos torte is known for buttercream filling and a caramel-topped layer. Doberge is the New Orleans adaptation with custard filling and a poured glaze finish.
How many layers should a classic Doberge have?
Six thin layers is the common “classic” target for home bakers. More layers are possible, but require very even baking and slicing.
Do I have to use poured fondant?
For the most traditional look, yes. But if you want an easier finish, a smooth ganache glaze still gives that glossy bakery vibe (and it tastes fantastic).
of Real-Life Doberge Experience (a.k.a. What Nobody Tells You)
The first time you bake a Doberge cake, you will learn something important: this dessert has the confidence of a parade float. It takes up space. It demands attention. And it has absolutely no interest in being “low effort.” But here’s the good newsmost of the effort is organized effort. If you can keep your cool, keep things cold, and keep your custard from turning into scrambled eggs, you’re already halfway to victory.
Let’s start with the layers. Thin layers are the heart of Doberge, but thin layers also have a hobby: breaking at the worst possible moment. Chilling the cakes before slicing is the difference between “clean, even layers” and “vanilla geology.” I like to wrap the cakes and let them firm up in the fridge, then slice slowly with a long serrated knife using gentle, sawing motions. If one layer cracks? Nobody needs to know. Once it’s stacked and filled, the cake becomes structurally forgivinglike it suddenly remembers it’s supposed to be a celebration.
Custard is where Doberge bakers earn their badge. The temptation is to rush it. Don’t. Whisk constantly, keep the heat moderate, and think of the custard as a moody celebrity: it wants steady attention and hates sudden changes. When it thickens, it thickens fast. Pull it when it’s glossy and clearly thick, then strain it. Straining is not an admission of failure. Straining is self-respect. After chilling, the custard should be spreadable but stable like a frosting that went to graduate school.
Assembly day is when the cake starts looking impressive, which is also when the cake starts testing your patience. The trick is to spread thinner layers of filling than your instincts suggest. Doberge is about repetition, not thick slabs. After stacking, I chill the whole cake before the crumb coat. That short chill sets the custard and keeps the layers from doing the slow-motion “lean” that makes you question your life choices.
Now the glazethe glamorous, terrifying finale. The first time you pour fondant, you’ll think, “This is too runny.” Then you’ll realize that’s exactly the point. If it’s too thick, it won’t flow and you’ll end up spatula-wrestling a sugary paste over the cake. If it’s too hot, it melts the buttercream and turns your crisp edges into a soft blur. My best advice: make the glaze, test a small drip on the edge, and adjust with hot water by teaspoons. Pour confidently, because hesitation creates ripples. It’s like parallel parking: commitment improves outcomes.
Finally, slicing. A chilled Doberge rewards you with that iconic lookclean stripes of cake and custard, like a dessert barcode scanning as “delicious.” Use a warm knife, wipe between cuts, and serve slightly cool. Then watch people take a bite and immediately start talking about how they had one “just like this” at a birthday party in New Orleans. That’s when you know you did it right.