Table of Contents >> Show >> Hide
- Why a Sweater Pillow Works (and Why It Looks Expensive)
- Pick the Right Sweater
- What You’ll Need
- Size, Inserts, and the Secret to a Plump Pillow
- Method 1: The Classic Sewn Sweater Pillow Cover (Envelope Back)
- Method 2: The Cardigan/Button Hack (A Cozy Shortcut)
- Method 3: No-Sew Sweater Pillow (Yes, Really)
- How to Keep Knit Fabric from Stretching (and Other Pillow Crimes)
- Design Ideas That Look Custom (Not Craft-Table Chaos)
- Care Tips: Keeping Your Cozy Sweater Pillow Looking Fresh
- FAQ
- Conclusion
- Experiences: What Making a Cozy Sweater Pillow Teaches You (the Fun Way)
There are two kinds of old sweaters: the ones you swear you’ll wear again someday, and the ones quietly plotting their
retirement in the back of your closet. A cozy sweater pillow is the perfect third optionpart home
décor, part upcycle victory lap, and 100% permission to keep that soft knit texture in your life without forcing your
elbows through a stretched-out cuff.
This guide walks you through how to turn a sweater into a pillow cover (or a fully stuffed pillow), plus
pro-level tips for keeping knits from stretching, getting crisp corners, and choosing the right insert for that
“designer-chop” fullness. Expect options: beginner-friendly sewing, clever button/neckline hacks, and a no-sew
approach for the “I own scissors and ambition” crowd.
Why a Sweater Pillow Works (and Why It Looks Expensive)
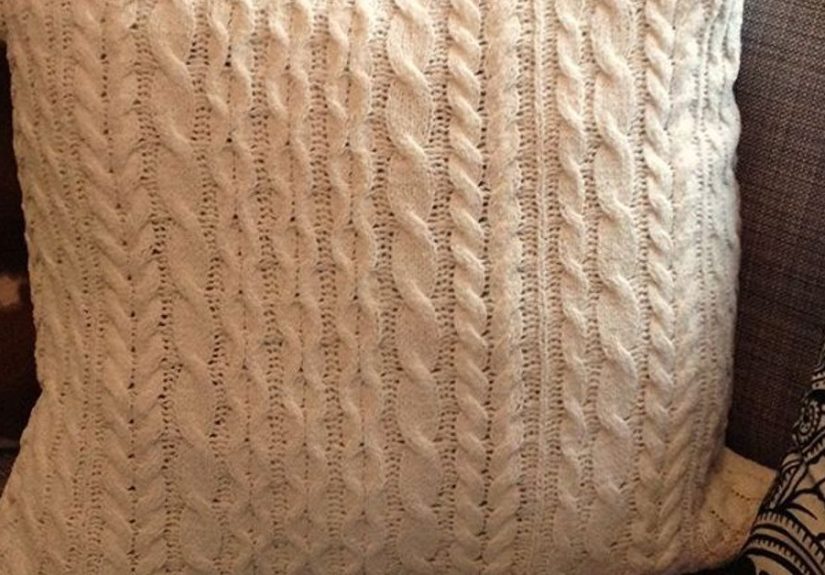
Sweater pillows look high-end because they’re all about texture. Cable knits, ribbing, Fair Isle patterns,
and chunky stitches add visual depth that flat fabric can’t fake. They also bring warmth into a room without changing
your entire color paletteespecially if you stick with classic neutrals (cream, oatmeal, charcoal) or rich winter
tones (forest green, burgundy, navy).
On the practical side, sweater covers are cozy against skin, forgiving with wrinkles, and excellent at hiding minor
“oops” moments. A slightly imperfect seam on a knit? That’s not a mistakethat’s artisanal charm. (Fine, it’s a
mistake. But it’s a charming one.)
Pick the Right Sweater
Best knits for a cozy sweater pillow
- Chunky or medium knits (cable knit, fisherman, ribbed): texture reads well from across the room.
- Wool or wool-blends: great for felting (shrinking) into a sturdier fabric if you want less stretch.
- Cotton sweaters: breathable and easy to sew, usually less “springy” than acrylic.
- Cardigans with buttons: built-in closure = fewer steps and a cute “tailored” back.
When to consider felting a wool sweater
If your sweater is mostly wool and you want a tighter, sturdier fabric (less stretch, fewer runs), felting is a smart
move. Felting happens when wool fibers are exposed to heat, moisture, and agitation, causing them to shrink and lock
together. The result feels more like a thick, dense fabricexcellent for crisp pillow edges and durability.
If you love the drapey, soft stretch of the knit as-is, skip felting and use stabilization (interfacing or lining)
instead. Both paths workit’s just a matter of whether you want “sweater squish” or “structured cozy.”
What You’ll Need
- 1 old sweater (clean and fully dry)
- Pillow insert or pillow form (common sizes: 16×16, 18×18, 20×20)
- Fabric scissors (or a rotary cutter + mat if you’re feeling fancy)
- Straight pins or clips
- Sewing machine (recommended) or hand-sewing needle
- Thread (polyester thread handles stretch well)
- Optional but helpful: lightweight fusible interfacing, a zipper foot or walking foot
- For no-sew: fabric glue or iron-on hemming tape
Safety note: If you’re using an iron, hot glue, or sharp tools, work on a clear surface and take your time. Cozy should
be the vibenot “why does my pillow smell like regret?”
Size, Inserts, and the Secret to a Plump Pillow
A sweater pillow can be a cover (removable, washable-ish) or a sealed pillow (stuffed
and sewn shut). Covers are more flexible: you can swap them seasonally and wash the insert separately.
Insert sizing: match or size up?
Many home stylists recommend sizing the insert 1–2 inches larger than the cover for a fuller, more
“finished” lookespecially when the outer fabric is sturdy enough to hold shape. If your sweater is very stretchy,
match sizes to avoid distortion. If it’s felted or stabilized, sizing up can look extra plush.
Quick measuring rule
- Measure your pillow insert width and height.
- Add seam allowance (usually 1/2 inch on each side).
- If the sweater stretches a lot, consider adding a lining or interfacing so the cover doesn’t grow over time.
Method 1: The Classic Sewn Sweater Pillow Cover (Envelope Back)
An envelope closure is beginner-friendly: no zipper, no buttonholes, no mysterious hardware. It’s also the easiest way
to remove the cover later.
Step-by-step
-
Prep the sweater. Turn it inside out and lay it flat. Smooth the knit, but don’t stretch it.
If the sweater has a great feature (a cable panel, motif, or stripe), center it where you want the pillow front. -
Cut the front. Cut a square/rectangle for the pillow front based on your insert size plus seam
allowance. Example: for an 18×18 insert, cut about 19×19 if using 1/2-inch seams. -
Cut the back pieces. For envelope backs, cut two overlapping rectangles:
- Back piece A: same width as the front, about 2/3 of the height.
- Back piece B: same width as the front, about 2/3 of the height.
The overlap creates the envelope opening.
-
Stabilize if needed. If the sweater knit is loose or stretchy, fuse lightweight interfacing to the
wrong side of the pieces. This helps prevent shifting and stretching while sewing and keeps corners crisp. -
Hem the envelope edges. On each back piece, finish the inner edge (the edge that will overlap).
You can fold it over and zigzag stitch, use seam binding, or add a simple knit-friendly hem. -
Assemble. Place the front piece right-side up. Lay back piece A right-side down on top, aligned at
edges. Then add back piece B right-side down, overlapping the first. Pin or clip around the perimeter. -
Sew with a stretch-friendly stitch. Use a narrow zigzag or stretch stitch so the seam can flex with
the knit. Sew around all four sides. -
Reinforce corners. Backstitch at corners, and consider a second line of stitching 1/8 inch inside
the first for durability. -
Turn and insert. Trim bulky seam allowance if needed, turn right-side out, poke corners gently, and
insert the pillow form.
Method 2: The Cardigan/Button Hack (A Cozy Shortcut)
If your sweater is a cardigan, you’re holding the crafting equivalent of a cheat code. Use the button placket as a
built-in closureeasy removal, and it looks intentional (like you bought it from a boutique that also sells $14 candles
called “Winter Whisper”).
How it works
- Button the cardigan and turn it inside out.
- Slide your pillow insert inside to preview placement.
- Pin around the insert, then remove the insert and sew along the pinned line.
- Trim excess with seam allowance, reinforce seams, then turn right-side out and reinsert the pillow.
Method 3: No-Sew Sweater Pillow (Yes, Really)
If sewing isn’t your thing (or your machine is currently serving as a very expensive shelf), you can still make a cozy
sweater pillow. The key is using a sweater with a tighter knit or felting a wool sweater first, so it doesn’t unravel
easily.
No-sew options
- Fabric glue: Glue seams inside-out, clamp with clips, let fully cure, then turn right-side out.
- Iron-on hemming tape: Fold edges and fuse with an iron (great for clean, flat seams).
- Hand tie closure: Cut fringe along the opening and tie knots (works best on felted wool).
No-sew is best for decorative pillows that won’t be aggressively pillow-fought. If your living room regularly turns into
a soft-object Olympics, sewing will hold up better.
How to Keep Knit Fabric from Stretching (and Other Pillow Crimes)
Stabilize the sweater
Knits stretch. That’s their job. Your job is telling them, kindly but firmly, to stay put while you sew. Lightweight
fusible interfacing is the easiest way to make sweater fabric behave. If you don’t have interfacing, a thin woven lining
fabric can also add structure.
Use the right stitch
A straight stitch can pop when a knit flexes. A narrow zigzag or stretch stitch holds better and keeps seams from
snapping under pressure (like when someone does a dramatic “fall onto the couch” move).
Don’t tug while sewing
Let the machine feed the fabric. Pulling creates ripples and stretched-out edges. If you have a walking foot, it helps
feed top and bottom layers evenly, especially with thicker knits.
Trim bulk for smoother corners
Chunky sweaters can build up thick seams at corners. Trim seam allowances carefully and clip corners (without cutting
through stitching) so the pillow turns neatly.
Design Ideas That Look Custom (Not Craft-Table Chaos)
Center a statement knit
Cable knit down the middle or a Fair Isle band across the front makes the pillow look intentional. Align the pattern
before cutting so the design sits square on the insert.
Add contrast backing
Pair a textured sweater front with a cotton canvas, denim, or flannel back for a sturdier cover. This is especially
useful if the sweater front is beautiful but the back of the sweater is thin or pilled.
Use elbow patches (on a pillow!)
Those suede-looking elbow patches? Put them where hands naturally grab the pillow. It adds charm and extra reinforcement.
Try a zipper if you want a crisp finish
A hidden zipper looks polished and keeps the cover snug. If zippers make you nervous, envelope backs are still totally
“real DIY”and significantly less likely to cause muttered speeches to your sewing machine.
Care Tips: Keeping Your Cozy Sweater Pillow Looking Fresh
- Spot clean first. Most sweater pillows do best with gentle spot cleaning and air drying.
- Removable cover wins. If you made a cover, you can wash it more safely than a fully stuffed pillow.
-
Wool caution. Wool can shrink or felt with heat and agitation. If you wash a wool cover, use cool water
and gentle handling, then dry flat to maintain shape. -
Reduce itch. If a wool sweater feels scratchy, gentle soaking methods sometimes help soften fibers,
but always test carefully on the specific material.
FAQ
Do I need to line a sweater pillow cover?
Not always. Lining or interfacing is most helpful for loose knits, very stretchy sweaters, or when you want sharp edges
and long-lasting shape. For tighter knits (or felted wool), you can often skip it.
What if my sweater is too small for my pillow insert?
Use the sweater front as the pillow front and add a coordinating fabric back. Or make a smaller pillow (lumbar inserts
are great for this). Another option: piece two sweater sections together for a patchwork look.
Will the sweater unravel when I cut it?
Some sweaters unravel more than others. Tighter knits and felted wool are safer. If you’re worried, zigzag stitch around
the cut edges before assembling, or use interfacing/lining to stabilize the knit.
How long does this project take?
With basic sewing, many people finish a sweater pillow cover in under an hourespecially if you’re using an envelope
back or a cardigan closure. Add time if you’re felting, lining, or adding extras like zippers and trim.
Conclusion
A cozy sweater pillow is one of the most satisfying upcycles you can make: it’s practical, affordable,
and instantly warms up a room. Whether you go envelope-back simple, cardigan-button clever, or no-sew brave, the end
result is a soft, textured accent that feels like winter comfortwithout forcing you to actually wear that one sweater
with the suspiciously long sleeves.
Choose a sweater you love, stabilize the knit if it’s stretchy, use a stitch that can flex, and don’t be afraid to size
your insert for that plush “store-bought” look. Then toss it on the couch and enjoy the rare thrill of home décor that’s
both cute and secretly sentimental.
Experiences: What Making a Cozy Sweater Pillow Teaches You (the Fun Way)
People who make their first sweater pillow almost always have the same moment halfway through: a mix of triumph and
confusion, like “Wow, I’m really doing this,” followed immediately by “Why is my pillow shaped like a trapezoid?”
That’s normal. Knits are friendly, but they’re also the soft anarchists of the fabric worldstretching when you least
expect it, curling at edges, and somehow getting bigger the more you try to smooth them.
One common experience is discovering that sweater texture placement matters more than you think. A cable
knit looks gorgeousunless it’s drifting off-center like it missed its bus. Many makers end up learning a simple habit:
before cutting, they fold the sweater in half, find the true center line, and then “audition” the design on the pillow
insert. It’s the crafting version of holding a shirt up in a store mirror and realizing the stripes do something weird
to your soul. Taking two minutes to position the best part of the sweater can make the final pillow look like a curated
piece rather than a “close enough” experiment.
Another real-life lesson: inserts are mood boosters. People often reuse an old, slightly flat insert and
then wonder why their sweater pillow looks tired. Swap in a fuller insert (or size up when the knit is stabilized), and
the pillow suddenly looks crisp and styled. It’s wild how quickly a couch goes from “we live here” to “we host people”
with one plump throw pillow. Many DIYers describe this as the moment they understand why home stores charge what they
chargenot because it’s impossible, but because it’s a bunch of small details done consistently.
If someone tries felting for the first time, the experience is usually equal parts science and suspense. You start with a
sweater that feels roomy and stretchy, and after heat, water, and agitation, it emerges denser and smallerlike it went
through a dramatic personal transformation montage. People learn quickly that felting outcomes can vary: some sweaters
felt evenly and become beautifully sturdy, while others shrink unpredictably or stay stubbornly fuzzy. That’s why many
crafters test with thrifted wool first, then “graduate” to a sentimental sweater once they know how their machine behaves.
Makers also talk about the emotional side of the project more than you’d expect. A sweater pillow can be purely practical
(hello, thrift-store cashmere look-alike), but it can also be a memory objectsomething made from a beloved sweater that
doesn’t fit anymore or has a small stain you can cut around. Turning “I can’t wear this” into “I can keep this” feels
surprisingly good. People describe it as decluttering without the heartbreak: you’re not tossing the story, just changing
the format.
Finally, there’s the very relatable “second pillow effect.” The first sweater pillow teaches you the basics. The second
one is where confidence shows up: cleaner seams, better corners, a smarter closure, maybe even a lining. By the third,
you’re eyeing every sweater in the house like, “You’d make a great 18×18.” It’s a cozy craft with an oddly empowering
learning curvebecause the results are immediate, the materials are forgiving, and the finished pillow is something you
actually use. That’s the best kind of DIY: the kind that earns a permanent spot on the couch.