Table of Contents >> Show >> Hide
- Why These Bars Work (A Tiny Bit of Dessert Science)
- Ingredients You’ll Need (Plus Smart Swaps)
- Tools That Make This Easier
- Creme Brulee Cheesecake Bars Recipe (9×13 Pan)
- Brûlée Tips for a Glassy, Crackly Sugar Top
- Cheesecake Bar Success: The Little Things That Matter
- Troubleshooting (Because Dessert Has Opinions)
- Make-Ahead, Storage, and Freezing
- Flavor Variations (Choose Your Adventure)
- Conclusion: Your New Favorite “Fancy but Not Fussy” Dessert
- of Real-World “Experience” Notes (What Bakers Typically Run Into)
- SEO Tags
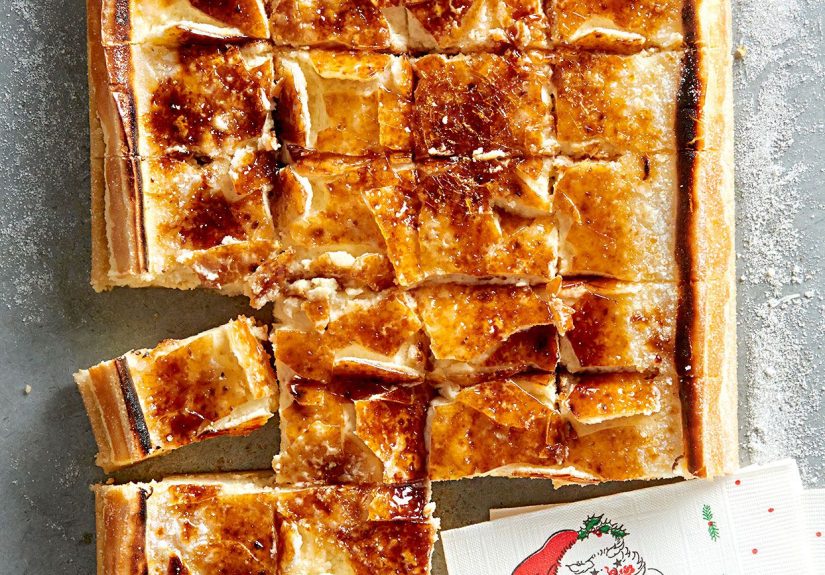
Imagine your favorite cheesecake dressed up as crème brûlée for Halloween… except it’s not Halloween, and it’s not a costume. It’s a full-on glow-up. These creme brulee cheesecake bars have three personalities that get along surprisingly well: a buttery graham cracker crust, a rich vanilla cheesecake layer, and a crackly caramelized sugar top that snaps like thin glass. (Yes, you get to “break” dessert on purpose. Highly recommended for stress management.)
This guide gives you a reliable, bakery-style crème brûlée cheesecake bars recipe with the real-world details that matter: how to avoid lumpy batter, how to bake so the center stays creamy, and how to brûlée without turning your cheesecake into soup. Torch preferred. Broiler accepted. Kitchen drama encouraged.
Why These Bars Work (A Tiny Bit of Dessert Science)
1) Cheesecake likes gentle heat
Cheesecake is basically a custard wearing a cream cheese sweater. It wants low, steady heat so the eggs set smoothly. Too hot and it puffs, cracks, and then collapses like it just remembered an embarrassing middle school moment. Gentle baking + slow cooling = creamy texture and clean slices.
2) Crème brûlée topping needs the bars to be cold
The sugar topping caramelizes fast, but the cheesecake underneath melts if you hang around too long with heat. So the winning strategy is: make bars very cold, add sugar, brûlée quickly, serve proudly.
3) Bars are easier than a tall cheesecake
A 9×13 pan means more surface area, quicker chill time, and built-in portion control. (Portion control meaning: you can cut smaller bars… and then go back for “just one more,” which is emotionally correct.)
Ingredients You’ll Need (Plus Smart Swaps)
For the crust
- Graham cracker crumbs for that classic cheesecake vibe
- Butter to glue everything together in the most delicious way
- Sugar for structure + a little crispness
- Salt because dessert without salt is just sweet sadness
Swap ideas: Use vanilla wafers, digestive biscuits, or chocolate cookies for a different base. Gluten-free crumbs work too.
For the cheesecake layer
- Full-fat cream cheese (softened) for the smoothest texture
- Granulated sugar for clean sweetness
- Sour cream (or Greek yogurt) for tang + silkiness
- Eggs for structure (room temp helps them blend)
- Vanilla (extract, paste, or scraped bean) for crème brûlée energy
- Pinch of salt to sharpen flavor
- Cornstarch (optional) to slightly stabilize and help clean slicing
- Lemon zest (optional) for brightness without tasting “lemony”
For the brûlée topping
- Granulated sugar or superfine sugar for an even melt and crisp snap
- Optional raw sugar (like demerara) for a slightly thicker, crunchier crust
Skip brown sugar (burns fast and can look spotty) and powdered sugar (absorbs moisture and doesn’t caramelize as cleanly). You want a sugar layer that melts evenly and turns glassy.
Tools That Make This Easier
- 9×13 metal baking pan (metal bakes more evenly than glass for bars)
- Parchment paper (make a “sling” for easy lifting)
- Hand mixer or stand mixer (low speed is your friend)
- Kitchen torch (best brûlée results, plus it’s objectively fun)
- Optional: roasting pan + hot water for a water bath, instant-read thermometer, offset spatula
Creme Brulee Cheesecake Bars Recipe (9×13 Pan)
Quick Recipe Details
- Yield: 16 bars (or 24 smaller party bars)
- Prep time: ~25 minutes
- Bake time: 40–50 minutes
- Chill time: 6–8 hours (overnight is best)
- Brûlée time: 5 minutes right before serving
Ingredients
Crust
- 2 cups graham cracker crumbs (about 14–16 full sheets)
- 2 tablespoons granulated sugar
- 1/4 teaspoon fine salt
- 10 tablespoons (1 stick + 2 tbsp) unsalted butter, melted
Cheesecake Layer
- 32 ounces (4 blocks) full-fat cream cheese, softened to room temperature
- 1 cup granulated sugar
- 2 tablespoons cornstarch (optional, for cleaner slicing)
- 1/2 teaspoon fine salt
- 1 cup sour cream (room temp)
- 2 teaspoons vanilla extract (or 1–2 teaspoons vanilla bean paste)
- 4 large eggs, room temperature
- Optional: 1 teaspoon lemon zest
Brûlée Topping
- 1/3 to 1/2 cup granulated or superfine sugar (enough for a thin, even layer)
Instructions
- Prep your pan and oven. Preheat oven to 325°F. Line a 9×13 pan with parchment paper, leaving overhang on two sides so you can lift the bars out later. Lightly grease the parchment and any exposed pan sides.
- Make the crust. Mix graham crumbs, sugar, and salt. Stir in melted butter until the mixture resembles wet sand. Press firmly into the bottom of the pan (a flat-bottom cup works great). Bake for 8–10 minutes, then set aside while you make the filling.
- Lower the drama: beat cream cheese gently. In a large bowl, beat softened cream cheese on low until smoothno big air bubbles, no marathon mixing. Add sugar, cornstarch (if using), and salt. Mix just until combined.
- Add the creamy stuff. Mix in sour cream and vanilla (and lemon zest if you want that subtle brightness). Scrape the bowl. This is not optionalthis is “future-you wants smooth bars” insurance.
- Add eggs last (and slowly). Add eggs one at a time on low speed, mixing only until each disappears. Overmixing = extra air = puffing + cracking. We’re not making cheesecake soufflé today.
- Bake. Pour filling over the crust and smooth the top. Bake at 325°F for 40–50 minutes until the edges look set and the center still has a gentle jiggle (think: Jell-O that’s trying to be subtle).
Optional moisture hack: Place a separate pan of hot water on the lower rack to add steam. If you want a true water bath, wrap your cheesecake pan’s outside with heavy-duty foil and set it in a larger roasting pan with hot water halfway up the sides (more effort, very smooth results).
- Cool slowly. Turn off the oven, crack the door open slightly, and let the bars sit for 20 minutes. Then move the pan to a rack and cool to room temperature.
- Chill like you mean it. Cover and refrigerate for at least 6–8 hours, preferably overnight. Cold cheesecake slices cleanly and survives the brûlée step without melting into a puddle of regret.
- Lift and slice. Use the parchment sling to lift the slab onto a cutting board. For neat edges, run a long knife under hot water, wipe dry, slice, and wipe between cuts.
- Brûlée the tops (right before serving). Arrange bars on a heat-safe surface (a metal sheet pan is perfect). Sprinkle a thin, even layer of sugar over each bar.
Torch method (best): Torch in small circles, moving constantly, until sugar melts and turns deep golden. Let sit for 2–3 minutes to harden.
Broiler method (works in a pinch): Freeze bars for 10 minutes, then sugar them. Broil on high with the rack positioned so the tops are several inches from heat. Watch nonstopcaramelization can go from “golden” to “oops” fast. Let crust harden briefly, then serve.
Brûlée Tips for a Glassy, Crackly Sugar Top
Keep the sugar layer thin
Too thick and it becomes jaw-resistant candy. Too thin and you get sad sugar freckles. Aim for an even dusting that fully covers the top.
Start with cold bars
Cheesecake is happiest cold before torching. If your kitchen is warm (or your torch enthusiasm is intense), pop the sliced bars in the freezer for 10 minutes before brûléeing.
Move the flame, don’t camp there
The goal is caramelizing sugar, not roasting cheesecake. Keep the torch moving in small circles until the surface turns amber. Let it set for a couple minutesthe “snap” shows up as it cools.
Cheesecake Bar Success: The Little Things That Matter
Room-temperature ingredients = smoother batter
Softened cream cheese and room-temp eggs blend without lumps. Cold cream cheese fights back and leaves chunks. (And cheesecake chunks are not the fun kind of chunks.)
Don’t overmix
Mixing whips air into batter. Air expands in the oven, then collapses as it cools, which can lead to cracks. Low speed, minimal mixing, scrape the bowl, and call it a day.
Stop baking while the center still jiggles
Cheesecake finishes setting as it cools. Overbaking makes it dry and more likely to crack. If the edges are set and the center moves slightly, you’re in the sweet spot.
Troubleshooting (Because Dessert Has Opinions)
“My cheesecake cracked!”
Common culprits: overmixing, overbaking, rapid cooling, or oven temperature swings. The good news? You’re literally covering the top with caramelized sugar. Your secret is safe.
“My brûlée topping got sticky.”
Sugar absorbs moisture from the cheesecake and the air. Brûlée right before serving. If you need to wait, keep bars uncovered in the fridge briefly so the top stays dry.
“The crust is crumbly.”
Press harder and make sure crumbs are evenly coated with butter. Prebaking the crust also helps it hold together.
“The bars are too soft to cut.”
They need more chill time. Cheesecake bars are a “tomorrow dessert” pretending to be a “right now dessert.” Chill overnight for the cleanest slices.
Make-Ahead, Storage, and Freezing
- Make-ahead: Bake and chill the bars up to 2–3 days in advance. Brûlée right before serving.
- Store: Keep bars covered in the fridge for up to 4–5 days (skip the brûlée top until serving).
- Freeze: Freeze un-brûléed bars (wrapped well) up to 2–3 months. Thaw overnight in the fridge, then brûlée.
Flavor Variations (Choose Your Adventure)
Vanilla bean deluxe
Add vanilla bean paste or scraped vanilla bean seeds for a classic crème brûlée aroma.
Espresso brûlée bars
Mix 1–2 teaspoons instant espresso powder into the sugar or add it to the cheesecake batter for coffee-caramel vibes.
Citrus pop
Orange zest in the filling + a pinch of salt in the brûlée sugar makes the top taste even more caramel-forward.
Chocolate cookie crust
Swap graham crumbs for chocolate wafer crumbs. The brûlée topping becomes “crunchy caramel brownie hat.”
Conclusion: Your New Favorite “Fancy but Not Fussy” Dessert
Creme brulee cheesecake bars are the kind of dessert that looks like you trained in Paris but actually just learned the sacred art of chilling something overnight and setting sugar on fire safely. Get the bars cold, keep mixing gentle, bake until barely set, and brûlée right before serving. You’ll end up with creamy cheesecake squares and that signature caramel crunch that makes people go quiet for a second the highest compliment a dessert can receive.
of Real-World “Experience” Notes (What Bakers Typically Run Into)
Most people’s first experience with creme brulee cheesecake bars goes like this: confidence during crust-making, mild panic during cheesecake baking (“Is it supposed to jiggle like that?”), pure joy during chilling (“I did nothing for hours!”), and then absolute power when the torch comes out. The torch is the emotional climax of the recipe. It’s also where a few common, totally fixable surprises show up.
One big “aha” moment for home bakers is realizing the cheesecake isn’t truly done when it looks done. Bars should come out when the edges are set and the middle still wobbles slightly. The center firms as it cools, and the chill time is what turns it from “soft cake” into that dense, creamy cheesecake texture. People who rush the chill often end up with messy slices and think they did something wrongwhen really, the refrigerator just hadn’t finished its shift.
Another very common experience: you’ll swear you mixed “just until combined,” and then notice tiny bubbles on top after baking. That’s normal. Cheesecake batter loves trapping air. The trick that many bakers adopt after a first attempt is lowering the mixer speed to almost comically slow and scraping the bowl more often. It feels like you’re doing less work (because you are), and somehow the result looks more professional. Dessert is unfair like that.
Cutting is its own mini skill. The first slice is always the messiest because it’s the “test slice” (scientific necessity). Most bakers report the cleanest cuts when they use a long knife warmed with hot water, wiped dry, then cleaned between every cut. It sounds extra… until you see those tidy bakery squares and realize you’ve become the kind of person who wipes a knife for dessert aesthetics.
Now, the brûlée top: the first time you sprinkle sugar, you may go too thick because you want a dramatic crunch. Then you torch it and it turns into a hard, tooth-stopping caramel shell. The learning curve is quick, though: thin and even beats thick and heroic. A second light sugar layer (torch, cool, sugar again, torch again) can give you more crunch without the jaw workout. Also, a lot of people discover that cold bars are the secret weaponsome even chill slices in the freezer for 10 minutes before torching. That short freeze protects the cheesecake from heat, especially if you’re new to torch technique and tend to linger.
Finally, serving for a crowd is where these bars shine. Bakers love that they can make the slab the day before, slice it when it’s fully chilled, and then brûlée in batches right before guests arrive. The caramel crust is at its best minutes after torchingsnappy, shiny, and loud in the most satisfying way. It’s the rare dessert that rewards planning and gives you a theatrical finish. People will hover when they see the flame. Let them. Dessert should have fans.