Table of Contents >> Show >> Hide
- Why a Covered Firewood Rack Beats a Simple Wood Pile
- Planning Your DIY Firewood Rack With Roof
- Tools and Materials Checklist
- How to Build a DIY Firewood Rack With Roof: Step-by-Step
- How to Stack Firewood in Your New Rack
- Design Ideas and Smart Upgrades
- Common Mistakes to Avoid
- Long-Term Maintenance Tips
- Real-World Experiences: Lessons From Building a DIY Firewood Rack With Roof
- Conclusion: Build It Once, Enjoy It Every Season
If you’ve ever walked outside on a chilly evening, grabbed a log, and realized it’s basically a
cold, soggy sponge, you already know why a DIY firewood rack with a roof is a
must-have. A good rack doesn’t just look nice next to your home it keeps your wood dry, lets
air circulate, and makes your life way easier when it’s time to light a fire.
Instead of buying an expensive pre-made rack or stacking wood in a sad, collapsing pile next to
the garage, you can build a covered firewood rack that fits your space, your
budget, and your style. In this guide, we’ll walk through planning, materials, step-by-step
building instructions, smart upgrades, and real-life lessons learned so you can build it once
and enjoy it for years.
Why a Covered Firewood Rack Beats a Simple Wood Pile
Firewood that’s properly stored burns hotter, cleaner, and more efficiently. A rack with a small
roof is one of the best ways to protect your investment in wood and your time.
Keep the wood dry where it matters most
Firewood storage experts generally recommend covering the top of the pile while
keeping the sides open. That way, rain and snow can’t soak the wood from above, but air can
still move freely around the logs so they dry out instead of mold. A simple roof does this far
better than wrapping the entire stack in a tarp, which often traps moisture and leads to rot.
Get the wood off the ground
One of the biggest mistakes people make is stacking logs directly on soil or grass. That’s an
open invitation for moisture, insects, and decay. A raised firewood rack keeps
the bottom layer dry, stable, and easier to grab. Even just 4–6 inches of air gap under the
wood makes a big difference in drying and lifespan.
Stay organized and safe
A dedicated outdoor firewood storage rack:
- Prevents the pile from toppling onto kids, pets, or your shins.
- Makes it easy to see how much fuel you actually have.
- Helps you rotate old wood to the front and new wood to the back.
- Looks a whole lot better than a random leaning tower of logs.
Planning Your DIY Firewood Rack With Roof
Before you make your first cut, take a few minutes to plan. It doesn’t have to be fancy a
quick sketch and some measurements are enough to avoid headaches later.
Step 1: Choose the right size
Think about how you’ll actually use the wood:
-
Occasional fires: A small rack about 4 ft wide and 2 ft deep is usually
enough to hold a nice stash close to the house. -
Daily heating: If you rely on wood as a primary heat source, you’ll want
something longer 8 ft or more or multiple racks so you can store a half-cord or full cord.
As a rule of thumb, a standard log-length rack about 4 ft high and 8 ft long will store roughly
half a cord of wood when neatly stacked.
Step 2: Pick a smart location
Aim for:
- Good air flow: A breezy spot helps wood season faster.
-
Some sun, but not too close to the house: Keep wood at least a few inches
away from siding and a safe distance from doors and windows to reduce pests. -
A solid, level base: Gravel is ideal; it drains well and discourages weeds
and mud.
Step 3: Choose materials that can handle the weather
For a classic DIY build, you’ll typically use:
-
Pressure-treated 2x4s or 4x4s for the base and posts to resist moisture and
insects. - Deck screws or exterior structural screws for strength and weather resistance.
- Metal roofing panels or exterior-grade plywood plus shingles for the roof.
- Concrete blocks or pavers under the base if your ground is uneven or soft.
You can absolutely build a budget version using reclaimed lumber or pallets, but inspect them
carefully for rot, nails, and structural issues before trusting them to hold hundreds of pounds
of wood.
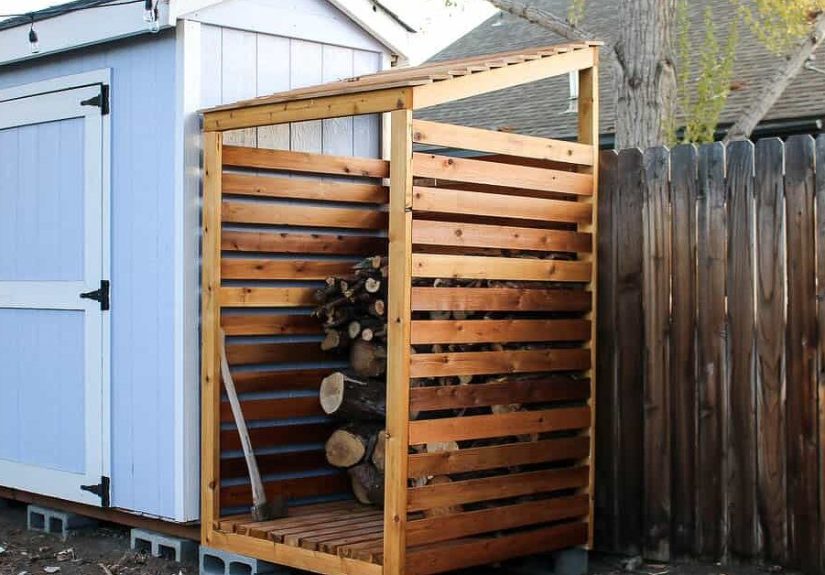
Tools and Materials Checklist
Here’s a sample list for a covered rack around 4 ft wide, 2 ft deep, and 5–6 ft tall at the
peak:
Materials
- 4 pieces of 2×4 for the base frame (two at 48″, two at 24″).
- 4–6 vertical posts (2×4 or 4×4) for uprights, about 5–6 ft tall.
- 2–3 horizontal braces for the back to keep the uprights rigid.
- 2 rafters or 2×4 roof supports with a slight pitch.
- 1 sheet of corrugated metal roofing or cut-to-size roofing panels.
- Exterior-grade screws (deck or structural screws).
- Optional: joist hangers, corner brackets, stain or exterior paint.
- Concrete blocks or pavers to support the base.
Tools
- Circular saw or miter saw.
- Drill/driver with bits.
- Measuring tape and pencil.
- Speed square and level.
- Safety gear: safety glasses, work gloves, hearing protection.
- Metal snips if you’re cutting metal roofing.
How to Build a DIY Firewood Rack With Roof: Step-by-Step
1. Prepare the base
Start by leveling the area where the rack will sit. Rake out debris, then lay down a few inches
of gravel if possible. Place concrete blocks or pavers at the corners (and center, if the rack
is long) to keep the wooden base off the ground.
Build a simple rectangular base frame by screwing the 2x4s together: the longer boards on the
front and back, shorter boards on the sides. Use two screws at each joint and check for square
by measuring diagonally from corner to corner.
2. Add vertical supports
Next, stand your uprights at each corner of the base and secure them with screws driven through
the base frame into the posts. For a wider rack, you can add extra uprights in the middle for
strength.
To keep things rigid, add horizontal braces across the back one near the bottom, one in the
middle, and one near the top. This prevents the structure from racking (twisting out of square)
once it’s loaded with logs.
3. Create the roof frame
A simple single-slope (shed-style) roof is easiest to build. Make the back posts slightly taller
than the front posts or attach a 2×4 “riser” along the back to create a pitch. Even a few inches
of height difference will help water run off.
Attach 2×4 roof rafters from front to back, securing them with screws or metal brackets. The
rafters should overhang the rack by at least 6–12 inches on the front and back to keep rain off
the stack below.
4. Install the roof
Lay your metal roofing panel or cut plywood on top of the rafters. If you use metal, pre-drill
holes and fasten with roofing screws that include rubber washers. If you use plywood, cover it
with roofing felt and shingles or roll roofing.
Make sure there’s a slight overhang on all sides. This helps water drip away from the rack,
instead of running down the posts and into the wood.
5. Add side rails or slats (optional but helpful)
You can leave the sides mostly open for airflow, but simple rails keep logs from spilling out.
Install a couple of horizontal 2×2 or 2×4 slats along each side, leaving gaps between them.
Some DIYers like to leave the front completely open and add a few slats across the back only.
This works well if your rack is against a fence or wall.
6. Finish and protect the wood
Once the structure is complete, sand any rough spots and apply an exterior stain or sealer.
This step isn’t mandatory with pressure-treated lumber, but it improves appearance and extends
the life of your rack.
How to Stack Firewood in Your New Rack
A great rack deserves a good stack. Here are a few simple tips:
-
Bark side up: For wood that’s still seasoning, place logs bark-side up so the
exposed surface can dry faster. -
Crisscross the ends: At the ends of your stack, alternate log directions to
create a stable “crib” that locks the pile in place. -
Leave a little space: Don’t pack the logs as tightly as Tetris pieces. Tiny
gaps allow air to move through the stack. -
Rotate by age: Keep older, seasoned wood toward the front and newer wood
toward the back so you burn the driest logs first.
Design Ideas and Smart Upgrades
Upgrade 1: Extended overhangs
Extending the roof 12 inches or more on each side gives extra protection from wind-driven rain
and snow. This small tweak can significantly reduce how often you have to brush off wet logs.
Upgrade 2: Split-level storage
If you have a mix of kindling, small splits, and big rounds, add a small raised shelf or
compartment at one end for kindling and fire starters. You’ll thank yourself on cold nights when
you don’t have to dig for tiny pieces.
Upgrade 3: Decorative touches
You can give your DIY firewood rack a custom look with:
- Diagonal braces or X-shaped side panels.
- Painted trim that matches your house or shed.
- Hooks on the ends for hanging tools, gloves, or a small broom.
- A sign or house number on the front beam.
Common Mistakes to Avoid
-
Building too low: If the rack is too short, you’ll constantly bend over to
grab logs. Aim for a comfortable height for stacking and reaching. -
No airflow underneath: Skip the solid deck floor; leave gaps or use spaced
boards so air can dry the bottom row. -
Too close to the house: Storing wood right against your home can invite
insects. Keep a small gap and follow local fire-safety guidelines. -
Oversized roof with weak structure: If you build a wide roof, make sure the
uprights and braces can support snow and wind loads in your area.
Long-Term Maintenance Tips
Your covered firewood rack doesn’t need much maintenance, but a little attention each season
keeps it in top shape:
- Check screws and fasteners annually and tighten anything that’s worked loose.
- Inspect the roof for rust, cracks, or missing shingles.
- Reapply stain or sealer every few years if the wood begins to gray or crack.
- Remove leaves, debris, and snow buildup around the base so moisture doesn’t linger.
Real-World Experiences: Lessons From Building a DIY Firewood Rack With Roof
When you start browsing projects like “DIY Firewood Rack With Roof | Hometalk,” it’s easy to get
inspired and a little overconfident. The photos look clean, the cuts look straight, and
everything seems to go together in a single afternoon. In reality, most DIYers learn a few
memorable lessons along the way.
One common experience is underestimating weight. Fresh firewood is heavy. Once the rack is
loaded, every screw, joint, and brace is under stress. Many people build a simple open frame,
stack a full load of logs, and then watch as the uprights slowly bow forward over the winter.
The fix is almost always more bracing than you think: extra back slats, diagonal braces at the
corners, and an occasional center post on longer racks. A little overbuilding up front saves you
from rebuilding in the cold later.
Another lesson is about roof overhang. On paper, a small roof that lines up with the edges of
the rack seems tidy and efficient. After the first sideways rain, however, you discover that the
top rows of logs are still getting wet not as bad as before, but damp enough to be annoying.
That’s when people usually go back and extend the roof a few inches or add a drip edge so water
doesn’t curl back under. Most seasoned DIYers will tell you: go a little bigger on the overhang
than you think you need, especially on the front.
A lot of homeowners also share stories about location regrets. The rack starts its life tucked
neatly beside the back door for convenience. A season later, they notice carpenter ants,
spiders, and other critters really like that cozy firewood condo right next to the siding.
Moving a fully loaded rack is no fun, so it’s better to think this through early. Many people
end up placing their firewood rack a short walk away, somewhere with decent sun and breeze, then
using a small indoor rack or basket near the fireplace for day-to-day use.
There’s also the “I’ll just throw down a couple of boards” crowd. It starts with good
intentions: you lay a few scrap boards on the ground, build the rack on top, and assume it’ll be
fine. Then the ground settles, one corner dips, and your nice straight stack leans just a little
more each week. DIYers who’ve made this mistake often recommend spending the extra few minutes
to level the area and use blocks, pavers, or a gravel pad. It doesn’t have to be perfect, but a
mostly level base makes a huge difference in how long the rack stays solid.
On the positive side, people are often surprised by how customizable these racks are. Once the
basic structure is up, it’s easy to tweak. You can add a small kindling bin, hooks for tools, or
even a little shelf for fire starters. Some folks end up building a second rack just for green
wood that’s still seasoning, keeping seasoned wood in the original rack so they always know
what’s ready to burn.
Probably the biggest “aha” moment many DIYers share is that a covered firewood rack quickly
becomes part of their outdoor routine. In fall, it’s satisfying to see it fill up, row by row.
In winter, grabbing a few dry logs from under the roof feels like a tiny luxury compared to
wrestling with a frozen tarp. By spring, when the rack is mostly empty, you can inspect the
structure, make any tweaks, and feel ready to do it all again next season this time with a bit
more experience and maybe a slightly bigger rack.
Conclusion: Build It Once, Enjoy It Every Season
A DIY firewood rack with roof is one of those projects that pays you back every
time you strike a match. It keeps your firewood dry, organized, and easy to access, all while
looking sharp next to your home or patio. With some basic tools, a weekend of effort, and a bit
of planning, you can build a sturdy rack that fits your space, your climate, and your style.
Whether you follow a full set of plans or sketch your own version inspired by Hometalk projects,
the key ingredients are the same: a solid raised base, strong uprights, a simple pitched roof,
and plenty of airflow. Get those right, and you’ll wonder how you ever lived with soggy, messy
wood piles before.