Table of Contents >> Show >> Hide
- What Counts as “High-Impact” DIY Decor?
- Start With a Plan (So Your DIY Doesn’t Become a Craft Avalanche)
- The DIY Tool Kit That Covers 90% of Home Decor Projects
- DIY Home Decor Ideas by Room
- Upcycling: The DIY Decor Trend That’s Budget-Friendly and Planet-Friendly
- Renter-Friendly DIY Home Decor (Deposit-Safe, Drama-Free)
- How to Make DIY Decor Look Expensive (Even If It Wasn’t)
- Common DIY Home Decor Mistakes (And How to Avoid Them)
- Conclusion
- Experience Notes: What DIYers Learn the Hard Way (and Secretly Love)
- SEO Tags
If you’ve ever looked around your home and thought, “This room has potential… it’s just currently hiding under a pile of meh,” welcome.
DIY home decor is the fastest way to turn “fine” into “wow” without handing over your entire paycheckor your weekends for the next six months.
The real magic isn’t that you can make things cheaper. It’s that you can make them yours: colors you actually like, storage that fits your life,
and details that look custom because (plot twist) they are.
The best DIY home decor projects share three traits: they’re doable, they make a noticeable difference, and they don’t require a garage full of power tools.
In this guide, you’ll get practical ideas by room, renter-friendly tricks, upcycling strategies, and designer-ish “finish” moves that make your DIY look intentionalnot accidental.
Expect specific examples, a little honest humor, and a zero-judgment policy for anyone who owns three different “almost-white” paint samples.
What Counts as “High-Impact” DIY Decor?
Here’s the secret most stylish homes don’t want you to know: a room rarely needs more stuff. It needs better decisions.
High-impact DIY decor focuses on the elements your eyes notice first:
- Color and contrast (paint, textiles, art)
- Lighting (a room can’t look good in bad lightingsorry, it’s science and vibes)
- Scale (tiny art over a giant sofa feels like a postage stamp in a stadium)
- Texture (woven, wood, linen, ceramic, metalmixing textures is the “rich” shortcut)
- Organization (clutter is the enemy of “cozy,” even when it’s “creative clutter”)
Start With a Plan (So Your DIY Doesn’t Become a Craft Avalanche)
1) Pick a “Room Goal” in One Sentence
Not a poem. Not a vision board novella. One sentence:
“I want this living room to feel warm, pulled-together, and easier to tidy.”
That line becomes your filter for every decisionpaint, pillows, shelving, even whether you really need a third basket (you might).
2) Choose a Simple Color Direction
If you’re overwhelmed, choose one neutral + one accent + one “metal.”
Example: warm white walls, dusty blue accents, aged brass hardware. Your DIY projects will instantly look coordinated.
A classic guideline is a balanced mix (often described as 60/30/10) where one color dominates, one supports, and one pops.
You don’t have to measure it with a calculatorjust don’t let your “pop” become a confetti cannon.
3) Measure Before You Make (Future You Will Send a Thank-You Note)
Measure key spots: wall width, sofa length, bed width, entryway depth. This prevents two common DIY tragedies:
the art that’s too small and the shelf that blocks the light switch. Both have happened to good people.
The DIY Tool Kit That Covers 90% of Home Decor Projects
You don’t need a workshop. You need a small squad of reliable tools:
- Tape measure and pencil
- Level (crooked frames are the #1 way DIY screams “I panicked.”)
- Hammer, basic screwdrivers, and a small set of wall anchors
- Utility scissors and a box cutter
- Painter’s tape, a small roller, and angled brush
- Sandpaper (or sanding sponge) and a cleaning cloth
- Command-style hanging strips for renter-friendly art and organization
Add a cordless drill if you can. It’s the most confidence-boosting tool in the DIY universeright up until you realize you now want to install shelves everywhere.
DIY Home Decor Ideas by Room
Living Room: The “Most Seen, Most Judged” Space
Living rooms benefit most from DIY projects that improve comfort, style, and storage at the same time.
-
DIY gallery wall (without the chaos):
Lay frames on the floor first and build a tight cluster.
Keep spacing consistent (about 2–3 inches between frames is a common sweet spot). Mix sizes, but repeat at least one frame finish to unify it.
Tip: hang the center of the arrangement roughly at eye level (around 57–60 inches from the floor) for a “designed” look. -
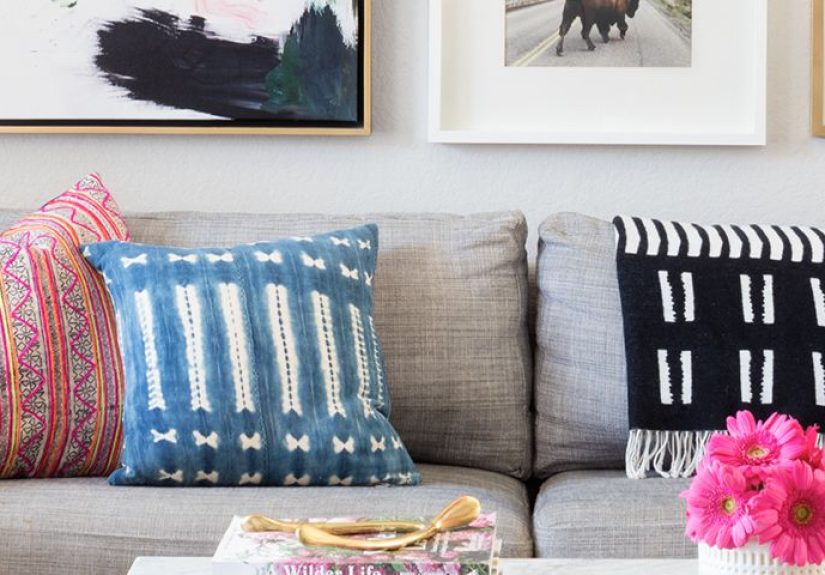
Upgrade throw pillows the smart way:
Don’t buy new inserts every time. Buy covers.
Mix textures (linen + knit + velvet) and vary sizes (like two larger pillows + one lumbar).
This is the easiest “new room” feeling for minimal effort. -
Paint a thrifted side table:
Clean, lightly sand, prime if needed, then paint.
A classic move: matte or satin black with updated knobs in a warm metal.
It reads “high-end” because contrast is doing the heavy lifting. -
Create a “corral” for clutter:
A DIY tray (wood, thrifted frame turned tray, or even a sturdy serving tray) organizes remotes, coasters, and candles into one intentional zone.
Your coffee table stops looking like a lost-and-found. -
Lighting swap that doesn’t require rewiring:
Use plug-in sconces, battery-operated picture lights, or upgraded lampshades.
Lighting is a decor multiplier: the same room can look “designer” or “dentist waiting room” depending on the glow.
Bedroom: Calm, Cozy, and Not a Laundry Museum
-
Upholstered headboard hack:
Use a plywood panel cut to size, add foam + batting, then staple fabric tightly on the back.
Mount it behind the bed or lean it for a softer look.
Choose a neutral fabric for longevity, or a patterned one if you’re brave and committed (respect). -
Peel-and-stick accent wall:
Great for renters and indecisive redecorators.
Try it behind the bed for maximum impact.
Pro tip: smoother walls make installation easier; textured walls can be trickier. -
“Hotel” bedside styling:
DIY a pair of matching lamps (or just matching shades), add a small tray for jewelry, and keep one intentional book or vase.
The goal is curated, not crowded. -
No-drill canopy vibe:
Use ceiling-safe hooks or a tension rod approach (depending on your space and rules) to hang lightweight curtains for softness.
It can feel dreamy without permanent changes.
Kitchen & Dining: Small Changes, Big Payoff
-
Swap cabinet hardware:
This is basically jewelry for your kitchen.
Choose one metal finish and keep it consistent.
Measure existing hole spacing to avoid extra drilling (unless you enjoy pain). -
Peel-and-stick backsplash:
A weekend project that adds pattern and “finished” energy.
Choose a design that complements counters and cabinets rather than competing with them. -
Open-shelf styling (without the dust shrine):
Limit to everyday items you actually use.
Group by color or material (all white dishes, or all wood boards) to keep it calm. -
Dining table refresh:
DIY a centerpiece using a shallow bowl + seasonal stems + a candle.
The trick is low (so people can see each other) and not overly precious (so you’ll keep it).
Bathroom: Make It Feel Like a Boutique Hotel, Not a Panic Closet
-
Frame the mirror:
A simple DIY frame can turn a basic builder mirror into a statement.
If you don’t want to commit, add better lighting and matching accessories to get a similar “upgrade” feel. -
Over-toilet storage that looks intentional:
Use shelves or a slim cabinet and add matching jars/baskets.
Labeling can look cute and keep things functional. -
Textiles that do the work:
Coordinated towels + a washable bath mat + a shower curtain with texture equals instant refresh.
Choose a curtain that’s long enoughtoo short looks accidental.
Entryway: The First Impression Zone
-
DIY key + mail station:
A small board with hooks, a basket for mail, and a tiny ledge for sunglasses.
If you never lose your keys again, that’s basically a miracle. -
Shoe control system:
Use baskets, a slim rack, or a bench with storage.
The entryway should feel like a welcomenot an obstacle course. -
Statement mirror:
Mirrors bounce light and make tight spaces feel bigger.
Even a thrifted mirror looks elevated with a quick paint update on the frame.
Upcycling: The DIY Decor Trend That’s Budget-Friendly and Planet-Friendly
Upcycling isn’t just “painting everything white.” It’s rethinking what something can be: a basket becomes a plant stand,
an old frame becomes a tray, a dated dresser becomes a bold accent piece.
The best part? Upcycled decor often looks more unique than store-bought because it literally is.
A Simple Furniture Makeover Formula
- Clean thoroughly (grease and dust sabotage paint).
- Lightly sand to help adhesion and smooth rough spots.
- Prime if needed (especially on glossy surfaces or dark stains).
- Paint in thin coats (less dripping, better finish).
- Upgrade hardware for an instant “new piece” effect.
- Seal or protect surfaces that get heavy use.
Example: Turn a thrifted console into an entryway star with a muted green paint, brass pulls, and a woven basket underneath.
Add a lamp and a small tray for keysnow it’s functional and styled.
Renter-Friendly DIY Home Decor (Deposit-Safe, Drama-Free)
Renting doesn’t mean living in a blank box forever. The trick is choosing projects that are removable or reversible:
- Peel-and-stick wallpaper for accent walls or inside bookshelves
- Removable hooks and strips for art, organizers, and lightweight shelves
- Swap-out hardware (keep originals in a labeled bag for move-out day)
- Temporary lighting (plug-in sconces, battery lights, updated lamps)
- Textiles (rugs, curtains, bedding) to add color and softness without permanent change
- Furniture layout “DIY” (yes, rearranging countsespecially when it fixes flow)
One of the most underrated renter moves: change what you touch daily.
New knobs, a better shower curtain, a stylish floor lamp, and a cohesive rug can make a rental feel personal fastno paint required.
How to Make DIY Decor Look Expensive (Even If It Wasn’t)
Use Repetition on Purpose
Repeat a finish, color, or shape at least three times in a room.
Example: black picture frames, a black lamp base, and a black vase. Your brain reads it as “designed,” not “random shopping spree.”
Go Bigger Than You Think (Especially with Art and Rugs)
Small rugs make rooms look smaller. Tiny art looks lost.
If you can’t buy large art, DIY it: paint abstract canvases, frame oversized prints, or create a fabric wall hanging.
Scale is the silent difference between “cozy” and “cluttered.”
Mix Textures, Not Chaos
Pair smooth with rough, soft with structured:
linen curtains + wood accents + ceramic vase + metal lamp.
Texture adds depth and makes neutral spaces feel rich without being loud.
Finish the Edges
Crisp edges are what separate “DIY” from “DIY… oh wow.”
Use painter’s tape, sand between coats when needed, and don’t rush drying time.
Patience is free, and it looks expensive.
Common DIY Home Decor Mistakes (And How to Avoid Them)
- Skipping prep: cleaning and sanding feel boring until your paint chips. Do the boring part.
- Too many trends at once: pick one “fun” trend per room, then ground it with timeless basics.
- Wrong proportions: measure, mock up with tape, and check sightlines from the doorway.
- Over-accessorizing: leave breathing room. Blank space is a design tool, not a failure.
- Forgetting lighting: if the room is dim, everything looks worse. Add layered light sources.
Conclusion
DIY home decor isn’t about perfectionit’s about making your space work better and feel more like you.
Start with one high-impact project (hardware, a gallery wall, a paint refresh, peel-and-stick detail, or an upcycled piece),
then build momentum. Focus on color, lighting, scale, and texture, and your home will look more intentional with every step.
And if a project goes sideways? Congratulations: you’ve joined the proud tradition of DIYers everywhere who learned a lesson and gained a story.
(Just maybe don’t start with the ceiling on day one.)
Experience Notes: What DIYers Learn the Hard Way (and Secretly Love)
You can read all the tutorials in the world and still be surprised by what DIY home decor feels like in real life: part creativity, part problem-solving,
and part “Why is this wall not the same size as the other wall?” The most common experience people share isn’t that DIY is always easyit’s that it’s
unexpectedly empowering. The first time you hang art in a layout that looks balanced, or you refinish a piece that was headed for the curb, the room
changes… and so does your confidence.
A lot of DIYers start with the expectation that the goal is to save money. That happens often, but the bigger win is control. You stop settling for
whatever is available and start creating what fits your space. For example, someone might spend weeks searching for the “perfect” entryway shelf, then
realize a simple board, a few hooks, and a coat of paint solves the problem betterand looks more custom than anything they almost panic-bought online.
Another common experience: the “small project spiral.” You swap cabinet hardware and suddenly the dated light fixture looks extra dated. You add a rug and
notice the walls feel bare. This isn’t failure; it’s your eye getting sharper. DIY tends to train your taste. You begin to notice proportion, spacing,
and how finishes repeat across a room. Over time, you also learn where effort pays off most: prep work, crisp edges, and lighting improvements deliver
a bigger visual return than random accessories.
DIYers also learn to embrace “good enough” in the healthiest way. A handmade item can have tiny quirksan imperfect brushstroke, a slightly uneven staple
line on the back of a headboardand still look fantastic once it’s styled in the room. In fact, those quirks often make the space feel warmer and more
personal than something mass-produced. Many people find they become less afraid of experimenting once they’ve survived a couple of paint samples and a
shelving plan that needed a second attempt. (Or third. No judgment.)
Then there’s the experience of learning your real preferences. DIY reveals what you actually like versus what you thought you were “supposed” to like.
Maybe you discover you prefer warm whites over cool whites, or that you love bold colorbut only on smaller pieces like a side table or a framed print.
Maybe you realize minimalism isn’t your thing, and you’re happiest with layered textiles and a few meaningful objects on display. DIY becomes a way to
test-drive style choices without committing to a full renovation.
Finally, DIY has a surprisingly social side. People swap tips, borrow tools, share leftover paint, and celebrate each other’s before-and-after wins.
Even if you’re working solo, there’s a shared feeling of “I made this place better with my own hands.” That pride is hard to buy in a store.
If you want the most satisfying experience, start small, document your progress, and choose a project that fixes a real annoyancelike dim lighting,
messy entry clutter, or blank walls. When DIY decor makes life easier, it doesn’t just look good. It feels good, too.