Table of Contents >> Show >> Hide
- Why Mason Jars Are the MVP of DIY Home Decor
- Before You Craft: The 10-Minute Prep That Makes Everything Look Expensive
- 12 DIY Mason Jar Decor Ideas That Actually Look Grown-Up
- 1) Frosted “Snow” Luminaries (Winter-Perfect, Still Cute Year-Round)
- 2) Herb-Tied Votive Holders (The “I Host Dinner Parties” Illusion)
- 3) Map, Sheet Music, or Book-Page Lanterns (Decoupage That Doesn’t Scream “Craft Store”)
- 4) Burlap-and-Lace Fall Vases (Autumn Without the Plastic Pumpkin Energy)
- 5) Painted “Milk Glass” Jars (Soft Vintage, Zero Thrift-Store Hunting)
- 6) Chalkboard-Label Pantry or Bathroom Jars (Organization That Also Decorates)
- 7) Macramé Mason Jar Plant Hanger (Boho Without Buying a New Personality)
- 8) Bathroom Counter “Set” (Soap + Toothbrush + Small Storage)
- 9) Patio Hanging Lanterns (Outdoor Glow on a Budget)
- 10) Simple Terrarium or Propagation Jar (Instant “Green Thumb,” Minimal Commitment)
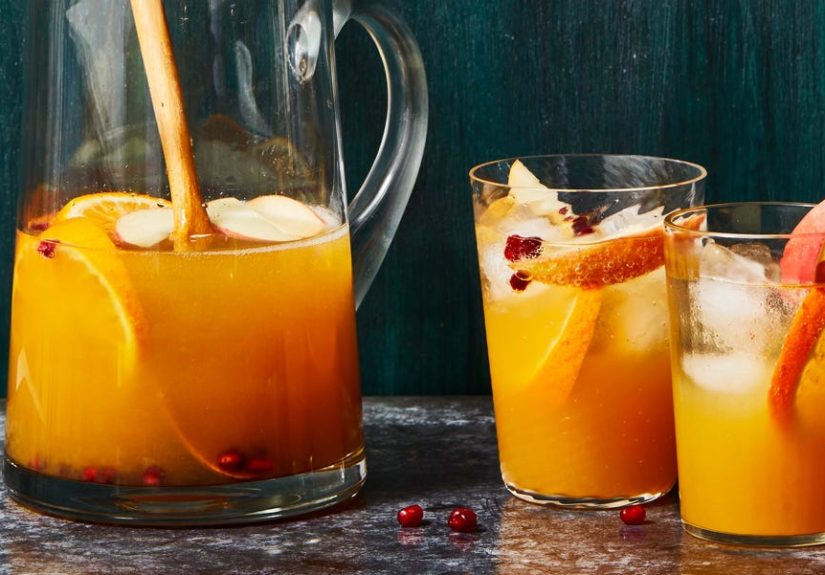
- 11) Flower-Arrangement Centerpieces (Party-Ready, Grocery-Store Friendly)
- 12) Snow Globe Jars (Holiday Magic That’s Surprisingly Easy)
- Design Recipes: Make Mason Jar Decor Match Your Home Style
- Common DIY Mason Jar Decor Mistakes (And How to Fix Them)
- Safety Notes (Because Cute Decor Shouldn’t Be a Hazard)
- Make It Feel “Styled”: Simple Placement Ideas
- Conclusion: Your Jar, Your Style, Your Tiny Decorating Victory
- Experiences: What I Learned After Going Full “Mason Jar Decor Mode” (500+ Words)
Mason jars are the Swiss Army knives of home decor: part storage, part centerpiece, part “I swear I’m crafty” personality trait.
They’re cheap, sturdy, easy to find, and magically compatible with basically every stylefarmhouse, modern, boho, coastal, and even
“I just moved in and my furniture is 70% cardboard.”
In this guide, we’ll turn ordinary jars into decor that looks intentional (not accidental), with practical tips to make your DIY mason jar decor
last longer than your current obsession with organizing bins. You’ll get prep tricks, 12 project ideas, style “recipes,” common mistakes to avoid,
and a final section of hands-on experience to help you nail the details that make jar crafts look genuinely polished.
Why Mason Jars Are the MVP of DIY Home Decor
The secret power of mason jar decor is simple: the jar is a blank canvas with built-in structure. The glass instantly feels “clean” and “classic,”
the lid gives you an easy finishing point, and the standard shapes make it simple to repeat the same idea across a room for a cohesive look.
That’s why DIY mason jar crafts work everywherefrom kitchens and bathrooms to patios and party tables.
And because mason jars are reusable, your decor can be seasonal without becoming wasteful. Swap spring florals for fall wheat stems, trade fairy lights
for mini ornaments, or convert a summer patio lantern into a winter “snow” luminary. Same jar, new vibe.
Before You Craft: The 10-Minute Prep That Makes Everything Look Expensive
1) Remove labels like a calm person (not a raccoon)
Start with warm soapy water to loosen paper labels. If the adhesive fights back, rub it off with cooking oil (or a little adhesive remover),
then wash again. Your goal is squeaky-clean glassbecause paint, glue, and vinyl all hate mystery grease.
2) Degrease the glass
Even if it looks clean, wipe the jar with rubbing alcohol or a vinegar-and-water mix and let it dry. This step prevents peeling paint and bubbly decoupage,
which is the craft equivalent of spinach in your teeth.
3) Lightly scuff (optional, but powerful)
If you’re painting the outside, a quick scuff with fine sandpaper helps paint grip. You don’t need to sand like you’re refinishing a deckjust a gentle once-over.
For extra durability, use a primer designed for slick surfaces.
4) Pick the right finish for the job
Want a translucent glow? Use frosted paint or a thin decoupage layer. Want bold color? Use acrylic craft paint (with proper prep) or spray paint for smoother coverage.
Want “vintage apothecary”? Go for chalk-style paint and a matte sealer. A good finish choice is what separates “cute DIY” from “Why does this look… sticky?”
12 DIY Mason Jar Decor Ideas That Actually Look Grown-Up
These projects are designed to be repeatable (so your decor can look coordinated), adjustable (so you can match your style), and realistic
(so you finish them before midnight turns you into an exhausted gremlin).
1) Frosted “Snow” Luminaries (Winter-Perfect, Still Cute Year-Round)
This is one of the prettiest tricks in DIY mason jar decor: coat the outside with decoupage medium, then sprinkle on textured “snow” (like Epsom salt)
for a frosted glow. Pop an LED tealight inside and the whole jar looks like it belongs in a cozy cabin movie where everyone has great hair.
Style upgrades: Add twine around the rim, tuck in a mini sprig of faux greenery, or stencil a simple shape (stars, trees, initials) before frosting.
2) Herb-Tied Votive Holders (The “I Host Dinner Parties” Illusion)
Wrap twine around a small jar, tuck in a woody herb sprig (like rosemary), and add a candle inside. It’s minimalist, affordable,
and smells like you have your life together. Cluster three jars in different heights for a quick centerpiece.
3) Map, Sheet Music, or Book-Page Lanterns (Decoupage That Doesn’t Scream “Craft Store”)
Wrap the jar with paper (maps look especially cool), smooth it down with decoupage medium, and let it dry fully.
When lit from inside with fairy lights, it becomes soft, glowy, and surprisingly upscale.
Pro look tip: Keep the paper edges clean and aligned. The straighter it is, the more “boutique” it feels.
4) Burlap-and-Lace Fall Vases (Autumn Without the Plastic Pumpkin Energy)
Dress jars with burlap bands and lace trim, then fill with dried grasses, wheat stems, or sunflowers.
It’s simple, seasonal, and perfect for entry tables, mantels, or as party centerpieces.
5) Painted “Milk Glass” Jars (Soft Vintage, Zero Thrift-Store Hunting)
To mimic milk glass, paint the inside of the jar with a white, satin-finish paint (or use glass paint), rotating to coat evenly.
When used as a vase or utensil crock, it looks vintage and calmlike your kitchen doesn’t contain three random spatulas that don’t match.
6) Chalkboard-Label Pantry or Bathroom Jars (Organization That Also Decorates)
Add a chalkboard label (or paint a small rectangle), then use jars for cotton balls, bath salts, Q-tips, tea bags, or baking staples.
The labels make it functional, and the uniform containers make it look like a design choice, not a storage emergency.
7) Macramé Mason Jar Plant Hanger (Boho Without Buying a New Personality)
A mason jar becomes the perfect holder for pothos cuttings or small plantsespecially when hung in macramé.
Use it in a sunny kitchen window, bathroom, or balcony corner for instant “I’m naturally creative” energy.
8) Bathroom Counter “Set” (Soap + Toothbrush + Small Storage)
Mason jars shine in bathrooms because they reduce clutter fast. Create a coordinated look with one jar for toothbrushes,
one for cotton rounds, and one for hair ties or makeup brushes. If you want a soap dispenser, consider using a pump top made for jars
or a ready-to-use dispenser lideasy, clean, and less fussy.
9) Patio Hanging Lanterns (Outdoor Glow on a Budget)
For porches and patios, jars become lanterns with a simple handle setupthen fill with LED fairy lights.
Hang them at different heights for a backyard look that feels intentional, not “I found these in a drawer.”
Outdoor durability tip: Use weather-resistant twine or wire, and avoid leaving paper-decoupage projects outside in rain.
10) Simple Terrarium or Propagation Jar (Instant “Green Thumb,” Minimal Commitment)
Use a jar as a propagation station for plant cuttings in water, or build a mini terrarium with pebbles, activated charcoal (optional),
potting mix, and small plants. Even one jar on a shelf makes your space feel more aliveliterally.
11) Flower-Arrangement Centerpieces (Party-Ready, Grocery-Store Friendly)
Mason jars are classic for flower arrangements because they hold stems upright and look charming in groups.
For a wedding, shower, or brunch: line up jars in a row and repeat the same flowers for a clean lookor mix jar heights for a playful centerpiece.
Design move: Tie matching ribbon or twine around each rim for cohesion, even if the flowers vary.
12) Snow Globe Jars (Holiday Magic That’s Surprisingly Easy)
Create a “scene” by attaching small figurines to the inside of the lid, then fill the jar with water and glitter.
When flipped, it’s a festive decoration that looks customespecially if you keep the color palette simple (white, gold, silver, and one accent color).
Design Recipes: Make Mason Jar Decor Match Your Home Style
Farmhouse / Rustic
Think twine, burlap, lace, galvanized accents, warm white lights, and dried botanicals. Keep colors neutral: cream, tan, sage, and black.
Group jars in threes and add height variation (books, trays, small risers).
Modern / Minimal
Skip the frills. Use clear glass, simple black-and-white labels, and one strong element: a single stem, a monochrome candle,
or clean-lined fairy lights. The goal is “intentional simplicity,” not “I forgot to finish.”
Coastal
Use sea-glass tones (soft blue, aqua, pale green), natural rope, and light textures. Fill with sand and LED lights, or display shells sparingly.
Coastal is calmnot “souvenir shop explosion.”
Boho
Add macramé, tassels, layered textures, and warm lighting. Combine jars with woven trays and natural wood.
Boho jars look best when they feel collected, not identical.
Common DIY Mason Jar Decor Mistakes (And How to Fix Them)
Paint peeling or scratching off
Usually caused by poor prep. Fix it by stripping the jar (soak, scrape, clean), then degrease and use a primer meant for slick surfaces.
Seal the final coat with a clear, compatible sealer once fully dry.
Cloudy decoupage or wrinkles
Use thinner layers, smooth from the center outward, and let each coat dry completely.
Also: don’t rush. Decoupage can smell impatience.
Hot glue strings everywhere
Let the glue cool slightly before pulling away. If strings happen anyway, remove them with a quick blast of warm air (like a hair dryer)
and gently peel off.
Decor looks “crafty” instead of “decor”
Limit your materials. Choose one main texture (twine or ribbon or lace), one main color, and one accent.
Too many elements turns the jar into a costume.
Safety Notes (Because Cute Decor Shouldn’t Be a Hazard)
If you’re using real candles, never leave them unattended, and keep flames away from twine, dried florals, and paper. LED candles and fairy lights
are the easiest “safe glow” option, especially for bedrooms, dorms, and busy homes.
For soap dispensers, the simplest route is using a pump lid made for jars or a ready-to-use dispenser top.
If a project involves tools or modifications, prioritize safety and get help from a responsible adult.
Make It Feel “Styled”: Simple Placement Ideas
DIY mason jar decor looks best when it’s treated like real decor. Try these easy placements:
- Entryway: One jar for keys, one for pens, one with a small plant cutting.
- Kitchen: A matching set of pantry jars with labels + one “pretty” lantern jar near the sink.
- Bathroom: A coordinated trio on a tray: cotton rounds, toothbrushes, hair ties.
- Dining table: Three jars in a line with flowers or candles; keep heights varied.
- Patio: Hanging jars with warm lights for evening glow.
Conclusion: Your Jar, Your Style, Your Tiny Decorating Victory
DIY mason jar decor works because it’s flexible: you can go rustic, modern, seasonal, or purely practical, and still end up with something that looks
cohesive. The biggest difference between “cute” and “wow” is prep, restraint, and repetition. Clean the glass, choose a style lane, and repeat the idea
in a small set (two to five jars) so it reads as designnot clutter.
And remember: the goal isn’t perfection. The goal is making your home feel more like you, one jar at a time.
Experiences: What I Learned After Going Full “Mason Jar Decor Mode” (500+ Words)
The first time I tried DIY mason jar decor, I thought the jar was the whole story. Spoiler: the jar is the supporting actor. The real star is preparation.
My earliest attempt was a painted jar “vase” that looked fantastic for about two daysthen the paint started peeling like a sunburn. That’s when I learned
the unglamorous truth: glass is slippery, and it will absolutely betray you if you skip cleaning and degreasing.
Once I got consistent about wiping jars down and letting layers dry fully, everything improved. Drying time is not optional; it’s the difference between
“Pinterest-worthy” and “why is my decoupage bubbling like pizza cheese?” If I’m doing paper lantern jars, I now use thinner coats and smooth slowly, because
rushing is basically asking for wrinkles. I also learned to place seams intentionally. If the paper edges meet in the back and stay straight, the whole jar looks
higher-end even if the materials were budget-friendly.
Another lesson: mason jar decor looks best when you commit to a small collection instead of making one lonely jar and hoping it carries the room like a hero.
When I started grouping jarsthree on a table, or a matched set of pantry jars on a shelfthe decor suddenly looked “designed.” Repeating one element (same twine color,
same label style, same paint finish) creates visual calm. It’s like giving your decor a dress code. Even a messy pantry feels more organized when the jars are consistent.
I also discovered that “more decoration” doesn’t always mean “more beautiful.” I went through a phase where every jar had ribbon, lace, a charm, and a tag.
The result was… enthusiastic. Now I use a rule: one main texture and one accent. If the jar has twine, it doesn’t also need lace. If it’s frosted, it doesn’t also need
glitter and beads and a tiny sign that says “Blessed.” Minimal choices look more intentional.
Lighting projects taught me another big truth: glow hides imperfections, and that’s not cheatingit’s strategy. Frosted luminaries became my favorite because they look
magical at night, and they’re forgiving. Tiny uneven spots disappear once the light is on. Plus, warm white fairy lights make almost any space feel cozier. When I’m decorating
for gatherings, I use jar lights like “soft filters” for the room. People don’t say, “Nice jar.” They say, “This feels really cozy in here.” That’s a win.
Finally, the most practical thing I learned is to match the project to the jar size. Wide-mouth jars are easier to clean, easier to fill, and easier to use for things like
bathroom storage or utensils. Smaller jars shine as votives or mini arrangements. When the scale fits the purpose, your DIY mason jar decor feels naturally functionalwhich is the
best kind of decor, because it earns its spot on the counter.
If you take nothing else from my jar adventures, take this: prep like you mean it, repeat a style element for cohesion, and don’t over-decorate. Mason jars already have charm.
You’re just giving that charm a job.