Table of Contents >> Show >> Hide
- Why the DIY Lite Side Table Still Works
- What You Need Before You Build
- How to Build a DIY Side Table, the DIY Lite Way
- Design Tips That Make a DIY Side Table Look Expensive
- Paint vs. Stain: Which Finish Should You Choose?
- Common DIY Side Table Mistakes to Avoid
- Where a DIY Side Table Works Best
- Why This Project Is Perfect for Beginners
- Experience: What Building a DIY Side Table Actually Feels Like
- Final Thoughts
If there is one piece of furniture that quietly earns its keep, it is the humble side table. It holds coffee, books, remotes, chargers, candles, and the occasional snack plate you swore would not become dinner on the couch. In other words, it is the unsung hero of everyday living. That is exactly why the Bob Vila “DIY Lite” approach to a DIY side table still feels so smart: it solves a real problem, does not demand a museum-grade workshop, and gives beginners a project that looks far more expensive than it is.
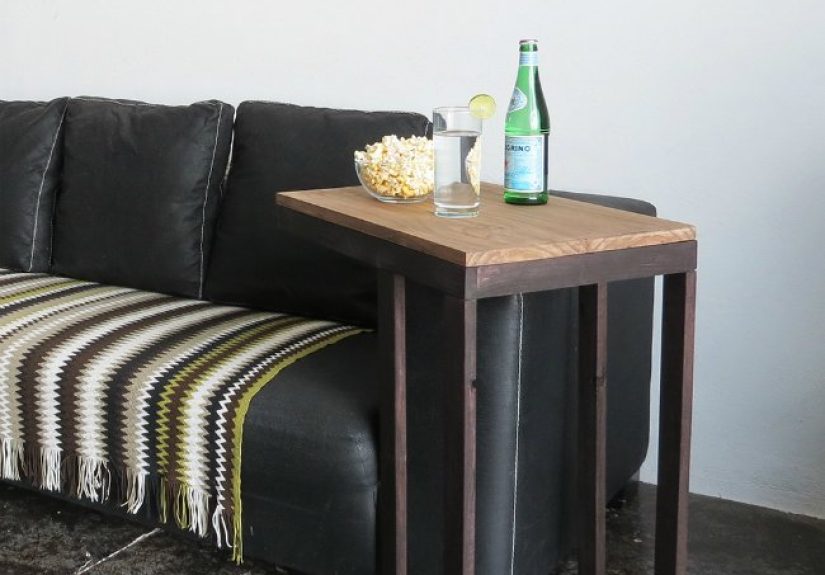
The original Bob Vila concept leans into a C-shaped design that slides neatly beside or over the arm of a chair or sofa. It is compact, practical, and friendly to small spaces. Better yet, it is the kind of woodworking project that teaches useful lessons without making you feel like you have enrolled in graduate school for sawdust. If you can measure carefully, cut straight enough, and resist the ancient DIY temptation to “eyeball it,” you can build a side table that looks custom-made for your room.
This guide takes that DIY Lite spirit and expands it into a full, modern, beginner-friendly article. We will cover why this style works so well, how to build your own version, what materials make sense, how to finish it so it looks polished, and how to avoid the classic mistakes that turn a cute side table into a wobbling monument to overconfidence.
Why the DIY Lite Side Table Still Works
Bob Vila’s side table idea endures because it solves a common design problem with a simple shape. Traditional end tables are useful, but they can eat up floor space. A C table, sofa-side table, or over-arm side table tucks close to seating and keeps your essentials within reach. For apartments, reading nooks, and living rooms where every square foot counts, that is not just convenient. It is survival with style.
It also works because the build is approachable. Many side table plans get fancy fast: turned legs, hidden joinery, drawers, decorative rails, and enough clamps to make you wonder whether you are building furniture or restraining a mythical beast. A DIY Lite side table keeps the structure straightforward. A top, a base, a few supports, and clean lines do most of the heavy lifting.
The beauty of a small project
A side table is one of the best starter furniture projects because the scale is manageable. You do not need a truckload of lumber, a giant assembly table, or the patience of a saint. Small pieces mean lower cost, easier handling, and less risk if you make a mistake. Mess up a side table board, and it is annoying. Mess up a dining table slab, and suddenly you are pricing therapy.
Why the C-shape is so practical
The C-shape lets the base slide under a couch or chair while the top hovers where you need it. That means your mug, laptop, or paperback can sit closer to you than on a standard end table. It is great for movie nights, morning coffee, work-from-couch days, and anyone who likes the phrase “everything within arm’s reach” to be taken literally.
What You Need Before You Build
You can build a clean, sturdy DIY side table with basic materials and simple tools. The exact shopping list depends on your design, but most builds use dimensional lumber, plywood, or a mix of both.
Best materials for a beginner-friendly DIY side table
- Solid wood boards: Great for a warm, classic look. Pine is affordable and easy to find. Oak, poplar, or maple look more refined but can cost more.
- Plywood: Excellent for modern boxy designs. It is stable, efficient, and especially useful if you want a sleek painted finish.
- Edge banding: Helpful if you use plywood and want the exposed edges to look cleaner.
- Wood glue and screws: The dependable duo of beginner furniture building.
- Stain, paint, or clear finish: Because raw wood has charm, but finished wood has charm and manners.
Basic tools that make life easier
- Tape measure
- Speed square or combination square
- Circular saw, miter saw, or handsaw
- Drill/driver
- Clamps
- Sander or sanding block
- Paintbrushes or rags for finishing
Safety gear matters too. Safety glasses, hearing protection, and a dust mask are not glamorous, but neither is spending the afternoon blinking sawdust out of your soul.
How to Build a DIY Side Table, the DIY Lite Way
The simplest Bob Vila-inspired route is to build a compact C table. The design is intentionally uncomplicated: a top panel, a base panel, vertical supports, and a finish that makes it look like you knew exactly what you were doing the whole time.
Step 1: Measure the furniture it will serve
Before you cut a single board, measure the couch or chair. Height matters most. If you want the tabletop to sit just above an armrest, your finished table height should match that goal. For a more traditional side table beside a chair, aim for a height that feels natural when reaching from a seated position.
Width and depth matter too. A narrow top can be enough for a mug and a book. A wider top can handle a lamp, tablet, or decorative tray. If the table is going to slide under a sofa, check the clearance beneath it. Nothing ruins momentum like building the perfect table and discovering your couch says, “Absolutely not.”
Step 2: Cut the top and base
For a simple project, cut matching panels for the top and base. If you are using solid wood, glue boards together for the top if needed. If you are using plywood, keep the cuts crisp and square. This is where slow, accurate measuring pays off. Furniture forgives many things, but not bad math.
Step 3: Create the vertical supports
Cut the legs or side supports to the height required by your chair or couch. A Bob Vila-inspired C table often uses clean vertical members rather than ornate legs, which keeps the build sturdy and beginner-friendly. Dry-fit the pieces before attaching anything. This quick rehearsal helps you catch problems before wood glue makes your decisions permanent.
Step 4: Assemble with glue and screws
Use wood glue at the joints, then reinforce with screws or pocket-hole joinery. Predrill pilot holes if you are working with solid wood to reduce the risk of splitting. Keep checking for square as you assemble. A side table should look intentional, not like it gave up halfway through construction.
Step 5: Sand thoroughly
This is the step many DIYers rush through and then regret for years, or at least until the next refinishing project. Start with a coarser grit if needed to smooth rough edges or remove marks, then progress to finer grits. Sand with the grain, not across it. The smoother your prep, the better your stain or paint will look.
Step 6: Finish for style and durability
If you love the natural look of wood, use stain followed by a protective clear coat. If you want a more modern or playful look, paint works beautifully, especially on plywood builds. Matte black looks sharp. Soft white feels classic. A two-tone finish, like a darker base and lighter top, adds custom character without getting overly dramatic.
Step 7: Let it cure before use
Yes, you are excited. Yes, it looks done. No, the finish does not care. Let stain, paint, and topcoat dry and cure properly before placing drinks, books, or that suspiciously sweaty glass of lemonade on the surface.
Design Tips That Make a DIY Side Table Look Expensive
The difference between a “nice homemade table” and a “wait, you made that?” table often comes down to details.
Keep the proportions balanced
A side table should feel visually comfortable next to the furniture it serves. If it is too chunky, it looks clumsy. If it is too spindly, it looks nervous. Fine woodworking principles often come down to proportion, and even a small project benefits from thinking about length, height, and thickness as a whole.
Soften the edges
Sharp cut edges can make a table look unfinished, especially on plywood. Light sanding around corners, edge banding, or a subtle chamfer can instantly improve the look. This tiny detail whispers “custom build” instead of shouting “garage emergency.”
Hide or clean up the fasteners
If you use screws, place them thoughtfully. Pocket holes on the inside or underside help keep the exterior clean. Wood filler can help in painted builds. On stained pieces, better joinery and clean layout matter even more because the finish tends to spotlight flaws like a gossip with a flashlight.
Paint vs. Stain: Which Finish Should You Choose?
Choose stain if you want to highlight the grain and give the table a more classic furniture feel. This works especially well with oak, maple, walnut-toned finishes, or any wood with decent character.
Choose paint if your design is more modern, your wood is visually inconsistent, or you want the table to double as an accent piece. Painted side tables are also forgiving for plywood and budget lumber because the finish unifies the surface.
Stain works best when:
- You have attractive wood grain
- You want a warm, natural look
- You are willing to do careful sanding and test on scrap first
Paint works best when:
- You want color or a contemporary vibe
- You are using plywood or mixed materials
- You want to hide imperfections more easily
Either way, surface prep is the secret sauce. Sand, remove dust, and work neatly. Furniture finishing is not magic. It is just patience wearing work clothes.
Common DIY Side Table Mistakes to Avoid
Ignoring the real measurements
Do not guess the height based on what “looks about right.” Measure the seat, armrest, and under-sofa clearance. A side table is only helpful if it actually fits your life.
Skipping the dry fit
Dry-fitting reveals crooked cuts, upside-down parts, and layout mistakes before glue enters the chat. It takes minutes and can save hours.
Underestimating sanding
A rough sanding job becomes even more obvious after stain or topcoat. Swirl marks, glue smears, and scratches love to reveal themselves at the worst possible moment.
Using too much finish
Thick coats look tempting, but thin, controlled coats usually look better and cure more reliably. Furniture is not a pancake. It does not need to be drowned in syrup.
Where a DIY Side Table Works Best
A Bob Vila-inspired side table is ideal in a living room, but it is not limited to one spot. It can work as a couch companion, laptop perch, reading table, bedside stand, or even a tiny plant display. In small homes, multi-use furniture wins every time. A slim side table can serve breakfast at 8 a.m., hold a lamp at 8 p.m., and support your “just one more episode” snack situation all night long.
It is also a smart project for renters and anyone decorating on a budget. Store-bought side tables can be shockingly expensive for what is essentially a flat surface with good posture. Building one yourself gives you control over size, finish, and character without paying luxury prices for a piece named something mysterious like “The Urban Minimal Occasional Form.”
Why This Project Is Perfect for Beginners
Not every DIY furniture project is beginner-friendly, no matter how casually the internet says, “Just whip this up in an afternoon.” A side table, though, really can be approachable. The cuts are manageable. The materials are affordable. The joinery can stay simple. And the result is useful immediately.
Even better, the project teaches fundamentals that transfer to bigger builds: measuring for real-world use, assembling square frames, sanding for finish quality, and making design choices that balance function with appearance. That is what makes the DIY Lite side table more than just a weekend project. It is a gateway project. Today it is a side table. Tomorrow you are explaining wood conditioner to your friends and owning far too many clamps.
Experience: What Building a DIY Side Table Actually Feels Like
The first time you build a DIY side table, you learn something funny: the project is never really just about the table. It starts with a practical need. You want a place for coffee. You want somewhere to set a book. You are tired of stretching toward the coffee table like a Victorian fainting patient. So you think, “How hard can a little side table be?” That is the exact moment the project begins teaching you things about your space, your habits, and your patience.
At first, it feels simple. A few boards. A few cuts. A small footprint. Confidence arrives early and loudly. Then the tape measure comes out, and suddenly the room becomes part of the project. The couch arm is higher than you thought. The base needs clearance under the sofa. The top should be wide enough for a mug but not so wide that it blocks the walkway. Building a side table teaches you to design for real life, not just for a pretty photo.
Then comes the workshop part, where theory meets reality. The cuts may be straight-ish. One board may be slightly bowed. You may discover that clamps are less “nice to have” and more “please save me.” You dry-fit the parts and realize one support is upside down, which is humbling but healthy. This is when the project gets good. You stop trying to be a genius and start trying to be careful. That shift is where actual DIY growth happens.
Sanding is usually the emotional middle chapter. No one begins a project excited about sanding, and yet this is where the table starts becoming furniture instead of lumber with ambitions. The edges soften. The surfaces even out. The project starts to feel intentional. You run your hand across the top and think, “Okay, now we are getting somewhere.” It is deeply satisfying, even if you and your floor are now approximately 14 percent sawdust.
Finishing the table is the reward phase. Stain can make cheap wood look richer. Paint can make a basic build feel modern and stylish. A clear topcoat gives the whole thing a grown-up sense of permanence. Suddenly the table is no longer a collection of parts. It has a personality. It looks like it belongs somewhere. And when you place it beside the couch, it often fits better than anything you could have ordered online because it was literally built for that exact spot.
That is the real joy of a DIY side table. It is small enough to finish without losing momentum, useful enough to earn daily appreciation, and personal enough to feel special. Every little choice shows: the height you measured, the finish you picked, the way you shaped the edges, the tiny flaws you notice but everyone else calls character. The project proves that a beginner build does not have to look beginner. It just has to be thoughtful.
And once you live with a handmade side table for a while, something strange happens. You start looking around the room differently. Could that corner use a matching table? Would a narrow nightstand work beside the bed? What about a small entry table? One successful project has a way of convincing you that your home is full of buildable opportunities. That might sound dangerous, and honestly, it is. But it is the fun kind of dangerous, the kind that ends with better furniture and a slightly overconfident relationship with the lumber aisle.
Final Thoughts
The charm of the Bob Vila DIY Lite side table is not just that it is easy. It is that it is useful, flexible, and stylish without trying too hard. It respects your time, your budget, and your square footage. Whether you build a classic C table, a painted plywood cube, or a stained wood piece with simple clean lines, the result is the same: a compact table that works hard and looks good doing it.
For beginners, this is one of the smartest woodworking projects you can choose. For experienced DIYers, it is a satisfying quick win. And for everyone else, it is proof that the best furniture is not always the most complicated. Sometimes it is just a well-built side table showing up exactly where you need it, quietly holding your coffee like the legend it is.