Table of Contents >> Show >> Hide
- What Makes a Trunk-or-Treat Display “Work”?
- Before You Start: A 60-Second Prep Checklist
- Step 1: Pick a Theme That’s Easy to Recognize in 3 Seconds
- Step 2: Match Your Theme to Your Car Type (So You Don’t Fight Physics)
- Step 3: Sketch a 3-Layer Layout (Backdrop, Middle, Front)
- Step 4: Start With a Cheap Backdrop That Covers “Car Stuff”
- Step 5: Build One Big “Hero” Element (The Main Attraction)
- Step 6: Use Car-Safe Attachment Tricks (No Paint Sacrifices Required)
- Step 7: Light It Up With Battery LEDs (Bright, Safe, and Not a Fire Drill)
- Step 8: Create Height With Boxes, Crates, and Coolers (Hidden Under Fabric)
- Step 9: Add One Interactive Moment (Keep It Simple)
- Step 10: Design a Candy Station That’s Fast, Clean, and Kid-Friendly
- Step 11: Make Your Costume Part of the Display
- Step 12: Add Sound Carefully (Because Not Everyone Wants a Jump Scare at 6 PM)
- Step 13: Windproof Everything Like You Live in a Leaf Blower
- Step 14: Do a Safety Walk-Through (Two Minutes That Prevents Chaos)
- Step 15: Pack a “Trunk-or-Treat Toolkit” (So Setup Doesn’t Become a Sitcom)
- Quick “Easy Theme” Examples You Can Build on a Budget
- Common Mistakes (And How to Avoid Them)
- Conclusion: Your Trunk Doesn’t Need to Be PerfectIt Needs to Be Clear, Safe, and Fun
- Extra: Real-World Trunk-or-Treat “Experience Notes” ()
Trunk or Treat is basically Halloween’s “drive-thru” of joy: cars line up in a parking lot, trunks pop open, and kids cruise from vehicle to vehicle collecting candywhile parents quietly celebrate not having to walk eight miles uphill both ways like it’s 1987.
The best part? You don’t need Hollywood-level props or a fog machine that accidentally summons a minor demon. With a smart plan, a few inexpensive supplies, and some removable tape that won’t ruin your paint job, you can build a trunk display that looks impressive, feels safe, and doesn’t require a second mortgage.
What Makes a Trunk-or-Treat Display “Work”?
The winning formula is simple: one clear theme, big visual shapes, safe lighting, and candy that’s easy to hand out. Bonus points if kids can interact with something (a quick game, a silly photo spot, or a “pick your potion” candy bowl).
This guide walks you through an easy, repeatable processso you can spend less time crafting and more time doing the important stuff, like guarding your candy stash from “quality control.”
Before You Start: A 60-Second Prep Checklist
- Know the rules: Some events ban scary themes, loud sound effects, or open flames. (Yes, even “tiny” candles.)
- Measure your space: Trunk opening width, height, and how far the hatch extends.
- Plan the candy flow: Where will kids stand, and how will you hand out treats quickly?
- Think safety first: Avoid tripping hazards, sharp edges, and anything that can fall in wind.
Step 1: Pick a Theme That’s Easy to Recognize in 3 Seconds
Kids are doing a fast visual scan while holding a bucket and vibrating with sugar-fueled enthusiasm. Choose a theme that reads instantlylike Pirates, Candy Land, Superheroes, Under the Sea, Camping, Monsters, or Sports Tailgate.
Pro tip: The easiest themes are the ones you can build with fabric backdrops + a few big props. Tiny details are fun, but they’re not doing the heavy lifting at night in a parking lot.
Step 2: Match Your Theme to Your Car Type (So You Don’t Fight Physics)
A minivan can become a “movie screen” with a big sheet. A pickup bed can become a “pirate ship deck.” A small sedan? Go for a compact theme that sits inside the trunk openinglike a “mad scientist lab” or “candy shop window.”
- SUV/Minivan: Great for backdrops, hanging decorations, and “walk-up” displays.
- Pickup truck: Great for layered scenes and big props with crates/hay bales.
- Sedan: Great for clean, graphic themes (monsters, emoji faces, “one big character”).
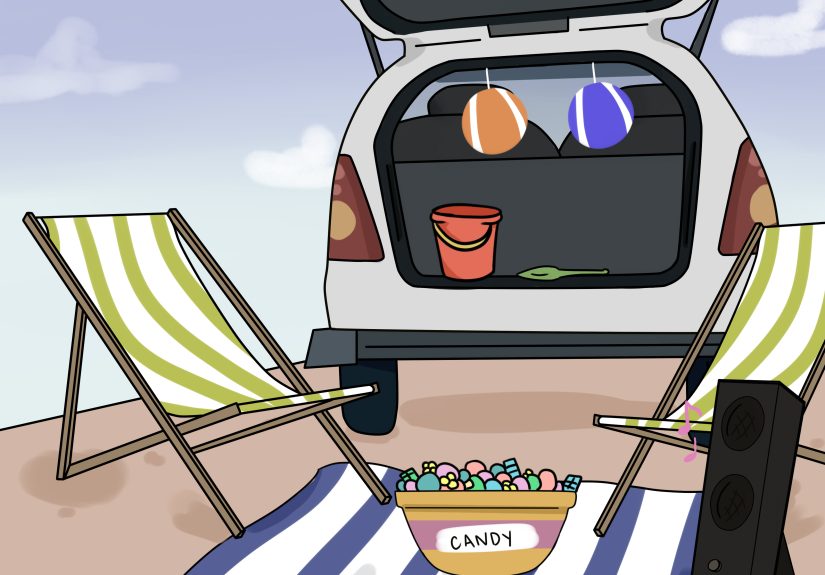
Step 3: Sketch a 3-Layer Layout (Backdrop, Middle, Front)
You’re building a stage, not a storage closet. Use three layers:
- Backdrop: A sheet, tablecloth, shower curtain, or large poster paper.
- Middle layer: The “scene” (cardboard cutouts, props, inflatable, hanging decor).
- Front layer: Candy station + a simple interactive element.
This structure makes your trunk look full and intentionaleven if you assembled it in the same amount of time it takes kids to eat a fun-size chocolate bar.
Step 4: Start With a Cheap Backdrop That Covers “Car Stuff”
The fastest way to upgrade your trunk is to hide the car interior. Use:
- Plastic tablecloths (solid color or printed)
- Old bedsheets (paint or tape shapes onto them)
- Roll paper (kraft paper = instant “wood” or “cave wall”)
- Disposable party backdrops (great for themed scenes)
Example: For an Under the Sea theme, use a blue backdrop + bubble cutouts + a few hanging jellyfish (paper lanterns + streamers). It looks fancy, costs little, and doesn’t require an art degree.
Step 5: Build One Big “Hero” Element (The Main Attraction)
Every great trunk has one centerpiece that screams the theme:
- Monster trunk: Giant eyes + teeth around the trunk opening (pool noodles make great “gums”).
- Pirate trunk: A “treasure chest” candy station + map backdrop.
- Candy Land: Oversized lollipops + colorful “path” tiles.
- Camping: Faux campfire + lanterns + “s’mores” candy basket.
If you do nothing else, do this. One big element makes the whole display feel deliberate.
Step 6: Use Car-Safe Attachment Tricks (No Paint Sacrifices Required)
Your future self will thank you for using removable methods. Reliable options include:
- Painter’s tape: Great for paper, lightweight decor, and quick outlines.
- Removable hooks: Handy for hanging lanterns or signs inside the hatch.
- Magnetic hooks/clips: Perfect for metal surfaces (test first).
- Zip ties: Great for securing to cargo loops, headrests, or a portable frame.
- Velcro strips: Useful for props that need to stay put but come off cleanly.
Avoid anything permanent, anything that leaves residue, and anything that turns your trunk into a sticky Halloween crime scene.
Step 7: Light It Up With Battery LEDs (Bright, Safe, and Not a Fire Drill)
Lighting makes the theme visibleand it’s also a safety feature. Use:
- Battery LED string lights
- Battery tea lights or LED candles
- Glow sticks tucked into jars for soft “lantern” light
- Clip-on LED puck lights to spotlight the hero element
Keep cords off the ground, keep walkways clear, and skip anything with open flame. It’s Halloween, not “Insurance Claim Season.”
Step 8: Create Height With Boxes, Crates, and Coolers (Hidden Under Fabric)
Flat trunks look unfinished. Add height by stacking:
- Cardboard boxes (covered with fabric)
- Milk crates (great for structure)
- Small folding tables (if allowed)
- Coolers (double-duty: keep drinks cold)
Example: For a Mad Scientist Lab, stack two boxes to make “equipment shelves,” cover them in black fabric, then add “potion bottles” (plastic bottles with colored paper labels).
Step 9: Add One Interactive Moment (Keep It Simple)
Interactive trunks get remembered. Keep it easy and fast:
- Ring toss: Toss rings onto witch hats or cones.
- Beanbag toss: “Feed the monster” through a mouth hole.
- Spin to win: A small spinner decides candy choice (chocolate vs. gummy).
- Photo spot: A frame that says “I Survived the Candy Kraken.”
The rule: it should take under 10 seconds per kid or the line will become a parking-lot epic.
Step 10: Design a Candy Station That’s Fast, Clean, and Kid-Friendly
Your candy station should be obvious and easy:
- Two-bowl system: One bowl for chocolate, one for non-chocolate.
- Grab bags: Pre-bagging speeds up distribution and reduces handling.
- “Choose your treat” sign: Helps shy kids know what to do.
- Candy chute: A simple slide or tube adds fun and keeps distance if needed.
Include a small “teal” or “non-food” option (stickers, pencils, tiny toys) if you canfamilies appreciate allergy-friendly choices.
Step 11: Make Your Costume Part of the Display
The easiest way to level up your trunk is to match your outfit to the theme:
- Pirate trunk + pirate hat + striped shirt
- Candy shop trunk + apron + “Candy Clerk” name tag
- Space trunk + astronaut helmet (even a toy one works)
- Sports tailgate trunk + jersey + foam finger
You don’t need a full costume. You just need enough to sell the story.
Step 12: Add Sound Carefully (Because Not Everyone Wants a Jump Scare at 6 PM)
Sound can be amazingif it’s controlled. If you use a speaker:
- Keep volume low (parking lots echo like a stadium)
- Choose family-friendly tracks (spooky fun, not horror-movie screams)
- Loop a short playlist so you’re not DJ-ing all night
Step 13: Windproof Everything Like You Live in a Leaf Blower
Parking lots get breezy. Use these tricks:
- Weigh down fabric with binder clips and small weights hidden behind props
- Use zip ties for anything hanging
- Choose thicker backdrops (sheets over tissue paper)
- Keep tall props secured to a crate or frame
If your ghost keeps flying away, it’s no longer a decorationit’s an escape attempt.
Step 14: Do a Safety Walk-Through (Two Minutes That Prevents Chaos)
Before the first kid arrives, check:
- Trip hazards: No cords, loose fabric, or low stakes where feet go.
- Stability: Props shouldn’t tip if bumped.
- Visibility: Candy area is lit; kids can see where to stand.
- Accessibility: Leave space for strollers, mobility aids, and shy kiddos.
- Comfort: Avoid strong scents, super-strobe lights, or overly scary visuals for younger kids.
Step 15: Pack a “Trunk-or-Treat Toolkit” (So Setup Doesn’t Become a Sitcom)
Bring a small tote with:
- Extra tape (painter’s + clear)
- Scissors + a small utility knife (use carefully)
- Zip ties + spare hooks
- Extra batteries
- Trash bags (cleanup hero move)
- Hand sanitizer
The goal is to solve problems in 30 seconds, not 30 minutes.
Quick “Easy Theme” Examples You Can Build on a Budget
1) The Friendly Monster Mouth
Use a dark backdrop, big paper eyes, and “teeth” made from foam sheets or cut poster board. Place candy in a bowl labeled “Monster Snacks.” Done.
2) Pirate Treasure Trunk
Turn a box into a treasure chest, add gold chocolate coins, beads, and a simple “X marks the spot” map. Bonus: kids love anything that looks like loot.
3) Candy Shop Window
Cover the trunk in bright colors, add “menu” signs (“Gummies,” “Chocolate,” “Sour”), and use big jars or bowls. This theme is basically Halloween on easy mode.
4) Cozy Camping Night
Faux campfire (cellophane + LED light), lanterns, and a “S’mores Station” sign. Hand out graham-cracker-shaped treats or chocolate bars for the joke.
Common Mistakes (And How to Avoid Them)
- Mistake: Too many small details. Fix: Go bigger: one hero element + bold backdrop.
- Mistake: Candy table blocks the walkway. Fix: Put candy at the front edge, clear a standing spot.
- Mistake: Decorations fall off the car. Fix: Use removable hooks, zip ties, and test before the event.
- Mistake: Dim display. Fix: Add LED strings and a spotlight on the centerpiece.
Conclusion: Your Trunk Doesn’t Need to Be PerfectIt Needs to Be Clear, Safe, and Fun
If you follow these 15 steps, you’ll end up with a trunk display that looks thoughtfully designed without turning your living room into a craft-store explosion. Start with a theme, build the backdrop, add one big focal point, light it safely, and make candy distribution quick. That’s the whole game.
And remember: kids aren’t judging your hot glue technique. They’re judging whether you have the good candy. (Just kidding. Mostly.)
Extra: Real-World Trunk-or-Treat “Experience Notes” ()
Trunk-or-treat decorating looks easy on social mediauntil you’re standing in a parking lot at dusk with a roll of tape stuck to your sleeve, a plastic tablecloth flapping like it’s trying to take flight, and a child asking, “Is this the one with the full-size candy?” (Spoiler: it’s never the one with full-size candy.)
What people tend to learn quickly is that setup time feels shorter than it is. Even if you arrive “early,” you’ll still want a display that can go from trunk closed to trunk fabulous in under 15 minutes. That’s why the three-layer method (backdrop, scene, candy station) is such a lifesaver. You can toss in a backdrop first to hide the inside of the car, then attach the hero element, then set the candy station last so it stays neat and reachable.
Another surprisingly common discovery: wind is the unofficial event coordinator. It will test your clips, your knots, and your patience. Lightweight paper decorations can look awesomeright up until the breeze turns them into a confetti tribute. People who look the calmest usually have one secret: they brought extra fasteners and weighted the base of anything tall. A couple of hidden water bottles or small weights behind props can make the difference between “Wow!” and “Why is your pirate flag in the next zip code?”
Candy flow becomes its own mini engineering problem. When a line forms, the best trunks are the ones where kids can understand the “rules” instantly. Clear labels like “Pick ONE” or “Choose: Chocolate / Gummy” prevent the awkward moment where someone reaches into the bowl like it’s a claw machine. Pre-bagging candy also helps speed things up and keeps your display from getting messy by the end of the night (because it will get messyHalloween is not a tidy holiday).
One more thing that often stands out: interactive doesn’t have to mean complicated. The most effective games are simple and visual, like tossing a ring onto a cone, or feeding a “monster” with a beanbag. It adds excitement without slowing down the line. And for kids who don’t want to play? They can still grab candy and move alongno pressure, no awkwardness.
Finally, the trunks that leave the best impression usually feel welcoming. Bright lighting, friendly signage, and themes that are “spooky-cute” instead of terrifying make the event enjoyable for a wide range of ages. A little humor goes a long way, toolike a sign that reads, “Please form an orderly line. The skeleton is in charge.” The goal isn’t perfection. It’s creating a small moment of magicright there between the minivan and the pickup truckwhere kids feel excited, safe, and delighted.