Table of Contents >> Show >> Hide
- Why Build a DIY Dining Table Bench With Curved Legs?
- Step 1: Plan Your Bench Dimensions
- Step 2: Gather Materials and Tools
- Step 3: Design and Make a Template for the Curved Legs
- Step 4: Build the Bench Frame
- Step 5: Attach the Curved Legs
- Step 6: Build and Attach the Seat Top
- Step 7: Sanding, Staining, and Finishing
- Styling Your New Curved-Leg Bench
- Common Mistakes to Avoid
- Real-World Tips and Experience for Building a Curved-Leg Dining Bench
- Final Thoughts
If your dining room feels a little cramped, a DIY dining table bench with curved legs might be the stylish space-saver your home is begging for.
Benches tuck neatly under the table, make it easier to squeeze in “just one more” guest, and that graceful curve in the legs instantly upgrades the whole room from “builder basic” to “I totally have a Pinterest board for this.”
In this guide, we’ll walk step by step through building a sturdy, comfortable bench inspired by curved-leg designs you might see on Hometalk and other DIY sites.
We’ll cover planning, cutting those swoopy legs (without needing a fancy woodworking degree), assembling the frame, and finishing the bench so it looks like a store-bought piece at a DIY price.
Why Build a DIY Dining Table Bench With Curved Legs?
A straight-leg bench is functional; a curved-leg bench is functional and fabulous. The curves soften all the hard lines in a dining space, echo rounded chandelier arms or arched doorways, and make the bench look custom instead of “I grabbed it in a panic at the furniture outlet.”
- Better flow: The curves visually take up less “weight” than chunky square legs.
- Custom size: You can match the exact length of your dining table or breakfast nook.
- Comfort factor: A long bench is perfect for kids, guests, and big family dinners.
- Budget-friendly: Simple construction lumber plus a bit of plywood and patience is far cheaper than buying a designer bench.
Step 1: Plan Your Bench Dimensions
Choose the Bench Length
As a general rule, plan about 20–24 inches of bench length per person. For example:
- 48-inch bench: comfy for 2–3 people.
- 60-inch bench: good for 3 adults or 3–4 kids.
- 72-inch bench: seats 3–4 adults; great for a large table.
Most people line the bench up just inside the table legsso if your table is 72 inches long, a 60–66 inch bench usually looks balanced and doesn’t bang into table legs.
Height and Depth
Typical dining seat height is about 18–19 inches from the floor to the top of the seat (or cushion if you’ll upholster). Depth around 14–16 inches feels good for most adults.
- Seat height: 18–19 inches.
- Seat depth: 14–16 inches.
- Leg height: Seat height minus thickness of the top and any cushion.
Step 2: Gather Materials and Tools
You can adjust exact sizes for your space, but here’s a sample materials list for a 60-inch (5-foot) bench:
Sample Materials List
- 2 × 4 or 2 × 3 boards for the bench frame and stretchers.
- 3/4-inch plywood for the curved legs (or thick hardwood boards if you prefer).
- 1 × 4 or 1 × 6 boards for the seat top (or a single glued-up panel).
- Wood glue (interior or exterior, depending on where your bench lives).
- 2 1/2-inch wood screws or pocket-hole screws.
- 1 1/4-inch screws for attaching the top.
- Sandpaper (80, 120, 180, 220 grits).
- Stain or paint plus clear topcoat (polyurethane, polycrylic, or hardwax oil).
- Wood filler for screw holes.
Tool Checklist
- Miter saw or circular saw (for straight cuts).
- Jigsaw or bandsaw (for cutting the curved legs).
- Drill/driver.
- Pocket-hole jig (optional, but great for hidden joinery).
- Clamps (bar clamps or pipe clamps).
- Measuring tape, square, pencil, and flexible curve or large round objects to trace your curve.
- Orbital sander or sanding block.
- Safety gear: safety glasses, ear protection, dust mask or respirator.
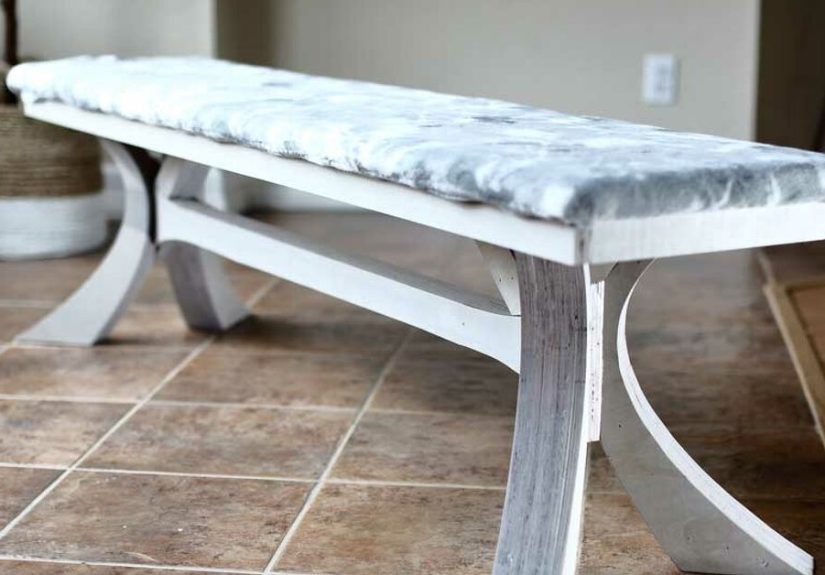
Step 3: Design and Make a Template for the Curved Legs
The secret to professional-looking curved legs is a good template. You’ll cut and sand one pattern you love, then use it to trace identical legs so the bench looks cohesive.
Create a Full-Size Template
- Draw the leg outline: On a scrap of cardboard or 1/4-inch MDF, draw a rectangle representing your leg blank (for example, 18 inches tall × 3 1/2 inches wide if using 2 × 4 sizing).
- Mark the top and bottom: The top will meet the bench frame; the bottom needs enough “foot” for stability. Leave at least 2–3 inches of flat area on the floor edge.
- Sketch the curve: You can use a flexible ruler, a paint can, or a large bowl to help draw a gentle S-curve from the top inner corner toward the bottom outer corner. Aim for a curve that’s soft and graceful, not too tight or skinny.
- Cut and refine the template: Use a jigsaw to cut along your line, then sand the edge smooth. This is your master pattern.
Trace and Cut the Real Legs
- Prepare leg blanks: Cut your plywood or solid wood into blanks the size of your rectangle (for example, four pieces at 18 × 3 1/2 inches).
- Trace the curve: Place the template on each blank and trace around it with a sharp pencil.
- Cut the curves: Use a jigsaw with a fine-tooth blade, taking your time around tight radiuses. Keep your off-hand out of the cut path and support the work securely.
- Clamp and sand: Stack a pair of legs together and sand them as a unit so they match. Repeat with the second pair. You can even use the template as a sanding guide to keep everything consistent.
Step 4: Build the Bench Frame
While the legs steal the show, the hidden frame is what keeps everyone from ending up on the floor mid-dinner. Think of it as a simple rectangular skeleton that the curved legs bolt into.
Cut the Frame Pieces
- 2 long stretchers: bench length minus about 2 inches (e.g., 58 inches for a 60-inch bench).
- 2 short stretchers: seat depth minus about 3 inches (for example, 11–12 inches for a 14–15 inch deep seat).
- Optional center support: 1 piece the same length as the short stretcher for extra rigidity under the seat.
Assemble the Rectangle
- Drill pocket holes in the ends of the short stretchers or pre-drill and screw through the long boards if you don’t have a pocket-hole jig.
- Glue and screw the rectangle together so it’s square. Check diagonals with a tape measure; both diagonals should match for a true rectangle.
- Add the center support in the middle if your bench is longer than about 48 inches or will see heavy use (kids using it as a launch pad, for example).
Step 5: Attach the Curved Legs
Now for the fun part: marrying those graceful curved legs to your practical frame.
Layout and Positioning
- Mark leg locations: Flip the frame upside down and measure in from each end (around 3–4 inches). Mark where the legs will sit so they’re symmetrical.
- Check orientation: Make sure all legs curve in the same direction and that the “foot” sits flat on the floor.
Secure the Legs
- Pre-drill screw holes: Drill through the frame into the top of each leg. Pre-drilling reduces the chance of splitting, especially with plywood or hardwood.
- Add glue: Apply wood glue where the leg meets the frame for added strength.
- Drive screws: Use 2 1/2-inch wood screws to secure the legs. Aim for at least two screws per leg connection.
- Check for wobble: Flip the bench upright and gently rock it. If there’s wobble, you can slightly trim a leg bottom or sand to get all four legs perfectly level.
Step 6: Build and Attach the Seat Top
You can keep the top simple and wood-only, or go fancy and add upholstery later. Either way, a solid, flat surface is key.
Wood Seat Option
- Cut seat boards: Rip or cut your 1 × 4 or 1 × 6 boards to the final bench length. Lay them across the frame with even overhangtypically 1/2–1 inch on each side.
- Glue and clamp: Spread wood glue between edges and clamp the boards together, or attach them individually to the frame with 1 1/4-inch screws from underneath.
- Hide screws if desired: Using pocket holes from underneath keeps the top clean with no visible fasteners.
Upholstered Seat Option
If you want a softer dining experience (and some sound absorption for echo-y rooms), try an upholstered top:
- Cut a 3/4-inch plywood panel to your bench size.
- Secure 2–3-inch foam to the top using spray adhesive.
- Wrap with batting, then with your fabric of choice, pulling it snug and stapling underneath.
- Attach the finished upholstered seat to the frame from below with 1 1/4-inch screws.
Step 7: Sanding, Staining, and Finishing
Finishing is where the bench really transforms from “stack of lumber” to “look what I made!” Take your time here, especially around the curves.
- Sand in stages: Start with 80-grit to smooth saw marks and shape the curves, then move to 120-, 180-, and 220-grit for a silky finish.
- Fill imperfections: Use wood filler on screw holes and gaps. Sand again once dry.
- Condition softwood: If you’re using pine, a pre-stain wood conditioner can help prevent blotchy stain.
- Apply stain or paint: Wipe on stain with a rag and buff off excess, or roll/brush paint in thin coats. Curved legs look amazing in a contrasting color to the seat.
- Seal the surface: Use two to three coats of clear finish, sanding lightly between coats with 220–320 grit for a smooth touchable feel.
Styling Your New Curved-Leg Bench
Once the bench is finished and cured, it’s time to show it off:
- At the dining table: Slide it along one long side for flexible seating.
- In a breakfast nook: Pair it with a round or rectangular table for a cozy café vibe.
- As hallway seating: Add hooks above and baskets below for an instant mudroom moment.
- In the bedroom: Place it at the end of the bed for a stylish perch and extra blanket storage.
Common Mistakes to Avoid
- Overly skinny legs: When in doubt, leave the legs a little beefier. Too-thin curves can look pretty but feel wobbly.
- No center support on long benches: A 6–8-foot bench almost always needs an extra stretcher or middle leg.
- Skipping the template: Freehand cutting each leg separately usually leads to mismatched shapes. Template first, cut second.
- Rushing the sanding: Curves show every scratch under stain. Take the extra 10–15 minutes to sand properly.
Real-World Tips and Experience for Building a Curved-Leg Dining Bench
The first time you cut a curved leg, it might feel a little intimidating. The good news: wood is more forgiving than it looks, and a sander is basically an “undo” button in slow motion. Here are some extra lessons that DIYers often learn the hard wayso you don’t have to.
Start With a Mockup
Before cutting into your “nice” plywood or hardwood, make at least one leg from scrap. This lets you test how dramatic the curve feels. A super-deep swoop may look gorgeous on paper, but in real life it can steal too much material from the leg and compromise stability. A gentler arc often looks more refined and is easier to sand smooth.
Clamp Like You Mean It
When attaching legs to the frame, clamping everything before driving screws helps avoid shifting. It’s tempting to hold a leg with one hand and run the drill with the other, but even a small wiggle can tilt the leg out of square. Two quick clamps across the joint keep everything locked in while you work, and your future self will appreciate having a solid, non-wobbly bench.
Read the Room (Literally)
It’s easy to get hyper-focused on the bench project and forget the rest of your dining area. Before you commit to a stain or paint color, look at your flooring, table finish, and nearby cabinets. A slightly warmer stain on the bench legs can balance a cool-toned table, while painted white or black legs can tie into trim or light fixtures. Taking a minute to hold a stain or paint sample in the actual room saves you from “why does this look orange now?” regret.
Think About Everyday Use
Benches live hard lives. They get kicked, slid, bumped, and occasionally turned into racetracks by small children. If you know your bench is going to see a lot of action:
- Choose a finish that’s easy to wipe clean and can handle occasional water rings.
- Round over the seat edges and leg corners for fewer bruised shins.
- Consider felt pads on the feet if you have hardwood or tile floors.
Also, think about how people will get in and out. Leaving a bit of space between the bench and wall makes sliding in easier and keeps your beautiful curved legs from constantly banging into baseboards.
Don’t Fear Minor Imperfections
Handmade furniture has personality. A tiny variation in the curve or a faint sanding swirl rarely shows once the bench is in use. Instead of chasing absolute perfection, aim for “consistent and sturdy.” If a curve looks slightly different on one leg, you can soften it with a bit more sanding or shift it toward the inside of the bench where it’s less noticeable. Most guests will be too busy enjoying dinner to critique the radius of your arcs.
Plan for the Future
Because you built the bench yourself, you control how easy it is to repair, refinish, or modify later. Using screws instead of only nails or glue means you can remove the top if you ever want to switch from wood to upholstery or vice versa. A solid frame with well-attached curved legs becomes a long-term piece you can evolve with your style: new fabric, a different stain color, or even a shortened version for a new table.
Ultimately, building a DIY dining table bench with curved legs is less about chasing a magazine-perfect photo and more about creating a piece that fits your home, your people, and your everyday life. Once you’ve built one, you may find yourself sketching curved-leg variations for entryway benches, bedroom seating, or a cozy breakfast nookbecause that mix of function and sculptural style is surprisingly addictive.
Final Thoughts
With thoughtful planning, a simple set of tools, and a little patience around those curvy cuts, you can build a dining table bench that looks custom-made and feels rock solid. The curved legs add a designer touch without dramatically increasing difficulty, and the bench format keeps your dining area flexible and welcoming.
Whether you’re hosting big family gatherings or simply want a more relaxed, casual dining setup, this DIY project turns basic lumber into a hardworking, beautiful piece you’ll be proud to say you built yourself.