Table of Contents >> Show >> Hide
- Quick Table of Contents
- Why Recessed Wall Shelves Work So Well
- Plan First (So You Don’t Cut Into “Surprise Plumbing”)
- Tools and Materials
- Step-by-Step: Build and Install the Shelf
- Step 1: Find the studs and choose the shelf location
- Step 2: Make a small inspection hole
- Step 3: Decide your shelf size (and keep it practical)
- Step 4: Mark and cut the full drywall opening
- Step 5: Add simple framing (blocking) if needed
- Step 6: Build the recessed shelf box
- Step 7: Add a face frame or “lip” for a built-in look
- Step 8: Dry-fit, level, and shim
- Step 9: Fasten the shelf box to studs (and/or blocking)
- Step 10: Fill, sand, caulk, and finish
- Design Upgrades That Look High-End (Without Being High-Stress)
- Common Mistakes (and How to Avoid Them)
- Time, Cost, and Difficulty (Realistic Expectations)
- DIY Experiences: What It’s Really Like Building a Recessed Wall Shelf (and What You’ll Learn)
- Final Thoughts
If your room feels like it’s one throw pillow away from a full-blown clutter uprising, a DIY recessed wall shelf can be your secret weapon.
It adds storage without stealing floor space, looks custom (even if you built it in sweatpants), and turns that “empty wall” into something
useful and good-looking.
In this guide, you’ll learn how to build a recessed wall shelf that sits between studs (aka the easiest, most “why didn’t I do this sooner?”
version). We’ll cover smart planning, safe drywall cutting, simple framing, building a sturdy box, finishing it cleanly, and a bunch of real-world
lessons DIYers typically learn the hard wayso you don’t have to.
Quick Table of Contents
- Why recessed shelves work so well
- Plan first (so you don’t cut into “surprise plumbing”)
- Tools and materials
- Step-by-step: build and install the shelf
- Design upgrades that look high-end
- Common mistakes and fixes
- DIY experiences: what it’s really like
- SEO tags (JSON)
Why Recessed Wall Shelves Work So Well
A recessed shelf (sometimes called an in-wall shelf or wall niche) uses the hollow cavity inside a framed wall. Instead of hanging a shelf that
sticks out and bumps shoulders in a hallway, you build a shallow “box” that sits inside the wall. The front edge finishes flush with the drywall
for a clean, built-in look.
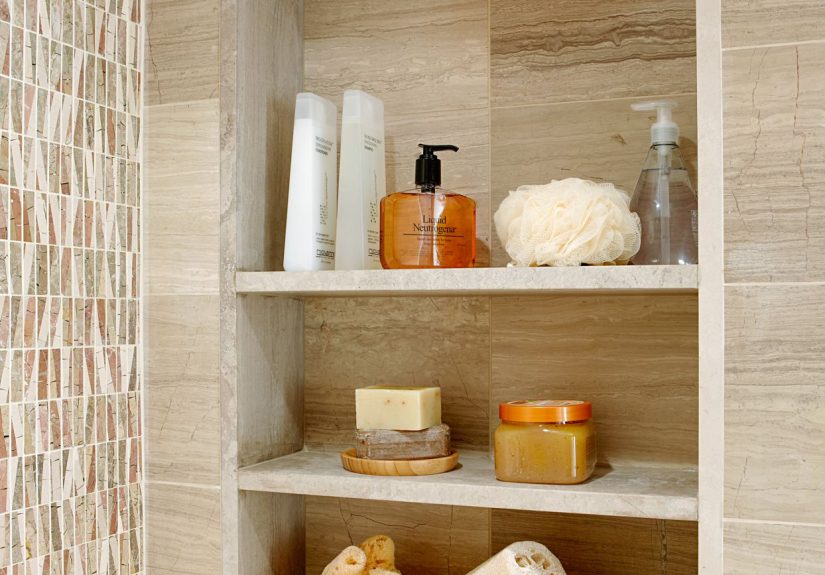
Perfect places for a recessed shelf
- Bathrooms: hair products, towels, extra toilet paper (the holy trinity)
- Hallways: keys, mail, small décorwithout turning the corridor into an obstacle course
- Bedrooms: a nightstand niche for a phone, book, and glasses
- Kitchens/pantries: spices, oils, or “where did we put the cling wrap?” storage
- Stairs/landings: a display nook for art, plants, or collectibles
Most walls framed with 2×4 studs can handle a shallow shelf for everyday items. The big trick is choosing the right wall bay and confirming it’s
clear of electrical, plumbing, and other “nope” obstacles before you make a bigger hole.
Plan First (So You Don’t Cut Into “Surprise Plumbing”)
1) Pick the right wall
For your first recessed wall shelf, choose an interior wall that’s unlikely to hide plumbing stacks or insulation. Bathrooms and kitchens can still
workjust expect more detective work behind the drywall.
2) Understand the “stud-bay shelf” vs. “wide shelf” decision
The simplest recessed shelf fits between two studs (one stud bay). That’s the approach this guide focuses on. If you want a shelf wider than one bay,
you may need to cut and reframe studs like you would for a window or recessed cabinetmore advanced and more “check local requirements and consider a pro.”
3) Do a safety check before you cut a big opening
- Turn off power to the area if you’ll be cutting near outlets/switches.
- Use a stud finder (bonus points if it also detects AC wiring).
- Make an inspection hole firstsmall, controlled, and easy to patch if needed.
- Stop immediately if you see wires, pipes, ducting, or anything you can’t confidently relocate.
Think of the inspection hole like knocking on a door before entering. Yes, it’s slower. No, it’s not optional if you like living in a home with
electricity and dry floors.
Tools and Materials
Tools
- Stud finder
- Tape measure and pencil
- Level (a small torpedo level is perfect)
- Drywall saw or oscillating multi-tool (cleaner cuts, more control)
- Flashlight and small mirror (or your phone camera)
- Drill/driver and bits
- Clamps (helpful, not mandatory)
- Sandpaper or sanding block
- Putty knife
Materials
- Wood for the box: 1/2-inch plywood is a common sweet spot (stable, strong, not bulky)
- Optional face frame/lip: 1×2 or 1×3 (or trim you already love)
- Wood glue
- Wood screws (for assembling the box and fastening to studs)
- Finish nails or brad nails (optional for trim/face frame)
- Wood filler/putty
- Paint or stain + primer (primer matters if you want a smooth finish)
- Caulk (paintable) for a seamless edge where wood meets drywall
Pro tip: If this shelf is going in a bathroom, choose moisture-resistant materials and finishes. Painted plywood or primed MDF can work,
but be thoughtful about sealing every edge. Water always finds the one spot you “meant to get later.”
Step-by-Step: Build and Install the Shelf
Step 1: Find the studs and choose the shelf location
Use a stud finder to locate the studs. Mark both edges of each stud, then mark the centerline. You want the shelf opening centered neatly in a stud bay
(the space between two studs).
Pick a height that makes sense for what you’ll store. Example: A bathroom shelf for hair products is often most convenient at chest-to-eye level,
while a hallway “catch-all” shelf is great at about waist height.
Step 2: Make a small inspection hole
Cut a small square opening (a few inches across) inside your planned shelf area. Angle the drywall saw slightly so the cutout doesn’t drop into the wall.
Shine a flashlight inside and use a mirror (or your phone camera) to look up, down, and sideways.
- If the bay is clear: great, proceed.
- If you see wires: stop and choose another bay (or consult an electrician).
- If you see pipes/vents: definitely choose another bay unless you truly know what you’re doing.
Step 3: Decide your shelf size (and keep it practical)
A simple recessed wall shelf is often designed as a clean square or rectangle that fits neatly between studs. Many DIYers start with something around
“small-cubby” size for a first buildbig enough to be useful, small enough to install without major framing changes.
Your shelf depth is determined by the wall framing. Interior walls are often framed with 2x4s, which typically allow a shallow but very usable niche.
If the wall is 2×6 framed, you can go deeper.
Step 4: Mark and cut the full drywall opening
Use a level to draw your cut lines. Outline the opening carefully, checking for square corners. Then cut along the lines with a drywall saw or
oscillating tool. Remove the drywall piece and clean up loose debris.
If your cuts are a little wobbly, don’t panic. Trim (or a face frame) can hide a lot. Drywall is forgiving. It’s basically the golden retriever of
building materials.
Step 5: Add simple framing (blocking) if needed
If you’re placing the shelf in a single stud bay and not cutting studs, you may be able to fasten the shelf box directly to the studs.
However, adding top and bottom blocking can make your installation more solid and give you more fastening points.
- Measure the distance between studs.
- Cut two pieces of 2×4 blocking to fit snugly.
- Install one at the top edge of the opening and one at the bottom edge, screwed into the studs.
If your shelf plan requires cutting a stud: That’s a different level of project. Treat it like framing a rough opening (header, supports,
proper fastening) and follow local building rules. When in doubt, get a professional opinionbecause drywall repair is cheap, but structural repair is
not a “fun weekend.”
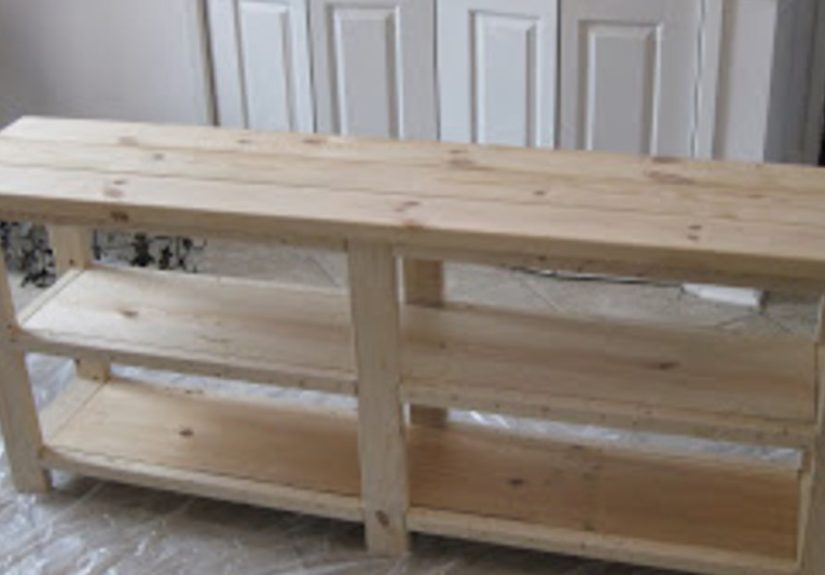
Step 6: Build the recessed shelf box
The box is the recessed shelf itself: a back panel, two sides, a top and bottom, plus one or more interior shelves. You can build it like a shallow cabinet
and then slip it into the wall opening.
Option A: Simple fixed-shelf box (beginner-friendly)
- Measure the opening (width, height, and usable depth). Build the box slightly smaller so it slides in without force.
- Cut the pieces from 1/2-inch plywood: back, two sides, top, bottom, and at least one shelf.
- Assemble the outer box using wood glue and screws (pre-drill to prevent splitting).
- Install the interior shelf (glue + screws through the sides, or use pocket screws, or cleats).
Option B: Adjustable shelves (a little extra effort, lots of flexibility)
Install shelf pin holes (using a jig) so you can move shelves later. This is perfect for bathrooms (tall bottles one month, rolled towels the next).
Step 7: Add a face frame or “lip” for a built-in look
A face frame (also called a trim lip) does two helpful things:
- Hides minor drywall cut imperfections
- Gives the shelf a finished, furniture-like edge
You can build a simple frame from 1×2 boards and attach it to the box front with glue and finish nails. Keep it square and flush.
If you like a cleaner modern look, you can skip the frame and instead make your drywall cut extra precisebrave, but totally doable.
Step 8: Dry-fit, level, and shim
Slide the box into the opening. Check that it sits flush with the wall and is level. If the studs are slightly twisted (extremely common), use thin shims
behind the box edges until it’s straight.
Don’t skip this. A shelf that’s “almost level” will display your items in a gentle downhill parade. You’ll notice. Your guests will notice. Gravity will win.
Step 9: Fasten the shelf box to studs (and/or blocking)
Drill pilot holes through the inside sides of the box into the studs (or into the blocking you installed). Then drive screws to secure it.
Use at least two screws per side for stability.
Step 10: Fill, sand, caulk, and finish
Now you make it look like it was always meant to be there.
- Fill holes and seams with wood filler; let dry.
- Sand smooth (especially on the face frame corners and edges).
- Caulk the perimeter where the shelf meets drywall for a seamless transition.
- Prime (especially important for plywood edges and any trim).
- Paint or stain (paint is easiest to blend into the wall; stain makes it look like a furniture feature).
If you’re painting in a bathroom, choose a durable, moisture-resistant paint. For a shelf that will hold toiletries, a satin or semi-gloss finish is often
easier to wipe clean than flat paint.
Design Upgrades That Look High-End (Without Being High-Stress)
Make it look custom with one small twist
- Paint it wall-color: makes the niche feel architectural and intentional.
- Contrast color: dark shelf interior, light wall = instant “designer did it.”
- Add an arch: a shallow arched top softens the look (great for older homes or cozy styles).
- Use a back panel detail: beadboard, wallpaper, or a thin wood slat panel turns the inside into a feature.
- Install subtle lighting: small, low-voltage puck lights can make a stairwell niche feel like a gallery.
Example design scenarios
Example 1: Bathroom “tiny wall” rescue. A narrow bathroom wall gets a recessed shelf with two adjustable shelves: top for skincare, bottom for hair tools. Paint it the same color as the wall so it disappears (in a good way).
Example 2: Hallway drop-zone niche. A recessed shelf near the entry holds keys, sunglasses, and mailplus a small hook rail beneath. Suddenly your countertops can breathe again.
Example 3: Stairwell display niche. Three shallow shelves for framed photos and small plants, finished with a simple trim frame. It turns a “blank wall you walk past” into a moment.
Common Mistakes (and How to Avoid Them)
Mistake 1: Cutting first, checking later
Always do the inspection hole. It’s the difference between “fun DIY project” and “why is the breaker tripping and why do I hear water?”
Mistake 2: Building the box to exact stud-bay width
Studs aren’t always perfectly straight or perfectly spaced. Build the box slightly smaller than the opening and plan to shim it. A snug fit is great;
a forced fit is how drywall corners get busted.
Mistake 3: Skipping primer
If you want your paint finish to look smooth and durable, prime firstespecially on cut plywood edges and trim. Otherwise, the wood grain will “telegraph”
through and your shelf will look… rustic. Even if you weren’t going for rustic.
Mistake 4: Underestimating how much a level matters
A recessed shelf is basically a frame for your stuff. If it’s even slightly crooked, your eyes will find it every time you walk past.
Take the extra two minutes to level and shim.
Mistake 5: Using the wrong wall in the wrong room
Exterior walls can have insulation and vapor barriers. Wet walls (like shower walls) require waterproofing systems and are a different category of project.
For your first recessed shelf, an interior wall is the easiest win.
Time, Cost, and Difficulty (Realistic Expectations)
- Time: Often a weekend project, with most time spent on finishing (filler drying, sanding, priming, painting).
- Cost: Typically modestwood, screws, filler, caulk, and paint. The “luxury upgrade” cost is usually trim and upgraded materials.
- Difficulty: Intermediate if you’re comfortable measuring, cutting, and basic assembly. Beginner-friendly if you go slow and keep it a single-bay shelf.
The good news: even if something goes slightly sideways, most fixes are cosmetictrim, filler, caulk, paint. Drywall is surprisingly forgiving when you
treat it nicely (and stop arguing with it).
DIY Experiences: What It’s Really Like Building a Recessed Wall Shelf (and What You’ll Learn)
Let’s talk about the part most tutorials gloss over: the “in-between moments” where you’re standing there with a drywall saw thinking,
Is this a home improvement project… or the start of a home improvement documentary?
First, you’ll learn that walls are basically mystery novels. You can make smart assumptions (studs are usually spaced consistently, interior walls usually
hide fewer pipes), but the plot twist is always possible. That’s why the inspection hole feels like overkill until it saves you from cutting into a wire.
Many DIYers discover a staple line, a random horizontal brace, or an old cable run that someone “temporarily” installed in 2009 and forgot to remove.
When that happens, the best move is to pause and pivot: shift the shelf up or down, move to the next stud bay, or change the shelf size.
Second, you’ll experience the great truth about framing: studs have personalities. Some are straight. Some lean. Some are slightly bowed like they’ve been
carrying the emotional weight of the house for decades. This is where shims become your best friend. The shelf box might be perfectly square on your workbench,
but the wall cavity might be a little “abstract.” Shimming behind the box edges and checking level from multiple angles is what separates a shelf that looks
built-in from a shelf that looks like it’s trying to slide into another dimension.
Third, finishing will take longer than you wantand that’s normal. The shelf can be structurally done in an afternoon, but the filler-dry-sand-prime-paint
cycle is what makes it look professional. DIYers often rush this part, then wonder why the corners look rough or why the paint finish feels uneven.
The reality: clean finishing is mostly patience, not talent. Apply filler neatly, sand with intention, and don’t skip primer. If you want a truly seamless
look where the shelf meets drywall, paintable caulk is the magic trickjust smooth it carefully and let it cure before painting.
Fourth, you’ll learn to design for real life, not just for photos. That ultra-minimal shelf with exactly one vase looks amazing online, but in a bathroom,
you need space for taller bottles, wider jars, and the occasional “why is this product shaped like a rocket?” container. Adjustable shelves help. A slightly
taller niche helps. Even a small front lip can prevent items from sliding forward when someone closes a door a little too enthusiastically.
Fifthand this one surprises peopleyou’ll start noticing “dead space” everywhere. After building one recessed wall shelf, you’ll look at blank walls and
think, “That could be storage.” A stairwell could be a display niche. A hallway could be a charging nook. A closet wall could hide a slim organizer.
That’s the real win: you’re not just building a shelf; you’re training your DIY brain to see opportunities.
The best part? When you’re done, it feels like you gained square footage without paying for square footage. Your shelf doesn’t stick out. It doesn’t crowd
the room. It just quietly does its jobholding your essentials, elevating the space, and reminding you that sometimes the best storage is the storage you
don’t trip over.
Final Thoughts
A DIY recessed wall shelf is one of those rare home projects that checks every box: practical, space-saving, attractive, and genuinely satisfying.
Start with a single stud bay, do the inspection hole, build the box slightly undersized, shim it level, and take your time on finishing. That’s the
recipe for a recessed shelf that looks like it came with the housein the best possible way.