Table of Contents >> Show >> Hide
- Why the Hip Thrust Machine Builds Glutes So Well
- Quick Anatomy: Which Glutes Are You Actually Training?
- Hip Thrust Machine Setup: The 60-Second Checklist
- The Perfect Rep: Step-by-Step Technique
- Common Hip Thrust Machine Mistakes (and the Fast Fix)
- Progressive Overload: How to Grow Glutes Without Growing Back Pain
- How to Program the Hip Thrust Machine for Glute Growth
- Warm-Up and Activation: Get Your Glutes “Online”
- Boosters and Variations (When You Need More Than “Up and Down”)
- How to Tell If Your Hip Thrusts Are Working
- FAQ: Hip Thrust Machine Questions People Actually Ask
- Real-World Experience: What It’s Like Building Glutes With a Hip Thrust Machine (About )
- Conclusion
If you want glutes that are strong enough to sprint, jump, hike, and carry your groceries up the stairs without your lower back writing a complaint letter, the hip thrust machine is basically a cheat code. It’s stable, easy to load, and (bless it) doesn’t require you to wrestle a barbell onto your lap like you’re auditioning for a circus.
This guide will show you how to use a hip thrust machine to build powerful glutes with clean form, smart programming, and progress you can actually measure. We’ll talk setup, cues, common mistakes, rep ranges, and sample workoutsplus a longer “real-life” experience section at the end, because the best tips usually show up after you’ve done a few sessions and learned what not to do.
Why the Hip Thrust Machine Builds Glutes So Well
The hip thrust is a hip extension movementyour glutes drive your hips from flexion into full extension. What makes the hip thrust machine special is how consistent it is. The machine stabilizes your body, keeps the resistance predictable, and makes it easy to repeat the same “good rep” again and again. Consistency is a huge deal for glute hypertrophy because your muscles grow best when the stimulus is repeatable and progressively increased over time.
- Easy progressive overload: Add weight, reps, pauses, or tempo without reinventing the setup every set.
- Less setup drama: No bench sliding, no bar rolling, no hip bones begging for mercy.
- Glute-friendly loading: Hip thrusts load the glutes hard near lockout, where they can produce a ton of force.
- Great for mind-muscle connection: The stable environment helps you feel your glutes working instead of “everything at once.”
Quick Anatomy: Which Glutes Are You Actually Training?
Your “glutes” aren’t one muscle. Think of them as a small team with one big star:
- Gluteus maximus: The main hip extensor and the biggest contributor to that powerful “stand up and drive” motion.
- Gluteus medius: Helps stabilize the pelvis and controls hip positionhuge for single-leg strength, knee alignment, and overall athleticism.
- Gluteus minimus: Works with the medius to stabilize and assist hip movement.
The hip thrust machine heavily targets the gluteus maximus, but your medius/minimus still matter because they stabilize your hips and help keep your knees tracking wellespecially when you add bands or do single-leg variations.
Hip Thrust Machine Setup: The 60-Second Checklist
A hip thrust machine rep is only as good as your setup. The goal is a strong, braced torso with the movement coming from your hipsnot your lower back. Use this checklist before you start cranking out reps like a metronome.
1) Adjust the machine to fit you
- Back/shoulder position: Your upper back should be supported so your torso can hinge smoothly during the thrust.
- Pad placement: The pad should sit across the crease of your hips (not your stomach, not your thighs, not your hopes and dreams).
- Foot platform distance: Set it so you can reach a strong top position without your knees collapsing inward or your lower back arching.
2) Nail your foot placement (this changes everything)
A simple starting point: at the top, your shins should look close to vertical and your knees should be around a right angle. Then fine-tune based on what you feel:
- Feeling mostly hamstrings? Bring your feet a bit closer or reduce how far you’re pushing through your toes.
- Feeling mostly quads? Move feet slightly farther away and focus on driving through midfoot/heel.
- Feeling it in your lower back? Reduce the load, tuck your ribs, and avoid “finishing” the rep by arching your spine.
3) Brace like you’re about to cough (politely)
Before each set, inhale through your nose, expand your ribcage 360 degrees, and brace your core. Keep your ribs “down” and pelvis controlled. A great cue is “ribs down, chin slightly tucked, eyes forward/down”. You want hip extension, not a mini backbend.
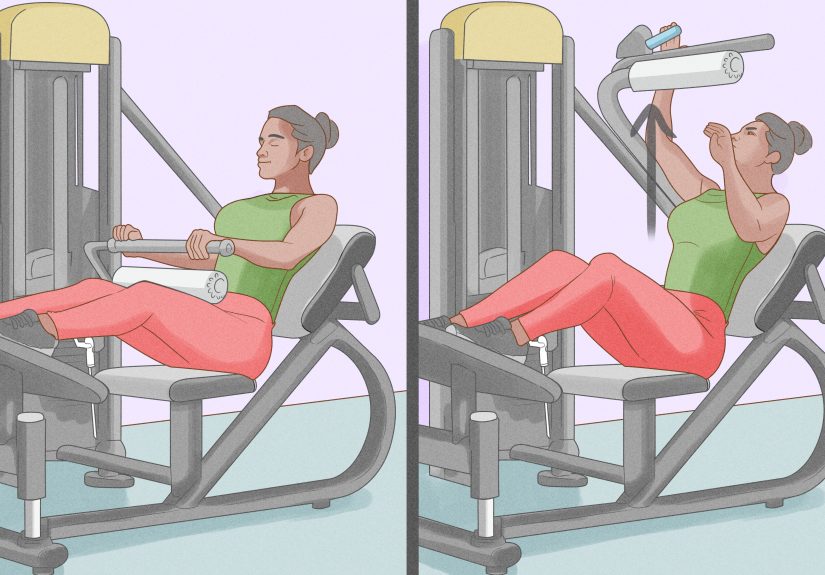
The Perfect Rep: Step-by-Step Technique
- Start position: Hips lowered with control. Keep your core braced and your feet planted.
- Drive up: Push through your heels/midfoot and squeeze your glutes to lift the pad. Think “hips to the ceiling,” but keep your ribs down.
- Own the top: At full hip extension, your torso and thighs form a strong line. Pause for 1 second and squeeze your glutes hard. You should feel your butt doing the worknot your spine.
- Controlled descent: Lower slowly (2–3 seconds). Don’t crash the weight. The eccentric matters for muscle growth and joint comfort.
- Repeat with the same shape: Every rep should look like a copy-paste of the one before it. Consistency beats chaos.
Common Hip Thrust Machine Mistakes (and the Fast Fix)
Mistake #1: Overextending at the top
This is the classic “I finished the rep with my lower back” problem. You hit lockout and then keep goingribs flare, pelvis tips forward, and suddenly your lumbar spine is the main character. Not ideal.
Fix: Stop the rep when your hips are fully extended and your ribs are still down. Think “glutes squeeze, not back bend.”
Mistake #2: Feet placed for someone else’s body
Copying a random foot position from the internet is like copying a random person’s shoe size. It might work. It might also be a disaster.
Fix: Start with vertical shins at the top, then adjust slightly until the glutes dominate and the movement feels stable.
Mistake #3: Bouncing reps to “get more”
Bouncing turns your set into a physics demo. Your glutes want tension. Your ego wants momentum. Only one of those builds muscle.
Fix: Add a 1-second pause at the top and a slow lower. If you can’t control it, it’s too heavy (for today).
Mistake #4: Knees collapsing inward
When the knees cave, you lose hip stability and often shift tension away from the glutes.
Fix: Drive knees slightly outward (not extreme) and keep feet firmly planted. A light mini-band above the knees can help teach the pattern.
Mistake #5: Turning it into a “hamstring bridge”
Hip thrusts should involve hamstrings, surebut if hamstrings are doing everything, your glutes are basically on a coffee break.
Fix: Move feet a little closer, emphasize the glute squeeze at lockout, and keep your pelvis controlled.
Progressive Overload: How to Grow Glutes Without Growing Back Pain
To build powerful glutes, you need progressive overload. The trick is picking overload methods that don’t wreck your form. Use one primary lever at a time:
- Load: Add 5–10 pounds when you can complete all sets with clean reps.
- Reps: Add 1–2 reps per set until you hit the top of your target range, then increase weight.
- Pause: Add a 1–2 second hold at the top to increase time under tension.
- Tempo: Slow the lowering phase to 3 seconds for a brutal (and effective) hypertrophy stimulus.
- Range of motion: Increase controlled depth if your hips and machine allow itwithout losing spinal position.
Pro tip: if your lockout gets sloppy as weight increases, don’t “solve” it by arching your back harder. Solve it by reducing load and building strength in the correct position (pauses are your best friend here).
How to Program the Hip Thrust Machine for Glute Growth
The hip thrust machine works best when you combine heavy-ish work (for strength) with moderate-to-higher reps (for hypertrophy and metabolic stress). Most lifters grow well using two to three glute-focused sessions per week, with hip thrusts appearing 1–2 times weekly depending on recovery.
Best rep ranges for the hip thrust machine
- Strength focus: 3–6 reps (heavier load, longer rests, perfect form)
- Size “workhorse” range: 6–10 reps (great balance of load and volume)
- Hypertrophy/pump focus: 10–20 reps (especially comfortable on machines)
Beginner plan (2 days/week lower body)
Day A (glute strength + patterning)
- Hip Thrust Machine: 4 sets x 6–10 reps (1-second squeeze at top)
- Romanian Deadlift (dumbbell or barbell): 3 sets x 8–12
- Leg Press (feet higher): 2–3 sets x 10–15
- Banded Hip Abductions: 2 sets x 15–25
Day B (glute hypertrophy + stability)
- Hip Thrust Machine: 3 sets x 12–15 (2–3 second lower)
- Bulgarian Split Squat (glute-biased stride): 3 sets x 8–12 each side
- Back Extension (glute focus): 2–3 sets x 10–15
- Cable Kickback or Machine Abduction: 2 sets x 12–20
Intermediate plan (3 days/week glute emphasis)
- Day 1: Hip Thrust Machine heavy 5×5 or 4×6, then hamstring hinge work
- Day 2: Single-leg pattern (split squats or step-ups) + abduction work
- Day 3: Hip Thrust Machine pump 3–4×12–20 + glute accessories
Keep at least one rest day between heavy thrust sessions. Your glutes might be tough, but your connective tissue is not impressed by nonstop maximal loading.
Advanced progression example (4-week wave)
- Week 1: 4×8 (moderate load, 1-second pause)
- Week 2: 5×6 (slightly heavier, longer rest)
- Week 3: 4×10 (back to moderate, add reps)
- Week 4: 3×12–15 (lighter load, slow eccentrics, huge pump)
Then repeat with slightly heavier loads or tighter execution. That’s how you build glute strength and size without burning out.
Warm-Up and Activation: Get Your Glutes “Online”
If you sit a lot, your body can get really good at using everything except your glutes. A short warm-up helps you feel the right muscles before you load heavy.
- Glute bridge holds: 2 x 20–30 seconds, squeeze hard
- Banded lateral walks: 1–2 x 10–15 steps each way
- Bodyweight hip hinges: 1–2 sets of 8–10 (practice bracing)
- Hip flexor stretch: 30–45 seconds each side (tight hip flexors can limit hip extension)
Boosters and Variations (When You Need More Than “Up and Down”)
The hip thrust machine can be progressed beyond adding plates. Here are smart add-ons that increase glute activation without turning your workout into chaos:
- Top-end pauses: 1–2 seconds at lockout to improve control and glute squeeze.
- 1.5 reps: Up → half down → back up → full down. Brutal pump, great for hypertrophy blocks.
- Banded knees: A mini-band above the knees encourages outward drive and hip stability.
- Tempo sets: 3-second lowering phase to increase time under tension.
- Mechanical drops: Finish your last set by reducing weight 20–30% and doing 8–12 more controlled reps.
How to Tell If Your Hip Thrusts Are Working
You don’t need a lab test to know you’re building glutes. You need consistent signals that progress is happening:
- Performance: More reps with the same weight, or more weight with the same reps, while keeping clean form.
- Target sensation: Strong glute pump and fatigue in the glutes (not sharp pain in the back or hips).
- Carryover: Stronger lockout in deadlifts, better sprinting/jumping power, improved posture and hip stability.
- Recovery: Soreness that’s manageable and decreases as you adapt (constant crippling soreness is not a badge of honor).
FAQ: Hip Thrust Machine Questions People Actually Ask
Should I feel hip thrusts in my hamstrings?
Some hamstring involvement is normal. But if hamstrings dominate, adjust foot placement (usually slightly closer), focus on glute squeeze at the top, and slow down.
What if I feel it in my lower back?
Reduce the load, brace harder, keep ribs down, and stop overextending at lockout. If discomfort persists, shorten range slightly and rebuild control with pauses.
How often should I use the hip thrust machine?
Most people do best with 1–2 hip thrust machine sessions per week, plus other glute exercises (hinges, split squats, abductions). More isn’t always better if recovery drops.
What’s a good starting weight?
Start light enough to keep every rep controlled with a clear glute squeeze at the top. Your first goal is repeatable form. The weight can climb quickly once the pattern is dialed in.
Real-World Experience: What It’s Like Building Glutes With a Hip Thrust Machine (About )
Here’s what tends to happen when people commit to the hip thrust machine for a few weeksbecause real progress is less “one perfect workout” and more “stacking a bunch of good sessions like pancakes.”
Week 1 usually feels… weird. Not bad-weird, just “Is this how my body is supposed to fold?” weird. Most lifters start by fighting the machine: the pad feels awkward, the feet feel “off,” and the top position is either too short (no lockout) or too dramatic (hello, lower back arch). The breakthrough almost always comes from a tiny adjustmentmoving the feet half an inch, lowering the load, and bracing harder. Suddenly, the glutes wake up like they just heard their favorite song.
Week 2 is the mind-muscle connection glow-up. Once you stop chasing heavy weight immediately, you start noticing which cues make the movement click: chin slightly tucked, ribs down, and a hard glute squeeze at the top. Many people also realize they were “rushing” the rep. Slowing the lowering phase turns the exercise from “up, down, done” into “oh wow, my glutes are doing work.”
Week 3 is where ego tries to sabotage you. You’re feeling stronger, so you add weight fast. This is the week where form can slipespecially at lockout. The common trap is thinking “more range = more gains” and then finishing the rep with your spine. The best strategy is boring but effective: keep your setup identical, pause at the top, and add weight only when your reps look the same as last week. If your last two reps turn into a back extension party, you didn’t “push hard”you changed the exercise.
Week 4 is when you notice carryover. People often report stronger hip drive in other lifts, better stability in single-leg movements, and a more obvious glute pump during training. The machine also tends to reduce the “setup fatigue” that can happen with barbell hip thrusts, which means you’re fresher for your accessory work (split squats, RDLs, abductions). That matters because the best glute programs don’t rely on one exercisethey build the glutes through multiple patterns: hip extension, hinge, and hip stability.
And yes, there’s the aesthetic side: glutes can look fuller when you’re consistent with progressive overload and you’re eating enough protein to support muscle growth. But the most underrated change is how your body feels: stronger hips can make daily movement smoother, reduce the tendency to “live in” your low back, and help you move like your legs and torso are on the same team.
If you take nothing else from the experience: treat the hip thrust machine like a skill. Master the shape first, then load it. Your glutes will reward you with strength, size, and a level of confidence that makes you walk away from the machine like you just paid rent on it.
Conclusion
The hip thrust machine is one of the most efficient tools for building powerful glutes because it lets you train hard with consistent form and repeatable tension. Dial in your setup, drive through your feet with a braced torso, squeeze at lockout without overextending, and progress intelligently using weight, reps, pauses, and tempo. Combine machine hip thrusts with hinges, split squats, and hip abduction work, and you’ll build glutes that are stronger, bigger, and more athleticnot just “tired.”