Table of Contents >> Show >> Hide
- Why Desk Chair Wheels Get So Gross So Fast
- What You Need for This Easy DIY Job
- Step-by-Step: How to Clean the Wheels of a Rolling Desk Chair
- Step 1: Flip the Chair Over and Inspect the Damage
- Step 2: Remove the Casters if Possible
- Step 3: Cut Away Hair and Large Debris
- Step 4: Vacuum or Brush Out Loose Dust
- Step 5: Wash the Wheels With Warm Soapy Water
- Step 6: Dry Everything Thoroughly
- Step 7: Add Lubricant Only if You Actually Need It
- Step 8: Reinstall and Test the Chair
- When Cleaning Is Not Enough
- How Often Should You Clean Office Chair Wheels?
- Easy DIY Tips to Keep Desk Chair Wheels Cleaner Longer
- Mistakes to Avoid When Cleaning Rolling Desk Chair Wheels
- Real-Life DIY Examples
- Experiences and Everyday Lessons From Cleaning Desk Chair Wheels
- Final Thoughts
- SEO Tags
If your desk chair sounds like it is chewing gravel every time you roll to the printer, congratulations: your caster wheels are officially begging for attention. The good news is that cleaning the wheels of a rolling desk chair is not some elite home-maintenance ritual reserved for people who label their storage bins. It is an easy DIY job, it usually takes less than an hour, and the payoff is immediate. Your chair glides better, your floor stays cleaner, and your sanity gets a modest but meaningful raise.
Over time, office chair wheels collect hair, dust, lint, crumbs, pet fur, mystery fuzz, and the kind of tiny debris that seems to appear whenever nobody is looking. That buildup wraps around the axle, sticks inside the wheel housing, and turns smooth rolling into a squeaky, sticky, draggy mess. In many cases, a basic cleaning restores the chair without replacing the casters at all.
In this easy DIY guide, you will learn how to clean rolling desk chair wheels step by step, what tools work best, when to soak the casters, when to use a brush, and when a wheel is simply done with this life and ready for retirement.
Why Desk Chair Wheels Get So Gross So Fast
Rolling desk chair wheels sit at floor level, which is basically the splash zone of your home office. Every bit of dust, shed hair, snack crumb, thread, and pet fluff takes a ride. Once the chair moves, that debris winds around the wheel axle and packs into the tiny gaps inside the caster.
The problem gets worse if you work on carpet, have pets, shed long hair, or use the same chair all day every day. Even hard floors are not immune. Fine dust and lint still cling to the wheel housing, and sticky residue from everyday life can make the buildup cling like it signed a lease.
Common signs your office chair wheels need cleaning include:
- The chair feels harder to push or pull.
- The wheels stop spinning freely.
- You hear squeaking, scraping, or a crunchy sound.
- The chair leaves dust trails or smudges behind.
- You can visibly see hair wrapped around the wheel axle.
What You Need for This Easy DIY Job
You do not need a fancy tool kit or a dramatic background soundtrack. Most people already have everything required at home.
Basic Supplies
- Scissors or a seam ripper
- Tweezers or needle-nose pliers
- Flathead screwdriver
- Old toothbrush or soft-bristle brush
- Dish soap
- Warm water
- Microfiber cloth or soft rag
- Small bowl, tray, or bucket
- Vacuum with hose attachment, optional
- Compressed air, optional
- Silicone-based lubricant, optional
Put down an old towel or mat before you flip the chair over. This protects both the chair and your floor, and it also prevents that awkward “wrestling a chair base on hardwood” moment nobody enjoys.
Step-by-Step: How to Clean the Wheels of a Rolling Desk Chair
Step 1: Flip the Chair Over and Inspect the Damage
Turn the chair upside down so the wheels are easy to access. At this point, do not be alarmed if the caster area looks like it has been filtering a golden retriever for six months. That is normal. Horrifying, yes. Common, also yes.
Take a close look at each wheel. Check for wrapped hair, string, dust clumps, sticky grime, cracked plastic, or flat spots. Spin each caster by hand. Some may still rotate a little, while others may be frozen like they are protesting unsafe working conditions.
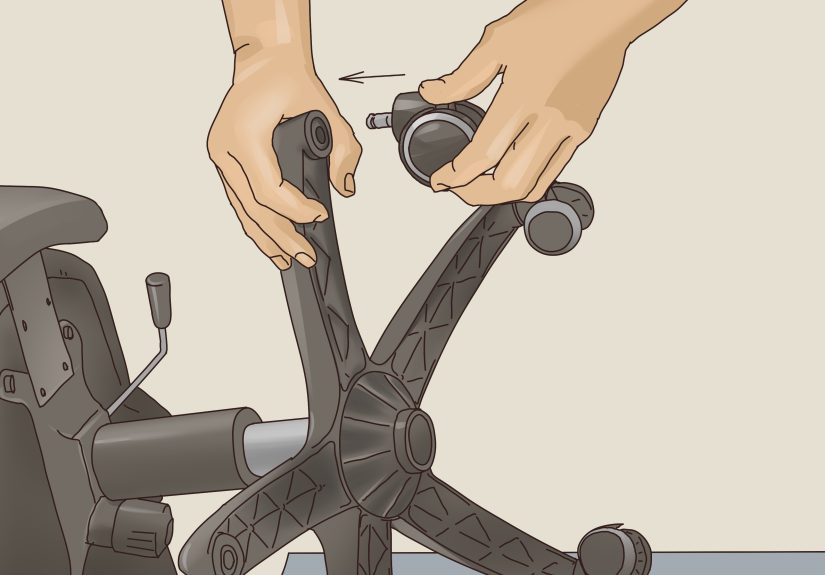
Step 2: Remove the Casters if Possible
Many rolling desk chair wheels pull straight out of the chair base. Grip a caster firmly and tug. If it resists, wiggle it gently while pulling. For stubborn wheels, use a flathead screwdriver to help pry carefully near the stem. Work slowly so you do not damage the base.
If your chair uses screw-in casters instead of push-fit ones, remove them according to the hardware style. If the wheels will not come off, do not panic. You can still clean them while attached; it is just a bit more awkward and a little less satisfying.
Step 3: Cut Away Hair and Large Debris
This is the most important part of the whole DIY process. Use scissors, a seam ripper, or the tip of a small blade to slice through hair and fibers wrapped around the wheel axle. Once you break the mat of hair, use tweezers or needle-nose pliers to pull everything out.
Work slowly around the center of the wheel. You are not trying to win a speed contest. You are trying to avoid stabbing your hand while removing what appears to be a tiny haunted wig from your chair wheel.
For really compacted buildup, alternate between cutting and pulling. Often, removing the bulk of the tangled hair is enough to make the wheel spin better right away.
Step 4: Vacuum or Brush Out Loose Dust
Once the big debris is gone, use a vacuum hose or compressed air to pull out the loose dust hiding inside the wheel housing. Then scrub the caster with an old toothbrush or soft-bristle brush to loosen dirt from the edges, grooves, and tight corners.
This step matters because tiny grit can keep the wheel from rolling smoothly even after you remove the visible hair. Think of it as the difference between “looks better” and “actually works better.”
Step 5: Wash the Wheels With Warm Soapy Water
Mix a small amount of dish soap into warm water. If the casters are removable, place them in a bowl or shallow bucket and let them soak for about 5 to 10 minutes. That softens grime and loosens the stubborn residue wedged into the wheel assembly.
After soaking, scrub each wheel with your brush. Pay extra attention to the axle area and the groove around the wheel where lint likes to hide. If the wheels are still attached to the chair, dip your brush into the soapy water and scrub in place. A shallow tray can help if you want to partially soak the attached wheels without turning your office into a swamp.
Wipe away dirty water with a cloth, then rinse with clean water using a damp rag. Do not drench the chair base if the wheels are still attached. The goal is clean, not soaked.
Step 6: Dry Everything Thoroughly
This is the step people rush, then regret. Use a microfiber cloth to dry the wheels well, then let them air dry fully before reinstalling or using the chair. Any trapped moisture can attract new dust, encourage grime buildup, or create issues around metal parts and bearings.
If you are cleaning a chair in a humid room, give it extra drying time. Five rushed minutes is not the same as truly dry.
Step 7: Add Lubricant Only if You Actually Need It
If the casters are clean and dry but still squeak or resist spinning, apply a tiny amount of silicone-based lubricant to the moving parts. Tiny means tiny. You want the mechanical equivalent of a polite handshake, not a deep-fryer situation.
Wipe away excess immediately. Too much lubricant can attract dust and turn your freshly cleaned wheels into lint magnets by next Tuesday.
Step 8: Reinstall and Test the Chair
Push the clean casters back into the chair base or screw them back in securely. Set the chair upright and roll it across the floor. Ideally, it should glide smoothly, turn easily, and stop sounding like a shopping cart with unresolved anger issues.
If one wheel still drags, remove it again and check for trapped debris or damage. Sometimes a second pass is all it takes. Sometimes the wheel is just worn out and needs replacing.
When Cleaning Is Not Enough
Sometimes the problem is not dirt. It is age, wear, or damage. Replace the caster if you notice any of the following:
- Cracked wheel housing
- Flat spots on the wheel
- Bent stem or loose fit
- Wheel still will not spin after cleaning
- Persistent wobbling or grinding
Replacement office chair wheels are widely available, and many are sold as universal-style casters. Just make sure the stem type and size match your chair before ordering. If you want a smoother ride, many people upgrade to soft polyurethane or rollerblade-style casters for better glide and less floor scuffing.
How Often Should You Clean Office Chair Wheels?
For most home offices, a quick inspection every month and a deeper cleaning every two to three months works well. If you have pets, long hair, carpeting, or a chair that gets heavy daily use, check the wheels more often.
A simple routine helps:
- Monthly: Inspect wheels and pull off visible hair.
- Every 2 to 3 months: Deep clean the casters.
- As needed: Replace damaged wheels.
This kind of maintenance sounds boring until you remember how annoying a sticky chair feels during a long workday. Suddenly, five minutes of prevention becomes very attractive.
Easy DIY Tips to Keep Desk Chair Wheels Cleaner Longer
Vacuum the Floor More Often
Cleaner floors mean cleaner caster wheels. This is the least glamorous but most effective strategy. If there is less lint and grit on the floor, there is less for the wheels to collect.
Use a Chair Mat
A chair mat can reduce friction, protect flooring, and cut down on the debris your wheels pick up, especially on carpet. It also makes rolling easier, which is nice for your chair and even nicer for your patience.
Consider Softer Replacement Casters
If your current wheels are hard plastic and noisy, switching to softer casters can improve movement and reduce marks on hard floors. That does not mean they never need cleaning, but they often perform better in home office setups.
Do Quick Hair Checks
If you spot hair wrapped around the axle, pull it out before it builds into a lint cocoon. Small maintenance beats deep grime archaeology every time.
Mistakes to Avoid When Cleaning Rolling Desk Chair Wheels
- Do not use harsh solvents on plastic wheels. Strong chemicals can damage plastic and finishes.
- Do not soak non-removable parts carelessly. Too much water around the chair base can create bigger problems.
- Do not use abrasive scrubbers. They can scratch surfaces and do more harm than good.
- Do not over-lubricate. Extra lubricant attracts dust and grime.
- Do not ignore worn-out wheels. A damaged caster will not magically improve because you believed in it.
Real-Life DIY Examples
Example 1: The pet owner problem. If you live with a dog or cat, your chair wheels are basically tiny fur collectors. In this case, monthly removal of wrapped hair can make a dramatic difference before the buildup hardens around the axle.
Example 2: The carpet office problem. Carpet tends to feed caster wheels a steady diet of lint and fibers. A chair mat plus more frequent vacuuming often cuts the buildup in half.
Example 3: The hard floor squeak problem. On wood or laminate, the issue may be fine dust and wheel wear rather than giant hair clumps. Cleaning thoroughly and switching to softer replacement casters can improve both glide and noise.
Experiences and Everyday Lessons From Cleaning Desk Chair Wheels
One of the funniest things about cleaning desk chair wheels is how such a tiny part of a chair can create such an outsized amount of annoyance. People usually notice the problem slowly. At first, the chair feels a little sluggish. Then it starts making a faint scraping sound. Then one day you try to roll back from the desk and the chair reacts like it has suddenly decided to become a stationary lifestyle brand.
In many home offices, the wheels tell a story about the room. In a pet-friendly house, they collect a soft ring of fur that somehow appears even after vacuuming. In a craft room, you might find thread, glitter, and little bits of paper packed into the casters like a bizarre art project. In a family workspace, there may be crumbs, lint, and one mysterious sticky patch that nobody claims responsibility for. The chair wheels become a tiny documentary about daily life.
People who try this DIY cleaning for the first time often have the same reaction: “I cannot believe that much junk was in there.” It is one of those satisfying maintenance jobs where the before-and-after difference is obvious. The chair rolls better immediately. The noise drops. The whole setup feels newer, even though nothing expensive was replaced.
Another common experience is discovering that the dirtiest wheel is not always the one you expected. Sometimes four casters look fairly normal and one looks like it survived a wilderness expedition. That can happen because one wheel bears more drag during the way you sit, pivot, or push off from the desk. It is a good reminder to inspect all five wheels, not just the one making the loudest complaint.
There is also a small but very real emotional reward in doing this job yourself. Cleaning chair wheels is not glamorous, and no one is likely to throw you a parade afterward. But there is something deeply satisfying about solving a daily irritation with simple tools, ten minutes of patience, and an old toothbrush that has finally found its true calling.
Some people also realize, after cleaning the wheels, that the real culprit was not only the chair. It was the floor. If the area under the desk is dusty, full of shed hair, or covered with grit from shoes, the newly cleaned casters will get dirty again fast. So the experience often turns into a two-part lesson: clean the wheels, then clean the space the wheels live in. Suddenly the whole workstation works better.
And then there is the replacement moment. Sometimes you do everything right: cut the hair, soak the casters, scrub the grime, dry them carefully, reinstall them, and one wheel still acts like it is auditioning for a role as a broken grocery cart. Oddly enough, that is still useful experience. You learn the difference between a dirty wheel and a worn-out one. Maintenance saves many parts, but it also helps you spot the ones that genuinely need replacing.
Over time, people who make this task part of their routine usually spend less time dealing with drag, noise, and floor marks. The chair feels better, the office feels cleaner, and the fix never becomes overwhelming. That is the real takeaway from this easy DIY project: you do not need to wait until your desk chair sounds like a haunted stroller. A little regular attention goes a long way.
Final Thoughts
Cleaning the wheels of a rolling desk chair is one of those small DIY jobs with a surprisingly big return. It improves mobility, helps protect your floors, reduces noise, and can extend the life of your chair. Better yet, it does not require advanced skills, expensive tools, or a full weekend devoted to office furniture wellness.
Remove the hair, wash the grime, dry the casters well, and check for damage. That simple routine is usually enough to turn a stubborn chair back into a smooth-rolling coworker. Your back, your floor, and your patience will all appreciate it.