Table of Contents >> Show >> Hide
- What You’ll Need (and What You Don’t)
- Quick Eye Anatomy (So Your Drawing Stops Looking Like a Sticker)
- Step-by-Step: Realistic Eye Drawing in Colored Pencil
- Step 1: Light sketch and placement
- Step 2: Map the big shadows first (values before “pretty colors”)
- Step 3: Build the pupil and the darkest accents
- Step 4: Lay the first iris layers (light, even, patient)
- Step 5: Create the limbal ring and iris depth
- Step 6: Shade the sclera (the “white” that isn’t white)
- Step 7: Eyelids and skin (where realism is quietly hiding)
- Step 8: Eyelashes without the “spider legs” effect
- Step 9: Blending and burnishing (the “when” matters)
- Step 10: Final sparkle and finishing checks
- Color Recipes for Different Eye Colors (No Exact Brand Required)
- Common Problems (and How to Fix Them Fast)
- Mini Practice Drills (Because One Perfect Eye Isn’t the Goal)
- Real-World Experiences: What Drawing Eyes in Colored Pencil Teaches You (500+ Words)
- Conclusion
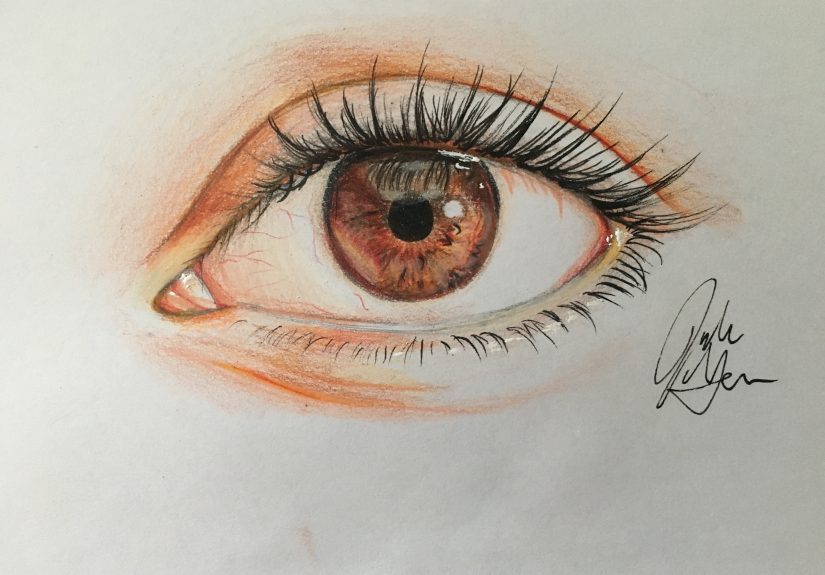
Drawing an eye in colored pencil is a little like making a tiny, shiny planet that also has feelings.
It’s got atmosphere (soft skin), weather (lash shadows), and one very dramatic sun reflection (the highlight).
The good news: you don’t need to be born with “eye-drawing genes.” You need a plan, light pressure, and the willingness
to draw the same curve more than once without taking it personally.
This guide walks you through a realistic colored pencil eye drawing step by stepfrom the first sketch to the final
glassy sparkleplus practical fixes for the most common “why does mine look haunted?” problems.
What You’ll Need (and What You Don’t)
Colored pencils
- A small set works. You can draw a convincing eye with 12–24 pencils if you understand layering.
- Two darks that behave like “black.” Many artists get a richer dark by layering deep blue + deep brown (instead of relying on a single black).
- A solid white pencil for highlights, burnishing, and soft transitions.
- Optional: a colorless blender pencil (helpful, not magical).
Paper
- Smooth or vellum Bristol is beginner-friendly for portraits and eyes (clean blending, easy edges).
- More tooth = more layers. Textured paper can hold extra glazing and deeper values, but it will show grain unless you burnish.
- Toned paper (light tan/gray) can make highlights pop and speed up the “skin looks alive” part.
Tools that actually help
- Sharpener + spare blade (dull pencils are the leading cause of fuzzy lashes).
- Kneaded eraser for lifting gentle highlights without shredding paper.
- Plastic/vinyl eraser for crisp corrections.
- Reference photo with clear lighting (your imagination is creative, but it lies about anatomy).
- Optional: white gel pen for the final pinpoint highlight (use sparingly, like hot sauce).
Quick Eye Anatomy (So Your Drawing Stops Looking Like a Sticker)
You’re not drawing an “eye shape.” You’re drawing a sphere (eyeball) with two lids wrapping around it.
That wrapping is why the upper lid usually overlaps the iris a bit, and why the lower lid looks softer and less dramatic.
- Iris: the colored ring. It has texture that radiates outward, but it’s not a fireworks showkeep it subtle.
- Pupil: the dark center. It’s usually the darkest value in the whole drawing.
- Limbal ring: the darker rim of the iris (not always super bold, but often present).
- Sclera (“white” of the eye): rarely pure whiteusually a mix of warm and cool grays with soft shadows.
- Highlight: the reflected light source. If you place it confidently, the eye instantly looks wet and real.
Step-by-Step: Realistic Eye Drawing in Colored Pencil
Step 1: Light sketch and placement
Start with a very light graphite sketch (or a light colored pencil if you prefer). Keep it simple:
outline the upper lid curve, lower lid curve, iris circle, and the inner corner (tear duct).
- Don’t draw a thick outline around the eye. You’ll trap yourself later.
- Make sure the iris is a circle, even if the lids cover part of it.
- Mark the highlight shape inside the iris early so you don’t accidentally color over it.
Step 2: Map the big shadows first (values before “pretty colors”)
Eyes look realistic because of value structure, not because you found the perfect “ocean blue.”
Identify the main shadow areas:
- Shadow under the upper lid across the top of the iris
- Crease shadow above the upper lid
- Soft shadow along the lower lid line
- Dark accents at the inner and outer corners
Use very light pressure and a neutral (light warm gray or beige) to “ghost in” these shapes.
You’re building a roadmap, not committing a crime.
Step 3: Build the pupil and the darkest accents
The pupil should be deep and clean. Instead of crushing the paper immediately, layer your darks:
a deep blue + deep brown often makes a natural, rich near-black.
- Use circular strokes to avoid obvious lines.
- Keep the edge of the pupil crisp (that sharpness reads as focus).
- Leave the highlight untouched.
Step 4: Lay the first iris layers (light, even, patient)
Choose your base iris color and apply a light layer from the pupil outward.
The iris texture usually radiates, so use short, controlled strokes that follow that directionlike tiny sunrays,
not long spaghetti lines.
Add variety with subtle shifts:
- Warmer notes (yellow ochre, light brown) near the pupil can make the eye feel alive.
- Cooler notes (blue-gray, teal) toward the outer iris can add depth.
- Neutrals (warm gray, beige) keep the color from looking like a neon sticker.
Step 5: Create the limbal ring and iris depth
The limbal ring is the darker outer rim of the iris. Lightly layer a darker version of your iris color (or a dark neutral)
along the outer edge. Then add a slightly darker halo around the pupil.
Here’s the trick: fade your darks inward so the iris looks round, not flat.
Think of it as shading a donut that’s secretly a dome.
Step 6: Shade the sclera (the “white” that isn’t white)
If you color the sclera with straight white, it can look like a hardboiled egg. Delicious, yes. Realistic, no.
Start with a light layer of white, then glaze gentle color:
- Cool notes: pale blue-gray where light reflects
- Warm notes: light peach or warm gray near the inner corner and along the lower lid
- Shadows: soft neutral darks where the lid casts shade
Keep edges soft. The sclera is smooth and slightly glossy, so transitions should be subtle.
Step 7: Eyelids and skin (where realism is quietly hiding)
Skin around the eye isn’t one color. It’s layers of warm and cool tones with gentle value shifts.
Build it the same way you built the iris: light pressure, multiple passes.
- Start with a light peach/beige base.
- Glaze warm browns for shadows and creases.
- Add a hint of cool gray in the deepest shadows for depth.
- Lift tiny highlights with a kneaded eraser (upper lid ridge, inner corner moisture line).
Step 8: Eyelashes without the “spider legs” effect
Lashes are tapered hairs that curve, overlap, and vary in thickness. They are not identical commas.
Use a very sharp dark pencil and draw them with a quick, confident flick:
- Upper lashes often start thicker at the lid line and taper outward.
- Direction changes across the lidinner lashes angle slightly inward, middle upward, outer outward.
- Group lashes into small clusters for realism. Nature loves teamwork.
Add lash shadows across the top of the iris if the lighting calls for it. That shadow is a major realism booster.
Step 9: Blending and burnishing (the “when” matters)
Blending in colored pencil is mostly layering, not rubbing.
Use light pressure and many layers to create smooth transitions. Burnishingpressing hard with a light pencil or blender
can create a polished, painterly look, but it also flattens the paper tooth.
- Save heavy burnishing for the final stages in areas that need a smooth finish (skin gradients, some iris zones).
- If you burnish too early, you may not be able to add more layers cleanly.
- Use a light neutral or white to burnish (it can unify colors without bleaching them).
Step 10: Final sparkle and finishing checks
Now you’re refining. This is where small adjustments make the eye “click.”
- Boost contrast: deepen the pupil, strengthen the upper-iris shadow, and define the lash line.
- Clean edges: sharpen the highlight shape and soften the sclera transitions.
- Add micro-details: a few subtle iris streaks, a soft waterline sheen, tiny tonal shifts in skin.
- Optional highlight pop: add a pinpoint gel pen highlight only at the very end.
Color Recipes for Different Eye Colors (No Exact Brand Required)
Brown eyes
Brown eyes shine when you layer warm colors with deep neutrals.
Start with light tan/ochre, deepen with warm browns, and push the darkest accents with dark brown + deep blue.
Add small amber notes near the pupil for glow.
Blue eyes
Blue eyes often look best when they’re not pure blue.
Base with a light blue-gray, add touches of teal or green near the outer iris, and neutralize with warm beige in places.
A darker rim and a shadowed top edge keep it realistic.
Green or hazel eyes
Hazel eyes love complexity: a mix of green, gold, and brown.
Layer light green with yellow-ochre and warm brown, then deepen the ring and pupil area with dark neutrals.
Keep transitions soft so the color feels “inside” the eye, not printed on it.
Common Problems (and How to Fix Them Fast)
“My iris looks flat.”
- Increase the shadow under the upper lid.
- Darken the limbal ring slightly.
- Add value variation: darker near the pupil + outer edge, slightly lighter mid-zone.
“Everything looks muddy.”
- Use lighter pressure and more layers instead of pressing hard.
- Clean your lights by lifting with a kneaded eraser, then re-glazing gently.
- Limit the number of dark pigments you mix in one area; let one “lead” and others support.
“My paper looks gritty and I can’t get smooth skin.”
- Try a smoother surface (Bristol smooth) for portrait-style eyes.
- Layer with small circular strokes to fill tooth more evenly.
- Burnish only after you’ve built enough color.
“The lashes look like a fence.”
- Vary length, thickness, and direction.
- Draw fewer individual lashes and more clustered suggestions.
- Keep the lash line darker than most lashesthis anchors them.
“The eye looks creepy…and I don’t know why.”
- Check highlight placement (it should match a believable light source).
- Soften the sclera (pure white + hard outlines can look uncanny).
- Make sure the iris isn’t perfectly centered unless the gaze truly is.
- Reduce harsh outlines; use value edges instead.
Mini Practice Drills (Because One Perfect Eye Isn’t the Goal)
- 5-minute iris studies: draw just the iris and pupil, focusing on value rings and radial texture.
- Lash rows: practice flick strokes in different directions, grouping into clusters.
- Sclera gradients: blend warm-to-cool grays smoothly without using pure white.
- Highlight control: practice preserving a highlight shape without outlining it harshly.
Real-World Experiences: What Drawing Eyes in Colored Pencil Teaches You (500+ Words)
If you spend a week drawing eyes in colored pencil, you’ll probably experience a very specific emotional arc:
optimism, confusion, mild betrayal by your own hand, and thensuddenlyone eye that looks weirdly alive.
That last part is what keeps people coming back.
One of the biggest “aha” moments artists commonly have is realizing that the eye isn’t a flat symbol. It’s a shiny sphere
with lids wrapped around it. Early attempts often look like a decal because the shading is missing where it matters most:
the shadow under the upper lid, the soft roll of the lower lid, and the gentle value shifts in the sclera. When you start
treating the eye like a 3D form, your drawings jump forward fastwithout needing more colors.
Another common experience: learning that colored pencil rewards patience in a way that feels almost unfair.
Pressing hard early feels productivebig bold color, instant contrastuntil the paper tooth fills up and your drawing stops improving.
Then you’re stuck with a waxy surface that refuses to take more layers and a skin tone that looks like it was applied with a crayon during a bumpy car ride.
The fix is annoyingly simple: lighter pressure, more layers, and letting values build gradually. It’s the artistic version of “drink water.”
Not exciting advice, but it works.
Eyes also teach you the power of controlled contrast. Beginners often put the darkest dark in random places (like outlining the entire iris)
and then wonder why the eye feels aggressive. In reality, the darkest accents are usually concentrated in a few key spots: the pupil, the lash line,
and the deepest crease shadows. When you keep the rest of the drawing slightly softer by comparison, those focal points feel intentionaland the eye looks real.
Then there’s the lash problem. Nearly everyone goes through the “spider lash phase.”
It’s not your fault. Lashes are tiny, curved, layered, and they change direction across the lid.
What typically helps is practicing lashes separately from the eye: quick flicks with a sharp point, varying pressure so each lash tapers naturally,
and drawing in small clusters rather than a hundred identical hairs. It’s also surprisingly helpful to remember that lashes are attached to the lid,
not floating in spacedarkening the lash line itself often makes the whole thing believable.
A more subtle lesson: the best-looking eyes usually have less detail than you think.
It’s tempting to carve every single iris line like you’re engraving a coin, but too much uniform detail can make the iris look stiff.
Realistic eyes often read better when the texture is suggested, with a few sharper streaks near the pupil and softer, quieter marks elsewhere.
The highlight does a lot of heavy liftingif it’s clean and bright, the eye feels wet even with minimal micro-detail.
Finally, drawing eyes in colored pencil teaches you to trust slow improvement.
The first few tries may be rough. Then your shading gets smoother. Your iris starts to look round. The lashes stop looking like a tiny broom.
And one day, you’ll add a small bright highlight at the end and think, “Wait…that’s an eye.”
That moment is worth every layer.
Conclusion
To draw an eye in colored pencil, focus on three things: values (light and shadow), layering (light pressure, many passes),
and edges (sharp where it counts, soft where it should melt).
Start simple, practice small studies, and let the realism build gradually. The eye is tiny, but it’s a whole worldtake your time and enjoy the process.