Table of Contents >> Show >> Hide
- Before You Start: Is This Rim Damage Safe to Fix Yourself?
- Tools and Materials You’ll Need
- Step 1: Clean the Rim Thoroughly
- Step 2: Mask the Tire and Valve Stem
- Step 3: Lightly Sand the Scratched Area
- Step 4: Apply Alloy Wheel Filler (If Needed)
- Step 5: Shape and Smooth the Repair
- Step 6: Prime the Repaired Area
- Step 7: Paint and Blend the Color
- Step 8: Seal with Clear Coat
- Step 9: Remove Masking and Inspect
- Step 10: When to Choose Professional Repair or Replacement
- How to Prevent Future Alloy Rim Scratches
- Real-World Rim Repair Experiences: What DIYers Learn the Hard Way
You glance at your car, admire the shine, and then you see it: that ugly scrape on your alloy rim,
staring back at you like it personally paid rent. The good news? Many alloy rim scratches and light
curb rash are mostly cosmetic, and with a little patience (and some sandpaper), you can fix them at
home and save serious money compared with a professional rim repair.
This step-by-step guide walks you through how to fix alloy rim scratches, from the first inspection
to the final clear coat. We’ll talk about which damage is safe for DIY, what tools you actually need,
how to avoid common mistakes, and when to stop and call a pro. Imagine pictures next to every step:
close-ups of the scratches, progress shots as you sand and fill, and a final glamour shot of your
freshly restored wheel.
Before You Start: Is This Rim Damage Safe to Fix Yourself?
Not every rim problem is a DIY project. Light cosmetic damage is usually fair game, but structural
damage is not something to “learn on.” Before you reach for a sanding block, take a careful look at
each wheel.
DIY-Friendly Damage
- Shallow scratches that only affect the clear coat or paint
- Light curb rash and scuffs around the outer lip of the wheel
- Small stone chips and nicks in the finish
If the scratch looks like it only “skin-deep” grazed the rim, you can usually sand, fill (if needed),
and repaint it without affecting safety.
Damage That Needs a Professional
- Cracks in the rim or between spokes
- Deep gouges where chunks of metal are missing
- Noticeable bends, wobbling, or vibration at highway speed
- Damage near the bead seat (where the tire seals) or around lug holes
If you see a crack, feel a wobble, or notice the tire losing air, stop. That’s no longer a cosmetic
job; that’s a safety issue. In those cases, have the wheel inspected by a professional shop. Your
goal here is to fix scratches and curb rash, not to gamble with the integrity of the wheel.
Tools and Materials You’ll Need
You don’t need a full body shop in your garage to fix alloy rim scratches, but you do need the right
basics. Here’s a typical DIY kit:
- Wheel cleaner and degreaser
- Microfiber cloths and paper towels
- Sandpaper in several grits (around 180–240, 400–600, and 800–1000)
- Masking tape and newspaper or plastic to protect the tire and valve stem
- Alloy wheel filler or metal-filled epoxy (for deeper scratches or small gouges)
- Automotive primer suitable for alloy wheels
- Color-matched wheel paint (spray can or touch-up paint)
- Clear coat (spray)
- Nitrile gloves, safety glasses, and a dust mask or respirator
Optional but helpful: a sanding block, a small plastic spreader or old credit card for applying
filler, and a polishing compound for final shine.
Step 1: Clean the Rim Thoroughly
Dirt is the enemy of smooth repairs. Before any sanding or filling, wash the wheel like it’s going
on a first date.
- Park the car on a level surface and let the wheels cool.
- Spray wheel cleaner generously over the entire rim.
- Use a soft brush or microfiber cloth to scrub off brake dust, grime, and road film.
- Rinse with clean water and dry thoroughly with a clean towel.
- For best results, wipe the damaged area with a degreaser or rubbing alcohol to remove any remaining
wax or oils.
Imagine a picture here showing a rim half covered in brake dust and half sparkling clean that’s the
before-and-after you’re going for before you even touch sandpaper.
Step 2: Mask the Tire and Valve Stem
You want to fix the wheel, not accidentally customize your tires with silver overspray. Masking is
essential if you plan to prime and paint.
- Run masking tape around the edge of the rim where it meets the tire. Press the tape down firmly so
paint can’t sneak underneath. - Tuck cards, plastic, or folded strips of paper between the rim and the tire to fully shield the
rubber. - Cover the entire sidewall of the tire with newspaper, a trash bag, or painter’s plastic and tape it
in place. - Mask the valve stem, valve cap, and any wheel weights or lug nut holes if they’re close to the repair
area.
In a “with pictures” layout, this is where you’d see a close-up of a rim carefully taped off, with the
tire wrapped like a burrito.
Step 3: Lightly Sand the Scratched Area
Sanding is what levels the scratch and helps primer and paint stick. Go slowly and let the sandpaper
do the work.
How to Sand for Light Scratches
- Start with a medium-fine grit (about 320–400). Wrap the sandpaper around a small block or use your
fingers for tight curves. - Sand in small circles over and slightly beyond the scratch. You’re trying to feather the edges so
there’s no sharp ridge. - Check periodically by wiping away dust with a cloth. The area should feel smoother and more uniform.
- Once the scratch feels level, switch to a finer grit (600–800) and sand again to refine the surface.
Don’t panic if the finish looks worse before it looks better. The rim may look dull and hazy at this
stage; that’s normal. You’ll bring back the shine with primer, paint, and clear coat.
Handling Deeper Scratches and Small Gouges
If your fingernail catches in the scratch or you see a small chunk missing, sanding alone might not
be enough. That’s where filler comes in.
- Sand the damaged area with a slightly coarser grit (around 180–240) to open up the scratch.
- Wipe off dust and clean the area again with alcohol or degreaser.
You’re now ready for filler if it’s still visibly low compared with the surrounding metal.
Step 4: Apply Alloy Wheel Filler (If Needed)
Alloy wheel filler or metal-filled epoxy is like spackle for your rim. It fills in deeper defects so
you can sand them flush.
- Mix the filler according to the package directions. You usually have a limited working time before
it hardens. - Using a plastic spreader or an old credit card, press a thin layer of filler into the scratch or
gouge. Slightly overfill the area so you have material to sand down. - Smooth the filler as much as possible while it’s still soft, feathering edges into the surrounding
rim. - Let the filler cure completely. This could be 20–30 minutes or longer depending on the product and
temperature.
Patience pays off here. If you sand too soon, the filler can tear or crumble. Once it’s fully cured,
move on to shaping.
Step 5: Shape and Smooth the Repair
Now it’s time to make that patch disappear.
- Start shaping the filler with 320–400 grit sandpaper. Sand in smooth motions, keeping your pressure
light and even. - Run your fingertips over the area often. The repaired area should feel level with the original metal.
- Once the contour feels right, refine the surface with 600–800 grit sandpaper to minimize scratches.
- Wipe away all dust with a microfiber towel and a final swipe of alcohol or degreaser.
At this point, a close-up photo would show a matte, uniformly smooth patch. It won’t match the color
yet, but the shape should be nearly invisible.
Step 6: Prime the Repaired Area
Primer helps paint adhere and gives you a uniform base color. If you’ve sanded down to bare metal or
used filler, primer isn’t optionalit’s essential.
- Shake the primer can for at least a minute to mix it thoroughly.
- Hold the can about 6–8 inches from the rim and apply light, even passes over the repaired section,
slightly overlapping the surrounding area. - Avoid heavy coats; it’s better to do 2–3 light coats than one thick runny one. Let each coat dry
according to instructions. - After the final coat dries, lightly scuff with very fine sandpaper (around 800–1000 grit) if you
feel any roughness.
The primed area should now look smooth, uniform, and ready for color. A “with pictures” version would
show a satin-gray patch blending into the rest of the rim.
Step 7: Paint and Blend the Color
This is the part where your rim goes from “repaired” to “wow, that actually looks good.” The key is
color match and thin, even coats.
- Use a paint labeled for wheels or automotive touch-up paint that matches your rim color (usually a
specific silver or graphite). - Shake the can or stir the touch-up paint well. Test spray on cardboard to check pattern and color.
- Spray light passes over the primed area, starting and ending your strokes off the rim to avoid heavy
spots. Slightly overlap into the original finish. - Allow proper drying time between coats. Two to four light coats are typical for good coverage.
Try not to obsess over microscopic differences in shade while it’s still drying. Once you add clear
coat and the wheel is back on the car, the repair usually looks much more natural.
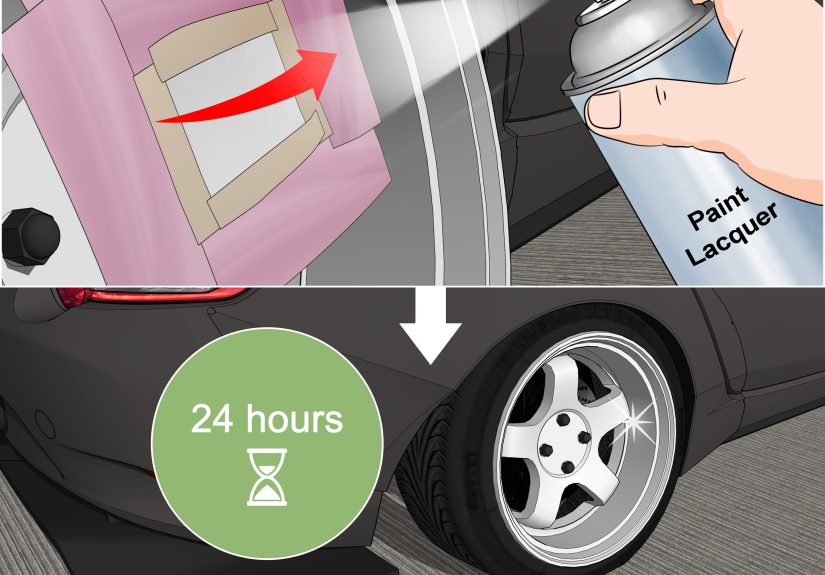
Step 8: Seal with Clear Coat
Clear coat protects your work, adds shine, and helps blend the repair with the factory finish.
- Shake the clear coat can thoroughly.
- Apply a very light tack coat firstjust a mistto help later coats stick and avoid runs.
- Follow with 2–3 slightly heavier but still controlled coats, keeping the can moving and overlapping
your passes. - Let the clear coat cure fully. This can take several hours to a full day depending on temperature
and humidity.
When fully dry, you can gently polish the area with a non-aggressive polish if needed to even out the
gloss. Just don’t get aggressive with buffing on fresh clear.
Step 9: Remove Masking and Inspect
This is the big reveal moment.
- Carefully peel off tape and coverings from the tire and valve stem, pulling away from the paint so
you don’t lift any fresh edges. - Step back a few feet and check the rim from different angles and lighting. The repair should be
smooth and the color difference minimal. - If you see a small low spot or rough patch, you can gently wet sand and touch up once everything
has fully cured.
Remember, you’re aiming for “no one notices unless they’re crouched with a flashlight,” not “show car
judged with a magnifying glass.”
Step 10: When to Choose Professional Repair or Replacement
DIY is perfect for minor cosmetic damage and saving money, but there are times when a shop is the
smarter and safer choice:
- You see cracks, deep gouges, or bends in the wheel.
- The rim is leaking air or the tire won’t hold pressure.
- You feel vibration or wobble through the steering wheel.
- The damage covers a large section of the rim face.
Professional shops use specialized equipment to straighten, weld, and fully refinish wheels. In some
casesespecially with severe structural damagereplacement is the only safe option. It may cost more
than DIY, but it’s a lot cheaper than dealing with a wheel failure at highway speeds.
How to Prevent Future Alloy Rim Scratches
Once you’ve put in the effort to repair your rims, you’ll be highly motivated not to do this again
next month. A few habits can help:
- Take corners slowly when parallel parking; use your mirrors and backup camera to judge distance from
the curb. - Avoid hugging the curb in tight drive-thru lanes and parking garages.
- Keep your rims clean; brake dust and road grit can hide fresh scratches and slowly attack the finish.
- Consider slightly higher-profile tires if you’re constantly scraping low-profile ones on city
curbs (check fitment first).
No one parks perfectly 100% of the time, but with good habits and a little space from the curb, you
can drastically cut down on new rim rash.
Real-World Rim Repair Experiences: What DIYers Learn the Hard Way
Guides are neat and tidy; real life is… less so. Here are some common experiences and lessons that
people share after fixing alloy rim scratches themselvesso you can borrow their wisdom instead of
their mistakes.
1. The “I Rushed It and Now I’m Doing It Again” Story
A very common theme: someone starts a rim repair on a Saturday afternoon, underestimates drying times,
and tries to rush through sanding, priming, painting, and clear coating in one sprint. The result?
Drips in the clear coat, rough patches in the filler, and a finish that looks worse than the original
scratch.
The takeaway: give yourself more time than you think you need. Plan for several light coats with real
drying time between them. It’s better to spread the job over a weekend than to redo it next weekend.
2. Under-Masking the Tire (a Classic Rookie Move)
Another frequent story: someone carefully tapes right at the edge of the rim but doesn’t fully protect
the sidewall. They spray primer and paint, step back, and realize they now have a fashionable silver
mist all over their tire.
Cleaning overspray off rubber is annoying and never perfect. After that, people tend to over-mask on
purpose: covering the entire tire and even a bit of the car’s body panel if they’re spraying with the
wheel on the vehicle. Once you’ve spent half an hour scrubbing overspray off a tire with solvent, you
never skip full masking again.
3. The Color Match Surprise
Wheel silver isn’t one shade; it’s a whole spectrum. Many DIYers buy generic “silver wheel paint” and
discover that their rim is actually a slightly darker graphite or a warmer metallic. In bright sunlight,
a poorly matched repair can look like a patch.
People who get the best results often take an extra step: they look up the OEM color code (sometimes
available through the dealer or on enthusiast forums) or buy paint specifically labeled for their rim
brand and model. Even if it’s not perfect, it tends to blend better than a totally generic silver.
4. The “I Didn’t Realize It Was Cracked” Wake-Up Call
Some DIYers start sanding what they think is just curb rash and discover, under the dirt, a fine crack
running along the rim or between spokes. In a few shared stories, this crack explained the slight
vibration or slow air loss they’d been ignoring.
The lesson: use rim repair as an excuse to do a full safety inspection. If your wheel is cracked,
bent, or causing vibrations, step away from the sandpaper and let a professional assess it. Your
repair project just turned into a safety project, and that’s okaycatching it early is a win.
5. The Unexpected Satisfaction of Doing It Yourself
Finally, there’s the fun part: many people report that once they fix one rim successfully, they
actually enjoy the process. It’s a satisfying mix of careful prep, hands-on work, and an immediate
visual payoff. That scraped, dull outer lip becomes smooth and shiny again, and you get to say, “Yeah,
I fixed that.”
Some even go furtherusing the same skills and tools to fully refinish all their wheels, change the
color, or touch up minor damage every year. Once you’ve seen how much improvement you can get from a
relatively low-cost DIY kit and a bit of time, a scratch on your rim feels less like a disaster and
more like a weekend project.
Whether you’re tackling one small curb rash or planning a full wheel refresh, the key is the same:
take your time, work in thin layers, and respect the line between cosmetic repair and structural
damage. Do that, and your alloy rims can keep looking sharp long after those first inevitable scrapes.