Table of Contents >> Show >> Hide
- Before You Start: Tools, Safety, and a 60-Second Reality Check
- Step 1: Confirm the Symptom (Don’t Skip This)
- Step 2: Check the Bulb (Because Yes, It’s Often the Bulb)
- Step 3: Inspect the Socket and Contacts (Corrosion Loves Tail Lights)
- Step 4: Check the Fuse (It’s a Tiny Part with Big Main-Character Energy)
- Step 5: Check Grounds and Wiring (The “Invisible” Problem)
- Step 6: Fix the Housing, Lens, and Water Intrusion
- Step 7: Handle the “Not the Bulb” Problems (Switches, Modules, and When to Call a Pro)
- Common Mistakes That Make Tail Light Repairs Harder
- How Much Does It Cost to Fix Tail Lights?
- Conclusion
- Extra: Real-World Tail Light Fixes I’ve Seen (and Learned From)
A broken tail light is one of those problems that feels small… right up until you realize it’s basically a neon sign that says, “Hello, Officer, I enjoy surprise conversations on the side of the road.” The good news: most tail light issues are simple a burnt bulb, a cranky fuse, or a socket that’s auditioning for a rust museum.
This guide walks you through a practical, no-nonsense (but slightly sarcastic) 7-step process to diagnose and fix tail lights. You’ll learn how to tell whether you’re dealing with a bulb problem, a power problem, or a wiring/ground problemplus when it’s smarter to call in a pro before you accidentally invent a new electrical firework.
Before You Start: Tools, Safety, and a 60-Second Reality Check
Quick tools list
- Owner’s manual (for bulb type and fuse locations)
- Gloves (clean hands + longer bulb life)
- Screwdriver set and/or small socket set
- Trim tool (optional, but it saves plastic clips and your sanity)
- Flashlight
- Dielectric grease (optional, great for corrosion prevention)
- Test light or multimeter (highly recommended for troubleshooting)
Safety basics (aka: don’t fight electricity)
- Park on a flat surface, set the parking brake, and turn the car off.
- If you’ll be unplugging connectors or poking around wiring, disconnect the negative battery terminal.
- Let bulbs cool before touching them. Hot glass + cold fingers = regret.
- If you’re working roadside, move well off traffic and use hazard lights.
Reality check: What exactly is “not working”?
“Tail light” can mean different things: running lights (on with headlights), brake lights (on with pedal), turn signals, reverse lights, or the high-mounted center brake light. The fix depends on what’s failing, so you’re about to do a quick detective montage.
Step 1: Confirm the Symptom (Don’t Skip This)
Turn this into a two-person mission if possible. If you’re solo, park near a wall/garage door to catch reflections, or use your phone camera on a tripod/selfie stick like a responsible adult who definitely has it all together.
Test in this order
- Running lights: Turn on headlights. Do both tail lights glow steadily?
- Brake lights: Press the brake pedal. Do both brighten?
- Turn signals: Left, then right. Do they blink normally or “hyperflash”?
- Reverse lights: Key on, shift to reverse (foot on brake). Do they come on?
- Hazards: Do both sides blink?
What the results usually mean
- One side out: Often a bulb, socket, or local wiring/ground issue.
- Both sides out (same function): Often a fuse, switch, relay, or control module issue.
- Brake lights work, tail/running lights don’t: Commonly a tail/running light fuse or headlight switch issue.
- Hyperflash after swapping to LEDs: Load/resistor or coding may be needed (vehicle-dependent).
Step 2: Check the Bulb (Because Yes, It’s Often the Bulb)
Most older tail lamps use bulbs that twist out from the back of the housing. Some cars require removing the entire tail light assembly from the trunk or hatch area. Either way, your owner’s manual usually points you to the access panel or fasteners.
Bulb inspection checklist
- Remove the bulb and look for a broken filament, dark spots, or a cloudy appearance.
- If it’s a dual-filament bulb (common for tail + brake), one filament can fail while the other still works.
- Match the replacement bulb number exactly (manual or the bulb’s marking).
- Pro move: Replace bulbs in pairs (left/right) to keep brightness consistent.
Installation tips that actually matter
- Wear gloves or avoid touching the glass (skin oils can shorten some bulb life).
- Seat the bulb fullymisalignment causes flickering and “it worked yesterday” drama.
- After installing, test the light before you button everything up.
Step 3: Inspect the Socket and Contacts (Corrosion Loves Tail Lights)
If the bulb looks fineor keeps dying suspiciously fastthe socket is your next suspect. Tail light housings live in the splash zone: water, road salt, humidity, and whatever science experiment is happening in your trunk.
What to look for
- Green/white crusty buildup (corrosion)
- Melted plastic around the socket (overheating or poor contact)
- Loose terminals that don’t grip the bulb properly
- Water condensation inside the lens/housing
Fixes you can do quickly
- Clean light corrosion with electrical contact cleaner and a small brush.
- Dry the area thoroughly (moisture and electricity are not a cute couple).
- Add a small dab of dielectric grease to help prevent future corrosion.
- If the socket is melted or badly corroded, replace the socket/pigtail connector.
Step 4: Check the Fuse (It’s a Tiny Part with Big Main-Character Energy)
If both tail lights are out (or an entire function is missing), the fuse box is calling your name. Most cars have fuses labeled for “TAIL,” “PARK,” “STOP,” or “LIGHTING.” Some have multiple fuses (left/right, or separate circuits).
How to do it right
- Locate the fuse diagram (owner’s manual or fuse box cover).
- Pull the suspected fuse and inspect it. A broken metal strip usually means it’s blown.
- Better: test with a fuse tester or multimeter for continuity.
- Replace only with the same amperage rating.
If the new fuse blows immediately…
That’s a clue: you likely have a short circuit, damaged wiring, or a water intrusion issue. At that point, stop feeding fuses to the electrical gremlin and move to Step 5 (and possibly Step 7).
Step 5: Check Grounds and Wiring (The “Invisible” Problem)
A surprising number of tail light failures come down to one unglamorous villain: a bad ground. Grounds connect the circuit back to the chassis. If that connection is loose or corroded, lights can flicker, dim, work only sometimes, or fail completely.
Fast checks that save hours
- Wiggle test: With lights on, gently wiggle the harness near the tail lamp. Flicker = suspect connection.
- Visual scan: Look for frayed wires, crushed sections, or cracked insulation near hinges and trunk lids.
- Ground point check: Find where the tail light ground bolts to the body; clean rust and tighten securely.
Using a multimeter (quick version)
- Set it to DC voltage.
- With the light function on, probe the power wire at the socket/connector and compare to a known good ground.
- If you have power but the bulb won’t light, the socket/ground is usually the issue.
- If you have no power, trace backward: connector → harness → fuse box/switch/module.
Wiring repairs should be sealed properly (heat-shrink + quality connectors). Tape alone is a temporary bandage that turns into a sticky mess the next time the weather gets moody.
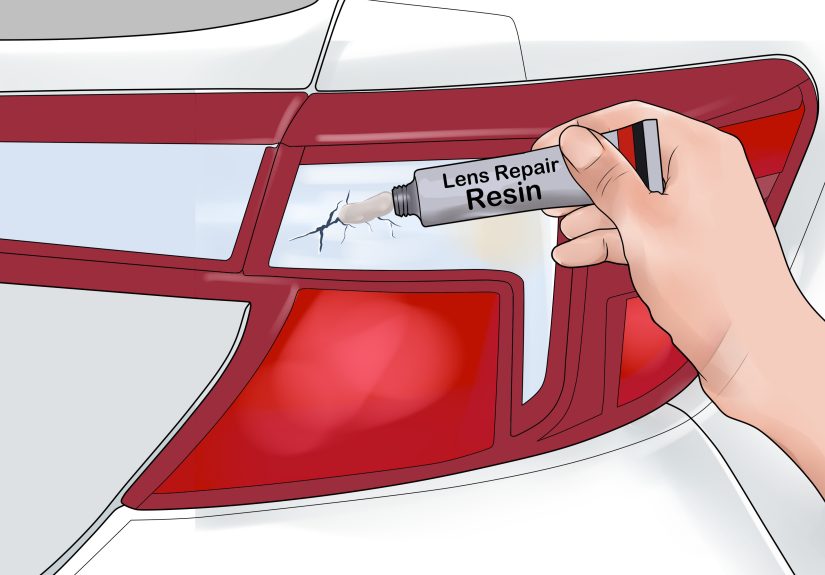
Step 6: Fix the Housing, Lens, and Water Intrusion
If you see moisture inside the tail light or you keep finding corrosion, your housing may be leaking. Cracks, bad gaskets, or mis-seated assemblies can let water in, and water loves to cause: dim lights, blown bulbs, short circuits, and random “why is my car possessed” moments.
What to do
- Inspect the lens for cracks and the gasket for gaps or deformities.
- Dry the housing and clean the sealing surfaces.
- If the gasket is worn, replace it (or replace the whole assembly if it’s integrated).
- Make sure all fasteners are snugtight enough to seal, not so tight you crack plastic.
Some vehicles use LED tail light modules that are not serviceable by bulb. If the LEDs fail, the fix may require replacing the entire lamp assembly (yes, it can be pricey, and yes, it’s frustrating).
Step 7: Handle the “Not the Bulb” Problems (Switches, Modules, and When to Call a Pro)
If you’ve checked bulbs, sockets, fuses, and wiring/groundsand the lights still refuse to cooperatewelcome to the advanced chapter. These are common next-level causes:
Common culprits
- Headlight switch / multifunction switch: Can affect running lights and signals.
- Brake light switch: Can cause brake lights not to come onor stay on and drain the battery.
- Body Control Module (BCM): Modern cars route lighting through modules that may need scanning or programming.
- Trailer wiring add-ons: Aftermarket trailer harnesses can introduce shorts or bad splices.
- LED retrofits: Some cars need resistors or coding to prevent hyperflash and error messages.
When it’s time for professional help
- You keep blowing fuses (short circuit likely).
- There’s visible melted wiring, burning smell, or heat damage.
- Your vehicle throws lighting-related warning codes.
- You suspect a control module issue and don’t have a scan tool.
Common Mistakes That Make Tail Light Repairs Harder
- Skipping the symptom check: Tail vs brake vs signal are different circuits on many vehicles.
- Using the wrong bulb type: It may fit but not function correctly (or it fails early).
- Over-tightening housing screws: Cracks lens assemblies and causes leaks.
- Ignoring condensation: Water will keep returning until the seal is fixed.
- “Just tape it” wiring repairs: Road spray will eventually win.
How Much Does It Cost to Fix Tail Lights?
DIY bulb replacements are typically the cheapest win: you pay for the bulb and maybe a few minutes of your life. Socket pigtails and fuses are also inexpensive. Replacing an entire LED tail lamp assembly can be much more costly, especially on newer vehicles where the lamp is a sealed module.
Conclusion
Fixing car tail lights isn’t about being a master mechanicit’s about following a clean troubleshooting path. Start by confirming which function is failing, then move through bulbs, sockets, fuses, and wiring/grounds. Most issues get solved long before you reach the “control module” chapter.
If you take one thing from this guide, make it this: tail light problems are usually simple, but they’re not optional. Working rear lights keep you legal, visible, and significantly less likely to be introduced to a stranger’s bumper.
Extra: Real-World Tail Light Fixes I’ve Seen (and Learned From)
Tail light repairs have a funny way of teaching humility. The first lesson: the “obvious” fix is often correct, but not always. One of the most common scenarios is the classic single tail light outage. The owner swears it’s not the bulb because “I replaced it last month.” When you pull the bulb, the filament looks finebut the base is slightly discolored and the socket has that telltale green fuzz. In those cases, the bulb wasn’t the villain; it was the victim. Corrosion increases resistance, resistance creates heat, and heat shortens bulb life. The real fix is cleaning the socket properly, making sure the contacts grip firmly, and adding a tiny bit of dielectric grease to slow the corrosion comeback tour.
Another frequent “gotcha” is the dual-filament bulb. Drivers notice their tail light is out at night, but the brake light still works, so they assume the whole unit is fine. Dual-filament bulbs can fail on one filament and keep the other alive, which makes the problem feel intermittent or confusing. The takeaway is simple: don’t judge a bulb by its ability to do one job. Pull it, inspect it, and match the correct replacement number so you’re not forcing a close-enough bulb into a not-actually-close-enough situation.
Then there are the “both sides out” mysteries. These can trigger panicpeople jump straight to “the wiring is toast!” But in real life, it’s often a fuse, a switch, or a connector that got bumped during cargo loading. A surprisingly effective habit is checking the fuse box early, especially if an entire lighting function disappears at once. When a replacement fuse blows immediately, that’s not bad luckit’s a clue. Somewhere there’s a short: a pinched wire near the trunk hinge, moisture inside a housing, or a trailer wiring splice that was done with the electrical equivalent of chewing gum and hope.
Speaking of trailer wiring: it’s responsible for more lighting weirdness than it gets credit for. A trailer harness that’s corroded or improperly spliced can backfeed voltage, cause flickering, or take out fuses repeatedly. If your lighting problems started after adding a hitch or wiring kit, the fastest “experience-based” tip is to disconnect the trailer adapter entirely and retest the car lights in their factory configuration. If the problem disappears, congratulationsyou just found the plot twist.
Modern LED tail light assemblies add a whole new layer of fun. Some are serviceable, many aren’t. I’ve seen people replace bulbs that don’t exist, because the housing looks like it should open like older designs. If your vehicle uses a sealed LED module, the fix may be an entire assembly replacementor in some cases a repair of the connector or the ground feeding that module. And for folks upgrading to LEDs in older housings, hyperflash is a rite of passage. It doesn’t mean your car hates you; it means the circuit is detecting a different electrical load than expected. Whether you solve it with resistors, an LED-compatible flasher, or vehicle coding depends on the carbut the key is knowing it’s normal behavior, not random failure.
The final lesson is the simplest: test early, test often. The number of tail lights that “still don’t work” simply because a bulb wasn’t seated all the wayor a connector wasn’t clicked inis honestly impressive. Always test before reassembling trim panels and tightening the last screw. It’s the difference between a 10-minute victory lap and a 45-minute rerun of the same steps, narrated by sighing.