Table of Contents >> Show >> Hide
- Before You Start: What You’ll Need (and What to Avoid)
- Step 1: Clean Like You Mean It
- Step 2: Reset the Surface (Optional, but Helpful for “Old Shine” Shoes)
- Step 3: Condition the Leather (But Don’t Overdo It)
- Step 4: Build the Base Shine (Cream First, Then Wax)
- Step 5: Create the Mirror Finish (Water-Based Spit Shine Technique)
- Step 6: Detail Work and “Parade-Ready” Finishing Touches
- Special Notes: Patent Leather, Coated Leather, and “Non-Shine” Boots
- Maintenance: Keeping the Mirror Between Parades
- Field Notes: Experiences From the Real World (Extra )
- Conclusion
Parade shoes are basically the red-carpet celebrities of the footwear world: they’re expected to look flawless, hold a pose for hours,
and reflect sunlight like a tiny disco ballwithout ever complaining about it. A true mirror finish (often called a “spit shine” or “bulling” shine)
isn’t magic, though it can feel like it around Step 5 when you’re whispering motivational quotes to your toe caps.
The real secret is simple: thin layers of wax + patience + just enough water. Done right, the wax fills and smooths the microscopic texture of leather
until the surface is flat enough to reflect light like glass. Done wrong… well, done wrong is how you end up with cloudy shoes and a deep personal grudge against humidity.
Below is a reliable, parade-ready method that works for most smooth leather dress shoes and many polishable boots.
(If your “parade shoes” are patent leather, jump to the patent-leather note before you startpatent doesn’t want wax polish.)
Before You Start: What You’ll Need (and What to Avoid)
Supplies checklist
- Horsehair brush (or a clean, soft shoe brush)
- Soft cloths (old cotton T-shirt works great)
- Cotton balls (optional, but excellent for mirror work)
- Leather cleaner or a slightly damp cloth for basic cleaning
- Leather conditioner (lightweight is better than greasy)
- Cream polish (matches shoe color) for conditioning + color depth
- Wax polish (matches shoe color) for the mirror finish
- A small bowl of clean water (the unsung hero)
- Optional: edge dressing for soles/heels, cotton swabs for tight areas
What to avoid (for your shoes and your sanity)
- Thick coats of wax (thick coats crack and haze)
- Heat or open flame (unsafe and can damage leather finish)
- “Instant shine” shortcuts if you want a true mirror (fine for quick gloss, not for glass)
- Polishing suede or nubuck (different universeuse suede tools instead)
Step 1: Clean Like You Mean It
Mirror shine is 80% prep and 20% polishing theatrics. If you wax over dust, you don’t get a mirroryou get a fossil record.
Start by removing surface dirt and old grime so your polish bonds evenly.
How to do it
- Brush the entire shoe with a horsehair brush to remove loose dirt.
- Wipe with a slightly damp cloth (not soaking wet) to pick up remaining dust.
- Let the shoes dry fully at room temperature before adding products.
Pro tip: Pay attention to seams, welt edges, and around the laces. Dirt likes to hide there like it pays rent.
Step 2: Reset the Surface (Optional, but Helpful for “Old Shine” Shoes)
If your shoes already have layers of old waxespecially if they look cloudy, cracked, or bumpyyour mirror finish will fight you.
You don’t always need a full strip, but you do need a smooth starting point.
When to do a reset
- The toe has a chalky haze that won’t brush off.
- You see fine cracks in the shine.
- The surface feels uneven, like waxy sandpaper.
A safe reset approach
- Use a leather cleaner (or saddle soap if appropriate) sparingly, following label directions.
- Wipe off residue and let the leather dry completely.
- If the shoes look dull afterward, that’s normalyou’re rebuilding correctly.
Think of this step like sanding a wall before painting: you’re not being dramaticyou’re being accurate.
Step 3: Condition the Leather (But Don’t Overdo It)
Dry leather absorbs polish unevenly and can look patchy under a high shine. Conditioning keeps the leather flexible and helps the color look rich,
especially on black parade shoes where every smudge shows up like a spotlight.
How to condition properly
- Apply a small amount of leather conditioner with a cloth.
- Work it in gently, especially on creased areas.
- Let it absorb for 10–20 minutes (follow your product directions).
- Brush lightly to remove excess and restore a clean surface.
Important: Too much conditioner can make it harder for wax to build on the toe. You want “healthy leather,” not “slippery snack wrapper.”
Step 4: Build the Base Shine (Cream First, Then Wax)
A mirror finish looks best when the underlying color is even and deep. That’s where cream polish shines (pun fully intended).
Cream nourishes and recolors; wax creates the glossy shell.
4A. Apply cream polish for color and depth
- Using a cloth or applicator, apply a thin layer of cream polish in small circles.
- Let it dry for a few minutes.
- Brush briskly with a horsehair brush to bring up a soft shine.
4B. Apply wax polish in thin layers
- Wrap a clean cloth around two fingers (or use a cotton ball).
- Pick up a tiny amount of waxless than you think you need.
- Apply to the toe and heel (the stiff areas that don’t flex as much) using small circles.
- Let it dry 5–10 minutes, then brush lightly.
- Repeat 2–4 times to build a smooth, even wax base.
Where to focus: Mirror shine belongs on toe caps and heels (or any stiff, structured leather panels).
Avoid heavy wax on soft vamp areas that crease when you walkthick wax + flexing = cracking.
Step 5: Create the Mirror Finish (Water-Based Spit Shine Technique)
This is the step everyone talks about like it’s a sacred ritual. The idea is to use micro-layers of wax and a few drops of water
to smooth the wax surface until it reflects sharply.
The mirror method (slow, steady, shiny)
- Dampen your cloth slightly (or lightly dampen a cotton ball). It should be moist, not dripping.
- Touch the cloth to wax polish to pick up a pinhead-sized amount.
- Work the wax onto the toe in tiny circles with light pressure.
- Add 1–2 drops of water to the shoe or cloth when it starts to drag.
- Keep circling until the surface looks smoother and glossier.
- Repeat: wax (tiny), circle (tiny), water (tiny), patience (giant).
What “right” feels like
- The cloth glides more easily as the surface levels out.
- The shine becomes sharperfirst glossy, then reflective.
- You stop seeing “swirl haze” and start seeing recognizable shapes.
Common mirror-shine problems (and quick fixes)
- Cloudy haze: Too much wax or not enough buffing. Use less wax, add a drop of water, and work longer with lighter pressure.
- Sticky drag: Cloth is too dry or wax is too heavy. Add a drop of water and switch to a cleaner part of the cloth.
- Speckled dots: Water droplets are too big. Use fewer drops; aim for barely-there moisture.
- Cracking later: Too much wax on flexing areas. Keep mirror shine on toe/heel, and build thin layers.
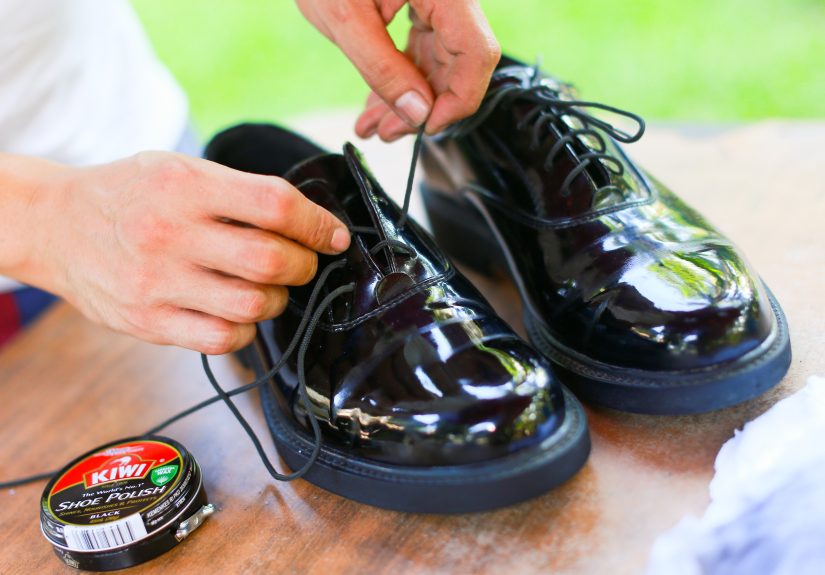
Example: If you’re shining black cap-toe Oxfords for a parade, do the full mirror routine on the cap toe and heel counter.
On the vamp (where your foot bends), stick to cream polish and a light wax buff so it stays flexible.
Step 6: Detail Work and “Parade-Ready” Finishing Touches
A true mirror finish is impressive, but parade inspection eyes love the details: edges, welts, and a clean overall presentation.
This step is where “shiny shoes” become “these shoes have their life together.”
Finish the edges and seams
- Use a cotton swab (or small cloth corner) to clean polish residue from stitching and seams.
- If your soles/heels need it, apply edge dressing carefully (avoid getting it on the upper leather).
- Give the whole shoe a final gentle brush to unify the finish.
Final buff for the “mirror pop”
- Use a clean, dry cloth and very light pressure.
- Buff the toe in straight strokes or gentle circleswhichever avoids haze for you.
- Stop when it’s crisp. Over-buffing can dull a perfect mirror.
Special Notes: Patent Leather, Coated Leather, and “Non-Shine” Boots
Patent leather parade shoes
Patent leather already has a plastic-like glossy coating. Wax polish usually won’t help and can smear.
Instead: wipe with a soft damp cloth, dry, then buff with a microfiber cloth.
If needed, use a patent-specific cleaner/conditioner designed for glossy coatings.
Matte-finish or coated tactical boots
Some modern boots are designed not to shine. If the manufacturer says “non-polishable” or “no-shine,” respect that.
Your best look is clean, evenly conditioned (if allowed), and scuff-freenot waxed into a sticky science project.
Maintenance: Keeping the Mirror Between Parades
Good news: after you build a mirror base, maintenance is easier. You’re not starting from scratch; you’re just refreshing the surface.
- After wear: wipe dust off with a soft cloth and brush lightly.
- Touch-up: a tiny bit of wax + 1–2 drops of water on the toe restores the mirror quickly.
- Storage: keep shoes in a cool, dry place. Stuff with paper or use shoe trees to help shape.
- Don’t chase perfection daily: save the full mirror session for parade week.
Field Notes: Experiences From the Real World (Extra )
The first time I ever tried to get a mirror finish, I thought “thin layers” was a suggestionlike the speed limit. I loaded a cloth with wax,
spun circles like I was trying to summon a polishing spirit, and ended up with a toe cap that looked shiny from one angle and suspiciously foggy from all others.
It wasn’t until I slowed downless wax, more patiencethat the shoe finally started reflecting real shapes instead of vague regrets.
One of the most useful lessons comes from parade-day timing. If you start the night before and rush, your wax layers don’t have time to set,
and the shine can smear when you “just do one more quick pass.” The best parade shoes I’ve seen usually follow a calm schedule:
base layers built over a couple evenings, then a short touch-up the morning of the event. That way, you’re polishing a stable surface,
not trying to stack wet layers like a wobbly pancake tower.
Humidity is another character in this storyusually the villain. In damp weather, water doesn’t evaporate as quickly, so it’s easier to use too much
and create little cloudy spots. The fix isn’t panic; it’s control. I’ve had good results switching to a barely damp cloth (instead of adding water directly to the shoe)
and using even smaller amounts of wax. Think “mist,” not “rainstorm.” If the cloth starts dragging, add a single drop and keep your circles small.
The mirror comes backeventually.
Scuffs happen. Parade routes, sidewalks, and the random mystery pebble are all out there doing their best. The trick is not to re-wax the entire shoe
like you’re repainting a house. For small scuffs on a mirrored toe, I’ve found it works better to clean the spot, add a micro-touch of wax,
and gently work it in with tiny circles and minimal water until it blends. Big scuffs sometimes need a reset: a little cleaner, then rebuild the wax in that area.
It’s slower, but it avoids that “lumpy patch” look that screams, “I fixed this in a parking lot.”
The most surprising experience? How much your technique improves once you stop pressing hard. Heavy pressure feels productive,
but mirror shining is more like polishing a delicate tabletoplight pressure, consistent motion, and frequent cloth rotation.
When I started switching to a clean section of cloth more often, the haze practically disappeared.
Now my “parade shoe ritual” is less frantic scrubbing and more controlled, repeatable steps.
And yes, it still feels a little ridiculous that a toe cap can become reflective enough to check your hair… but honestly,
that’s part of the charm. If you’re going to do parade shoes, you might as well do them gloriously.
Conclusion
A mirror finish isn’t about secret hacksit’s about clean prep, thin wax layers, and careful water control.
Follow the six steps, keep the mirror work on stiff areas like toe caps, and give yourself enough time to let layers set.
Do that, and your parade shoes won’t just look polishedthey’ll look like they’re ready to sign autographs.