Table of Contents >> Show >> Hide
- What Exterior Siding Installation Really Involves
- Choose the Right Siding Before You Start
- Tools and Materials You Will Likely Need
- Step 1: Inspect and Prep the Wall
- Step 2: Install the Weather-Resistant Barrier
- Step 3: Flash Windows, Doors, and Vulnerable Transitions
- Step 4: Establish Your Layout
- Step 5: Install Starter Strips, Corner Posts, and Trim
- Step 6: Install the Siding Panels or Planks
- Step 7: Handle Windows, Doors, and Penetrations Carefully
- Step 8: Finish the Top Course and Final Details
- Common Exterior Siding Installation Mistakes
- Should You DIY or Hire a Pro?
- Real-World Experience and Lessons From Siding Jobs
- Conclusion
Installing exterior siding is one of those projects that looks wonderfully straightforward from the driveway. You measure, cut, nail, and stand back waiting for your house to glow with fresh curb appeal. Then reality walks in wearing muddy boots and carrying a ladder. Suddenly you are dealing with chalk lines, flashing details, starter strips, corner posts, trim pieces, and a healthy respect for gravity.
The good news is that siding installation is absolutely learnable when you understand the system. The bad news is that siding is not just decoration. It is part of your home’s weather defense. Done well, it protects the sheathing, helps manage moisture, improves appearance, and can last for decades. Done poorly, it can trap water, buckle in the sun, and turn a handsome exterior into a very expensive lesson.
This guide walks through how to install exterior siding the smart way, with a focus on the principles that matter most on real houses: planning, prep, flashing, layout, fastening, and finishing. It also covers the common mistakes that make contractors sigh dramatically and homeowners say words not fit for family websites.
What Exterior Siding Installation Really Involves
Before you hang the first panel or plank, it helps to understand what siding does and what it does not do. Siding is the visible cladding layer. It sheds water, protects the structure from sun and wind, and gives the house its finished look. But siding alone is not the complete waterproofing system. Behind it, you typically need sound sheathing, a weather-resistant barrier, flashing at transitions, and carefully detailed openings around doors, windows, vents, and roof intersections.
That is why good siding installation starts long before the first piece of siding goes up. The wall has to be flat, dry, and properly flashed. If the structure underneath is out of plane, rotted, or damp, new siding will not magically solve the problem. It will simply cover it up for a while, which is home-improvement code for “surprise problem later.”
Choose the Right Siding Before You Start
The installation method depends on the material. Vinyl siding is lightweight, popular, and DIY-friendly, but it expands and contracts with temperature swings, so it must be installed loosely enough to move. Fiber cement is tougher and more dimensionally stable, but it is heavier, dustier to cut, and far less forgiving if you get the fastening or clearance details wrong. Engineered wood siding offers a wood-like appearance with easier handling than fiber cement, though it still requires careful flashing, spacing, and finish protection. Traditional wood siding looks beautiful but asks for the most maintenance and attention over time.
If your project is your first large siding job, vinyl is usually the easiest learning curve. If you are using fiber cement or engineered wood, it becomes even more important to follow the manufacturer’s instructions to the letter, especially for fasteners, joint treatment, required clearances above roofs and grade, and moisture-management details.
Tools and Materials You Will Likely Need
Basic Tools
Tape measure, chalk line, level, speed square, utility knife, hammer or siding nailer, circular saw or miter saw with the correct blade for the product, pry bar, ladder or scaffolding, safety glasses, gloves, and hearing protection.
Typical Materials
Siding panels or planks, starter strips, corner posts, J-channel or trim pieces, house wrap or other weather-resistant barrier, flashing tape, drip cap or head flashing, corrosion-resistant fasteners, caulk where approved, and mounting blocks for lights, outlets, and hose bibs.
Buy a little more material than your wall calculations suggest. Waste happens. Corners happen. Incorrect cuts happen. Confidence happens, then disappears. A practical extra margin keeps the project moving.
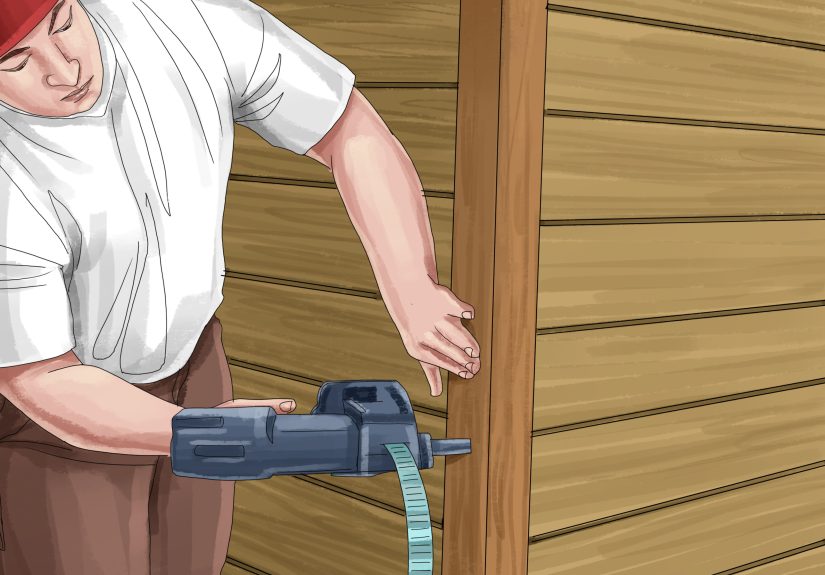
Step 1: Inspect and Prep the Wall
Remove old loose siding, failed trim, downspouts, light fixtures, and anything else that interferes with the wall surface. Inspect the sheathing for rot, delamination, mold staining, or soft spots. Replace damaged sections before you proceed. Check that the wall is reasonably flat and that framing irregularities are corrected with shims or furring where needed. Siding looks best when the wall behind it behaves.
This is also the time to think about details most people forget until they are standing on a ladder with a half-cut panel in one hand. Where will the siding terminate at brick or stone? How will it die into a roofline? Do you need special mounting blocks for lights and utilities? Are the windows trimmed in a way that will accept the siding neatly? Planning these details now is cheaper than improvising them later.
Step 2: Install the Weather-Resistant Barrier
If the wall is open or the old barrier is compromised, install a weather-resistant barrier over the sheathing. Work from the bottom up so each higher course laps over the course below, just like shingles. Tape seams if the product requires it, and repair tears immediately. The goal is simple: any water that gets behind the siding should be able to travel down and back out instead of soaking the wall assembly.
A good WRB installation also means paying attention to penetrations and transitions. Pipes, vents, light boxes, ledger connections, and wall intersections all need proper sealing and flashing. Most siding failures are not caused by a bad-looking panel. They begin at the details nobody sees once the job is done.
Step 3: Flash Windows, Doors, and Vulnerable Transitions
This is the step that separates a weather-resistant wall from a future headache. Flash the sill or pan area first, then the jambs, then the head, so each upper layer laps over the layer below. Around windows and doors, add head flashing or drip cap where required. At butt joints in some lap siding systems, use the approved flashing detail behind the joint. At the base of the wall, make sure water has a path to drain out rather than collect behind the siding.
If you remember only one rule from this whole article, make it this: always think like a raindrop. If the path sends water out and down, you are probably doing something right. If the path sends water behind a lower layer, into a seam, or straight into the sheathing, fix it before the siding covers the evidence.
Step 4: Establish Your Layout
Find the lowest point on the wall and snap a level chalk line for the starter strip or first course. This matters more than people think. If the first row is off, every course above it advertises that fact to the entire neighborhood. A small error at the bottom becomes a giant visual problem near the soffit.
Next, plan the course layout around windows, doors, and other major features. A professional-looking job usually has courses that land in visually balanced places rather than randomly slicing across the middle of every opening. With panel products or board-and-batten systems, take extra time to center seams and battens so the finished wall looks intentional instead of improvised.
Step 5: Install Starter Strips, Corner Posts, and Trim
Starter strips create the first locking point for horizontal siding. Install them level. Corner posts and trim channels go on before the field siding. Around windows and doors, install the appropriate receiving trim so cut siding ends are protected and the assembly can shed water correctly.
This stage is less glamorous than hanging the siding itself, but it is where the finished look is born. Sloppy trim makes even premium siding look cheap. Clean, straight accessory installation makes ordinary siding look far more expensive than it really is. In exterior work, details are the entire show pretending to be the opening act.
Step 6: Install the Siding Panels or Planks
For Horizontal Siding
Start at the bottom and work upward. Lock the first course securely into the starter strip, then fasten according to the manufacturer’s pattern. Keep each course level and check alignment often. Stagger end joints where the product requires it, and avoid obvious repeating patterns that make the wall look mechanical.
If you are installing vinyl siding, do not nail it tight. Vinyl must hang, not be strangled. Fasteners are usually placed in the center of the nailing slots, and the panel should still be able to move slightly after fastening. Leave the proper expansion clearance at trim and corner channels based on the temperature and product instructions. If you install vinyl as though it were wood, the sun will eventually hold a grudge.
For Vertical Siding or Board-and-Batten
Install the required furring or drainage detail if the system calls for it, then set the first panel perfectly plumb. Once the first panel is right, the rest of the wall goes much more smoothly. Battens should cover joints evenly, and the reveal should stay consistent from bottom to top. Vertical work looks sharp when it is precise and chaotic when it is not, with very little middle ground.
For Fiber Cement or Engineered Wood
Use the specified fasteners, follow the required nailing method, and maintain the required clearances above grade, roof surfaces, and hardscape. Some products use blind nailing for a cleaner look, while others may require face nailing in certain conditions or wind zones. Cut ends may need sealing or factory-finished edges depending on the product. Do not substitute generic habits for printed instructions. That is how warranties begin to disappear.
Step 7: Handle Windows, Doors, and Penetrations Carefully
Most of the tricky cuts happen around openings. Measure twice, cut once, and then measure again if you enjoy avoiding waste. Cut pieces should slip into receiving trim without being forced. Leave the appropriate gap for movement where needed. Around outlets, hose bibs, dryer vents, and light fixtures, use approved mounting blocks or trim accessories to keep the installation tidy and weather-resistant.
Do not rely on trim pieces alone to act as flashing. Trim is not magic. Water management still depends on the WRB and flashing behind the visible finish pieces.
Step 8: Finish the Top Course and Final Details
The top course often requires ripping panels or planks to fit beneath soffits or trim. Use the right finish trim or utility trim so the top edge is secured neatly. At gables, roof intersections, and sloped lines, work slowly and keep the cuts clean. This is one of the places where a rushed job reveals itself instantly.
Reinstall fixtures, downspouts, and decorative elements only after the wall is complete. Clean the site, remove scraps and sharp offcuts, and inspect the wall from several angles in daylight. Good siding should look consistent up close and calm from the street. If one section looks wavy or rushed, now is the time to fix it.
Common Exterior Siding Installation Mistakes
Nailing Too Tight
This is the classic vinyl siding mistake. Tight nailing prevents movement and can cause buckling, noise, or distortion when temperatures change.
Skipping Flashing Details
Missing head flashing, badly integrated house wrap, or careless butt-joint treatment can let water into the wall system even when the siding looks fine.
Starting Out of Level
An unlevel starter strip creates a domino effect that gets uglier with every course.
Poor Planning Around Openings
Random seams, awkward narrow strips, and badly cut notches around windows make the finished wall look amateurish.
Ignoring Manufacturer Rules
Siding is not a universal product. Fastener type, spacing, clearances, and trim details vary. The exact instructions for your product matter.
Should You DIY or Hire a Pro?
A simple shed, detached garage, or small wall repair can be a solid DIY project for a careful homeowner. A full-house re-side is much bigger. It involves ladders, layout, dust control, waterproofing, cutting accuracy, and working safely at height. If your home has multiple stories, lots of roof intersections, curved details, or existing water damage, hiring a qualified pro may actually be the cheaper decision in the long run.
The best DIY mindset is not “How hard can it be?” It is “How do I avoid trapping water in my walls while standing twenty feet in the air?” That is a much healthier question.
Real-World Experience and Lessons From Siding Jobs
One of the biggest surprises people have when they start installing exterior siding is how little of the project is about siding itself. New installers imagine the visible panels are the job. Experienced installers know the invisible prep is the job. Once you spend a day fixing sheathing, straightening a wall, adjusting trim depths, and flashing a couple of openings correctly, you stop seeing siding as a surface and start seeing it as part of a wall system. That shift in thinking usually marks the moment when the work starts getting better.
Another common lesson is that speed and quality do not arrive at the same time on day one. The first wall often feels slow because every piece seems to ask a question. Is this course level? Does this cut need more clearance? Should this joint move left so it does not line up with the joint below? That is normal. By the second wall, the sequence starts to make sense. By the third wall, your tape measure feels less like an interrogation device and more like a teammate.
Installers also learn quickly that houses are rarely as straight as drawings suggest. Corners lean. Window openings vary just enough to be annoying. Rooflines wander. Sheathing edges create bumps that magically appear only after the sun hits the wall at the perfect angle. The practical response is not frustration. It is patience. Dry-fit more pieces. Use longer sight lines. Step back often. Some of the best adjustments happen not while you are six inches from the wall, but while you are standing in the yard squinting at the whole elevation like a mildly suspicious art critic.
There is also a very real difference between a wall that is merely covered and a wall that looks finished. Good installers spend extra time on layout because symmetry is one of those things homeowners notice even when they cannot explain it. When siding lines up gracefully with windows and trim widths feel balanced, the house looks intentional. When seams drift and reveals jump around, the house feels off even if nobody knows why. That is not vanity. It is craftsmanship.
Weather teaches its own lessons. Hot sun can make materials more flexible and measurements less trustworthy. Wind turns long panels into giant awkward kites. A rushed late-day repair made before rain often becomes the exact spot you inspect with regret the next morning. Experienced crews respect the conditions because exterior work has no interest in your schedule. It responds only to technique.
Perhaps the most valuable lesson of all is this: most siding problems begin with the small details people are tempted to skip. The extra strip of flashing. The repaired tear in the house wrap. The careful clearance at a trim edge. The corrected starter line before continuing around the whole house. Those moments are not glamorous, but they are what separate a siding job that still looks sharp years later from one that starts hinting at trouble after the first hard season.
In other words, exterior siding rewards humility. The wall will tell you when it needs better prep, straighter layout, or more careful detailing. Listening early is much easier than ripping panels off later. And that may be the most practical siding wisdom of all.
Conclusion
Learning how to install exterior siding is really about learning how to build a durable exterior skin. The visible boards or panels matter, but the long-term success of the project depends on the prep behind them: solid sheathing, proper WRB installation, clean flashing, careful layout, correct fastening, and disciplined finishing details.
If you take your time, follow the product instructions, and think about drainage at every step, you can install siding that looks sharp and performs well. And if you ever feel tempted to skip the boring moisture-management details, remember this helpful rule: water is incredibly patient, and it always shows up for the parts of the project you tried to rush.