Table of Contents >> Show >> Hide
- Before You Start: Safety, Codes, and Planning
- Step 1: Choose the Right Placement and Height
- Step 2: Turn Off Power and Verify
- Step 3: Prepare the Wall and Install the Electrical Box
- Step 4: Attach the Mounting Bracket
- Step 5: Make the Electrical Connections
- Step 6: Mount the Sconce and Install Bulbs
- Step 7: Restore Power and Test
- Special Cases: Plug-In and Battery Sconces
- Design and Style Tips for Wall Sconce Lighting
- Real-World Experiences and Extra Tips
- Mock it up before you cut anything
- Think about sight lines, not just measurements
- Use the right anchors the first time
- Plan for bulb changes and cleaning
- Coordinate with furniture and artwork
- Give yourself permission to hire help for the hard parts
- Live with one sconce before installing the rest
- Remember: lighting is part tool, part mood
- Conclusion
Wall sconces are like the little black dress of lighting: simple, flattering, and they work almost everywhere.
Whether you want a pair of lights flanking your bathroom mirror, cozy bedroom reading sconces, or dramatic
hallway lighting, installing wall sconce lighting is one of those projects many DIYers can tackle as long as
they respect electricity and follow the rules.
This guide walks you through how to install wall sconce lighting inspired by the classic eHow step-by-step style,
from planning and safety to wiring and finishing touches. We’ll also talk about smart placement, common mistakes
to avoid, and real-world tips from people who’ve actually lived with their sconces (and occasionally bumped into them).
Before You Start: Safety, Codes, and Planning
What this guide does (and doesn’t) cover
This article is aimed at typical indoor hardwired sconces that connect to an existing 120-volt lighting circuit in
a U.S. home, or that replace an existing wall light. Running new cable through walls, adding new circuits, or
modifying your electrical panel usually requires a licensed electrician and may require permits. When in doubt,
call a pro it’s cheaper than an emergency room visit.
Safety first: your non-negotiables
- Turn off power at the breaker before you touch any wires.
- Use a non-contact voltage tester to confirm the power is off at the box.
- Follow the sconce manufacturer’s instructions in addition to this guide.
- Use UL-listed boxes, wire connectors, and components rated for your location.
- If anything looks old, damaged, or confusing, stop and get a licensed electrician.
Tools and materials
You won’t need a full electrician’s van, but gather at least:
- Wall sconces and included mounting hardware
- Compatible electrical box (if you’re adding or replacing one)
- Non-contact voltage tester
- Phillips and flathead screwdrivers
- Drill and suitable bits (for drywall, wood, or masonry)
- Drywall anchors or wall plugs if not mounting directly to a stud
- Wire strippers and needle-nose pliers
- Wire connectors (wire nuts) and electrical tape
- Level, tape measure, and pencil
- Stud finder, if you’re mounting to drywall
Step 1: Choose the Right Placement and Height
Placement is where design, comfort, and safety come together. You want light that’s flattering and functional,
not a beam aimed directly into your corneas.
Typical sconce height
For most indoor walls, a good starting point is to mount sconces so the center of the fixture is about
60 to 72 inches above the floor. In bedrooms or beside mirrors, many designers aim closer to eye level roughly
55 to 65 inches for most adults so light falls across the face instead of from above. Adjust for your ceiling
height, furniture, and the specific fixture.
Spacing and symmetry
If you’re installing multiple sconces along a hallway or large wall, spacing them about 5 to 7 feet apart creates
even illumination without hot spots. Around a mirror or headboard, focus on symmetry: equal height and equal
distance from the center line. Use a level and tape measure; “close enough” will look “slightly wrong” forever.
Think about what the light needs to do
-
Task lighting: For reading or grooming, position sconces so the light beams toward the work area
without casting harsh shadows. -
Ambient lighting: For general mood lighting, aim higher and choose shades or diffusers that
spread light softly along the wall. -
Accent lighting: If you’re highlighting art or architectural details, align the beam with the
focal point rather than the furniture layout.
Step 2: Turn Off Power and Verify
This is not the step to “wing it.” Head to your electrical panel and switch off the breaker that controls the
existing fixture or the circuit where the new box will connect. Label it if it isn’t already your future self
will thank you.
Back at the wall, remove the existing fixture (if there is one) and gently pull the wires out of the box. Use your
non-contact voltage tester on each wire and on the box. Only proceed when the tester confirms there is no power.
Step 3: Prepare the Wall and Install the Electrical Box
If you’re replacing an existing fixture
Replacements are usually the easiest scenario. You’ll likely already have an electrical box in place. Check that:
- The box is firmly attached to the framing or secure remodel clips.
- The box is rated for the fixture weight (especially if it’s large or heavy).
- The box is flush with the drywall surface or slightly proud (not recessed).
If the box is loose, damaged, or undersized, replace it with a modern remodel (old-work) box designed for
wall fixtures. These clamp against the drywall and provide a secure mounting point without opening up a big
section of wall.
If you’re adding a new sconce location
For a new location, many homeowners have an electrician run the cable to the general spot, then DIY the box and
fixture installation. To place the box:
-
Mark the desired center point on the wall at your chosen height. Use a level to line up with furniture,
mirrors, or other sconces. - Trace the outline of the electrical box using its paper template or by holding the box against the wall.
- Cut along the outline with a drywall jab saw or rotary tool and remove the cutout piece.
- Pull the electrical cable into the box opening (if it’s already run) and strip back the sheathing as required.
- Insert the box and tighten the screws or clamps so it snugly grips the drywall.
For masonry or tile walls, you might need a surface-mounted box and special anchors or fasteners. In those cases,
follow the manufacturer’s directions or bring in a pro if you’re not comfortable drilling harder materials.
Step 4: Attach the Mounting Bracket
Most wall sconces include a metal mounting bracket or crossbar that attaches to the electrical box. This bracket
supports the fixture and often provides threaded posts for the decorative nuts or screws.
-
Feed the circuit wires (hot, neutral, and ground) through the center opening of the bracket or through any slots
provided. - Align the bracket with the screw holes on the electrical box. Make sure any “UP” markings actually face up.
-
Secure the bracket with the provided machine screws. Tighten them so the bracket is solid a loose bracket equals
a wobbly, annoying sconce. - If your bracket has a green grounding screw, leave it accessible for connecting the ground wire in the next step.
Step 5: Make the Electrical Connections
If you are not completely confident about electrical work, stop here and hire a licensed electrician to make the
connections. If you decide to proceed, work slowly and carefully, and follow local codes.
Understand the typical wire colors
- Hot: usually black (sometimes red).
- Neutral: usually white.
- Ground: bare copper or green.
Your sconce will usually have matching colored wires or labeled leads. If the fixture uses two identical insulated
wires, one may have ribbing or printing to indicate neutral check the instruction sheet.
Connecting the wires
-
Connect the house ground wire to the sconce’s ground wire and, if required, to the green screw
on the mounting bracket. Twist the bare wires together and secure with an appropriately sized wire connector. -
Connect the neutral (white) supply wire to the neutral fixture wire. Again, twist and secure with
a wire connector. - Connect the hot (black) supply wire to the fixture’s hot wire using a wire connector.
-
Gently tug each connection to be sure it’s secure. Wrap connections with electrical tape if desired, and tuck the
wires neatly into the box, keeping them behind the mounting bracket.
If you encounter aluminum wiring, mixed wire types, or unfamiliar color schemes, do not guess. Call an electrician
guessing with electricity is not a fun game.
Step 6: Mount the Sconce and Install Bulbs
Once the wiring is connected, it’s time for the satisfying part: getting the fixture on the wall.
-
Align the sconce base or backplate over the mounting bracket. Thread the decorative nuts or screws onto the
posts or into the bracket holes. -
Tighten the screws until the fixture is snug and level, but don’t overtighten you don’t want to crack glass or
deform the metal. - Install any shades, glass covers, or decorative elements according to the instructions.
-
Screw in the recommended bulbs (or install the integrated LED components if applicable). Use the correct wattage
and color temperature warm white (2700K–3000K) is cozy for bedrooms and living spaces, while brighter neutral
white can work well in bathrooms or work areas.
Step 7: Restore Power and Test
Head back to the electrical panel and turn the breaker back on. Flip the wall switch and admire your work. If the
light doesn’t come on, turn the breaker off again before troubleshooting. Common issues include a loose wire
connection, a tripped breaker, or a defective bulb.
Special Cases: Plug-In and Battery Sconces
If the idea of touching wires makes you feel like a cartoon character about to get zapped, consider plug-in or
battery-powered sconces. These typically mount with anchors and screws, then plug into a nearby outlet or run on
rechargeable batteries no in-wall wiring required.
- Follow the same planning and placement tips (height and symmetry still matter).
- Use appropriate wall anchors for the fixture weight and wall type.
- Conceal cords with paintable cord covers or routing behind furniture when possible.
You won’t get the completely cordless look of a hardwired sconce, but the installation is much simpler and often
renter-friendly.
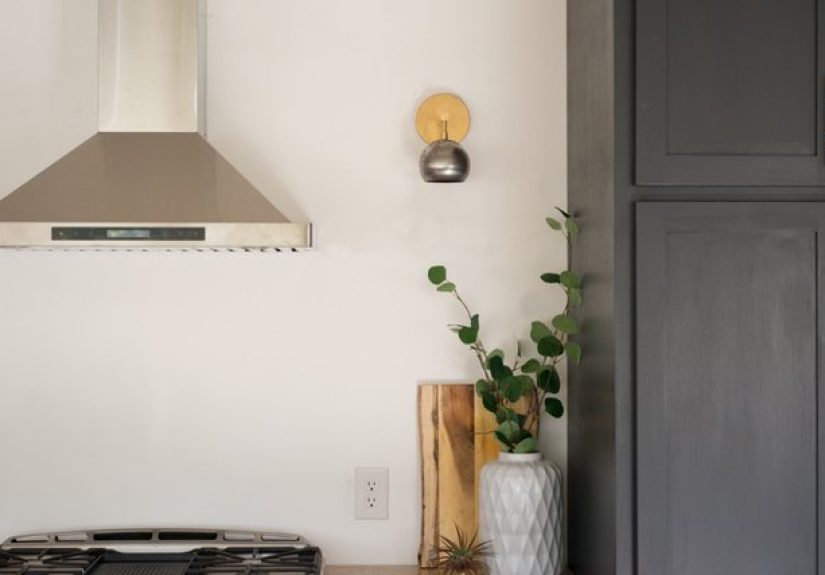
Design and Style Tips for Wall Sconce Lighting
Match the sconce to the room’s personality
In a modern living room, sleek metal or minimalist LED sconces can echo clean lines and neutral colors. In a
farmhouse or traditional home, lantern-style or candle-style fixtures feel right at home. Try to pick finishes that
coordinate with existing hardware think door handles, faucets, or cabinet pulls.
Layer your lighting
Wall sconces are team players, not solo acts. Combine them with ceiling fixtures, floor lamps, and task lights to
create layers of light you can adjust throughout the day. Put sconces on dimmers where allowed by code and compatible
with the bulbs; dimmed sconces can transform a bright functional room into a cozy evening retreat.
Avoid glare and awkward shadows
Clear glass and exposed bulbs can look stylish, but they may also shine directly into your eyes especially in
narrow hallways or small bathrooms. Frosted shades, opal glass, or fabric shades soften the light and are generally
more forgiving. Always stand at typical viewing angles and check how the light feels before you commit to installing
several identical fixtures.
Real-World Experiences and Extra Tips
Installing wall sconces looks simple in diagrams, but real homes have quirks: slightly crooked walls, oddly placed
studs, and that surprise HVAC duct exactly where you wanted your light. Here are some experience-based tips to make
the project smoother.
Mock it up before you cut anything
Painters’ tape is your best friend. Before you cut drywall or even drill pilot holes, tape an outline of the sconce
on the wall at your chosen height. Step back, sit down, and walk past it like you would normally move through the
space. Does it feel too low or too high? Too close to the doorway? Adjust until it feels natural, then mark your
final location with a pencil and level.
Think about sight lines, not just measurements
Measurements are important, but so is how the sconce looks from different spots in the room. For example, a pair of
sconces beside a bathroom mirror might be perfect when you’re standing at the vanity, but one might look awkwardly
close to the shower wall when seen from the doorway. When planning, stand in all the main viewing spots entry,
seating areas, and hall approaches to be sure the layout feels balanced from every angle.
Use the right anchors the first time
Many DIYers discover after installation that their sconces wiggle or the screws slowly loosen over time. Usually the
culprit is undersized anchors or simply screwing into drywall with no support. If you can’t hit a stud, invest in
strong drywall anchors rated for more than the fixture’s weight. It takes a few extra minutes now and saves you from
repairing wall damage later.
Plan for bulb changes and cleaning
Some fixtures look gorgeous on the box but are awkward in real life. Ask yourself:
- Can you easily reach the fixture to change the bulb?
- Do you have to remove three tiny screws and a glass shade every time?
- Will dust collect in decorative crevices you’ll never realistically clean?
If your answer to these questions is “uh-oh,” consider a simpler design or install the fancier fixture in a lower
traffic area where maintenance is easier.
Coordinate with furniture and artwork
It’s easy to fall in love with a sconce in the store and forget about that tall bookshelf or headboard at home.
Make sure the sconce won’t conflict with doors, cabinet doors, headboards, or artwork. A well-placed sconce should
frame these elements, not bump into them or force you to hang art awkwardly low.
Give yourself permission to hire help for the hard parts
Plenty of homeowners do a hybrid approach: an electrician runs new wire and installs boxes, then the homeowner
installs the fixture and finishes the wall. This can keep costs down while still ensuring the critical electrical
work is done safely and up to code. There is absolutely no “DIY badge” worth risking your safety over.
Live with one sconce before installing the rest
If you’re adding several identical sconces in a hallway or large room, install one first and use it for a few days.
Pay attention to:
- How the light feels at night too bright, too dim, or just right.
- Whether the placement works with how you walk through or use the room.
- Any unexpected glare on screens, mirrors, or shiny surfaces.
It’s much easier to adjust your plan after one installation than after you’ve cut six holes and mounted six fixtures.
Remember: lighting is part tool, part mood
At the end of the day, wall sconces are both practical and emotional. They help you read, cook, or get ready in the
morning, but they also create that cozy glow you notice on hotel walls and in magazine photos. If you approach
installation with safety, good planning, and a bit of patience, you’ll end up with lighting that feels like it
belongs in a professionally designed space minus the professional-price invoice.
Conclusion
Installing wall sconce lighting is a manageable project for many homeowners, as long as you respect electrical safety,
follow local codes, and take the time to plan your layout. From choosing the right height and spacing to making neat
connections and securing the fixture, each step contributes to a result that looks polished and performs well every day.
Whether you’re upgrading a single hallway light or adding a symmetrical pair beside your bed, wall sconces can
instantly elevate your home’s style and comfort. Slow down, measure twice, test your power, and enjoy that moment
when you flip the switch and your new lighting makes the whole room feel finished.
SEO Summary
meta_title: How to Install Wall Sconce Lighting (DIY Guide)
meta_description: Learn how to install wall sconce lighting safely and stylishly with this
step-by-step DIY guide, from planning placement to wiring and mounting.
sapo: Installing wall sconce lighting is one of those DIY projects that looks intimidating but
becomes surprisingly doable when you break it into clear steps. This in-depth guide, inspired by the classic eHow
format, walks you through everything from choosing the right height and spacing for your sconces to turning off the
power, prepping the wall, wiring the fixture, and mounting it securely. You’ll also get real-world tips on picking
anchors that actually hold, avoiding glare and awkward shadows, and deciding when it’s smarter to call in a licensed
electrician. By the end, you’ll know how to combine safety, code-conscious installation, and decorator-level design
decisions so your new wall lights look intentional, feel comfortable, and make your room glow like it belongs in a
magazine spread.
keywords: how to install wall sconce lighting, wall sconce installation, DIY wall lights,
bedroom wall sconces, wiring a wall sconce, installing light fixture, step by step wall sconce guide