Table of Contents >> Show >> Hide
- What Is an Obelisk Trellis (and Why It’s Worth Building)?
- Plan First: Size, Placement, and What You’re Growing
- Materials and Tools
- Wood Choice: What Holds Up Outdoors (Without Drama)
- Cut List for a Basic 6-Foot Obelisk
- Step-by-Step: How to Build the Obelisk Trellis
- Make It Stronger: Two Easy Upgrades
- Anchoring: The Difference Between “Sturdy” and “Yard Jenga”
- Finishing and Weather Protection
- Best Plants for an Obelisk Trellis
- Maintenance: Keep It Looking Good (and Standing Up)
- FAQ
- Extra: Real-World Build Notes and “Experience-Based” Lessons (About )
- Conclusion
If your garden plants had a wish list, a DIY obelisk trellis would be right up there with “more sunshine” and “please stop the squirrels.” An obelisk trellis (sometimes called a tuteur) is a tall, tapered, freestanding structure that gives climbing plants a stylish ladder to the skywithout taking over your whole bed like that one zucchini you swore you could “totally manage this year.”
This guide walks you through a beginner-friendly build for a sturdy, six-foot wooden obelisk trellis that looks intentional (not “I had extra scrap wood and a dream”). You’ll get a cut list, easy assembly steps, anchoring tips, and practical options depending on what you’re growing.
What Is an Obelisk Trellis (and Why It’s Worth Building)?
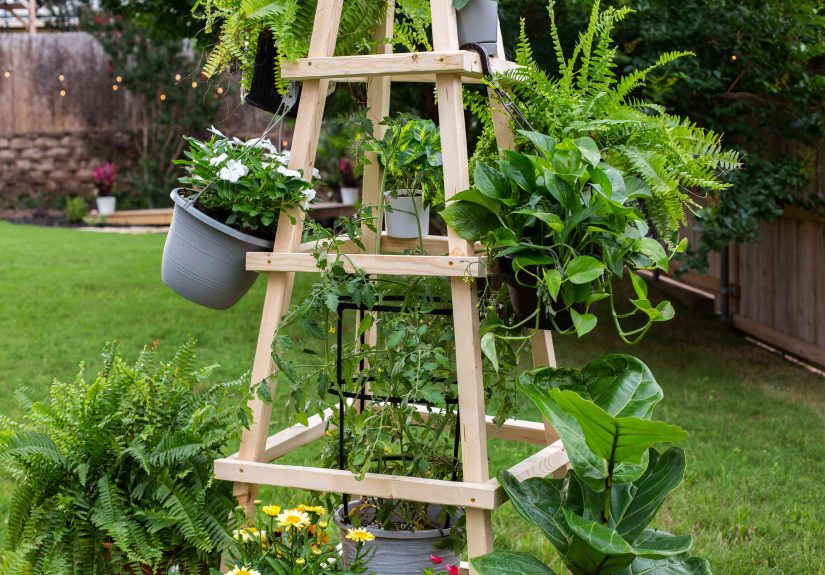
An obelisk trellis is a four-sided, tapered towerwide at the bottom, narrow at the topdesigned to support vines as they climb. It’s popular because it:
- Saves space by pushing growth upward instead of outward.
- Improves airflow and sunlight exposure, which can mean fewer leaf problems and better production.
- Looks good even when your plant is “between careers.” (That is, not doing much yet.)
- Works in beds, borders, and large potsperfect for small yards or tight gardens.
Plan First: Size, Placement, and What You’re Growing
A simple, reliable size
For a “basic” obelisk that fits most home gardens, aim for:
- Height: ~6 feet (tall enough to matter, still manageable to build)
- Bottom footprint: about 18–24 inches square
- Top opening: about 6–10 inches square
Where it works best
Place your obelisk where you can easily reach around it. A good rule: leave enough room to weed, harvest, and admire your work like it’s a garden sculpture (because it is).
- In a raised bed: put it in the middle of a bed that’s at least 3 feet wide, or toward the back if the bed is against a wall/fence.
- In-ground beds: center it in a planting pocket so vines can climb evenly.
- Containers: use a shorter version (4–5 feet) and anchor it deep into the potting mix.
Pick your “climber personality”
Different plants climb differently. Match your trellis style to the plant’s habits:
- Twining vines (morning glories, sweet peas, pole beans): love horizontal slats or string/wire “rungs.”
- Tendrils (cucumbers, small squash varieties): appreciate thinner supports or mesh they can grab.
- Climbers that need tying (some roses, young vines): plan to attach with soft ties as they grow.
Materials and Tools
Materials (for one 6-foot wooden obelisk)
- (4) 2×2 boards, 8 feet long (cedar is great; other outdoor-rated lumber works)
- (8–12) 1×2 boards, 8 feet long (for horizontal slats)
- Exterior screws (1 5/8-inch is a good all-purpose size for slats; 2 1/2-inch for main joints)
- Outdoor wood glue (optional but helpful)
- Sandpaper (medium and fine grit)
- Outdoor stain/sealer or exterior paint (optional but recommended)
- Anchoring option: landscape stakes, rebar stakes, or screw-in ground anchors (more on this below)
Tools
- Measuring tape
- Pencil
- Miter saw or circular saw (a handsaw worksjust slower)
- Drill/driver
- Drill bits (including a small bit for pilot holes)
- Clamps (helpful, not mandatory)
- Safety glasses and hearing protection
Wood Choice: What Holds Up Outdoors (Without Drama)
Outdoor projects fail for the same reason most New Year’s resolutions fail: reality. Rain happens. Sun happens. Soil contact happens. Choose materials that can handle it.
Best beginner-friendly option
Cedar is a favorite because it naturally resists rot and insects and looks great unfinishedo not. Redwood and cypress are also commonly used outdoor woods (availability depends on your region).
What about pressure-treated lumber?
Pressure-treated wood is widely used outdoors because it lasts longer, but some gardeners prefer keeping it away from edible beds or soil contact for peace of mind. If you use treated lumber, consider placing the trellis so most of it stays above soil line, and seal cut ends. When in doubt, choose naturally rot-resistant wood for a simple garden structure like this.
Cut List for a Basic 6-Foot Obelisk
This cut list aims for a classic shape: tall, tapered, and stable.
Main legs (2×2)
- (4) legs at 72 inches each (6 feet)
Horizontal slats (1×2)
You’ll create “bands” around the obelisk at several heights. The lower bands are longer; the upper bands are shorter. Here’s an easy approach that looks balanced:
- Bottom band (near 8–12 inches from ground): (4) slats at 22 inches
- Lower-mid band (about 24 inches up): (4) slats at 18 inches
- Upper-mid band (about 40 inches up): (4) slats at 14 inches
- Top band (about 56 inches up): (4) slats at 10 inches
Optional “ladder” slats: Add 2–4 extra horizontal slats per side (cut to match the band length at that height) if you want more climbing rungsespecially helpful for peas and beans.
Step-by-Step: How to Build the Obelisk Trellis
Step 1: Prep the lumber
- Cut your four 2×2 legs to 72 inches.
- Cut your 1×2 slats according to the band list above.
- Sand rough edges and corners (splinters are not a personality trait).
Step 2: Build two flat side panels first
Working in panels makes this project dramatically easier (and reduces the chances you’ll invent new swear words).
- Lay two 2×2 legs on a flat surface, parallel, about 22 inches apart at the bottom ends.
- Taper the top ends inward so the distance between legs is about 10 inches at the top.
- Use the slats for the band heights: attach a 22-inch slat near the bottom, then 18-inch, 14-inch, and 10-inch as you move upward.
- Pre-drill pilot holes to prevent splitting, then screw slats into the 2×2 legs.
- Repeat to build a second matching side panel.
Pro tip: If you’re building solo, clamp the slat in place before drilling. Clamps are like extra hands that don’t text while working.
Step 3: Stand the two panels up and connect them
- Stand both panels upright, facing each other.
- Hold them in place so the footprint forms a square (or close to it) at the bottom.
- Connect the panels using the remaining slats at the same heights you used on the first two sides.
- Work from the bottom band up to keep everything aligned and stable.
Step 4: Square it up (without obsessing)
Check that it doesn’t wobble like a baby deer. Minor imperfections are fineplants are forgiving and frankly can’t read a level.
Step 5: Add a simple top cap (optional)
If you want a more finished look, add a small wooden cap or finial at the top. Even a simple square of scrap wood can make it look “store-bought,” which is the nicest compliment a DIY project can get.
Make It Stronger: Two Easy Upgrades
Upgrade 1: Add diagonal braces
If you live somewhere windy (or your neighborhood has a habit of surprise thunderstorms), add small diagonal braces near the lower corners. This greatly reduces racking (side-to-side wobble).
Upgrade 2: Add wire or mesh panels
For cucumbers or small-fruited squash varieties, staple galvanized wire mesh (or garden fencing) to the inside of each side. It gives tendrils more to grab.
Anchoring: The Difference Between “Sturdy” and “Yard Jenga”
An obelisk trellis is tall, which means physics gets a vote. Anchor it wellespecially once your plant turns it into a leafy sail.
- In-ground: push legs a couple inches into soil, then drive landscape stakes or rebar beside two legs and screw/zip-tie the trellis to them.
- Raised beds: anchor to the inside of the bed frame with brackets, or drive stakes deep into the bed’s soil near the corners.
- Containers: sink legs deep into the pot and add weight (stones at the base) or attach the trellis to a central stake hidden inside the pot.
Finishing and Weather Protection
Raw wood can work, but finishing helps the trellis last longer and stay better-looking through seasons.
- Stain + sealer: highlights grain and offers protection.
- Exterior paint: gives a crisp, decorative look (white and black are classics).
- Seal cut ends: end grain soaks up water fastestgive it extra attention.
Best Plants for an Obelisk Trellis
Here are reliable options that look great and won’t immediately bully the structure:
Edibles
- Pole beans: fast climbers, easy harvest
- Peas: love lots of rungs
- Cucumbers: benefit from mesh support
- Small gourds: choose lightweight varieties or provide extra ties
Ornamentals
- Morning glories: quick coverage, big color
- Sweet peas: fragrance + charm
- Clematis: gorgeous, long season in many zones
- Climbing roses: may need tying but look spectacular
Maintenance: Keep It Looking Good (and Standing Up)
- Check screws each season: wood expands and contracts outdoors.
- Re-seal as needed: especially if the trellis gets full sun or frequent irrigation splash.
- Clean gently: a soft brush and mild soap is usually enough.
- Winter strategy: in harsh climates, store it in a shed/garage or cover it to extend lifespan.
FAQ
Do I need exact measurements?
No. Think of this as “guidelines with benefits.” Keep the bottom wider than the top, make sure it’s stable, and your plants will do the rest.
Can I build one without power tools?
Yesuse a handsaw and a screwdriver. It’s slower, but very doable. Pre-drilling pilot holes still helps a lot.
How do I keep it from tipping over once plants grow?
Anchor it early, before plants add weight and wind resistance. Stakes or rebar beside the legs are simple and effective.
Extra: Real-World Build Notes and “Experience-Based” Lessons (About )
Let’s talk about what usually happens in real backyardswhere the ground is uneven, the tape measure mysteriously disappears, and at least one screw will roll into a parallel universe.
First lesson: the “flat surface” is a myth. Most people start building on a garage floor or patio and discover that “level” is more of a philosophical concept than a physical reality. The good news is that an obelisk trellis is forgiving. If one panel ends up slightly skewed, you can usually correct it when you connect the sidesespecially if you work from the bottom band upward and keep checking for wobble. Many DIYers find that clamps (even cheap ones) suddenly feel like luxury items, because they hold boards steady while you drill and screw.
Second lesson: pre-drilling is not optional if you value your sanity. When people skip pilot holes, the wood can splitusually on the prettiest slat, right when confidence is peaking. A small pilot hole takes seconds and saves you from having to pretend the split board was “rustic character.” That said, small imperfections rarely matter once vines start climbing. Plants are the ultimate interior decorators: they hide everything.
Third lesson: the trellis will feel comically large… until the plant arrives. A six-foot obelisk can look tall and dramatic on day one, then mid-summer it’s wearing a full leafy sweater and asking for seconds. This is especially true with pole beans, cucumbers, and enthusiastic ornamentals. People often report that their “perfect footprint” suddenly feels cramped when harvest time hitsso leaving walking space around the trellis (and putting it where you can reach all sides) becomes a big quality-of-life upgrade.
Fourth lesson: anchoring is where good builds become great builds. In calm weather, an unanchored obelisk seems fine. Then a storm shows up and your trellis leans like it’s listening to gossip. Many gardeners say the best time to anchor is right after installation, before planting gets thick. A simple stake system prevents mid-season rescue missions and makes the whole structure feel professional.
Fifth lesson: finishing pays off, but you can do it in stages. Lots of people build the trellis, install it immediately (because excitement), and seal it later when the weather cooperates. That worksjust try to keep the base from sitting in constant wet soil. Even a quick coat on the end grain helps. Over time, you’ll notice that a maintained trellis becomes a permanent “garden feature,” and you start designing plantings around it. That’s when you know your DIY obelisk has officially leveled up from “project” to “personality.”
Conclusion
A basic DIY obelisk trellis is one of those rare garden projects that’s genuinely practical and makes your yard look more put-together. Build it once, anchor it well, and it’ll support climbing plants for seasonswhile giving you a vertical garden moment that looks fancy without acting fancy.