Table of Contents >> Show >> Hide
- Why a Plastic Window Shutter Makes a Surprisingly Great Angel
- Materials and Tools
- Design First: Pick Your Angel’s Style (and Size) Before You Cut
- Prep Work That Makes Paint Stick (Instead of Flaking Off in Sad Confetti)
- Step-by-Step: Building the Shutter Angel
- Step 1: Map out the body
- Step 2: Create wings that look intentional
- Step 3: Cut the plastic safely (and without melting it)
- Step 4: Assemble with screws first, adhesive second
- Step 5: Paint like you mean it (thin coats, good conditions)
- Step 6: Add angel details that don’t scream “craft aisle panic”
- Step 7: Add lights (tastefully) for max festive impact
- Mounting Options: Yard, Porch, Fence, or “Floating”
- Weatherproofing Tips for a Long-Lasting Shutter Angel
- Troubleshooting (Because Crafts Are Just Problem-Solving With Glitter Nearby)
- Creative Variations to Keep This Project Fresh Every Year
- Experiences From the Real World: What I Learned Making Shutter Angels
- Conclusion
You know that lonely plastic window shutter hiding behind the garagethe one you swear you’ll “deal with someday”? Congratulations: it’s about to get promoted to holiday décor. Not just any décor, either. We’re turning it into a festive angel that looks charming on a porch, in a garden bed, or hovering (politely) over your front-yard lights like it’s judging your neighbor’s inflatable snowman.
This project is equal parts upcycling, basic tool work, and “wow, that actually looks expensive.” The goal isn’t to make a museum sculptureit’s to make a sturdy, weather-friendly angel decoration using a material that already survives outside for years: plastic/vinyl shutters. Bonus: the shutter slats naturally read like flowing angel robes, so you get built-in texture without carving a single dramatic fold.
Why a Plastic Window Shutter Makes a Surprisingly Great Angel
Plastic shutters (often vinyl or PVC blends) are lightweight, water-resistant, and designed to take sun and rain without rotting like wood. They’re also easy to clean and easy to paintif you prep them correctly. That last part matters, because plastic can be slick, and slick surfaces love to make paint peel off at the worst possible moment (like during the neighborhood cookie exchange).
The “robe effect” is already built in
The vertical grooves and louvers on a shutter create instant dimension. When painted, they look like draped fabric, which is extremely convenient when you are not, in fact, Michelangelo.
Materials and Tools
You can keep this project simple or go full “angelcore” with lights and sparkles. Here’s a practical shopping list that covers both.
Core materials
- 1–2 plastic (vinyl) window shutters (one for the body, optional second for wings)
- Outdoor-rated screws (with washers, ideally) or short bolts/nuts
- Plastic-safe spray paint (or bonding primer + exterior paint)
- Plastic primer (recommended if you want the finish to last)
- Sandpaper (medium grit for scuffing, fine grit for smoothing edges)
- Cleaner/degreaser + dish soap + water
- Painter’s tape (for crisp lines and detail areas)
- Optional adhesives: a flexible industrial craft adhesive or a plastic-bonding system
Tools
- Measuring tape + marker/chalk pencil
- Drill (with small bit for pilot holes)
- Jigsaw, multi-tool, or a sturdy utility knife (depending on shutter thickness)
- Safety glasses + gloves + a dust mask
- Clamps (helpful, not mandatory)
Fun extras (highly recommended for personality)
- Metal hoop or thick wire for a halo
- Ribbon, raffia, or outdoor-safe fabric for a bow/sash
- LED string lights (battery pack or outdoor plug-in)
- Outdoor clear coat (non-yellowing)
- Small ornament, star, or “peace” sign for the hands
Design First: Pick Your Angel’s Style (and Size) Before You Cut
The easiest way to end up with an angel that looks “off” is to wing itpun fully intended. Spend five minutes deciding: Where will it go? Porch corner? Front yard? Fence? Inside by the fireplace? That dictates size, mounting, and whether you should add lights.
Three easy design options
- Classic Holiday Angel: white robe, gold halo, evergreen bow, soft warm lights.
- Winter Garden Guardian: icy silver/white palette, “snowy” texture spray, and a slightly rustic look.
- Bold & Modern: matte black robe with metallic wings, minimalist face (or no face at all), clean lines.
Quick proportion trick: keep the wings roughly the same height as the torso section you want to “feel” angelic. Too small and it reads like “shutter with accessories.” Too big and it reads like “holiday pterodactyl.”
Prep Work That Makes Paint Stick (Instead of Flaking Off in Sad Confetti)
Painting plastic is totally doable, but it rewards the boring steps. Think of prep as the angel’s skincare routine: you may not want to do it, but it shows.
1) Wash and degrease thoroughly
Start with dish soap and water. Scrub the grooves. Rinse. Let it dry fully. Then use an all-purpose cleaner/degreaser to remove any lingering oils and grimeespecially if the shutter lived outdoors or near a road (hello, invisible grime film).
2) If the shutter is “new-ish,” remove mold-release residue
Some plastic items have manufacturing residues that fight paint adhesion. A careful wipe with mineral spirits/paint thinner (used safely, outdoors, and per label directions) can help remove that slick layer. Let it flash off completely before the next step.
3) Scuff sand, don’t sand to exhaustion
You’re not trying to reshape the shutterjust knock down the shine so primer and paint can grip. A light scuff is enough. Wipe off dust afterward. And once it’s clean, try not to touch the surface with bare hands (skin oils are tiny, sneaky saboteurs).
4) Prime smart (optional, but your future self will thank you)
A plastic-specific primer or bonding primer helps paint last longer outdoors. If you use a paint designed to bond to plastic, you can sometimes skip primer, but primer still improves durabilityespecially for older, weathered shutters or any slick plastics.
Step-by-Step: Building the Shutter Angel
Step 1: Map out the body
Lay the shutter flat and decide which end is the top. Mark where the head will sit (you can keep it abstract, like a simple circle, or go full “cherub vibes” with a face). If you want a neck, mark a small rectangle between the body and head area. If you prefer a simplified silhouette, skip the neckmodern angels don’t need anatomy lessons.
If your shutter is tall, you already have a dramatic, elegant angel. If it’s shorter, you can extend the look by mounting it on a stake or backing board that continues below the shutter like a “hidden base.”
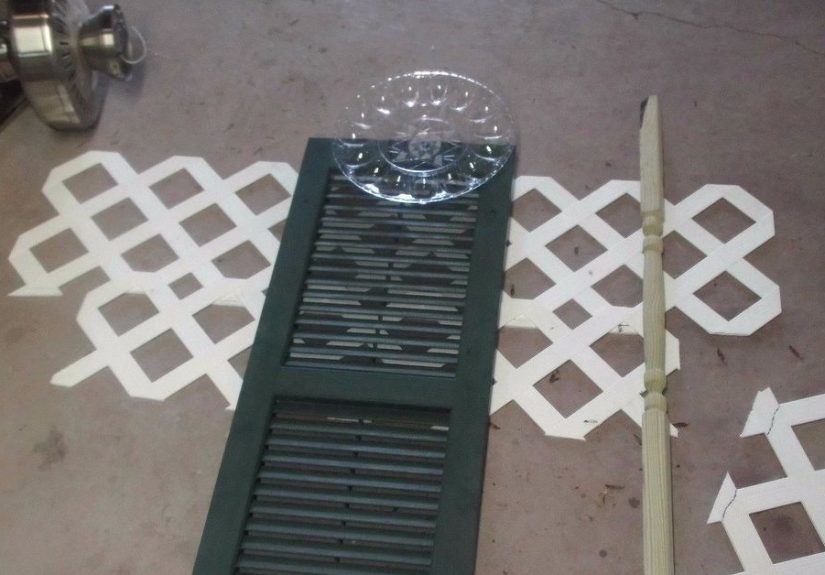
Step 2: Create wings that look intentional
Wings can be made three ways:
- Second shutter method: cut the second shutter in half lengthwise, then round the outer edges to form two wings.
- Single shutter method: use the main shutter as the body and cut wings from scrap plastic or a sturdy sign board.
- No-cut method: attach two smaller shutters behind the body like layered feathers (fastest, more “folk art”).
For a classic wing shape, sketch a gentle teardrop curve: wide near the top, tapering slightly toward the bottom. If symmetry stresses you out, trace the first wing onto the second before cutting. Nobody needs a lopsided angel unless that’s your brand.
Step 3: Cut the plastic safely (and without melting it)
Use a jigsaw with a fine-tooth blade for cleaner cuts. Support the shutter so it doesn’t vibrate like a kazoo. Cut at a steady pacetoo fast can cause chipping, and too slow can build heat and make plastic gummy. Wear safety glasses and a mask, especially if you’re sanding afterward. Tiny plastic dust is not festive.
After cutting, smooth the edges with sandpaper. If you want the angel to look polished, this step is worth it; rough edges can make an otherwise pretty project look like it fought a lawnmower and lost.
Step 4: Assemble with screws first, adhesive second
For outdoor décor, mechanical fasteners (screws/bolts) usually outlast glue alone. Plastic expands and contracts with temperature changes, and that movement can weaken a purely glued joint over time.
- Wings: position the wings behind the body. Pre-drill pilot holes to reduce cracking. Use screws with washers so the screw head doesn’t pull through.
- Arms: you can use narrow slats of shutter material, thin wood strips, or even sturdy paint sticks. Attach them to the back and let “hands” wrap around to the front with a small ornament or sign.
- Back support (optional but excellent): attach a furring strip or slim board vertically on the back. It strengthens the whole piece and gives you an easy way to stake or mount the angel.
If you use adhesive, choose one that remains flexible and is rated for outdoor or industrial use. Clean surfaces well, follow cure times, and consider adhesive as a helpernot the only thing holding your angel together through a windy December.
Step 5: Paint like you mean it (thin coats, good conditions)
Spray paint is your friend here because it gets into shutter grooves evenly. Work outdoors or in a well-ventilated area. Avoid super windy days (unless you enjoy painting your driveway “accidentally”).
General best practice: apply light, even coats with a steady side-to-side motion, keeping the can moving and overlapping strokes slightly. Let coats dry between applications. For outdoor longevity, consider a plastic-bonding paint line or use plastic primer first, then a topcoat.
Want it to last outdoors? Finish with a clear, non-yellowing protective coat once the color coat is fully cured. This is especially useful if your angel will sit in full sun, because UV is the uninvited guest at every outdoor craft party.
Step 6: Add angel details that don’t scream “craft aisle panic”
Details sell the illusion. Keep them bold enough to read from the sidewalk, but not so busy that your angel looks like it lost a fight with a tinsel tornado.
- Halo: a small metal hoop, thick wire circle, or even a sturdy embroidery hoop painted gold. Attach behind the head with screws or heavy-duty zip ties.
- Hair: raffia, outdoor ribbon, or a simple painted “hair shape.” (A painted swoop can look classy and low-maintenance.)
- Face: optional. A soft blush circle and closed eyes can be sweet. Or skip it entirely for a modern silhouette.
- Hands item: small wreath, star, trumpet, or a wooden sign that says “Joy” or “Peace.” Keep it weather-friendly.
Step 7: Add lights (tastefully) for max festive impact
If you want your angel to glow, wrap warm-white LED string lights around the halo or outline the wings. Secure the wire behind the angel with zip ties or outdoor tape. If you’re using plug-in lights, pick outdoor-rated sets and route cords to avoid tripping hazards. Battery packs are great for porchesno extension cord gymnastics required.
Mounting Options: Yard, Porch, Fence, or “Floating”
Yard stake method (sturdy and classic)
If you added a vertical back support board, extend it past the bottom of the shutter to create a stake. Screw the shutter angel to the support board, then push the stake into the ground. For extra stability, add a second smaller stake behind it like a brace.
If you plan to dig deeper holes or install near utilities, use common-sense safety: call your local utility locating service (like 811 in many areas) before serious digging. For a shallow décor stake, you’re usually finebut safety wins over surprise sprinkler geysers.
Porch wall or fence method (great for small yards)
Attach D-rings, a French cleat, or heavy-duty exterior hooks to the back support board. The angel sits flatter against a wall, and wind is less of an issue. This is also the best option if you live where winter winds treat lawn décor like a competitive sport.
Door display method (welcome, but make it celestial)
Keep it lighter and smaller, skip the long stake, and hang it like a sign. Use felt pads or spacers behind it so it doesn’t scuff the door. A shutter angel on a front door is unexpectedly charminglike a holiday card that decided to become 3D.
Weatherproofing Tips for a Long-Lasting Shutter Angel
- Let paint cure fully before sealing or storing. “Dry to touch” and “ready for weather” are not the same thing.
- Seal high-contact areas (edges, wing tips, halo attachment points) with a clear coat if needed.
- Use washers on screws to spread load and reduce cracking.
- Store smart: if you can, keep it out of direct sun in the off-season to reduce UV wear.
Troubleshooting (Because Crafts Are Just Problem-Solving With Glitter Nearby)
“My paint is beading up / scratching off.”
That’s usually contamination or insufficient scuffing. Clean again, scuff sand lightly, and use a plastic-specific primer or a paint made to bond to plastic. Also: avoid painting when it’s too humid or too coldpaint can behave like a moody cat in bad conditions.
“My angel wobbles in the wind.”
Add a back support board (if you didn’t) and use two ground stakes or a brace. You can also mount it to a fence or wall to stop the twist.
“The plastic cracked around a screw.”
Pre-drill pilot holes, use washers, and don’t over-tighten. If a crack already happened, back off the screw, add a washer, and reinforce the spot from behind with a small patch of plastic plus adhesive (then re-drill carefully).
Creative Variations to Keep This Project Fresh Every Year
Once you’ve made one angel, you’ll start seeing “shutter potential” everywhere. (This is normal. Your friends may not understand, but they will benefit from your surprisingly specific gifts.)
- Patriotic angel: red/white/blue sash, star wand, and a subtle shimmer wing.
- Autumn angel: copper paint, leaf wreath, and a plaid bow.
- Coastal angel: sea-glass colors, shell “halo,” and a driftwood accent.
- Minimalist winter angel: matte white with a single gold halo and tiny light outline.
Experiences From the Real World: What I Learned Making Shutter Angels
The first time I tried a plastic shutter angel, I assumed plastic was “easy” because it doesn’t rot. Trueplastic doesn’t rot. Unfortunately, it does have opinions about paint. My initial attempt was a classic: I wiped the shutter down “pretty well,” sprayed on a gorgeous white coat, and admired it like a proud DIY parent at a school play. Two days later, I bumped the wing with my elbow and watched a perfect paint chip pop off like a Pringle. That was the day I learned the difference between “looks dry” and “actually bonded.”
Round two was the redemption arc. I washed the shutter like it owed me money, scuffed the surface just enough to dull the shine, and used a plastic-friendly primer before painting. Suddenly, the paint behaved. It went on smoother, it didn’t scratch off when I handled it, and the grooves looked more like “fabric folds” and less like “plastic from aisle 12.” The biggest surprise? Thin coats were faster than thick coats. Heavy coats felt efficient until they ran into the shutter’s little channels, pooled, and turned into drips that looked like the angel had been crying mascara. Light coats dried cleaner and looked more professional.
Then came the wind test. I mounted my angel in the yard with one stake, stepped back, and felt triumphantright up until a gust turned it sideways like a rotating retail sign. The fix was simple: a vertical backing board plus a second brace stake behind it. I also started using washers under screw heads. Plastic shutters are tough, but the screw head can create pressure points, and washers spread the load so the wings stay attached through weather mood swings.
Lighting was another lesson in restraint. My first instinct was to wrap lights everywhere, because “more sparkle = more joy,” which is only true up to the moment your yard looks like it’s trying to guide airplanes. What worked best was outlining the halo and adding a gentle wing glow. If you choose plug-in lights, cord management matters more than you think. I now tuck cords behind the back support board and secure them with zip ties so they don’t flap around and yank at connections.
Finally, I learned that you don’t need a detailed face. In fact, the most complimented angel I made had no face at alljust a clean head shape, a gold halo, and a big evergreen bow. People filled in the “expression” themselves, which is basically what good design does anyway. If you’re nervous about painting eyes, give yourself permission to skip it. Your angel can be mysteriously serene, and nobody will call the Holiday Police.
The best part? Every year gets easier. Once you have a wing template and a preferred paint combo, you can build a new angel in an afternoon. And if you mess up a detail, the angel won’t mind. It’s already made from a shutter. It knows about second chances.
Conclusion
Making a festive angel from a plastic window shutter is one of those rare DIY wins that checks every box: it’s affordable, sturdy, and genuinely cuteand it keeps a perfectly usable item out of the trash pile. With smart prep, thin coats of paint, and solid mounting, your shutter angel can handle the season and come back for an encore next year.
If you take only one lesson from this guide, let it be this: prep is the difference between “Pinterest-worthy” and “peeling by Tuesday.” The rest is just personalitybows, halos, and whatever sparkly item you already own that’s begging for a new purpose.