Table of Contents >> Show >> Hide
- What a Grindstone Does (and Why It’s Not Just Decoration)
- Minecraft Grindstone Recipe: Materials You’ll Need
- Step-by-Step: How to Craft a Grindstone
- How to Place a Grindstone (Plus a Java vs. Bedrock Quirk)
- How to Use a Grindstone
- Where to Find a Grindstone (If You Don’t Want to Craft One)
- Villagers: Why the Grindstone Matters for Trading
- Grindstone vs. Anvil vs. Crafting Table vs. Smithing Table
- Best Ways to Use a Grindstone (Real-World Minecraft Scenarios)
- Common Mistakes and Troubleshooting
- Player Experiences: The Grindstone Moments ()
- Conclusion
Minecraft has a funny way of teaching life lessons. Like: “Always carry food,” “Never dig straight down,” and “That enchanted fishing rod you found is definitely cursed with something you didn’t ask for.” Enter the grindstonethe humble block that lets you clean up bad enchantments, squeeze extra life out of worn gear, and quietly run a weaponsmith economy like you’re the CFO of a medieval mall kiosk.
In this guide, you’ll learn the Minecraft grindstone recipe, how to place it, how it works in real gameplay (not just “click thing, receive dopamine”), plus the best tips for using it without accidentally turning your favorite sword into a very expensive paperweight.
What a Grindstone Does (and Why It’s Not Just Decoration)
A grindstone has two main jobs, and it’s surprisingly good at both:
- Disenchant items: Remove non-curse enchantments from tools, weapons, armor, and even enchanted bookswhile popping out some experience orbs as a partial refund.
- Repair items: Combine two of the same item (like two iron swords) into one item with higher durabilityplus a little bonus durability on top.
It also serves as a job site block for a weaponsmith villager, which matters if you like trading emeralds for pointy things (or if you’re building a villager trading hall and want everyone to keep their resumes updated).
Minecraft Grindstone Recipe: Materials You’ll Need
The grindstone is refreshingly cheap. No diamonds. No netherite. No ancient debris. Just basic “I punched a tree and hit a rock” supplies:
- 2 Sticks
- 2 Wooden Planks (any wood type; they don’t have to match)
- 1 Stone Slab (generally any stone slab works; Bedrock has some extra flexibility in certain cases)
Step-by-Step: How to Craft a Grindstone
1) Get sticks and planks
Chop wood, turn logs into planks, and then turn planks into sticks. If you’ve played Minecraft for more than twelve seconds, you’ve already done this. If you’re brand new: one log becomes planks, and two planks become sticks.
2) Make a stone slab
Mine stone or cobblestone, smelt cobblestone into stone if you want, then craft slabs. In most versions, slabs are crafted by placing three stone (or the appropriate block) in a row on a crafting table to make six slabs.
3) Use the correct crafting pattern
Open a crafting table (3×3 grid) and place items like this:
When the pattern is correct, the grindstone appears in the output slot. Drag it into your inventory and congratulate yourself: you have officially built a block that specializes in undoing your past decisions.
How to Place a Grindstone (Plus a Java vs. Bedrock Quirk)
Place the grindstone like most blocks, but know this: it’s a bit picky about physics depending on your edition. In Java Edition, it can be placed without a supporting block. In Bedrock Edition, it can break if unsupported, so attach it to something sturdy (floor, wall, or ceiling).
You can also rotate and orient it when placinghandy if you’re designing a workshop or want it to look like a real blacksmith station instead of “random block I slapped down while running from a creeper.”
How to Use a Grindstone
Right-click (or your platform’s “use” button) to open the grindstone interface. You’ll see:
- Two input slots (left side)
- One output slot (right side)
Use Case #1: Disenchant an item (and get some XP back)
Put an enchanted item in either input slot. The output becomes the same item with non-curse enchantments removed. Take the output, and you’ll get experience orbs.
A few important realities (Minecraft loves “important realities”):
- Curses stay. The grindstone won’t remove Curse of Binding or Curse of Vanishing, so don’t expect a magical un-haunting service.
- Custom names stay. If you named your sword “Excalibrrrr,” the grindstone won’t judge you.
- XP is a partial refund. You get experience back, but not necessarily everything you ever spent to make that item fancy.
This is especially useful when you loot gear from mobs, chests, fishing, or trading and the enchantments are… let’s say “artistically questionable.”
Use Case #2: Repair tools, weapons, and armor
Put two of the same item (two pickaxes, two helmets, two swordssame type) into the two input slots. The output becomes one item with:
- Durability = durability A + durability B
- + a bonus equal to 5% of that item’s maximum durability (rounded down)
- capped at the item’s maximum durability
Both input items are consumed in the process. Also: the output item is not enchanted. If either input was enchanted, repairing this way is basically saying, “I’m saving the item, not the magic.”
Example: If you combine two swords that each have about 30% durability left, you don’t just get 60%. You get 60% plus the grindstone’s bonus durabilityoften landing around 65% depending on the item’s max durability. That little bonus is why the grindstone feels like it’s quietly doing extra credit.
Bonus perk: It “cleans” an item’s repair history
When you’re working with anvils, items can become painfully expensive to repair or combine over time. Using a grindstone to remove enchantments produces a “fresh” non-enchanted item with no prior work penalty. Translation: it’s one of the easiest ways to reset an item’s baggageat the cost of losing enchantments.
Where to Find a Grindstone (If You Don’t Want to Craft One)
Grindstones can generate naturally in villagesspecifically in weaponsmith areas/structures. If you find one, you can mine it and take it home.
Just remember: you’ll want to use a pickaxe. If you break it without a pickaxe, it won’t drop anything. Minecraft calls this “learning.” You’ll call it “why did I do that.”
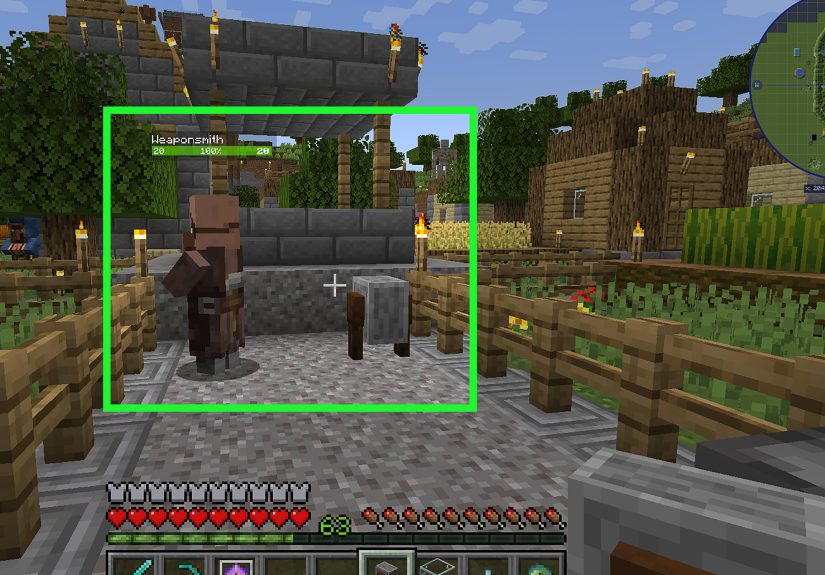
Villagers: Why the Grindstone Matters for Trading
The grindstone is the weaponsmith’s job site block. If you place a grindstone near an unemployed villager (and the villager can access it), there’s a good chance they’ll claim it and become a weaponsmith.
Why care? Weaponsmiths can trade weapons and (eventually) better gear for emeralds. If you’re building a villager trading setup, the grindstone is basically the sign that says: “Swords sold here. No refunds.”
Grindstone vs. Anvil vs. Crafting Table vs. Smithing Table
These blocks overlap a little, but each has a personality:
- Grindstone: Disenchant items (except curses), repair by combining two items, and get some XP back. Great for cleanup and durability efficiency.
- Anvil: Combine enchantments, rename items, and repair with materialspowerful, but repair and combine costs can climb quickly.
- Crafting Table: Basic combining repairs (limited utility once you’re deep into enchantments).
- Smithing Table: Upgrades and templates (depending on version), more about progression than enchantment management.
If the anvil is your “build-a-legend” station, the grindstone is your “fix my messy life choices” station. You’ll end up using both.
Best Ways to Use a Grindstone (Real-World Minecraft Scenarios)
1) Turn junk enchantments into XP “cashback”
Looted armor with Blast Protection when you wanted Protection? Fishing rod with an enchant you don’t like? Toss it in the grindstone and take the XP. It’s not full price, but it’s better than stuffing it in a chest labeled “Maybe Later” (which is Minecraft for “never”).
2) Save rare items by swapping enchantment paths
Some items have mutually exclusive enchantments (like certain trident builds). If you get the “wrong” direction on a valuable item and don’t want to re-farm the item itself, the grindstone lets you wipe the slate clean so you can re-enchant it the way you want.
3) Repair gear efficiently early game
Before you have a steady supply of repair materials or a full enchantment setup, combining two damaged tools into one better toolplus the bonus durabilitykeeps you moving without constantly crafting replacements.
4) Reset “Too Expensive” problems (with a catch)
If an item has become too costly to work on via anvil, removing enchantments on a grindstone can give you a “fresh” base item again. The catch is obvious: you lose the enchantments. But if the choice is “keep a dead-end item forever” or “reset and rebuild,” the grindstone is your reset button.
Common Mistakes and Troubleshooting
- “It won’t disenchant!” Check for curses. Grindstones do not remove curses, period.
- “Why is the output not enchanted after repair?” Repairs via grindstone produce a non-enchanted output item.
- “Nothing shows in the output slot.” Make sure you used the right inputs: one enchanted item for disenchanting, or two of the exact same item type for repairing.
- “Where’s my XP?” It drops as experience orbsmake sure you’re close enough to collect them.
- “Can I transfer enchantments to a book?” Not with a vanilla grindstone. It removes enchantments; it doesn’t move them.
Player Experiences: The Grindstone Moments ()
Most Minecraft blocks have a “first time you realize it’s useful” moment. The crafting table happens in minute two. The bed happens the first night when you discover that skeletons have Olympic-level aim. The grindstone’s moment usually arrives laterright when you’ve started collecting enchanted gear, and half of it feels like it was enchanted by a raccoon with a random number generator.
Imagine you’re deep in a cave system with two iron pickaxes. Both are battered, both are hanging on by a few pixels of durability, and you’re still hearing that sweet, sweet “diamond nearby” whisper in your soul. You don’t want to turn around, but you also don’t want your pickaxe to break at the exact moment you finally find the good stuff. A grindstone back at base means you can combine those two sad pickaxes into one sturdier tool, snag a little bonus durability, and head back out without crafting a whole new one. It’s not glamorousbut it feels like winning a tiny efficiency trophy.
Or maybe your “aha” comes from loot. You raid a structure, open a chest, and pull out an enchanted piece of armor that looks impressive… until you see the enchantment set. It’s not what you wanted, and you’re not building a museum dedicated to bad decisions. The grindstone turns that awkward loot into a clean piece of gear and a handful of XP orbslike trading in a disappointing gift card for store credit. Not enough to buy a car, but enough to feel slightly better about your life.
Villager setups create another kind of grindstone storyusually the kind where you swear you’re making a “simple trading hall” and then suddenly it’s a full-blown corporate office with assigned desks. The grindstone is key because it defines the weaponsmith. Place it, let a villager claim it, and you’ve got someone ready to trade blades. Players who love optimizing trades often talk about the moment their village stops feeling like a place and starts feeling like a system: librarians for books, farmers for food, and weaponsmiths for gear. The grindstone becomes one of those quiet “infrastructure blocks” that makes the whole operation run smoother.
And then there’s the emotional grindstone moment: the one where you accept that your beloved named sword is stuck with enchantments you no longer want. Maybe it was fine when you started, but now you’re building a specific combat kit. The grindstone doesn’t erase the name, so your sword can keep its identity while losing its outdated enchantment baggage. It’s like sending your gear to a spa. It comes back relaxed, refreshed, and ready to be enchanted properly this timebecause we all deserve a second chance (especially your tools).
Conclusion
The grindstone is one of Minecraft’s most practical blocks: cheap to craft, easy to use, and wildly helpful once you start dealing with enchanted loot and worn-out gear. Use it to disenchant items (curses aside), repair tools efficiently, and support a weaponsmith villager setup for trading. In other words: it’s a low-cost upgrade to your entire survival workflow.