Table of Contents >> Show >> Hide
If you grew up in the U.S. anywhere near a church basement, school potluck, or Fourth of July cookout, there’s a good chance you’ve met a poke cake. It’s that bright, stripey, suspiciously neon dessert that looks like a regular sheet cake from the top… until you slice it and discover colorful tunnels of Jell-O or pudding running through every piece.
This retro dessert was popularized in the 1970s by the Jell-O brand as a clever way to sell more gelatin and boxed cake mix. Today, poke cake is still loved because it’s easy, nearly impossible to mess up, and stays incredibly moist without any fancy pastry skills.
In this guide, you’ll learn exactly how to make a classic poke cake, how to customize it with different flavors, and what tricks actually matter if you want ultra-moist, slice-worthy results that look impressive on the dessert table.
What Is a Poke Cake?
At its core, a poke cake is a simple American sheet cake baked in a 9×13-inch pan (usually from a box mix) that gets “poked” all over with holes and then drenched in something delicious: flavored gelatin, instant pudding, sweetened condensed milk, fruit purée, or a mix of these. The liquid sinks into the holes and sets, creating colorful streaks and pockets of flavor in every bite.
The original 1970s version used white or yellow cake and a box of fruit-flavored gelatin, topped with a cloud of whipped topping. Over time, cooks started experimenting with chocolate cake and pudding, lemon cake and lemon pudding, or red-and-green Jell-O for Christmas.
The magic of poke cake is that it solves a classic cake problem: dryness. The poked holes give you built-in channels to soak the cake with extra moisture and flavor, so even boxed cake mix tastes like you tried way harder than you did.
Ingredients for a Classic Jell-O Poke Cake
Basic Ingredients
For a standard strawberry Jell-O poke cake, you’ll need:
- 1 box white or yellow cake mix (15.25 ounces is standard in U.S. grocery stores) plus the eggs, oil, and water listed on the box.
- 1 box (3 ounces) strawberry gelatin – or any fruit-flavored gelatin you like.
- 1 cup boiling water (to dissolve the gelatin completely).
- 1/2 cup cold water (to cool and slightly thicken the gelatin so it doesn’t turn your cake soggy).
- 1 tub (8 ounces) whipped topping or homemade whipped cream.
- Optional: fresh fruit such as sliced strawberries, raspberries, or blueberries for garnish.
Equipment
- 9×13-inch baking pan
- Mixing bowl and whisk (or a stand mixer)
- Fork, straw, skewer, or the handle of a wooden spoon for poking holes
- Measuring cup and kettle or saucepan for boiling water
Step-by-Step: How to Make a Classic Poke Cake
1. Bake the Cake
- Preheat your oven according to the cake mix directions (usually 325–350°F).
- Prepare the cake mix as directed on the box: add water, eggs, and oil and mix just until combined. Don’t overmix; too much mixing makes the cake tough.
- Pour the batter into a greased 9×13-inch pan and bake as directed, usually 25–35 minutes, until the top springs back and a toothpick inserted in the center comes out clean.
2. Cool, Then Poke
- Let the cake cool for about 15–20 minutes. You want it warm but not steaming hot. If it’s too hot, the gelatin may melt and soak unevenly; if it’s completely cold, the liquid doesn’t absorb as easily.
- Using the handle of a wooden spoon, a thick straw, or a skewer, poke holes all over the surface of the cake. Space them about 1/2 to 1 inch apart. Go almost to the bottom, but don’t dig through the pan like you’re searching for buried treasure.
3. Mix the Gelatin
- In a heat-safe bowl, stir the gelatin powder with 1 cup boiling water until completely dissolved (about 2 minutes). Any undissolved bits will leave rubbery spots in the cake.
- Add 1/2 cup cold water and stir again. This cools the mixture down so it doesn’t damage the cake’s structure but is still fluid enough to soak in.
4. Pour and Chill
- Slowly pour the gelatin mixture evenly over the cake, making sure to get it into all the holes. Pour in several passes rather than dumping it all in one spot.
- Cover the pan and refrigerate for at least 3–4 hours, or until the gelatin is fully set and the cake is thoroughly chilled. Many bakers prefer to let it sit overnight for the best flavor and texture.
5. Add the Topping
- Once the cake is chilled, spread whipped topping or whipped cream evenly over the surface.
- Top with sliced fruit, sprinkles, or shaved chocolate if you’re feeling fancy.
- Slice into squares and serve straight from the pan. Poke cake is not a dainty layer cake – it’s more of a scoop-and-smile situation.
Popular Poke Cake Variations
Once you master the basic “how to make a poke cake” method, you can swap flavors for endless combinations.
Pudding Poke Cake
Instead of gelatin, use instant pudding mix for a creamy, custard-like interior. A common combo is yellow or chocolate cake with chocolate pudding poured into the holes, then topped with whipped topping.
- Bake a 9×13-inch cake as usual.
- Poke holes while the cake is still warm.
- Prepare instant pudding (not cook-and-serve) with cold milk according to package directions, then let it thicken slightly.
- Pour or spoon the pudding over the cake, gently nudging it into the holes with a spatula.
- Chill until set, then frost with whipped topping.
This variation makes a very moist poke cake that almost tastes like a mash-up of cake and cream pie.
Lemon Poke Cake
For a bright, tangy dessert, use lemon cake mix and lemon pudding or lemon gelatin. Pro tip from recipe developers: don’t overmix the batter, poke the cake while it’s still warm, and let it cool to room temperature before refrigerating to avoid condensation that can make the topping soggy.
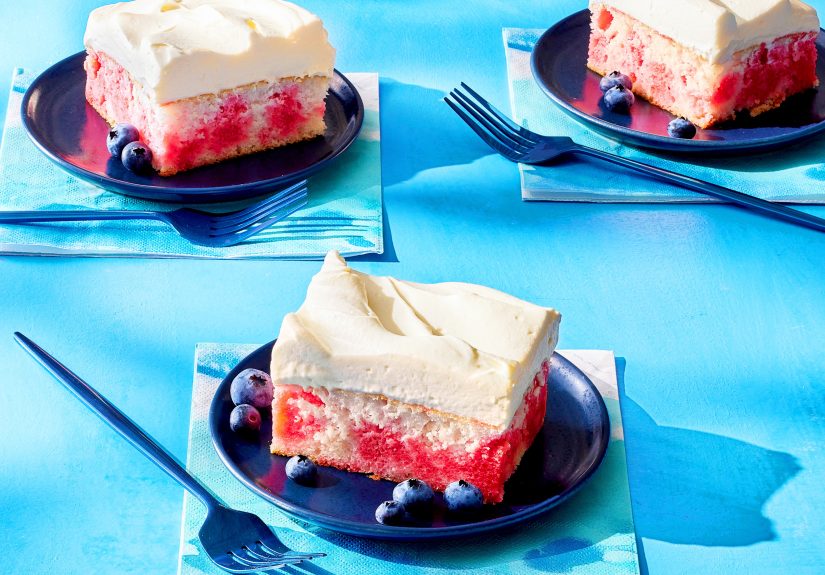
Red, White, and Blue Poke Cake
Use white cake, strawberry and berry-blue gelatin, and top with whipped cream and berries. Poke half the cake with red gelatin and the other half with blue for a patriotic potluck star.
Chocolate Overload Poke Cake
Start with chocolate cake, then add chocolate pudding or chocolate syrup plus sweetened condensed milk for an ultra-rich dessert. Some recipes finish it with chocolate whipped cream or ganache for a triple-chocolate situation.
Pro Tips for Making a Perfect Poke Cake
- Don’t skip the cooling step. A cake that’s scalding hot can melt the gelatin or pudding and cause it to pool at the bottom instead of creating neat streaks. Let it cool 15–20 minutes first.
- Poke enough holesbut not too many. Around 1/2–1 inch apart is ideal. Too few holes and the flavor won’t distribute; too many and your cake can turn mushy.
- Use instant pudding only. If you substitute cook-and-serve pudding, it doesn’t set up the same and can leave you with a soupy mess at the bottom of the pan.
- Stir gelatin until fully dissolved. Undissolved grains create weird textures. Stir for at least 2 minutes in boiling water before adding cold water.
- Chill long enough. Poke cake tastes best after several hours in the fridge. This gives the liquid time to soak in and set completely.
- Add the topping just before serving. Whipped topping holds up well, but fresh fruit is best added closer to serving so it doesn’t weep and discolor the topping.
- Store it right. Keep poke cake covered and refrigerated. Most versions are good for 3–4 days, assuming you used dairy ingredients like pudding or whipped topping.
Is Poke Cake Beginner-Friendly?
Absolutely. That’s one reason poke cake became a classic American dessert: it leverages boxed cake mix and shelf-stable products like gelatin and pudding, so you get a reliable texture without worrying about creaming butter or sifting flour.
If you’re terrified of layer cakes, think of poke cake as “training-wheels baking.” You bake in one pan, poke a few holes, pour a mixture, and chill. The most effort you’ll expend is not licking the spoon before you’re done.
Serving Ideas for Poke Cake
- For potlucks: Keep it in the pan, slice into squares, and serve with a small spatula.
- For birthdays: Add sprinkles between the whipped topping and the cake or press sprinkles onto the sides of each slice.
- For holidays: Coordinate gelatin colors and toppings to the occasionorange for Halloween, green for St. Patrick’s Day, red and green stripes for Christmas, pastels for Easter.
- For a “grown-up” twist: Use coffee-flavored pudding with chocolate cake, or soak the cake with a mix of chocolate pudding and a splash of coffee or flavored syrup (just keep it non-alcoholic if kids are involved).
Real-Life Poke Cake Experiences & Lessons Learned
Now for the fun part: what actually happens when real humanskids, distracted adults, and “I swear I followed the recipe” bakersmake poke cake.
The first time I made a poke cake, I poked exactly three polite rows of holes with a toothpick, poured the gelatin over the top, and was genuinely offended when the slices looked…normal. No vibrant stripes. No dramatic tunnels of color. Just cake that tasted a little fruity in random spots. That’s how I learned rule number one: don’t be shy about poking. Use the handle of a wooden spoon or something substantial, and poke all the way down. Your cake should look like it lost a fight with a porcupine.
On attempt number two, I over-corrected and poured the gelatin on while the cake was still basically lava. The kitchen smelled amazing, but the gelatin soaked straight down and pooled at the bottom. When I sliced it, the top looked fine, but every piece had a squishy, jelly-brick layer sitting on the crust. It tasted okay, but it was more “jelly bar with cake garnish” than “moist poke cake.” That was the day I discovered the sweet spot: about 15–20 minutes of cooling, when the pan is warm but you can comfortably touch the bottom.
Then there was the pudding incident. I once grabbed cook-and-serve pudding instead of instant because the boxes look nearly identical when you’re in a hurry. I followed the directions, poured the warm pudding over a freshly poked cake, and stuck the whole thing in the fridge. Hours later, I opened the door to find a cake swimming under a thick layer of pudding soup. It never set properly, and scooping it out looked like serving cake from a shallow chocolate pool. Tasty, yes, but not something you can confidently bring to a party unless the theme is “chaotic dessert night.”
The good news is that poke cake is forgiving. Even your “oops” versions are usually edible and often delicious. Over-poured gelatin? It’s just extra moist. A few cracks on top? Hide them under whipped topping. Uneven stripes? Call it “tie-dye poke cake” and people will think you did it on purpose.
One of the best things about learning how to make a poke cake is how customizable it is for different crowds. For kids, I like white cake with rainbow-colored gelatin stripes and sprinkles on top. For summer cookouts, strawberry gelatin with fresh berries and a light whipped topping tastes like a cross between strawberry shortcake and trifle. For chocolate lovers, chocolate cake with chocolate pudding and chocolate whipped cream turns into an over-the-top dessert that looks like you visited a bakery, not your pantry.
Over time, you also get a feel for how far you can push flavor combinations. Lemon cake with lemon pudding and fresh berries is bright but not cloying. Mixing two gelatin flavors in different halves of the cake makes it look like you’ve baked two desserts in one pan. And if you’re feeding people who “don’t really like cake,” poke cake is a sneaky way to win them overits texture is closer to a chilled dessert like trifle or tres leches than a typical frosted birthday cake.
Most importantly, poke cake has this easygoing, nostalgic energy that takes the pressure off. No crumb coating. No perfectly level layers. No six-hour decorating sessions. Just a box mix, a few pantry staples, and a cake that’s meant to be sliced in messy squares and passed around to people you like. Once you make it a couple of times, you start to improvise without thinkingchoosing flavors based on what’s on sale or what’s already in your pantry.
So if you’re nervous about baking or just short on time, poke cake is one of the friendliest desserts you can learn. You’ll get a moist, colorful, crowd-pleasing cake with very little effort, and you might even enjoy the oddly satisfying step of poking a cake full of holes. Once you’ve done it, you’ll understand why this 1970s potluck classic still shows up on modern dessert tables: it’s fun, it’s forgiving, and it delivers maximum “wow” for minimal work.