Table of Contents >> Show >> Hide
- What Are Skeleton Leaves (and Why Do They Look So Cool)?
- Before You Start: Pick the Right Leaves (This Matters a Lot)
- DIY Skeleton Leaves Supplies
- Safety Notes (Read This Like You Actually Want Eyebrows)
- Method 1: Quick Skeleton Leaves (Washing Soda Simmer Method)
- Optional: Make Them Whiter (Bleach Bath)
- Optional: Color-Tint Your Skeleton Leaves (Easy Ways)
- Method 2: Slow Skeleton Leaves (Water Soak Method)
- Troubleshooting: When Your Leaf Has Opinions
- What to Make With Skeleton Leaves (Quick Project Ideas)
- Conclusion
- Extra: Real-World “Skeleton Leaf” Experiences (What You’ll Actually Notice)
Skeleton leaves are what happen when a leaf decides to go minimalist: the soft “flesh” disappears, and the delicate vein network stays behind like nature’s lace doily. They’re perfect for fall crafts, Halloween decor, wedding centerpieces, resin art, greeting cards, junk journalsbasically anywhere you want a little “I found this in an enchanted forest” energy without having to actually fight a squirrel for it.
The good news: you can make DIY skeleton leaves at home with simple supplies. The slightly less-good news: your kitchen may briefly smell like a science fair married a laundry room. But the results? Chef’s kiss. Let’s do this.
What Are Skeleton Leaves (and Why Do They Look So Cool)?
A leaf is built from two main “parts”: the soft plant tissue (which breaks down) and the stronger vein structure (which holds on like it has a deadline). Skeletonizing is the process of removing that soft tissue while keeping the veins intact, so you’re left with a fragile, filigree leaf “skeleton.”
There are two popular ways to get there:
- The quick method (washing soda simmer): faster (same day), more hands-on, great for impatient creatives.
- The slow method (water soak): gentler, less chemistry, takes weeks, feels like you’re raising a tiny leaf pet.
Before You Start: Pick the Right Leaves (This Matters a Lot)
If your first attempt turns into leaf confetti, it’s usually not your techniqueit’s the leaf choice. Look for leaves that are:
- Thicker and waxier (they hold their vein structure better)
- Mature but not crispy (freshly picked beats brittle)
- Strongly veined (you want that visible “skeleton” network)
Great leaf options to try
- Magnolia
- Oak
- Rhododendron
- Maple (often works, but be gentle during brushing)
- Ivy (pretty, but can be delicatepractice leaf)
Pro tip: collect a variety for your first batch. You’re not “indecisive.” You’re doing R&D.
DIY Skeleton Leaves Supplies
Must-haves
- Leaves (10–20 is a nice starter batch)
- Washing soda (sodium carbonate) not baking soda
- Large pot (ideally not your favorite soup pot; a dedicated craft pot is smart)
- Tongs or tweezers
- Soft toothbrush or soft paintbrush
- Colander
- Gloves and eye protection
- Paper towels and a flat surface for drying
Nice-to-haves (for the “ooh pretty” finish)
- Bleach (optional, for whitening)
- Dye (food coloring, fabric dye, inks, or watered-down acrylics)
- Two sheets of paper + heavy books (for pressing flat)
Safety Notes (Read This Like You Actually Want Eyebrows)
Washing soda (sodium carbonate) is a strong base. That doesn’t mean it’s a villain, but it does mean you should treat it like one: wear gloves and eye protection, avoid breathing dust, and work with good ventilation. If you use bleach for whitening, avoid mixing it with other cleaners, and keep fumes under control.
Method 1: Quick Skeleton Leaves (Washing Soda Simmer Method)
This is the classic DIY skeleton leaves tutorial because it’s relatively fast and reliableespecially with thick, waxy leaves. Plan on a couple hours for simmering plus cleanup time.
Step 1: Rinse and prep your leaves
Rinse leaves in cool water to remove dirt and hitchhiking outdoor drama. Trim long stems if needed. If your leaves curl like they’re trying to escape, don’t worrypressing later fixes that.
Step 2: Mix your washing soda solution
Fill your pot with enough water to fully cover the leaves. Add washing soda. Exact ratios vary by tutorial and leaf type, but a practical range is: about 1–3 tablespoons per 2 cups of water or roughly 1/4–3/4 cup per several cups of water for larger batches.
Translation: you want a strong solution, but you don’t need to summon a chemistry professor to measure it. Start moderateyou can always run a second simmer if the leaves don’t release easily.
Step 3: Heat to a gentle boil, then simmer
Bring the solution to a boil, then lower heat to a simmer. Add your leaves carefully (tongs help). Cover partially, and let them simmer.
- Thin leaves: ~30–60 minutes may be enough
- Thicker leaves (magnolia/oak/rhododendron): ~1.5–3 hours is common
Check occasionally and add water if it evaporates. You’re going for “softened tissue that brushes away,” not “leaf jerky.”
Step 4: Cool the leaves
Using tongs, transfer leaves to a bowl of cool water. Let them soak for a few minutes. This helps loosen the softened tissue and makes handling easier.
Step 5: Brush away the leaf tissue (the magic part)
Place one leaf flat on a plate or shallow tray. Using a soft toothbrush, gently brush from the center (near the stem) outward. Use short, light strokes. If the veins start tearing, you’re either brushing too aggressively or the leaf needs more simmer time.
Flip and repeat on the other side. Yes, it’s a bit fiddly. Yes, you will feel like a tiny leaf dentist. That’s the vibe.
Step 6: Rinse and reveal the skeleton
Rinse the leaf gently in clean water (a slow trickle works well). If bits of tissue cling stubbornly, soak the leaf in water for another 10 minutes, then brush again.
Step 7: Dry flat (so they don’t look like curly chips)
Lay skeleton leaves between paper towels or plain paper. Press them under a heavy book for a day to dry flat. If you want them perfectly smooth for crafts like resin art or card-making, pressing is your best friend.
Optional: Make Them Whiter (Bleach Bath)
If your skeleton leaves look beige, yellow, or “vintage parchment” (which is honestly a mood), you can leave them as-is. If you want a brighter, creamy white look, do a short bleach soak:
- Mix a small bowl of water with a splash of household bleach (start mild).
- Soak the cleaned skeleton leaves for 5–30 minutes, checking frequently.
- Rinse thoroughly in clean water.
Important: bleach can weaken delicate veins if left too long. Treat it like a tanning appointmentcheck often, don’t overdo it, and don’t fall asleep.
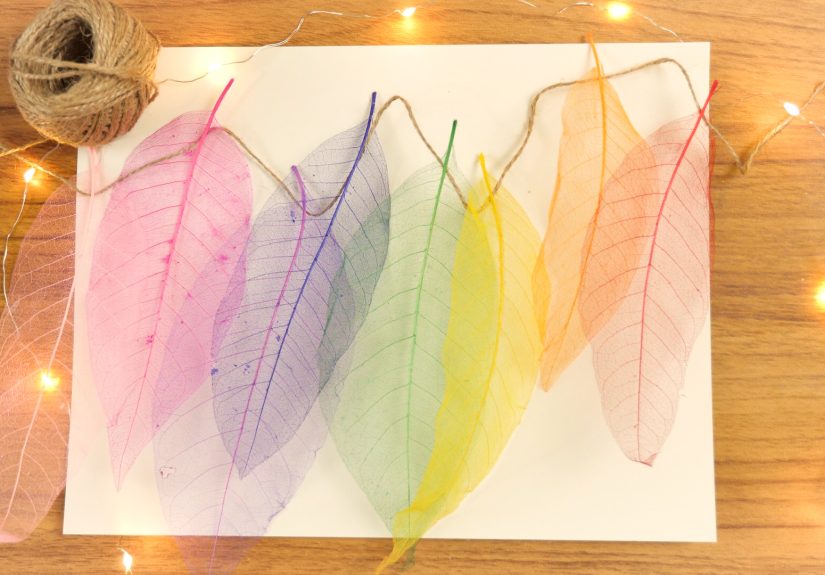
Optional: Color-Tint Your Skeleton Leaves (Easy Ways)
Once dry (or mostly dry), tinting turns your DIY skeleton leaves into showstoppers. A few easy methods:
Method A: Food coloring or watercolor wash
Mix color with water, dip the skeleton leaf briefly, then lay flat to dry. This gives a soft, translucent look.
Method B: Fabric dye
Great for stronger color. Follow dye instructions, dip quickly, rinse lightly, and dry flat. (Use gloves unless you want “mysteriously artistic” fingertips.)
Method C: Metallic ink accents
Paint just the veins with metallic ink for an elegant, high-contrast look. It’s like giving your leaf a tiny couture outline.
Method 2: Slow Skeleton Leaves (Water Soak Method)
If you’d rather avoid simmering chemicalsor you want the gentlest approachthis method uses time and water. It’s basically composting, but with goals.
Step 1: Submerge leaves in water
Place leaves in a container of water (they must stay submerged). Put something on top to keep them from floatinganother container, a plate, a clean weight.
Step 2: Wait (weeks, not hours)
Leave the container in a safe spot and let natural breakdown loosen the tissue. Depending on temperature and leaf type, this can take 2–8 weeks. You’ll know they’re ready when the leaf feels slimy and the tissue rubs away easily.
Step 3: Brush gently and rinse
Just like the quick method: brush from center outward, rinse carefully, and dry flat under light pressure.
The slow method is less “stove supervision” and more “periodic check-ins,” making it a great classroom-style nature craft if you’re okay with delayed gratification.
Troubleshooting: When Your Leaf Has Opinions
“My leaf disintegrated.”
- Try thicker, waxier leaves (magnolia/oak/rhododendron are popular picks).
- Simmer more gentlyhard boiling can shred delicate veins.
- Brush with less pressure; a soft paintbrush can help for fragile leaves.
“The tissue won’t come off.”
- Simmer longer or do a second round with fresh solution.
- Let leaves soak in cool water 10–20 minutes before brushing.
- Increase washing soda slightly (small adjustments go a long way).
“They curled up like potato chips.”
- Press them flat while drying (paper + heavy book).
- Don’t blast them with heat; air-dry under light pressure instead.
“They tore while brushing.”
- They may be undercookedtissue should slide off, not fight back.
- Brush outward from the center, not back-and-forth like you’re scrubbing grout.
What to Make With Skeleton Leaves (Quick Project Ideas)
- Floating-frame art: mount on white paper for a botanical, gallery look.
- Resin coasters or trays: seal fully dried leaves in resin for a modern nature vibe.
- Place cards: write names on dyed skeleton leaves for weddings or dinner parties.
- Halloween decor: pair with black paper, gold ink, and candlelight for tasteful spooky.
- Scrapbooking/junk journals: layer with vellum, stamps, and ink washes.
Conclusion
Making DIY skeleton leaves is one of those crafts that feels weirdly impressive for how simple it is: simmer (or soak), brush, rinse, dry, and suddenly you’ve got nature’s lace in your hands. Start with sturdy leaves, stay gentle with the brushing, and rememberif your first batch looks a little chaotic, that’s not failure. That’s “limited edition.”
Extra: Real-World “Skeleton Leaf” Experiences (What You’ll Actually Notice)
Most people go into this project thinking it’s going to be a clean, calm, Pinterest-perfect craft moment. Then reality shows up in sweatpants holding a pot of brownish leaf water like, “Hi, I’m the process.” And honestly? That’s part of the fun. Here are the most common real-world experiences you’ll run into while making skeleton leavesso you can recognize them, laugh, and keep going.
First surprise: the smell can be… memorable. Not “call the fire department” bad, but more like “laundry day met autumn compost and they’re working it out.” This is why ventilation gets recommended so often. Crack a window, run a fan, and consider it your home’s brief audition for a science museum exhibit.
Second surprise: not all leaves behave the same, even if they came from the same yard. One magnolia leaf might turn into a perfect lace masterpiece, while the leaf next to it decides to become modern art confetti. This doesn’t mean you did something wrongit means plants, like people, contain multitudes. The best way to “win” is to experiment with several leaf types and keep notes on what worked: thickness, waxiness, simmer time, and how much brushing it tolerated.
Third surprise: brushing is a skill, not a punishment. If you’ve ever tried to peel a clingy sticker off a glass jar without tearing it, you already understand the vibe. The sweet spot is when the leaf tissue is softened enough to slide away with gentle strokes. If you’re scrubbing and nothing’s happening, it usually needs more time (either a longer simmer or a longer soak). If it tears instantly, it might be over-softened or too delicate of a leaf. Either way, your fix is usually the same: slow down, use lighter pressure, and start from the center outward.
Fourth surprise: your best tools are not fancy. A soft toothbrush, a shallow dish, and patience will outperform expensive craft gadgets every time. In fact, “too much force” is the number one reason beginners lose a leaf. The vein network is strong for what it is, but it’s still basically plant thread. Treat it like lace, not like a dirty frying pan.
Fifth surprise: drying flat is where your project goes from “interesting” to “wow.” When skeleton leaves dry without pressing, they can curl into little sculptures. Sometimes that’s cool! But if you want them usable for cards, framing, or resin, pressing is the upgrade. Slip them between plain paper (or paper towels) and put a heavy book on top. The next day, they’ll look dramatically more polishedlike they went to a tiny leaf spa.
Sixth surprise: color changes everything. A plain, natural skeleton leaf is elegant, but tinting turns it into a statement piece. Soft watercolor washes look dreamy. Bold dye colors look modern. Metallic accents look expensive (even if the “expensive” part was just you holding a coupon). The trick is to let the leaves dry first so they don’t tear when you move them around, and to keep your color baths gentle so you don’t over-handle the veins.
Finally: you’ll end up noticing leaf veins everywhere. Once you’ve made a few skeleton leaves, normal leaves start looking like they’re wearing a secret blueprint. That’s the sneaky bonus of this project: it’s a craft, a science demo, and a nature appreciation moment all rolled together. And if a few leaves don’t make it? Congratulationsyou’ve produced authentic “process evidence,” which is a fancy way of saying you’re learning like a pro.