Table of Contents >> Show >> Hide
- Why This Dollar Store Picket Fence Wall Decor Works So Well
- Supplies You Will Need
- How to Make Dollar Store Picket Fence Wall Decor DIY: Step by Step
- Easy Design Ideas and Variations
- Mistakes to Avoid
- Where to Display Your DIY Picket Fence Wall Decor
- Final Thoughts
- The Real-Life Experience of Making This DIY
- SEO Metadata
There are two kinds of home decor projects in this world: the ones that look charmingly handmade, and the ones that look like a glue gun had a nervous breakdown. The good news? This Dollar Store picket fence wall decor DIY lands firmly in the first category. With a few inexpensive supplies, a little paint, and a tiny amount of patience, you can turn humble dollar store finds into wall decor that looks rustic, intentional, and surprisingly stylish.
The beauty of this project is that it is flexible. You can make it farmhouse, cottage, shabby chic, patriotic, springy, spooky, or just plain cute. You can keep it minimal with a painted fence and a simple wreath, or load it up with florals, ribbons, wooden words, and tiny decorative extras until it becomes the overachiever of your gallery wall. Either way, you do not need advanced crafting skills, expensive tools, or a workshop that smells like cedar and ambition.
In this guide, you will learn how to make dollar store picket fence wall decor step by step, what supplies work best, how to get that lightly weathered finish people love, and how to hang it without turning your wall into a cautionary tale. If you love budget-friendly DIY wall decor, this project is about to become your new favorite excuse to wander the craft aisle “just to look.”
Why This Dollar Store Picket Fence Wall Decor Works So Well
A picket fence shape has instant charm. It suggests cottage gardens, front porches, spring wreaths, and that sweet spot between rustic and tidy. On a wall, it creates texture without feeling bulky, and it is versatile enough to work in an entryway, kitchen, laundry room, bedroom, craft room, or covered porch.
Another reason this DIY is so popular is that it solves a very specific decorating problem: blank walls that need personality but not a major financial commitment. A small fence panel gives you a ready-made structure. Instead of building a wood sign from scratch, you are decorating an existing shape and customizing it with paint, embellishments, florals, greenery, ribbon, hooks, mini signs, or seasonal accents.
Translation: you get the visual payoff of rustic wall decor without spending the kind of money that makes your wallet stare at you in betrayal.
Supplies You Will Need
One of the best things about this DIY picket fence wall decor project is that the supply list is short and forgiving. You can keep it basic or dress it up depending on your style.
Basic Supplies
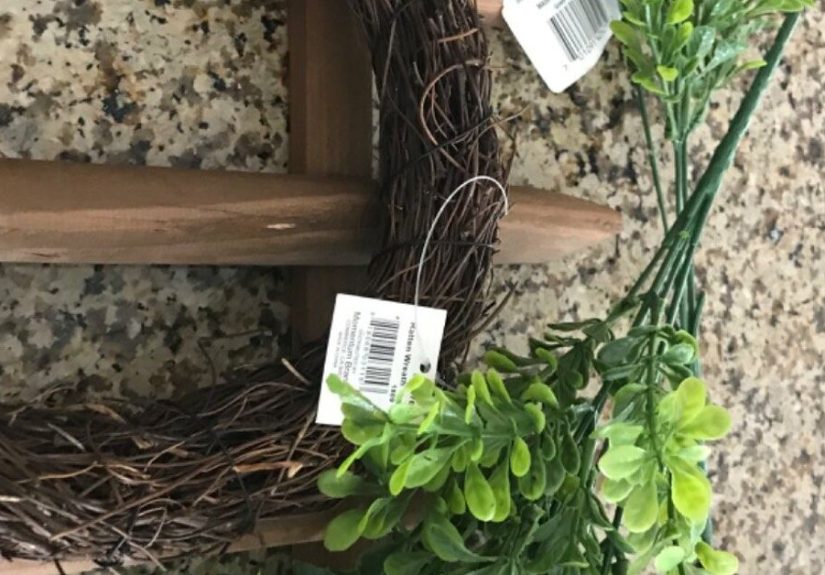
- Dollar store mini picket fence, garden fence panel, or wood-look fence piece
- Acrylic craft paint, chalk-style paint, or matte spray paint
- Primer for raw or unfinished wood surfaces
- Medium and fine-grit sandpaper
- Hot glue gun and glue sticks, or a strong craft adhesive
- Paintbrushes or foam brushes
- Scissors and a ruler
- Paper towels or a lint-free cloth
Optional Decorative Extras
- Mini wreath, faux greenery, or floral stems
- Wood cutouts, monograms, or seasonal words
- Ribbon, twine, burlap, or lace
- Tiny metal embellishments or miniature signs
- Stencils, vinyl letters, or rub-on transfers
- Picture hangers, sawtooth hanger, or appropriate wall-safe hanging method
If your fence piece feels flimsy, you can reinforce the back with a lightweight wood strip, paint stir stick, or a second support piece before decorating. This adds stability without making the project look clunky.
How to Make Dollar Store Picket Fence Wall Decor DIY: Step by Step
1. Decide on Your Style Before You Touch the Paint
Before you paint, glue, or dramatically commit to a bow the size of a houseplant, decide what look you want. This helps you avoid the classic crafter’s dilemma of making something that starts as farmhouse, turns coastal halfway through, and ends its journey in “confused seasonal cousin.”
Popular style directions include:
- Farmhouse: white or cream paint, light distressing, twine, greenery, black lettering
- Cottage: soft pastels, florals, lace, mini wreaths
- Rustic: weathered wood tones, muted paint, metal accents
- Seasonal: pumpkins, snowflakes, shamrocks, patriotic bows, spring blooms
- Modern farmhouse: cleaner lines, limited embellishments, black-and-white contrast
Lay out your embellishments on the fence before gluing anything down. This is the crafting equivalent of trying on an outfit before leaving the house. It prevents regret and unnecessary glue strings.
2. Prep the Fence Piece Properly
If your dollar store fence is unfinished wood or has a rough surface, do not skip prep. A quick sanding helps paint go on more evenly and gives your project a smoother, more polished finish. Sand lightly with the grain, wipe away dust, and inspect for splinters, fuzzy edges, or rough spots.
If you notice little gaps, dents, or uneven edges, you can fill them with a small amount of wood filler and sand again after it dries. For a rustic look, perfection is not the goal. You want “charming handmade accent,” not “machine-made clone with no personality.” Still, you do not want obvious bumps or jagged edges telegraphing that the project was assembled in a state of cheerful chaos.
For raw wood, apply a thin coat of primer before painting. This step helps seal the surface so your paint color looks richer and lasts longer. Let it dry fully before moving on.
3. Paint the Fence
Now for the fun part: turning a basic fence piece into something wall-worthy. Use a foam brush or small paintbrush to apply thin coats rather than one thick, gloopy layer. Thick paint fills in detail, takes longer to dry, and has a way of looking like it got dressed in the dark.
White is the classic pick for farmhouse wall decor DIY, but do not feel limited. Soft sage, dusty blue, matte black, beige, pale gray, buttercream, and muted blush can all look beautiful depending on your room. If you want a natural wood effect, use stain or dry brushing to let some of the grain show through.
Two thin coats usually look cleaner than one heavy coat. Let each layer dry before adding the next. If you are using multiple colors, keep one dominant shade and one or two accent tones. That way, the project looks styled rather than visually caffeinated.
4. Add a Distressed Finish, but Keep It Believable
A distressed finish can make your picket fence decor look charming and lived-in, but this is one of those moments where less is more. Lightly sand the edges, corners, and a few raised areas after the paint dries. Focus on places that would naturally wear first. If every inch looks attacked by sandpaper, the piece starts to look less “vintage cottage” and more “survived a dust storm.”
You can also dry brush a second color over the surface for extra texture. A little brown, gray, or cream brushed on lightly can create a soft weathered look. If you are nervous, test your distressing technique on a scrap piece first.
5. Build Your Decorative Focal Point
Every good wall decor piece needs a focal point. On a picket fence panel, that could be a mini wreath, a wooden word, a floral spray, a bow, or a cluster of greenery and ribbon. Think of the fence as your backdrop and the embellishment as the headline.
Here are a few easy arrangements:
- Mini wreath center: Attach a small wreath to the middle slats and add a ribbon at the top
- Vertical floral accent: Glue greenery and flowers down one side for an asymmetrical look
- Lettered sign: Add a word like “Welcome,” “Home,” “Bloom,” or a family initial
- Seasonal cluster: Use pumpkins for fall, berries and pine for winter, tulips for spring, or flags for summer
Use hot glue for lightweight embellishments and a stronger adhesive when needed. Before gluing, stand back and look at the composition. Does it feel balanced? Does one side look too heavy? Is the bow trying to steal the whole show? Adjust first, glue second.
6. Add Layers for a More High-End Look
The difference between “cute craft” and “where did you buy that?” is often layering. Mix materials so the piece has depth. Pair smooth painted wood with soft ribbon, leafy greenery, a little metal, or a textured jute bow. Layering creates contrast, and contrast makes budget decor feel more intentional.
For example, if your fence is painted white, try adding eucalyptus, a neutral bow, and a small black script word. If your fence is stained or darker, lighten it with pale florals, cream ribbon, or a tiny sign in a soft color. You do not need to add everything you own. This is decor, not a yard sale with a theme.
7. Seal It If Needed
If the piece will hang indoors in a low-traffic area, sealing is optional. But if it is going on a covered porch, in a humid laundry room, or near a kitchen where splatters and fingerprints happen, a clear matte sealer can help protect the finish.
Use a non-yellowing clear coat and make sure all paint and glue are fully dry first. Matte or satin finishes usually look best for rustic or farmhouse decor.
8. Hang It the Smart Way
Once the project is finished, choose your hanging method based on the final size, depth, and weight. A very lightweight piece may work with wall-friendly hanging strips if the surface and product instructions are compatible. But if your fence decor has chunky embellishments, thick wood, or a three-dimensional wreath, use a proper picture hanger, nail, or suitable anchor instead.
Add a sawtooth hanger to the back if needed, or staple twine tightly for decorative hanging support. If the piece is wider than it is heavy, hanging it from two points can help it stay straight. Because nothing kills the rustic charm faster than wall art that hangs like it just gave up.
Easy Design Ideas and Variations
Once you know the basic technique, you can make several versions of this dollar store wall decor DIY without repeating yourself.
Spring Picket Fence Decor
Paint the fence white or pale sage. Add faux tulips, lavender, or eucalyptus with a soft ribbon bow. A tiny “Hello Spring” sign or floral wreath finishes the look.
Summer Farmhouse Version
Use a creamy white base with black lettering and a simple greenery bundle. This is ideal for entryway decor that feels fresh but not overly seasonal.
Fall Fence Wall Decor
Try tan, ivory, or weathered gray paint with mini pumpkins, muted orange florals, and burlap ribbon. Add the word “Harvest” or “Gather” for a cozy autumn touch.
Winter or Holiday Fence Accent
Add frosted greenery, berries, bells, mini ornaments, or snowflake embellishments. Keep the palette simple for a more elegant look: white, green, silver, red, or soft gold.
Everyday Neutral Decor
If you do not want to remake decor every season, go neutral. Think off-white paint, muted greenery, linen ribbon, and a small monogram or word. It will blend into your home year-round and still look finished.
Mistakes to Avoid
Even easy DIY projects have a few traps. Here are the most common ones:
- Skipping prep: Rough wood and dusty surfaces make paint and glue less reliable.
- Using too much paint: Thick coats can look heavy and hide the details of the fence slats.
- Over-distressing: A little weathering looks charming. Too much looks like the fence lost a fight.
- Adding too many embellishments: Pick one focal point and support it with smaller accents.
- Ignoring balance: Clustered decor should feel intentional, not like everything rolled to one side.
- Using the wrong hanger: Lightweight is not the same as no-thought-required. Always match your hanging method to the finished piece.
Where to Display Your DIY Picket Fence Wall Decor
This decor works especially well in spaces that benefit from warmth and texture. Try it in an entryway above a bench, in a kitchen near a coffee station, in a laundry room that needs a little personality, or in a bedroom with cottage or farmhouse styling.
It also looks great layered with other items. Hang it above a small wreath, pair it with framed botanical prints, or use it as part of a simple gallery wall. If your home leans modern, keep the design restrained with fewer embellishments and stronger contrast. If your style is more rustic or cottage-inspired, lean into florals, bows, and weathered finishes.
The goal is not to make it look expensive. The goal is to make it look intentional, polished, and full of personality. That is the sweet spot.
Final Thoughts
How to make Dollar Store picket fence wall decor DIY really comes down to three things: smart prep, a clear style plan, and restraint. Yes, restraint. The dollar store will absolutely tempt you into buying six extra embellishments you do not need. Stay strong.
With a fence panel, a little paint, and a few thoughtful decorative elements, you can create wall art that feels warm, charming, and far more custom than its humble beginnings suggest. This is the kind of project that works for beginners, satisfies seasoned crafters, and proves that budget decor can still have taste.
In other words, you do not need a huge budget to make your walls look more interesting. You just need a picket fence, a plan, and the courage to say, “Yes, I absolutely turned dollar store supplies into home decor, and yes, I am weirdly proud of it.”
The Real-Life Experience of Making This DIY
The experience of making Dollar Store picket fence wall decor is honestly half the reason people fall in love with the project. It is not just about the finished piece. It is about that oddly satisfying moment when a pile of inexpensive, slightly random supplies starts turning into something that looks like it belongs in a carefully styled home.
At first, the project can feel deceptively simple. You see a mini fence, a couple of flowers, maybe a ribbon, and think, “Oh, this will take twenty minutes.” That is adorable. What actually happens is that you spend ten minutes deciding between white paint and cream paint, another ten minutes choosing whether the bow should be on the left or the right, and at least five full minutes staring at the greenery like it personally offended you. But that is part of the fun. It is low-stakes creativity, which is a rare and beautiful thing.
There is also something genuinely relaxing about working on a project like this. Sanding the wood, brushing on paint, testing embellishments, and adjusting the layout can feel almost meditative. It is the kind of DIY that lets you be creative without requiring intense concentration or a power tool that sounds like it came from a race car pit crew. You can do it at the kitchen table, while listening to music, chatting with a friend, or pretending you are just “organizing craft supplies” when really you are making your fifth seasonal variation.
Another common experience is realizing how much the little details matter. The light distressing on one edge, the shape of the bow tails, the angle of the floral stem, or the decision to leave a little negative space can completely change the final result. That is when this project becomes more than a budget craft. It becomes a styling exercise. You start noticing balance, texture, color contrast, and proportion in a way that carries over into other decorating projects too.
And then there is the moment of surprise. It usually happens right after the last piece is glued down and the fence is finally hung on the wall. Suddenly, the dollar store supplies no longer look like dollar store supplies. They look intentional. They look charming. They look like you knew exactly what you were doing the entire time, even if there was a point earlier when you accidentally glued a leaf to your sleeve and questioned your life choices.
This DIY also tends to spark ideas. Once you make one, it is very hard not to imagine a spring version, a Christmas version, a kitchen version, a laundry room version, and at least one version that exists only because you found cute ribbon and lost all self-control. That is the slippery little joy of affordable crafts: they invite experimentation. Because the materials are inexpensive, you feel freer to try things, tweak your style, and make mistakes without drama.
Perhaps the best part of the experience is the feeling that your home becomes more personal. Store-bought decor can be beautiful, but handmade pieces tell a different story. They show taste, effort, humor, and a willingness to make something unique. Even if the project is simple, it adds character because it came from your own hands and your own eye for design.
So yes, making this project is about wall decor. But it is also about the pleasure of transforming ordinary materials into something that feels warm, creative, and just a little bit clever. And for a DIY that starts in the dollar store aisle, that is a pretty excellent ending.