Table of Contents >> Show >> Hide
- What Exactly Is Teriyaki Sauce?
- Key Ingredients for a Great Homemade Teriyaki Sauce
- Step-by-Step: How to Make Homemade Teriyaki Sauce
- How to Use Homemade Teriyaki Sauce
- Food Safety and Storage Tips
- Troubleshooting Common Teriyaki Sauce Problems
- Real-Life Teriyaki Lessons from the Home Kitchen (Experience Corner)
If you’ve only ever met teriyaki sauce in a bottle, you’re in for a glow-up. Homemade teriyaki is glossy, garlicky, gently sweet, and ridiculously easy. We’re talking “whisk a few pantry ingredients in one pot and pretend you’re running a tiny Japanese bistro in your kitchen” easy.
In this guide, you’ll learn how to make a classic homemade teriyaki sauce, how to tweak it for marinades, glazes, and stir-fries, and how to store it safely so you can have a batch ready whenever the craving hits.
What Exactly Is Teriyaki Sauce?
Teriyaki is a Japanese cooking style where foods are grilled or pan-cooked and finished with a shiny, sweet–salty glaze. The classic base is simple: soy sauce for salt and umami, sugar (or other sweeteners) for sweetness and shine, and mirin or sake for a subtle tang and aroma. Reduce that mixture, and you get the thick, spoon-coating sauce that clings to chicken, salmon, tofu, or veggies.
Most modern homemade versions add garlic and ginger for extra flavor, sometimes a splash of sesame oil for nuttiness, and a little cornstarch to help the sauce thicken quickly. The result: a versatile sauce that can act as a marinade, stir-fry sauce, or finishing glaze.
Key Ingredients for a Great Homemade Teriyaki Sauce
You don’t need a specialized Asian pantry to make a respectable teriyaki. Here’s what each ingredient does and how to swap if needed.
Soy Sauce (the Salty, Savory Backbone)
- Regular soy sauce: Gives the deepest color and boldest flavor.
- Low-sodium soy sauce: Great if you want more control over saltiness, especially if you’ll cook the sauce down a lot.
- Tamari or shoyu: Excellent substitutes if you’re avoiding regular soy sauce or want a slightly smoother flavor profile.
Sweeteners (Shine and Caramel Notes)
- Brown sugar: The workhorse sweetener, adding molasses depth and that classic restaurant-style sweetness.
- Honey: Rounds out the flavor and helps the sauce cling to food.
- Granulated sugar: Fine as a backup; your sauce will just be a bit cleaner-tasting.
Mirin, Sake, or Rice Vinegar (A Little Tang)
- Mirin: A sweet Japanese rice wine that adds a mild acidity and gentle sweetness.
- Sake: A drier flavor; usually paired with sugar.
- No mirin? Use rice vinegar plus a pinch of sugar as a simple, accessible swap.
Garlic & Ginger (Flavor Boosters)
- Garlic: Minced fresh garlic gives a savory punch; garlic powder works in a pinch.
- Ginger: Fresh grated ginger adds warmth and brightness. It’s what makes the sauce taste “fresh” rather than flat.
Optional but Awesome Add-Ins
- Sesame oil: Just a teaspoon adds toasty, nutty aroma.
- Crushed red pepper or chili flakes: For a sweet–spicy teriyaki.
- Cornstarch: Mixed with cold water, this slurry thickens the sauce quickly into a glaze.
Step-by-Step: How to Make Homemade Teriyaki Sauce
Ingredients (Basic Pantry Version)
- 1/2 cup soy sauce (low-sodium recommended)
- 1/2 cup water
- 1/4 cup packed brown sugar
- 2 tablespoons honey (or more brown sugar)
- 2 tablespoons mirin, sake, or rice vinegar with a pinch of sugar
- 2 cloves garlic, minced
- 1 teaspoon fresh grated ginger
- 1 teaspoon toasted sesame oil (optional but recommended)
- 2 teaspoons cornstarch + 2 tablespoons cold water (optional, for a thicker glaze)
Step 1: Whisk Everything Together
In a small saucepan, whisk together the soy sauce, water, brown sugar, honey, mirin (or substitute), garlic, ginger, and sesame oil. Make sure the sugar is mostly dissolved. This helps the sauce cook evenly and prevents gritty bits at the bottom.
Step 2: Bring to a Gentle Simmer
Place the saucepan over medium heat and cook, stirring occasionally, until the mixture just starts to simmer. You’ll see small bubbles forming around the edges. Turn the heat down to low so the sugar doesn’t burn.
Step 3: Decide on Thickness
At this point, you’ve got two paths:
- For a thinner, marinade-style sauce: Let it simmer for 3–5 minutes to slightly reduce and meld the flavors. You’re done!
- For a thick, glossy glaze: In a small bowl, whisk the cornstarch with the cold water until smooth. Slowly pour this slurry into the simmering sauce while whisking.
Step 4: Simmer Until Glossy
After adding the cornstarch slurry, continue stirring over low heat for 1–3 minutes. The sauce should thicken enough to coat the back of a spoon. If it gets too thick, splash in a bit of water, whisking until it loosens up.
Step 5: Cool and Store
Remove the pan from the heat and let the sauce cool slightly. Transfer to a clean, airtight jar or container. Once completely cool, refrigerate.
How to Use Homemade Teriyaki Sauce
Now that you’ve got a jar of liquid gold, here’s how to put it to work.
1. As a Marinade
- Chicken thighs or breasts: Marinate 30 minutes to 2 hours before grilling or baking.
- Salmon or other fatty fish: 20–30 minutes is plenty; the salt and acid work quickly.
- Tofu or tempeh: Press first, then marinate 1–4 hours for maximum flavor.
If you want a thinner marinade, whisk in 2–4 tablespoons of water or orange juice so it penetrates the protein more easily.
2. As a Stir-Fry Sauce
Cook your veggies and protein first in a little oil. When everything is nearly done, pour in enough teriyaki sauce to coat the pan’s contents. Let it bubble for 1–2 minutes until thick and shiny. Toss to coat and serve over rice or noodles.
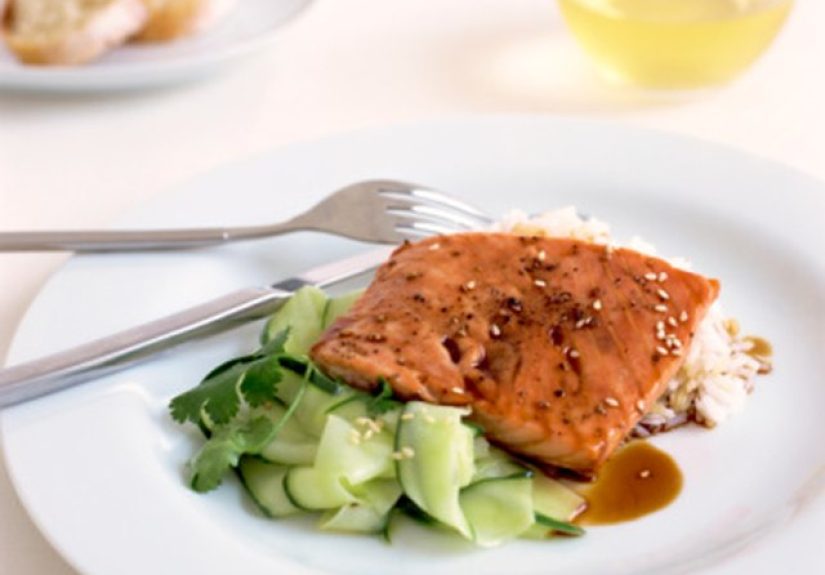
3. As a Glaze
For that classic sticky finish, brush the thicker version of your teriyaki sauce onto grilled or baked meats during the last 5–10 minutes of cooking, adding another layer just before serving. It caramelizes and creates a gorgeous sheen.
4. As a Dipping or Drizzle Sauce
Use the sauce as a dip for potstickers, chicken skewers, or roasted veggies. Or drizzle it over rice bowls, sushi bowls, or even roasted Brussels sprouts for a sweet–savory kick.
Food Safety and Storage Tips
Homemade teriyaki doesn’t have the same preservatives as store-bought bottles, so treat it more like a fresh sauce than a forever condiment.
How Long Does Homemade Teriyaki Sauce Last?
- In the fridge: Generally 1–2 weeks when stored in a clean, airtight container and kept refrigerated.
- In the freezer: Up to about 3 months in a freezer-safe container or flat in a zip-top bag. Thaw overnight in the fridge and whisk before using.
The exact life span depends on how clean your utensils are, how quickly you chilled it after cooking, and the overall acidity and salt content of your recipe. If in doubt, toss it outespecially if you notice mold, off smells, or strange separation.
What About Store-Bought Teriyaki?
Bottled teriyaki sauces often last months (or even up to a year) in the fridge once opened, thanks to added preservatives and high salt content. Your homemade version is more delicate, so don’t assume the same time frame applies. Label your jar with the date you made it so you’re not playing “sauce roulette” a month later.
Smart Storage Tips
- Let the sauce cool before refrigerating so it doesn’t warm up your fridge.
- Use clean spoons every timeno double dipping from raw chicken bowls.
- Divide into small containers if you plan to freeze; that way, you only thaw what you need.
Troubleshooting Common Teriyaki Sauce Problems
“My Teriyaki Sauce Is Too Salty”
- Stir in a bit of water and a teaspoon or two of brown sugar, then simmer to re-balance.
- Next time, start with low-sodium soy sauce.
“It’s Too Sweet”
- Add a splash of soy sauce or a little extra water.
- For extra complexity, a teaspoon of rice vinegar can cut through the sweetness.
“It Won’t Thicken”
- Simmer longer over low heat to reduce.
- Whisk another small cornstarch slurry (1 teaspoon cornstarch + 1 tablespoon cold water) and add slowly while stirring.
“It’s Too Thick”
- Remove from heat and whisk in water, one tablespoon at a time, until you reach the desired consistency.
“The Bottom Burned”
- Unfortunately, burned sugar flavor is hard to hide. If it tastes bitter and smoky (in a bad way), it’s best to start over.
- Next time, keep the heat low and stir regularly, especially once the sauce starts to thicken.
Real-Life Teriyaki Lessons from the Home Kitchen (Experience Corner)
Once you start making your own teriyaki sauce, you quickly realize it’s a “template” more than a rigid recipe. The first time you whisk it together, you might follow the measurements to the letter. By the third batch, you’re confidently eyeballing, tasting, and adjusting like you’ve been doing this for years.
One common experience: your very first batch may taste a bit saltier than you expect. That’s normal. Restaurant teriyaki is usually balanced by a whole plate of rice and vegetables. At home, if you dip a spoon straight into the sauce, it will seem intensebecause it’s supposed to be. Think of it like a concentrate that’s meant to coat food, not be eaten by the spoonful (even if you are tempted).
Another thing you’ll notice is how flexible the recipe is. Out of mirin? Most home cooks quickly discover that rice vinegar plus a pinch of sugar does a surprisingly good job in everyday cooking. No fresh ginger? A little ginger powder will keep your sauce from tasting flat. One night you might add chili flakes for a spicy teriyaki chicken bowl; another night, you’ll skip the heat because you’re cooking for kids or spice-sensitive friends.
Meal prep fans often fall in love with teriyaki sauce because it works across multiple dinners. Make one batch on Sunday, then use it to marinate chicken thighs for Monday, drizzle over roasted vegetables on Wednesday, and toss with a quick tofu stir-fry Friday night. It’s like having a tiny flavor shortcut waiting in your fridge. Just remember the storage windowlabeling the jar with the date helps you actually use it instead of letting it slowly migrate to the back of the shelf.
You also start to learn how thickness changes the personality of the sauce. A thinner, unslurred version is fantastic as a marinade; it soaks into meat and tofu more easily. The thicker, cornstarch-enriched version behaves more like a glaze, clinging stubbornly (in a good way) to crispy chicken or charred salmon. Many home cooks keep the sauce base the same but tweak the water and cornstarch depending on how they plan to use it that night.
One of the biggest “aha” moments happens when you compare homemade teriyaki with a store-bought bottle. The homemade version usually tastes fresher and more livelyyou can actually identify the garlic and ginger, and it doesn’t have that heavy, syrupy aftertaste some bottled sauces carry. Plus, you’re in charge of the sweetness. If you prefer a more savory, less sugary teriyaki, you can cut the sugar by a third and lean more into soy and ginger.
If you cook for people with different dietary needs, homemade teriyaki is also a small superpower. You can choose gluten-free tamari instead of regular soy sauce, control the amount of sugar, and skip any unnecessary additives. When someone at the table asks, “Wow, where did you buy this sauce?” you get to smile and say, “Oh, that? I just threw it together.” (No need to confess that “threw it together” involved reading a guide like this.)
Over time, you’ll probably end up with your own house version: maybe a slightly spicier teriyaki with chili flakes and extra ginger, or a mellow one with more honey and a softer garlic note. The point is not to chase some mythical “perfect” recipe, but to treat teriyaki sauce as a flavorful, forgiving base you can adjust to your taste and your pantry. Once you internalize the basicssoy, sweet, acid, aromaticsyou’ll be able to improvise without fear, and your weeknight dinners will taste a lot more exciting for it.
And perhaps the most underrated perk? The smell of soy, sugar, garlic, and ginger simmering gently on your stove is dangerously good. It floats through the kitchen, luring people to ask, “What are you making?” That alone is worth keeping this homemade teriyaki sauce in your rotation.