Table of Contents >> Show >> Hide
- Why Pallet Coasters Are the Perfect Tiny Wood Project
- Safety First: How to Choose Pallet Wood You Actually Want in Your Home
- Materials and Tools You’ll Need
- Three Easy Ways to Make DIY Pallet Coasters
- How to Seal Wood Coasters So They Survive Condensation
- Design Ideas That Make DIY Coasters Look Store-Bought
- Troubleshooting: Fix the Stuff That Usually Goes Wrong
- Care Tips So They Stay Nice
- Experience Notes: What You’ll Learn Making Your First Set (and How to Make the Second Set Better)
- Conclusion
Your coffee table has been through a lot. Hot mugs. Sweaty glasses. That one “I swear it wasn’t me” water ring.
The good news: you can make a set of rustic, tough little DIY pallet coasters in an afternoonusing
scrap pallet wood (or “pallet-ish” materials) and a finish that can handle real life.
This guide walks you through safe pallet selection, simple cutting and sanding, and three beginner-friendly coaster
stylesfrom “mini pallet” coasters to ultra-simple squares. You’ll also get finishing options, design ideas, and
troubleshooting tips so your coasters look intentional (not like tiny pieces of regret).
Why Pallet Coasters Are the Perfect Tiny Wood Project
Pallet wood coasters hit the sweet spot: small parts, fast results, and plenty of personality. They’re also a great
way to practice basic woodworking skillsmeasuring, cutting, sanding, gluing, and finishingwithout committing to a
full dining table makeover (emotionally or spatially).
- Budget-friendly: Many pallets are free or low-cost.
- Rustic charm: Pallet wood naturally looks “farmhouse” without trying too hard.
- Giftable: Tie them with twine and suddenly you’re a thoughtful person.
- Customizable: Stain, paint, burn, stamp, or keep it raw and minimalist.
Safety First: How to Choose Pallet Wood You Actually Want in Your Home
Pallets are tough, but their backstories are… mysterious. For coastersitems that live near drinks and handsyou want
to be picky. The safest shortcut is to use new, untreated wood or craft sticks and simply copy the
pallet look. But if you’re using real pallets, do a quick “pallet background check.”
Look for a Stamp (and Know What It Means)
Many pallets used in shipping have an IPPC-style stamp. In general, choose pallets marked HT
(heat-treated). Avoid pallets marked MB (methyl bromide fumigation). If there’s no stamp,
treat it as unknown and skip it for indoor projectsespecially anything handled often.
Say “No Thanks” to These Pallets
- Painted or dyed pallets: Unknown coatings and harder-to-sand pigments.
- Strong odors, stains, or oily spots: That’s the wood telling you a secret you don’t want to know.
- Visible mold, rot, or insect damage: Not worth the effortor the sneezing.
- Food-transport pallets or outdoor-soaked pallets: Higher chance of bacteria and contamination.
Cleaning Pallet Wood (Quick and Practical)
- Knock off loose dirt with a stiff brush.
- Wash with soapy water (or a light disinfecting solution), then rinse.
- Let it dry completelyideally in the sunbefore cutting or sanding.
Important: Always remove nails/staples and wear safety glasses. Pallets love hiding sharp metal like
it’s a hobby.
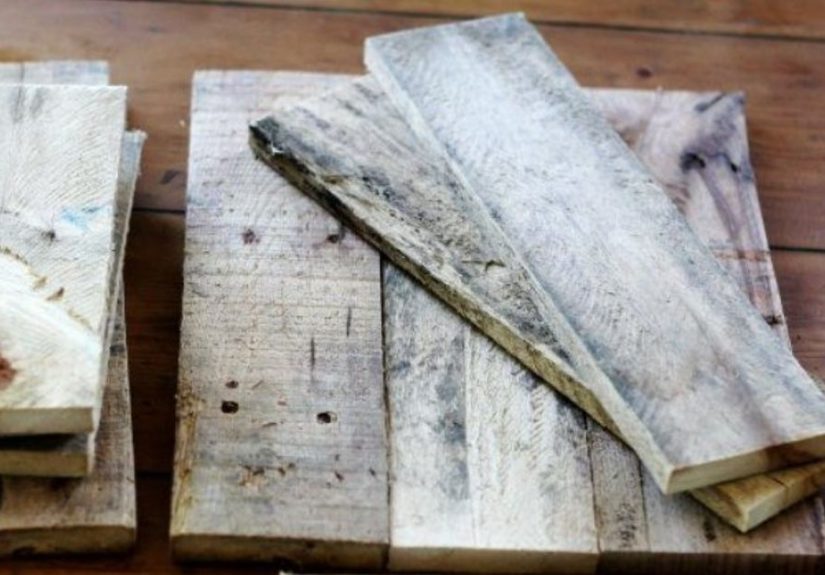
Materials and Tools You’ll Need
Materials
- Pallet boards (heat-treated preferred) or craft sticks / scrap wood
- Wood glue
- Sandpaper (80, 120/150, 220; plus 320 for between coats if finishing)
- Finish: polyurethane (water-based or oil-based) or wipe-on poly or epoxy resin
- Optional: stain, paint, wood burner, stencil, cork sheet, felt pads
Tools
- Tape measure + pencil
- Small saw (miter saw, table saw with safety setup, jigsaw, or handsaw)
- Clamps (or heavy books in a pinch)
- Orbital sander (optional but helpful)
- Utility knife/scissors (for cork or felt)
Three Easy Ways to Make DIY Pallet Coasters
Pick the style that matches your patience level. All of these aim for a standard coaster size:
about 4 inches by 4 inches (big enough for most mugs and glasses).
Option A: Classic “Mini Pallet” Coasters (Most Popular Look)
These are the tiny versions of a real pallet: top slats glued onto bottom runners. They look fancy, but the build is
straightforward.
Step 1: Disassemble the Pallet
If you’re starting with a whole pallet, cut it apart into individual boards. A reciprocating saw can cut through nails
between slats and stringers faster than fighting with a crowbar.
Step 2: Cut Your Pieces
For one coaster (4″ x 4″ target), a simple cut list is:
- Top slats: 5 pieces at about 4″ long (width varies based on your pallet boards)
- Bottom runners: 2 pieces at about 4″ long (slightly thicker strips look best)
Tip: Keep your slats roughly the same thickness so the coaster sits flat. If one slat is thicker, it becomes the
“wobble leader.”
Step 3: Sand Like You Mean It
Pallet wood is rough. Start with 80 grit to remove splinters and surface grime, move to
120/150 to smooth it, and finish at 220 for a touch-friendly surface. Lightly round
edges so your hands don’t learn a lesson.
Step 4: Assemble the Mini Pallet
- Lay your top slats face-down with small gaps between them (a credit card makes a great spacer).
- Apply wood glue to the two bottom runners.
- Press the runners across the slats (perpendicular), keeping everything square.
- Clamp for 30–60 minutes (follow your glue’s label), then let cure fully.
Step 5: Optional Upgrades Before Finishing
- Rustic stamp: Add a faux shipping mark with a stencil.
- Two-tone stain: Dark runners + lighter slats looks sharp.
- Wood-burned monogram: Personalized without being “Live Laugh Love.”
Option B: The Simplest Pallet Wood Coasters (One-Piece Squares)
If you want coasters fast, cut pallet boards into 4″ squares, sand, and finish. Done.
This is also the best option if you don’t want to deal with tiny slats.
- Cut 4″ squares from a clean, straight section of board.
- Sand to 220 grit, rounding edges.
- Add cork or felt to the bottom (optional but table-friendly).
- Finish with a water-resistant topcoat.
Option C: “Pallet Look” Coasters Without Real Pallets (Safest + Easiest)
Want the mini pallet vibe without the pallet mystery? Use craft sticks (popsicle sticks) or new thin
wood slats. You still get that slatted look, and you’ll sleep better.
- Trim sticks to 4″ (or buy jumbo sticks and cut).
- Glue 5–6 sticks side-by-side for the top.
- Glue 2 shorter sticks across the bottom as runners.
- Sand lightly and seal.
How to Seal Wood Coasters So They Survive Condensation
Coasters live in the danger zone: moisture + temperature changes + the occasional dramatic mug slam. A good finish is
the difference between “handmade heirloom” and “why is it fuzzy?”
Best All-Around Finish: Polyurethane
Polyurethane forms a durable protective film and is widely used for moisture resistance on wood surfaces. For coasters,
it’s a practical choice because it’s tough and easy to refresh.
- Water-based polyurethane: Dries faster, low odor, stays clearer (great for light wood).
- Oil-based polyurethane: More amber warmth, very durable, stronger fumes and longer dry time.
- Wipe-on poly: Beginner-friendly, thin coats, great control on small pieces.
Simple Poly Finish Schedule (Beginner-Proof)
- Apply a thin coat with a foam brush or lint-free cloth.
- Let dry fully (follow the canhumidity loves to change the rules).
- Lightly sand with 320 grit to knock down dust nibs.
- Apply 2–4 total coats for coasters (more coats = more protection).
- Let cure before use. “Dry” and “cured” are not the same thing.
Alternative: Epoxy Resin (Maximum Waterproofing, More Fuss)
Resin gives a glossy, almost glass-like top that resists water very well. The trade-off is mixing, bubble control, and
careful leveling. If you like a modern look (or want to embed glitter, pressed flowers, or tiny jokes), resin is fun.
Wax-Only Finishes (Pretty, but Not Enough Alone)
Wax looks beautiful but doesn’t provide strong protection by itself. If you love a waxed feel, apply it over a cured,
protective finishthink of wax as the “polish,” not the “armor.”
Design Ideas That Make DIY Coasters Look Store-Bought
1) Simple Two-Tone Stain
Stain the top slats one shade and the bottom runners a darker shade. The contrast screams “intentional design”
(instead of “I used whatever was in the garage”).
2) Burned Edges for Rustic Drama
Lightly singe edges with a wood-burning tool for a smoky, weathered lookthen seal well. (No, a lighter is not the
same thing as a plan.)
3) Minimalist Stripe or Geometric Tape Lines
Use painter’s tape to mask clean lines, paint, peel, and seal. This works especially well on the one-piece square
coasters.
4) Add Cork Backing (Quietly Luxurious)
Cut cork squares slightly smaller than the coaster, glue them on, and you’ll get better grip plus less tabletop drama.
Troubleshooting: Fix the Stuff That Usually Goes Wrong
“My coaster sticks to the bottom of the glass.”
This can happen with some film finishes when condensation creates suction. Try:
- Switching to a satin finish (less “seal-like” than high gloss)
- Adding a cork backing to break suction
- Ensuring the finish is fully cured before use
“The surface feels rough after finishing.”
That’s usually dust nibs or raised grain. Lightly sand between coats with fine grit (around 320) and keep coats thin.
“My coasters warped.”
Thin wood + moisture changes = movement. Reduce warping by:
- Using drier, flatter boards
- Sealing all sides (top, bottom, and edges)
- Applying similar coats to both faces so moisture exchange is balanced
Care Tips So They Stay Nice
- Wipe spills quickly (especially sugary drinks).
- Don’t soak in water; clean with a damp cloth.
- If they look dull over time, scuff lightly and add a fresh coat of finish.
Experience Notes: What You’ll Learn Making Your First Set (and How to Make the Second Set Better)
The first time you make simple DIY pallet coasters, you’ll probably think, “These are tinythis will
be quick.” And you’ll be right… until you meet the three time-eaters: pallet disassembly, sanding, and waiting for
finish to cure. None of that is bad, but it’s where the “easy afternoon project” becomes “why am I still holding
sandpaper at dusk?” Here’s what tends to happen in real lifeand how to use it to your advantage.
1) Choosing wood matters more than cutting perfectly. Beginners often obsess over getting every slat
identical. In practice, the biggest upgrade comes from picking boards that are already straight, dry, and relatively
clean. If a pallet board is twisted, cracked, or soaked with mystery stains, it will fight you all the way through the
build. You’ll spend extra time flattening, sanding, and still end up with a coaster that rocks like it’s listening to
a great song. Next time, start with better boards and your “skills” will magically improve.
2) Sanding is the secret to “nice,” not fancy tools. You can cut coasters with basic tools, but
sanding is what makes them feel finished. Most people find that 80 grit is for “rescue,” 120/150 is for “getting
civilized,” and 220 is for “I’d hand this to a friend.” If you stop too early, the coaster looks rustic but feels like
it’s holding a grudge. If you go too fine too soon, you just polish splinters instead of removing them.
3) Tiny parts can be surprisingly tricky. Small slats love to shift when you glue them, and it’s easy
to end up with a coaster that’s slightly out of square. A simple trick is to assemble on a flat surface and use a
quick “frame” jig: two straight scraps clamped at a right angle. Slide your coaster pieces into the corner so they
stay square while you glue. It feels like cheatingin the best way.
4) Thin coats beat thick coats every time. With finish, the temptation is to lay it on heavy for
“maximum protection.” On coasters, thick coats are more likely to drip, pool in corners, or feel plasticky. Multiple
thin coats look cleaner and cure more predictably. You’ll also learn that “dry to the touch” is a prank label; coasters
used too soon can imprint, scuff, or stick to a glass. If you can, let them cure longer than you think you need. Future
you will be smugand right.
5) The best-looking sets usually have one simple theme. A matched stain, a small burned logo, or a
consistent paint stripe makes the whole set look cohesive. Too many techniques on one coaster can feel busy. Many DIYers
get their best results when they pick one “hero detail” and keep the rest clean: crisp edges, smooth sanding, and a
reliable seal. The magic is boringin a very attractive way.
Finally, expect your second set to be faster and cleaner. Not because you suddenly became a woodworking wizard, but
because you’ll stop negotiating with bad wood, you’ll sand more efficiently, and you’ll treat finishing like a system
instead of a last-minute splash. That’s the real DIY glow-up.
Conclusion
DIY pallet coasters are a small project with big payoff: they protect your surfaces, look charmingly rustic, and give
you a satisfying “I made this” moment every time you set down a drink. Choose safe, clean pallet wood (or go with a
pallet-inspired alternative), sand until it feels friendly, and seal with a finish that can handle condensation. Then
make a second setbecause the first one will mysteriously get “borrowed” by friends and family who suddenly love
coasters.