Table of Contents >> Show >> Hide
- Can You Paint Aluminum Siding?
- Quick Reality Check: When Painting Is Smart (and When It’s Not)
- Best Time and Weather for Painting Aluminum Siding
- Tools and Materials
- Step-by-Step: How to Paint Aluminum Siding
- Step 1: Inspect and plan your “zones”
- Step 2: Protect everything you don’t want painted (which is… most things)
- Step 3: Think about lead safety (especially on older homes)
- Step 4: Clean thoroughly and remove chalking
- Step 5: Remove loose paint and feather edges
- Step 6: Make small repairs and seal gaps
- Step 7: Prime for adhesion (don’t skip this if the surface is questionable)
- Step 8: Paint with a durable exterior 100% acrylic
- Brush/roller tips
- Sprayer tips (fast, smooth, and dangerously good at making a mess)
- Step 9: Cure, clean up, and do a final walkthrough
- Choosing Color and Sheen (So You Don’t Accidentally Highlight Every Dent)
- Common Mistakes That Cause Peeling (or Regret)
- Maintenance: How to Keep It Looking Good
- FAQ
- Experience Section: Lessons You Only Learn Mid-Project (About )
- Conclusion
Aluminum siding is like that friend who never gets invited to the makeover show because it’s “fine.”
It’s not rotting, it’s not crumbling, it’s just… tired. Faded. Chalky. Slightly embarrassed in direct sunlight.
The good news: painting aluminum siding is absolutely doable, and when it’s done right, it can look crisp for years.
The bad news: the paint does not magically stick to “years of oxidation plus airborne mystery grime,” no matter how inspiring your playlist is.
This guide walks you through a proven, contractor-style processcleaning, de-chalking, priming, and paintingwith the why behind each step.
You’ll get practical tips, common mistakes to avoid, and a realistic game plan so you don’t end up repainting next summer because the new coat decided to “peel like a sunburn.”
Can You Paint Aluminum Siding?
Yes. Aluminum siding can be repainted successfully as long as the surface is cleaned thoroughly and the coating system is compatible with metal.
The biggest enemies are oxidation (that white, dusty “chalking”), loose paint edges, and moisture (dew, rain, high humidity) that messes with drying and adhesion.
Win the prep phase, and the painting phase suddenly feels… suspiciously easy.
Quick Reality Check: When Painting Is Smart (and When It’s Not)
Painting is a great option if:
- The siding is structurally sound (not heavily dented, warped, or pulling loose).
- Most of the existing paint is still bonded (you’re not scraping half the house into a trash bag).
- You want a new color without the cost and disruption of replacement.
Consider replacement or repairs first if:
- You have widespread corrosion, holes, or severe impact damage.
- The siding is loose and rattling or the underlying wall issues need fixing.
- Old coatings are failing everywhere (you’ll spend more time scraping than painting).
Best Time and Weather for Painting Aluminum Siding
Exterior painting isn’t just “pick a weekend.” You want a window of mild temperatures, low wind, and low moisture.
In most regions, late spring through early fall is idealbut the best day is the one that stays dry long enough for the coating to set up and cure properly.
- Temperature: Follow the paint label. Many modern exterior acrylics can be applied down to the mid-30s°F, but plenty of products want 50°F+ for best results.
- Humidity: Lower is better. High humidity slows drying and increases the odds of a dull, blotchy finish.
- Dew and condensation: Avoid late-day painting if the surface will cool into dew conditions before the film sets.
- Sun: Don’t paint baking-hot siding in direct sun. Paint can “flash dry” too fast, leaving lap marks and poor adhesion.
- Wind: Wind speeds up drying but also carries dust into wet paint (and spreads overspray like it’s trying to redecorate your neighbor’s car).
Tools and Materials
Cleaning and prep
- Garden hose with spray nozzle or pressure washer (used carefully)
- Soft-to-medium scrub brush (and a smaller brush for corners)
- Cleaner/degreaser (often a TSP substitute) and water
- Plastic sheeting and painter’s tape for masking
- Drop cloths (canvas is nicer than plastic for walking)
- Scraper, putty knife, and sanding sponge or sandpaper
- Caulk rated for exterior use (paintable) and a caulk gun
Priming and paint
- Primer: A high-adhesion acrylic bonding primer or a direct-to-metal (DTM) acrylic primer suitable for aluminum and previously painted metal
- Paint: High-quality exterior 100% acrylic paint (often satin/low-luster for siding)
- Optional: Rust-inhibitive primer for any steel fasteners or mixed-metal trim (if applicable)
Application
- Quality brush (a 4-inch brush can be a hero on lap siding profiles)
- Roller with appropriate nap (useful for flatter sections) and a tray
- Airless sprayer (fast and smooth on siding, but requires masking discipline)
- Ladders and/or scaffolding; ladder stabilizer recommended
Step-by-Step: How to Paint Aluminum Siding
Step 1: Inspect and plan your “zones”
Walk the house and mark issues: peeling spots, open seams, dents, mildew, chalky areas, and any bare metal.
Decide how you’ll break up the projecttypically one side of the house at a time.
This helps you keep a wet edge, manage drying times, and avoid the classic DIY trap: “I started everywhere and finished nowhere.”
Step 2: Protect everything you don’t want painted (which is… most things)
Mask windows, light fixtures, door hardware, and electrical boxes. Cover plants with breathable fabric or move potted items away from the wall.
If you’re spraying, assume overspray can travel farther than your optimism and mask accordingly.
Step 3: Think about lead safety (especially on older homes)
If your home was built before 1978, there’s a real possibility of lead-based paint somewhere in the existing coatings.
If you’ll be scraping or sanding old paint, use lead-safe methods: minimize dust, wet-scrape where appropriate, contain debris, and consider professional testing.
If in doubt, treat the prep like it could create hazardous dustbecause that’s a much better vibe than “surprise.”
Step 4: Clean thoroughly and remove chalking
This is the step that makes or breaks aluminum siding paint jobs. Oxidation looks like a powdery film and feels chalky to the touch.
Paint does not bond well to chalk; it bonds to what’s under the chalk. So your goal is to remove it, not paint over it like it’s a skincare primer.
A practical cleaning method:
- Wet the siding from top to bottom (yes, top to bottomstreaks are real).
- Scrub with a cleaner (many DIYers use TSP substitutes mixed with waterfollow the label and wear gloves/eye protection).
- Pay extra attention under eaves and near dryer vents where grime builds up.
- Rinse extremely well. Cleaner residue can interfere with adhesion.
You’ll know you’re getting somewhere when you can rub your hand across the surface and it no longer leaves a dusty film.
If it still chalks your palm like you just high-fived a sidewalk, keep washing and scrubbing.
Step 5: Remove loose paint and feather edges
After the siding dries, scrape any peeling or flaking paint until you reach firmly bonded edges.
Then feather the transition with a sanding sponge so you don’t leave a sharp ridge that telegraphs through the new finish.
You’re not trying to sand the entire house down to bare metalyou’re trying to create a smooth, stable base.
If you find bare aluminum, that area should be cleaned and primed properly.
If you find rust, you likely have a mixed-metal issue (fasteners, trim, or steel components). Remove rust as best you can and use a primer suitable for that metal.
Step 6: Make small repairs and seal gaps
Replace damaged pieces if needed. Tighten loose sections. Caulk small gaps around trim, windows, and penetrations where water could get behind the siding.
Use an exterior-rated, paintable caulkand don’t caulk the bottom edge of siding profiles where they need to drain.
The goal is to block water intrusion, not build a water trap.
Step 7: Prime for adhesion (don’t skip this if the surface is questionable)
Aluminum siding can present adhesion problems, especially if the surface is oxidized, glossy, or has old coatings of unknown type.
A high-adhesion acrylic bonding primer or DTM acrylic primer helps the topcoat grip and improves long-term durability.
Prime these situations every time:
- Bare aluminum spots
- Heavily sanded areas
- Chalky surfaces that needed aggressive cleaning
- Areas with inconsistent old paint layers
Apply primer evenly and follow dry time and recoat windows on the label.
Rushing this step can cause the finish coat to fail even if the paint itself is excellent.
Step 8: Paint with a durable exterior 100% acrylic
For most aluminum siding repaints, a high-quality exterior 100% acrylic paint is the go-to choice because it’s flexible, durable, and handles weather well.
Plan on two coats for even color and a protective film thickness that lasts.
Brush/roller tips
- Work from top to bottom.
- Maintain a wet edge to avoid lap marks.
- Use a low-luster or satin sheen to help hide minor dents and surface texture.
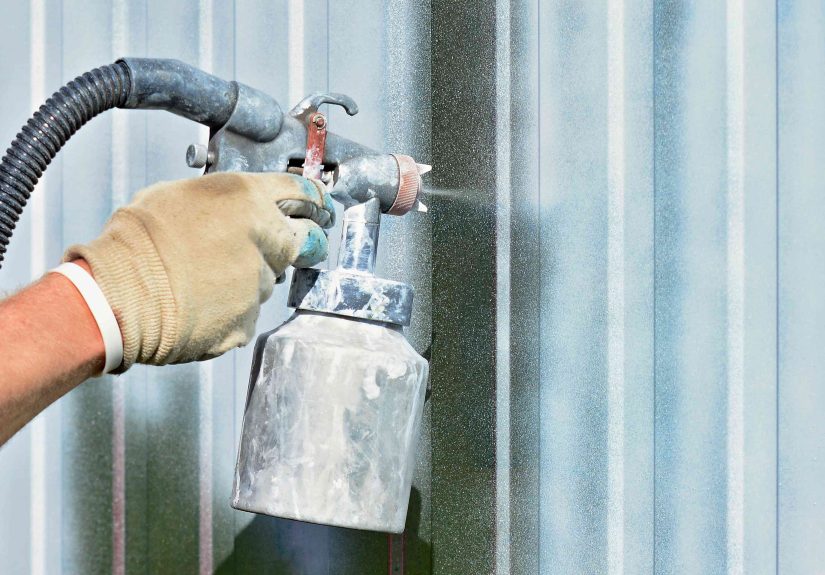
Sprayer tips (fast, smooth, and dangerously good at making a mess)
- Mask thoroughlywindows, soffits, trim, walkways, cars, grills, the universe.
- Use steady passes and consistent distance; don’t “whip” the gun at the ends.
- Apply thin, even coats rather than trying to cover in one heavy pass.
- If you’re spraying, some painters “back-brush” or “back-roll” to work material into texture and even out coverage, depending on the profile and condition.
Let the first coat dry per the label before recoating. If you push recoat times because “it feels dry,” you can trap moisture and soften the film.
Paint is patient. Be like paint.
Step 9: Cure, clean up, and do a final walkthrough
“Dry” and “cured” are not the same thing. Dry means it’s not tacky; cured means it has developed its intended hardness and durability.
Avoid aggressive washing right away and be careful with landscaping that rubs the surface.
After cleanup, do a slow lap around the house and touch up thin spots while everything is still fresh in your mind.
Choosing Color and Sheen (So You Don’t Accidentally Highlight Every Dent)
Aluminum siding often has subtle waviness and small dents from decades of weather, lawn equipment, and whatever happened in 2009.
Dark colors can look modern and dramatic, but they may also emphasize surface imperfections and absorb more heat.
Lighter or mid-tone colors are generally more forgiving. Satin or low-luster finishes are popular because they balance washability and “hiding power.”
Common Mistakes That Cause Peeling (or Regret)
- Painting over chalk: The new coat sticks to the powder, not the siding. Then the powder lets go.
- Skipping primer on bare or oxidized areas: Adhesion failures usually start there.
- Painting in direct hot sun: Flash drying leads to lap marks and weak bonding.
- Not rinsing cleaner thoroughly: Residue can interfere with adhesion.
- Ignoring dew/humidity: Moisture can ruin a finish overnight.
- Under-masking when spraying: Overspray is forever (or at least until you repaint everything).
Maintenance: How to Keep It Looking Good
- Rinse siding seasonally to remove dirt and pollen buildup.
- Trim shrubs so they don’t rub the paint film.
- Touch up chips quickly so water can’t creep behind the coating.
- Check caulked joints every year or two and repair as needed.
FAQ
Do I have to use a primer?
If your siding is in perfect shape with firmly bonded paint and zero chalking, you might get away without full priming.
But aluminum is notorious for adhesion challenges, and primer is cheap insurance compared to repainting.
At minimum, spot-prime bare aluminum and any aggressively prepped areas.
What’s the best paint type for aluminum siding?
A high-quality exterior 100% acrylic paint is commonly recommended for durability and flexibility on siding.
Pair it with the right primer for your substrate condition.
Should I brush, roll, or spray?
Spraying is fastest and can look very smooth, but it demands excellent masking and technique.
Brushing and rolling are slower but often simpler for DIYers and reduce overspray risk.
Many successful projects use a hybrid approach: spray broad areas and brush details.
How much does it cost to paint aluminum siding?
Costs vary widely by region, home size, prep needs, and whether you hire a pro.
DIY costs are typically driven by materials (primer, paint, masking) and equipment (sprayer rental/purchase).
Professional quotes often reflect the labor-intensive prep work that makes the finish last.
Experience Section: Lessons You Only Learn Mid-Project (About )
If you ask ten people how their aluminum siding paint job went, nine will say, “It looks amazing… now,” and the tenth will stare into the distance and whisper,
“I didn’t wash it enough.” That’s not a jokeokay, it’s a little funnybut it’s also the most common real-world reason aluminum paint fails.
Aluminum oxidation can be sneaky: the siding looks clean from the street, but the moment you start scrubbing, your rinse water turns milky and your brush looks like it fought a powdered donut.
The only reliable test is the hand swipe. If your palm comes away chalky, the siding isn’t ready. People want to move on because cleaning feels like “not painting,”
but cleaning is the part that decides whether your finish lasts two years or ten.
Another surprise is how much weather matters even when the forecast looks friendly. A day that starts cool and dry can turn into a high-sun, high-surface-temperature situation by noon.
That’s when lap marks happen: the paint starts drying before you can blend edges, so the overlap lines become visible like rings in a tree.
Many DIYers find their rhythm by painting one “lane” at a timetop to bottomstaying in the shade, and rotating around the house as the sun moves.
It feels a little like chasing a slow, polite monster around your yard, but it works.
Then there’s masking. Everyone underestimates masking until they’ve spent 40 minutes picking tiny paint freckles off a window with a razor blade.
If you’re spraying, plan your masking like you’re preparing for a small hurricane made of colored mist.
Cover what’s near, what’s adjacent, and what you think is “probably fine.” Wind disagrees with “probably.”
And if you’re tempted to skip covering shrubs because “it’s just a little overspray,” remember: plants do not enjoy being lightly seasoned with acrylic.
Primer also teaches a hard lesson: it’s not just an extra step, it’s a translator. Aluminum and old coatings speak one language; your shiny new topcoat speaks another.
Bonding/DTM primers get them to cooperate. The practical benefit you notice is that your finish coat lays down more evenly and feels more secure,
especially on areas that were chalky, sanded, or patched.
Finally, most people learn that the last 10% of the job takes 30% of the time. Cutting in around doors, feathering touch-ups, hunting for thin spots at dusk
that’s where patience pays off. A great paint job isn’t just about color; it’s about consistency.
When you slow down for the final walkthrough, you catch the little misses that would otherwise become the only thing you can see every time you pull into the driveway.
And yes, you will see them. Forever. Because that’s how brains work.
Conclusion
Painting aluminum siding is a classic “do it once, do it right” project.
Spend your effort on cleaning and surface prep, use an adhesion-friendly primer where needed, and finish with two coats of quality exterior acrylic paint under good weather conditions.
Do that, and your home gets a fresh look without the cost of replacementplus the deeply satisfying feeling of winning an argument against oxidation.