Table of Contents >> Show >> Hide
- Before You Start: A 2-Minute Reality Check
- The 14 Steps to Plant a Tree (So It Lives to Brag About It)
- Step 1: Pick the right tree for your region (and your patience level)
- Step 2: Match the tree to the space it will occupy as an adult
- Step 3: Choose the best planting time (your tree likes cool weather)
- Step 4: Call 811 before you dig (yes, even for a tree)
- Step 5: Water the tree while it’s still in the pot (and handle it correctly)
- Step 6: Find the root flare (a.k.a. the “this part should NOT be buried” zone)
- Step 7: Measure the root ball so you know how deep to dig
- Step 8: Dig the hole wide, not deep
- Step 9: Rough up the sides of the hole
- Step 10: Set the tree in the hole and check the height (twice)
- Step 11: Remove the container and correct circling roots
- Step 12: Backfill with native soil (skip the “fancy soil sandwich”)
- Step 13: Water in thoroughly and build a watering berm if needed
- Step 14: Mulch correctly, stake only if necessary, and protect the trunk
- Aftercare: The First Year Is the Whole Game
- Common Tree-Planting Mistakes (Quick Fix Guide)
- Troubleshooting: Signs Your Tree Is Stressed (and What to Do)
- Experiences and Lessons People Learn After Planting Trees (The “Ohhhh” Section)
- Conclusion
Planting a tree sounds simpledig hole, insert tree, walk away like a nature hero. But trees are the ultimate long-game investment:
they remember everything. Plant them too deep, smother the trunk in mulch, or forget to water for three weeks, and they’ll quietly
hold a grudge (by not growing).
This guide walks you through how to plant a tree the right way, using the same best practices taught by
foresters, arborists, and university extension programs across the U.S. You’ll learn how to size the hole, find the
root flare, avoid classic mistakes like the dreaded “mulch volcano,” and set a realistic
watering schedule for new trees.
Before You Start: A 2-Minute Reality Check
- Small trees establish faster. A younger tree often outgrows a larger one because it adapts quicker.
- Most failures are planting-depth failures. Too deep = too wet, too little oxygen, too much stress.
- The first year is the whole game. Planting day matters, but consistent aftercare matters more.
The 14 Steps to Plant a Tree (So It Lives to Brag About It)
Step 1: Pick the right tree for your region (and your patience level)
Start with what actually thrives where you liveyour climate, rainfall, and typical pests. If your area gets brutal summer heat,
choose heat- and drought-tolerant options. If you’re in a windy spot, pick a species known for sturdy branch structure.Bonus sanity tip: choose a tree that matches your maintenance style. Some trees are “plant me and forget me.” Others are more
like adopting a leafy toddler.Step 2: Match the tree to the space it will occupy as an adult
Trees don’t stay the size they were at the garden center. Check mature height and spread, then look up and around:
overhead wires, rooflines, sidewalks, septic areas, driveways, and visibility near roads.A good rule: if you’re planting for shade near a house, plan placement so the mature canopy shades the structure
without becoming a roof-scratching menace.Step 3: Choose the best planting time (your tree likes cool weather)
In much of the U.S., the easiest establishment happens in fall or early spring because temperatures are mild
and roots can grow before extreme heat arrives. Summer planting isn’t impossible, but it demands more watering discipline.If the ground is frozen or waterlogged, wait. Trees want moist soilnot soup.
Step 4: Call 811 before you dig (yes, even for a tree)
Before you put a shovel in the ground, contact 811 to have underground utilities marked. Planting trees counts as digging,
and it’s one of the most common ways people accidentally meet a cable line the hard way.Build this into your timeline. A few business days of planning beats a lifetime of “remember when we took out the internet.”
Step 5: Water the tree while it’s still in the pot (and handle it correctly)
A dry root ball is hard to re-wet once planted, especially in hot or windy conditions. Give the tree a deep soak before planting.
When moving it, lift by the container or root ballnot the trunk (trees hate being dragged like luggage).Keep roots shaded and protected if you’re working slowly. Roots exposed to sun and wind dry out fast.
Step 6: Find the root flare (a.k.a. the “this part should NOT be buried” zone)
The root flare (also called the root collar) is where the trunk widens and transitions into the root system.
It should end up at or slightly above the finished soil level.Many nursery trees have extra soil piled over the flare. Gently remove excess soil from the top of the root ball until you can
see where the trunk starts to flare and the first substantial roots begin.Step 7: Measure the root ball so you know how deep to dig
Here’s the trick: you don’t dig based on the container heightyou dig based on the distance from the bottom of the root ball to
the root flare/topmost major root.Planting hole depth should match that measurement (or be slightly shallower), so the flare sits at/above grade after settling.
Too deep is a common “why is my tree struggling?” moment.Step 8: Dig the hole wide, not deep
Dig a hole about 2–3 times the width of the root ball, but no deeper than needed. Wide holes loosen surrounding
soil so new roots can expand outward.If your soil is heavy clay, “wide” matters even more. In sandy soil, wide still helps, but water management becomes the bigger challenge.
Step 9: Rough up the sides of the hole
Smooth, glazed sides (common in clay) can act like a pot in the ground and slow root penetration. Scratch the sides with a shovel
to create texture. The goal is inviting soil, not a ceramic bowl.If you used an auger, double-check depthaugers are notorious for digging too deep and compacting edges.
Step 10: Set the tree in the hole and check the height (twice)
Place the tree so the root flare is at or slightly above grade. Step back and look from multiple angles.
It’s easier to fix height now than after you backfill.Rotate the tree to position its best side facing the primary viewpoint (front door, patio, street). Trees don’t mind being photogenic.
Step 11: Remove the container and correct circling roots
Slide the tree out of its pot. If roots are circling tightly, gently tease them outward. For severely root-bound trees, you may need
to slice or “box” the outer root mat so new roots grow outward instead of continuing the circle-of-life… around the trunk.If the tree is balled-and-burlapped, remove or fold back as much burlap as possible from the top and sides, and remove wire or rope
that could constrict the trunk or roots over time.Step 12: Backfill with native soil (skip the “fancy soil sandwich”)
Use the soil you dug outbreak up large clods, remove big rocks, and backfill in layers, lightly firming to remove major air pockets.
Avoid packing it like you’re building a brick wall.It’s tempting to add lots of compost or amendments, but over-amending can encourage roots to stay in the “good stuff” instead of exploring
native soil. Your goal is a tree that can fend for itself.Step 13: Water in thoroughly and build a watering berm if needed
Water slowly right after backfilling to settle soil around roots. If your site slopes or your soil sheds water, form a low berm
(a shallow ring of soil) just outside the root ball to help water soak in instead of running off.You’re aiming for deep moisturenot a quick splash that only wets the surface.
Step 14: Mulch correctly, stake only if necessary, and protect the trunk
Apply 2–4 inches of organic mulch in a wide ring over the disturbed soil, keeping mulch at least a few inches away
from the trunk. You want a mulch donut, not a mulch volcano.Stake only if the tree truly needs it (windy sites, top-heavy canopies, loose root balls). If you stake, use soft ties that won’t rub,
allow slight movement, and plan to remove stakes within about a year (or sooner if the tree stands firm).Add trunk guards if you have deer, rabbits, string trimmers, or lawnmowers roaming like tiny vandals.
Aftercare: The First Year Is the Whole Game
Watering schedule for new trees (a practical baseline)
New trees need consistent moisture while roots expand into surrounding soil. Exact frequency depends on weather and soil type,
but these intervals are a solid starting point:
- Weeks 1–2: water daily (especially in warm, dry, or windy conditions).
- Weeks 3–12: water every 2–3 days.
- After 12 weeks (through the first growing season): water weekly, adjusting for rainfall and heat.
How much? Many pros use rules of thumb such as about 10 gallons per inch of trunk diameter per watering for young trees,
or smaller “gallons per diameter inch” guidelines for the first year. If you prefer a simpler method: water slowly until the root ball
and surrounding soil are moist several inches down, then stop before the site becomes soggy.
Mulch and weed control (and why your mower is the enemy)
Mulch moderates soil temperature, reduces moisture loss, and helps keep weeds from stealing water. Keep the mulch ring widewider than you think.
Also keep it off the trunk. Bark pressed against damp mulch can invite rot, pests, and disease.
The mulch ring also creates a visual “no-fly zone” for string trimmers and mowers. Trunk injuries from yard equipment are a surprisingly common
reason young trees struggle.
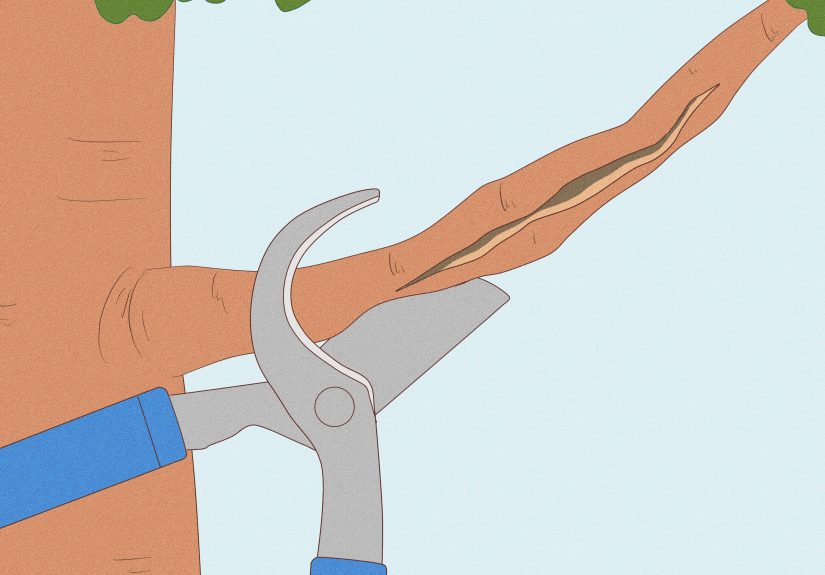
Pruning: less is more at planting time
At planting, remove only broken, dead, or clearly damaged branches. Heavy pruning can slow establishment because the tree needs leaves
to fuel root growth. Structural pruning is better done after the tree begins to settle in.
Staking: a temporary tool, not a permanent accessory
If your tree can stand on its own, skip staking. Movement encourages stronger trunk development. If you do stake, check ties regularly and remove
them on schedule so they don’t girdle the trunk.
Common Tree-Planting Mistakes (Quick Fix Guide)
- Planted too deep: expose the root flare if possible; in severe cases, replant at proper depth.
- Mulch against the trunk: pull it back to create a clear gap around bark.
- Roots circling in a pot shape: correct at planting time by teasing/cutting outward-facing root growth.
- Inconsistent watering: set reminders; deep watering beats frequent tiny sips.
- Leaving nursery stake on: remove it at planting; it’s for transport, not for long-term support.
Troubleshooting: Signs Your Tree Is Stressed (and What to Do)
Wilting leaves or crispy edges
Often underwatering, hot wind, or root ball drying out. Increase deep watering frequency and check soil moisture beneath the surface.
Mulch helps, but only if it’s not touching the trunk.
Yellow leaves
Could be overwatering (roots need oxygen), poor drainage, or nutrient issues. Check whether water is pooling or soil stays saturated.
Improve drainage if needed and avoid excessive fertilizing in the first year unless a soil test suggests it.
Little growth the first season
Normal. Many trees focus on root establishment first. If the tree looks generally healthy, patience is not only a virtueit’s the assignment.
Experiences and Lessons People Learn After Planting Trees (The “Ohhhh” Section)
People who plant trees regularly tend to collect the same hard-won wisdomusually after one or two “learning trees” (the ones that teach you
what not to do). The first big lesson is that planting depth is destiny. Many folks start by trusting the soil line in the nursery pot.
Later, they discover the root flare was buried under extra soil, and the tree spent months acting like it had a damp sweater pulled over its head.
Gardeners who correct the flare early often notice the tree looks perkier, dries out more normally between waterings, and becomes sturdier faster.
Another common experience: watering is more complicated than “it rained once”. New trees can dry out even when lawns look green,
because turf is shallow-rooted and quick to recover, while a transplanted root ball can repel water if it gets too dry. Many experienced planters
switch to slow watering methodslike a hose at a trickle, a soaker hose loop, or a watering bagbecause it’s easier to soak deeply without runoff.
They also learn to adjust for soil type: clay holds water longer (so overwatering is a risk), while sandy soils may need smaller, more frequent
deep soaks so water doesn’t drain past the root zone too quickly.
Then there’s the moment almost everyone has: discovering the mulch volcano in their own yard or neighborhood. It usually comes from
good intentionsmulch looks tidy, and more mulch must mean more protection, right? But experienced tree people start treating mulch like sunscreen:
helpful at the right thickness, harmful if you slather it where it doesn’t belong. Once they see how much better a tree does with a broad,
shallow mulch ring (and bare bark at the base), they rarely go back.
Staking creates its own set of stories. Many first-timers stake a tree “just in case,” then forget about it. Later, they find ties rubbing the bark
or stakes still standing long after the tree could have supported itself. People who’ve been burned by that tend to stake only when necessary
and put a calendar reminder on stake removal. They also notice that trees allowed a bit of movement often develop stronger trunkslike nature’s
version of strength training.
Finally, there’s the emotional lesson: trees reward consistency, not drama. It’s rarely one big heroic watering that saves a treeit’s the steady,
boring rhythm of checking moisture, keeping mulch in place, and protecting the trunk from lawn equipment and wildlife. The best “experience” many
planters report isn’t a dramatic growth spurt; it’s the quiet satisfaction of seeing buds break the next spring and realizing, “Okay… you live here now.”
Conclusion
If you remember only three things: find the root flare, dig wide (not deep), and water consistently for the first year.
Do that, and your tree has an excellent chance of becoming the kind of long-term yard upgrade you’ll brag aboutwithout the “weird mystery decline”
subplot.