Table of Contents >> Show >> Hide
- Why Collard Greens Deserve a Spot in Your Garden
- When and Where to Plant Collard Greens
- Preparing the Soil for Collard Greens
- How to Plant Collard Greens
- Watering, Fertilizing, and Ongoing Care
- Common Pests and Problems (and How to Fix Them)
- Harvesting and Storing Collard Greens
- Great Collard Varieties to Try
- Growing Collard Greens in Containers or Small Spaces
- Real-Life Tips & Experiences for Growing Collard Greens
If you’ve ever dug into a pot of silky collard greens and thought, “I should really grow these myself,” your garden is about to get a delicious upgrade. Collard greens are one of the easiest cool-season vegetables to grow, and they reward even beginner gardeners with big, leafy harvests for months. With the right timing, soil prep, and a little pest patrol, you can have homegrown collards that taste better than anything from the store.
Why Collard Greens Deserve a Spot in Your Garden
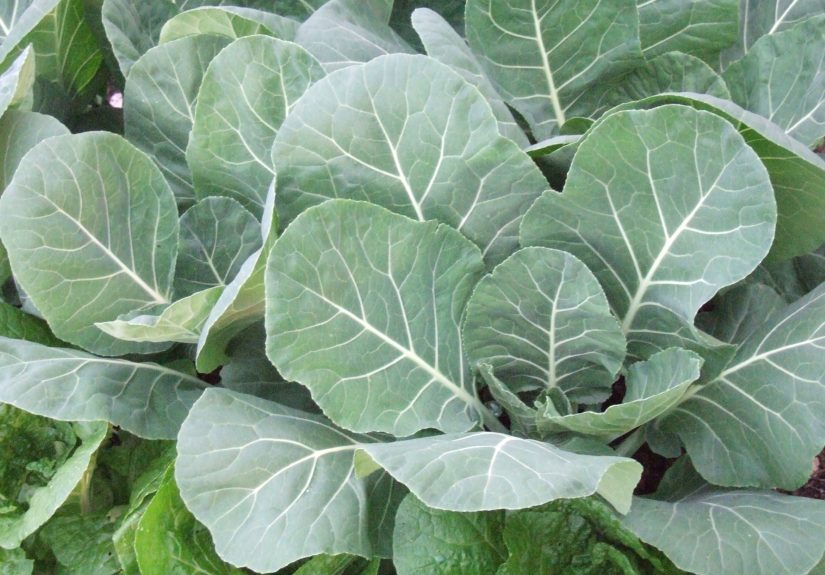
Collard greens (Brassica oleracea var. viridis) are part of the brassica or “cole crop” family, alongside cabbage, kale, broccoli, and Brussels sprouts. They’re grown mainly for their large, sturdy leaves, which are perfect for slow braises, quick sautés, and nutrient-packed soups.
They’re also nutritional powerhouses: rich in vitamins A, C, and K, and a good source of calcium, fiber, and antioxidants. On top of that, collards are very cold-hardy. In many regions, the plants shrug off light freezes and actually taste sweeter after a frost as the starches in the leaves convert to sugars.
In short: easy to grow, ridiculously healthy, and tastycollard greens check a lot of boxes for home gardeners.
When and Where to Plant Collard Greens
Best Climate and Timing
Collard greens are classic cool-season vegetables. They grow best in temperatures between about 55°F and 75°F, and they tolerate light to moderate frosts without complaint. In many areas, you can grow them both in spring and fall, with fall crops typically having the best flavor.
- Spring planting: Start seeds indoors 4–6 weeks before your last expected spring frost, or sow outdoors 2–4 weeks before the last frost once the soil can be worked.
- Fall planting: Sow seeds 6–8 weeks before your first expected fall frost. In warm regions (USDA Zones 8–10), collards can grow through fall and winter.
- Frost is your friend: Don’t worry if a cold snap hits. Those frosty nights often result in sweeter, more tender leaves.
Choosing the Right Spot
Collard greens love sun and rich soil. For the best harvest, choose a site that gets at least 6 hours of direct sun per day. In very hot climates, a bit of afternoon shade can help prevent heat stress and bolting (flowering too early).
Like most brassicas, collards prefer well-drained, loamy soil with a slightly acidic to neutral pH, roughly 6.0–7.0. Adding plenty of compost or well-rotted manure improves soil structure and provides the organic matter these leafy plants crave.
Rotate your crops when you can. Avoid planting collards where other brassicas (kale, cabbage, broccoli, etc.) grew in the last 2–3 years to reduce disease and insect pressure.
Preparing the Soil for Collard Greens
Good soil prep is the secret behind huge, healthy collard leaves.
- Test and adjust pH (if possible): If your soil test shows a pH below 6.0, add garden lime according to the test recommendations. If it’s above 7.5, incorporate sulfur or plenty of acidic organic matter like pine bark or leaf mold over time.
- Add organic matter: Work in 2–4 inches of compost or well-rotted manure over the top 8–10 inches of soil. This boosts nutrients, drainage, and water-holding capacity.
- Use a balanced base fertilizer: Many extension services recommend a general fertilizer such as 10-10-10 at planting timeabout 2–3 pounds per 100 square feetfollowed by nitrogen side-dressings to keep the leaves growing strong.
- Rake smooth: Remove rocks and large clumps. The goal is a loose, fine seedbed where tiny seeds can make good contact with the soil.
How to Plant Collard Greens
Planting from Seed
Collard seeds are small but tough. You can start them indoors in cell packs or sow them directly outdoors.
- Planting depth: Sow seeds about 1/4 inch deep.
- Row spacing: Space rows 24–36 inches apart to give mature plants room to spread.
- In-row spacing: Sow seeds 1–2 inches apart in the row, then thin seedlings to 12–18 inches apart once they have a few true leaves. Eat the thinnings as “baby collards.”
- Soil temperature: Seeds germinate best when soil is at least 45°F, but you’ll get faster germination around 60–75°F.
If you want earlier or more predictable harvests, start seeds indoors 4–6 weeks before transplant time, then set out sturdy seedlings when outdoor conditions are right.
Planting Transplants
Using nursery starts or your own seedlings is a great way to jump-start the season.
- Choose stocky, dark green seedlings with no yellowed leaves or flowers.
- Plant them at the same depth they were growing in their pots.
- Space plants 12–18 inches apart in rows 24–36 inches apart.
- Firm the soil gently around the roots and water thoroughly to settle them in.
If a spring cold snap is forecast, cover new transplants with row cover or an overturned bucket overnight to prevent damage.
Watering, Fertilizing, and Ongoing Care
Watering
Collard greens need consistent moisture for tender, non-bitter leaves. Aim for about 1–1.5 inches of water per week from rainfall and irrigation combined.
- Use a rain gauge to track how much water your garden is getting.
- Water deeply and less often rather than sprinkling lightly every day. Deep watering encourages deeper root growth.
- Mulch around plants with straw, shredded leaves, or grass clippings to conserve moisture and keep soil temperatures more even.
Fertilizing
Because you’re harvesting leaves, collards respond especially well to nitrogen-rich fertilizers.
- Side-dress with nitrogen: About 3–4 weeks after planting, apply a nitrogen source such as calcium nitrate or blood meal alongside the rows, then water it in. Repeat again 3–4 weeks later if plants look pale or growth slows.
- Go organic if you prefer: Compost, fish emulsion, or alfalfa meal are good options for slow, steady feeding.
- Avoid overdoing it: Too much nitrogen can create lush leaves that are more attractive to pests and may flop over.
Weeding and Mulching
Collard greens don’t like to compete with weeds for nutrients and water. Hand-weed around plants while they’re small, then let mulch do most of the future weed control. Just keep mulch pulled back an inch or two from the stems to prevent rot.
Common Pests and Problems (and How to Fix Them)
If collard greens have a flaw, it’s that every insect in the neighborhood seems to think you planted them as an all-you-can-eat salad bar. The good news: most issues are manageable with simple, low-toxicity strategies.
Insect Pests
- Cabbage worms and loopers: These green caterpillars chew holes in leaves and leave behind dark droppings. They’re often the larvae of small white moths you’ll see fluttering around your plants.
- Aphids: Tiny sucking insects that cluster on new growth and undersides of leaves, causing curling or sticky honeydew residue.
- Flea beetles and harlequin bugs: These can create shot-hole damage or large patches of yellowing and wilting.
To manage pests:
- Inspect plants regularly and handpick caterpillars.
- Use lightweight row covers to keep moths from laying eggs on your plants.
- Spray a strong jet of water to knock off aphids, or use insecticidal soap if infestations are heavy.
- Encourage beneficial insects by planting flowers like alyssum, dill, or yarrow nearby.
Diseases
Collards are generally tough, but they can be affected by diseases such as downy mildew, black rot, or clubroot.
- Practice crop rotation: avoid planting brassicas in the same spot year after year.
- Water at the soil line instead of overhead to keep foliage drier.
- Space plants properly so air can circulate between them.
- Remove and discard (don’t compost) heavily diseased plants.
Harvesting and Storing Collard Greens
When to Harvest
Depending on the variety and growing conditions, collard greens are typically ready for harvest 60–80 days after seeding, or a bit sooner from transplants. Most gardeners use a “cut-and-come-again” approach:
- Begin harvesting when leaves reach about 8–12 inches long.
- Always pick from the bottom of the plant first, leaving the central growing tip intact so new leaves can keep emerging.
- You can harvest individual leaves as needed or take several from each plant for a larger batch.
For the most tender texture and best flavor, harvest early in the morning when leaves are crisp and hydrated. After a frost, expect a noticeable sweetness boostmany gardeners plan their big collard harvests around the first few cold nights.
Storing Your Collard Greens
Once harvested, collard leaves should be cooled quickly. Rinse them, shake off excess water, and store them in a breathable bag or container in the refrigerator’s crisper drawer. Under good conditions, fresh collard greens can last up to about two weeks.
If you grow more than you can eat fresh (a common “problem”), blanch and freeze leaves in recipe-sized portions to enjoy them long after the garden has gone to sleep.
Great Collard Varieties to Try
Seed catalogs offer a wide range of collard varieties, so you can choose types that match your climate and taste preferences.
- ‘Georgia Southern’: A classic heirloom with large, smooth, blue-green leaves, good heat tolerance, and excellent flavor.
- ‘Morris Heading’: Produces somewhat tighter, cabbage-like heads of leaves while still offering that classic collard taste.
- ‘Champion’ or ‘Vates’: Compact, slow-bolting cultivars often recommended for areas with temperature swings or shorter seasons.
Feel free to experimentplant a few varieties side by side and see which ones you like best in both the garden and the kitchen.
Growing Collard Greens in Containers or Small Spaces
No big backyard? Collards are surprisingly container-friendly.
- Use a pot at least 12–14 inches wide and deep for each plant.
- Fill with high-quality potting mix enriched with compost.
- Water more frequently than in-ground plants (containers dry out faster).
- Fertilize lightly but regularly, since nutrients leach out of pots with each watering.
On a balcony or patio, a single lush collard plant can function as both vertical décor and a ready-to-pick salad bar.
Real-Life Tips & Experiences for Growing Collard Greens
Once you’ve grown collard greens a season or two, you start collecting little “secrets” that never quite make it into the basic how-to guides. Here are some experience-based tips that can help your patch thrive and keep you supplied with greens for months.
1. Start Smaller Than You ThinkThen Scale Up
Many new gardeners enthusiastically plant a long row of collards and then realize they have way more greens than their household can handle. A single healthy plant can easily feed a couple of people throughout the season when you harvest leaves regularly. Start with just a few plants, see how often you cook with them, and expand in future seasons if you find yourself wishing for more.
2. Baby Leaves vs. Full-Size Leaves
Collards are famous for slow-cooked, full-size leaves, but baby collard leaves are a hidden gem. If you thin seedlings or harvest when leaves are just 3–5 inches long, you’ll get a surprisingly tender, mild “baby green” that works beautifully in salads and stir-fries. Many gardeners grow one bed for full-size leaves and another where they intentionally keep plants closer together and harvest small, frequently.
3. Don’t Fear the Winter Garden
In much of the United States, collards are one of the last vegetables standing when cold weather sets in. If your ground doesn’t freeze solid, try planting a fall crop and leaving it in place with a thick mulch. You might be able to harvest leaves well into winter, especially if you toss a simple row cover or low hoop tunnel over the plants during the coldest nights. There’s something magical about stepping outside on a chilly day and coming back in with a bundle of fresh greens.
4. Watch the Moths, Not Just the Leaves
Most gardeners learn about cabbage worms only after they notice shredded leaves. A helpful habit is to watch for the small white butterflies or moths fluttering above your collard patch. When you see them, you know caterpillars are coming soon. Cover plants with row cover, or be extra vigilant about checking leaf undersides and handpicking tiny green caterpillars before they grow big and hungry.
5. Use Collards as a Learning Crop
Because collard greens are forgiving and fast-growing, they make an excellent “practice crop” for learning core garden skills: timing, fertilizing, pest scouting, and succession planting. If you’re new to vegetable gardening, think of collards as your training wheels. Once you’ve successfully grown a couple of rounds of collards, you’ll find it much easier to tackle other cool-season veggies like broccoli, cabbage, and kale.
6. Think Beyond the Traditional Recipes
Yes, slow-simmered collard greens with smoked meat or aromatics are a classic for a reasonbut don’t stop there. Homegrown collards are tender enough to shine in quick sautés with garlic and olive oil, chopped into soups, added to grain bowls, or used as sturdy wraps in place of tortillas. Many gardeners find that once they experiment in the kitchen, they start planting extra collards specifically for their favorite dishes.
7. Keep a “Greens Notebook”
If you’re serious about improving your collard-growing game each season, jot down notes. Record which varieties you grew, when you planted them, how pests behaved, and any weather extremes. Next year, those scribbles will help you decide whether to plant earlier, choose a more bolt-resistant variety, or adjust how often you fertilize. Over time, you’ll build a personalized playbook for how to plant and grow collard greens in your exact climate and garden.
With a bit of planning and a willingness to experiment, collard greens can become one of the most reliable, productive, and delicious crops in your garden. From that first tiny seed to a towering, leafy plant, they’re a reminder that simple vegetables can bring huge rewards.