Table of Contents >> Show >> Hide
- Getting to Know Your Christmas Cactus
- Step One: Prepping Your Plant and Tools
- Method 1: How to Propagate Christmas Cactus in Soil
- Method 2: How to Propagate Christmas Cactus in Water
- Aftercare for Newly Rooted Christmas Cactus
- Troubleshooting Common Propagation Problems
- Fun Ways to Use Your New Christmas Cactus Plants
- Real-World Experiences with Propagating Christmas Cactus
- Conclusion
Christmas cactus might just be the easiest houseplant to turn into free gifts.
Once you learn how to propagate Christmas cactus from a few small segments,
you can turn one plant into a whole holiday squad of blooming beautieswithout
spending another dime at the garden center.
In this guide, we’ll walk through two proven methods to propagate Christmas cactus:
rooting cuttings in soil and rooting cuttings in water. Both are simple, beginner friendly, and
based on what horticulture experts and university extension services recommend for holiday cacti.
By the end, you’ll know exactly when to take cuttings, how to prep them, what they should look
like while they’re rooting, and how to keep those new plants thriving for years to come.
Getting to Know Your Christmas Cactus
Despite the name, a Christmas cactus isn’t a spiky desert cactus. It’s a
tropical epiphyte (genus Schlumbergera) that naturally grows in the
crooks of trees in Brazil’s rainforests. Instead of blazing sun and bone-dry soil, it prefers:
- Bright, indirect light (no harsh midday sun on those flat segments).
- Moderate temperatures, usually around 60–70°F (15–21°C).
- Higher humidity than most true cacti enjoy.
All of this matters when you propagate. You’re trying to convince a small piece of plant tissue
to grow roots, so you want conditions that are comfortable, not extreme.
The Best Time to Propagate Christmas Cactus
You can technically propagate any time the plant is healthy, but the
ideal time is late spring through summer, after the blooming season is fully over.
During this period the plant is in active growth, which helps cuttings root more quickly and recover more easily.
Avoid taking cuttings when the plant is actively setting buds or in full bloom. That’s like asking it to
run a marathon and knit a sweater at the same timepossible, but rude.
Step One: Prepping Your Plant and Tools
Choose a Healthy “Mother” Plant
Good propagation starts with good genetics. Pick a Christmas cactus that:
- Has plump, firm segments with no shriveling.
- Shows no signs of rot, mushiness, or blackened areas at the joints.
- Is free from pests like mealybugs or scale.
If your plant is stressed (drooping, turning red from too much light, or overwatered),
you can still save it by taking a few healthy segments and propagating them, but expect rooting to be a little slower.
Gather Your Supplies
For both propagation methods, you’ll want:
- Clean, sharp scissors or pruning shears (or you can simply pinch by hand at the joints).
- Rubbing alcohol or soap and water to sanitize your tools.
- Small nursery pots or a shallow container with drainage holes.
- A well-draining potting mix (cactus/succulent mix, or regular potting soil mixed with perlite).
- Optional: rooting hormone powder (helpful, but not required).
How to Take Cuttings the Right Way
Christmas cactus segments connect at natural joints. That’s where new roots are most likely to form.
- Choose a stem with 2–5 segments that looks full and healthy.
- Hold the stem near a joint and gently twist or pinch so the segment snaps off cleanly,
or use sanitized scissors to cut at the joint. - Set the cuttings on a clean paper towel or tray and let the cut ends
dry and callus for 1–2 days. This helps prevent rot once they’re in soil or water.
The callus stage is important. If you skip it and stick freshly cut segments into soggy soil or deep water,
they’re more likely to rot than root.
Method 1: How to Propagate Christmas Cactus in Soil
Propagating in soil is the “classic” method that many gardeners prefer. It’s fast, tidy, and your cuttings never
have to adjust from water to soil later.
1. Mix the Right Potting Medium
Christmas cactus hates heavy, compacted soil. You want a mix that drains well but still holds some moisture:
- Use a cactus or succulent mix, or
- Blend about 2 parts high-quality potting soil with 1 part perlite or coarse sand.
Fill a small pot about three-quarters full and gently tap it to settle the mix. Make sure the pot has drainage holesno exceptions.
2. Plant the Cuttings
- Once the ends are callused, dip them in rooting hormone if you’re using it (tap off the excess).
- Insert each cutting so that at least one segment joint is buried about ½–1 inch deep.
- Firm the soil gently around each cutting so it stands upright. You can cluster several cuttings in one pot
for a fuller future plant.
Don’t pack the soil like you’re building a sandcastlejust enough pressure to hold the segments steady.
3. Water Sparingly (But Not Never)
Right after planting, lightly moisten the soil so it’s damp, not soggy. Then:
- Let the top 1–2 inches of soil dry before you water again.
- When in doubt, wait a dayoverwatering is the #1 way to lose cuttings.
A good rule of thumb while they’re rooting is to keep the mix barely moist, similar to a wrung-out sponge.
Roots typically form in about 4–8 weeks.
4. Give Them the Right Light and Temperature
Place your pot in:
- Bright, indirect light (east- or north-facing windows are great).
- Temperatures between 60–70°F.
Avoid direct afternoon sun that can scorch the fleshy segments. If your windows are intense,
sheer curtains work wonders.
5. How to Tell If Cuttings Have Rooted
After a few weeks, gently tug a cutting:
- If it slides out easily, it’s still thinking about it.
- If you feel resistance, roots have formed and are anchoring the plant.
Once a cutting is well rooted and showing new growth at the tips, you can gradually water more regularly
(still allowing the top of the soil to dry between waterings).
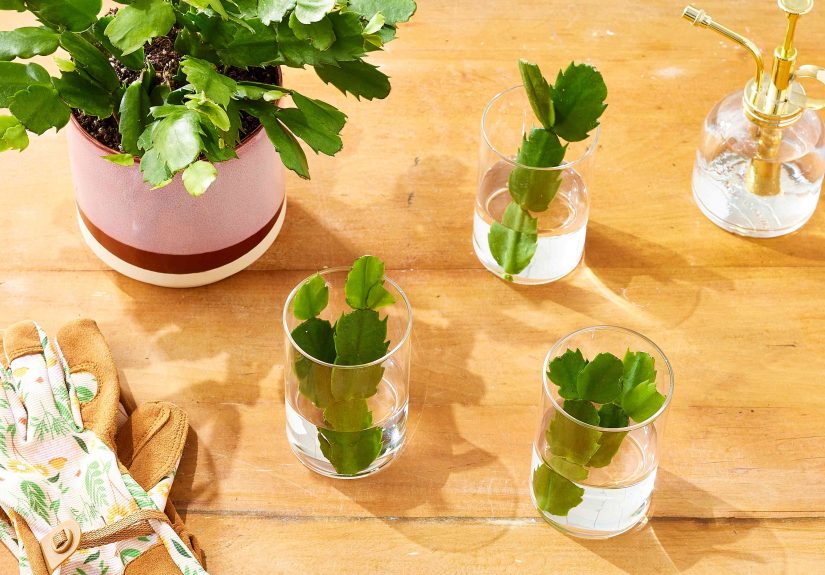
Method 2: How to Propagate Christmas Cactus in Water
Rooting Christmas cactus in water is popular because it’s fun to watch the roots develop.
It’s also a great method if you like to keep a close eye on what’s happening below the surface.
1. Choose the Right Container and Water Level
Use a small glass jar, vase, or even a shot glass for shorter segments. The key is:
- Fill with clean, room-temperature water.
- Only submerge the very bottom of the last segment (about ¼–½ inch).
If too much of the segment sits in water, it’s more likely to rot. Think “toe-dip” rather than “full bath.”
2. Let Cuttings Callus First
Just like with soil propagation, let your cut ends dry for 1–2 days before they touch water.
This helps seal the tissue and reduces infection risk.
3. Position Cuttings in Bright, Indirect Light
Set your jar in a warm, bright spot away from direct sun. Too much heat or direct sunlight will encourage algae in
the water and stress the cuttings.
4. Change the Water Regularly
To keep things fresh and oxygenated:
- Change the water every 3–5 days.
- Rinse the jar to remove any slime or algae.
Within a few weeks, you should begin to see small white roots emerging from the callused end.
Full, plant-ready root systems may take around 4–8 weeks, depending on temperature and light.
5. When and How to Pot Water-Rooted Cuttings
Once the roots are about 1–2 inches long, it’s time to move them to soil:
- Prepare a pot with the same well-draining mix you’d use for soil propagation.
- Make a small hole in the soil, gently place the rooted cutting in, and firm the soil around the roots.
- Water lightly to settle the soil, then follow the same care rules as for soil-rooted cuttings.
Expect a short adjustment period while the plant shifts from water roots to soil roots.
Some very fine roots may dry back and regrow, which is normal.
Aftercare for Newly Rooted Christmas Cactus
Light, Water, and Humidity
Once your new plants are established, treat them like mature Christmas cacti:
- Keep them in bright, indirect light. Too little light can make them leggy;
too much can turn segments red or cause scorching. - Water when the top inch of soil feels dry. Let excess water drain away completelynever leave the pot sitting in a saucer of water.
- If your home is very dry, use a pebble tray with water or keep plants in a more humid room like a kitchen or bathroom (as long as the light is good).
Fertilizing Young Plants
About a month after potting, during the growing season (spring through summer),
you can feed your Christmas cactus with a diluted balanced houseplant fertilizer once a month.
Avoid heavy feeding in fall when you want the plant to set flower budscooler temperatures and longer nights
are more important than fertilizer for bloom formation.
When Will New Plants Bloom?
New Christmas cactus plants don’t usually bloom immediately. Once they’ve put on some growth,
they’ll start following the same pattern as mature plants:
- They typically need about 6 weeks of shorter days and cooler temperatures in fall.
- They prefer nights a bit cooler than days and 12–14 hours of darkness to set buds.
If your propagated plant doesn’t bloom the first holiday season, don’t panic.
Healthy foliage now usually means flowers next year.
Troubleshooting Common Propagation Problems
Cuttings Are Mushy or Blackened
This usually means rot, often caused by:
- Planting in soil that stays soggy or has poor drainage.
- Submerging too much of the segment in water.
- Skipping the callus period and planting immediately after cutting.
Solution: discard rotted pieces, adjust your watering, and always let fresh cuttings dry for a day or two before planting.
Cuttings Are Shriveling
Mild shriveling is normal while cuttings are pushing out new roots, but severe shriveling can signal:
- Very dry soil or water level too low for water propagation.
- Excessive heat or direct sun evaporating moisture faster than the cutting can handle.
Move them to a slightly more humid, shaded location and adjust moisture so the rooting medium stays lightly damp, not bone-dry.
Nothing Seems to Be Happening
Rooting can take several weeks, and some cuttings are simply slower than others. If the segments are still firm and not rotten:
- Be patientmany cuttings suddenly “wake up” after 6–8 weeks.
- Check that temperatures are warm enough (around 65–70°F is ideal).
- Ensure light is bright but indirect; too dark and they simply sit there.
Fun Ways to Use Your New Christmas Cactus Plants
Once your propagation experiment is a success, you’ll probably end up with more plants than you expected.
Not a problemthis is where the fun begins.
- Holiday gifts: Pot several rooted cuttings in a pretty container for an easy, meaningful gift.
- Family heirloom sharing: If your plant came from a parent or grandparent, passing on cuttings keeps the tradition going.
- Color collections: Root cuttings from different varietiesred, white, pink, peachand group them together for a mixed “holiday cactus” planter.
- Rescue mission: If an older plant gets woody, tired, or stressed, propagate from its healthiest segments and start a fresh, vigorous pot.
Real-World Experiences with Propagating Christmas Cactus
If you talk to long-time plant lovers, you’ll notice that Christmas cactus stories almost always
sound a little sentimental. These plants are often passed down through generations, and propagation
is how those memories travel.
Many home gardeners will tell you they started with a single, slightly scruffy plant from a
relative’s windowsill. The first time they took cuttings, they were nervous:
“What if I break it?” or “What if none of these root?” But once the first tiny white roots appear,
the anxiety usually melts into excitement. It’s strangely addictivelike realizing one slice of cake can turn into ten cakes if you just wait a month.
One common real-world lesson is how forgiving Christmas cactus can be. Gardeners often admit that
they forgot to water their soil cuttings for a week or two, only to discover that this mild neglect
actually helped rather than hurt. Because the segments store moisture, they’re surprisingly tolerant
of brief dry spells. Overwatering, not underwatering, is the villain in most failed propagation attempts.
Another shared experience is the “window experiment.” People will line up cuttings in water on different
windowsillsnorth, east, westand watch how the rooting speed varies. In many homes, an east-facing window
ends up being the goldilocks spot: bright morning light, but no harsh afternoon sun. That’s a real-world hint that
matching the plant’s preferred environment matters just as much as any special fertilizer or fancy pot.
Gardeners also learn quickly that grouping cuttings turns into a fuller, more impressive plant sooner.
Instead of planting one segment per pot, they’ll drop four or five into the same container. A year later,
that pot looks lush and mature, while single-cutting pots still have a more “starter plant” vibe.
So if you’re hoping for a showy centerpiece, start with several cuttings in each container.
For many people, the emotional payoff is the best part. A rooted cutting from a decades-old family plant
becomes a living connection to the person who first grew it. When the new plant finally blooms in your homemaybe
hanging in a different country, or in a brand-new apartmentit feels like the holiday cactus has traveled along with you.
Over time, you’ll probably develop your own preferences. Some plant owners swear by water propagation because they
like seeing the roots, while others decide soil is easier and less fiddly. Some people add a bit of coarse sand to their mix,
others lean hard on perlite. The important thing is that both methods work. Once you see how easily a Christmas cactus can
multiply, you’ll never look at a single plant as “just one” againit’s really the start of an entire future forest of holiday blooms.
In short, the more you experiment with Christmas cactus propagation, the more confident you’ll become.
You’ll get a feel for how firm cuttings should be, how fast they root in your particular home conditions,
and which windows or rooms they prefer. And along the way, you get to hand out small, blooming pieces of that
experience to friends and familyone propagated plant at a time.
Conclusion
Learning how to propagate Christmas cactus two ways in soil and in water gives you a flexible,
low-cost way to grow new plants, rescue old ones, and share living gifts. The steps are straightforward:
take healthy cuttings, let them callus, provide a well-draining medium, and keep conditions bright but gentle.
Whether you’re multiplying a cherished heirloom or just turning one grocery-store plant into a small collection,
propagation is a satisfying project that pays off for years. With a little patience and light-handed watering,
you’ll soon have your own mini forest of holiday cacti, ready to burst into color every season.
SEO JSON