Table of Contents >> Show >> Hide
- Before You Start: Quick Safety + Paint Reality Check
- Tools and Supplies
- How to Remove Bumper Stickers: 12 Steps
- Step 1: Choose the right spot (and timing)
- Step 2: Wash the area first
- Step 3: Gather your tools and set a “no rushing” rule
- Step 4: Warm the sticker with gentle heat
- Step 5: Lift one corner without gouging the paint
- Step 6: Peel slowly at a low angle
- Step 7: Handle leftover paper layers the smart way
- Step 8: Apply adhesive remover (test first)
- Step 9: Gently wipe and “roll” the residue off
- Step 10: Use a lubricated plastic scraper only if needed
- Step 11: Wash again to remove chemical residue
- Step 12: Restore shine and protect the paint
- Special Cases and Troubleshooting
- Common Questions
- Conclusion
- Real-World Experiences and Lessons Learned (Extra )
Bumper stickers are like tattoos for your car: hilarious in the moment, sometimes regrettable later, and oddly
committed to staying forever. The good news is you can remove them cleanlywithout turning your bumper into a
patchy science fair projectif you use the right combo of patience, gentle heat, and paint-safe adhesive removal.
This guide walks you through a proven, car-friendly process in 12 clear steps. You’ll also find
troubleshooting tips for stubborn, sun-baked stickers and a realistic “what I wish I knew” section at the end so
you can avoid rookie mistakes (like using a metal razor blade on paint and then pretending it was “already like that”).
Before You Start: Quick Safety + Paint Reality Check
- Work in the shade on a cool surface. Direct sun makes cleaners flash-dry and increases the chance of smearing or marring.
- Use gentle tools: plastic scraper/plastic razor blade, microfiber towels, and your fingertips (yes, your fingers are sometimes the best tool).
- Test first: dab any adhesive remover on a hidden spot, especially on older paint or repainted areas.
- Heat wisely: a hair dryer is safer than a heat gun. If you do use a heat gun, keep it moving and on low.
- If you’re a teen, ask an adult before using chemical removers or heat tools. Burns and fumes are not a fun DIY souvenir.
Tools and Supplies
You don’t need a detailing studiojust a small “sticker eviction kit.” Pick what you have and what matches your bumper.
Must-haves
- Car wash soap + water
- Microfiber towels (at least 2)
- Hair dryer (or low-heat gun, carefully)
- Plastic scraper / old plastic card (not metal)
Helpful add-ons (choose one adhesive option)
- Paint-safe adhesive remover (automotive formula is ideal)
- Isopropyl (rubbing) alcohol
- Citrus-based remover
- Detail spray or glass cleaner (as lubrication while scraping)
- Optional: car wax/sealant for aftercare
How to Remove Bumper Stickers: 12 Steps
-
Step 1: Choose the right spot (and timing)
Park in shade or a garage. The bumper should feel cool or only slightly warm to the touch. If it’s hot enough
to cook an egg, it’s too hot for controlled adhesive removal. Mild temperatures help you soften glue without
baking chemicals onto the clear coat. -
Step 2: Wash the area first
Wash around the sticker with car soap and water, then dry with a microfiber towel. This removes grit that can
scratch paint when you start lifting edges. Think of it as clearing the dance floor before the sticker does its
dramatic exit. -
Step 3: Gather your tools and set a “no rushing” rule
Sticker removal is mostly a patience contest. Put your plastic scraper, towels, and remover within reach. The
goal is to remove the sticker in large pieces, not confetti. Confetti becomes residue. Residue becomes regret. -
Step 4: Warm the sticker with gentle heat
Use a hair dryer on low/medium. Hold it a few inches away and move it slowly back and forth for about 20–40 seconds.
You’re softening the adhesive so it releases cleanly. If you use a heat gun, keep it on low and keep it movingno
“one spot roasting.” -
Step 5: Lift one corner without gouging the paint
Use a fingernail or a plastic scraper to lift a corner. If it won’t budge, apply a bit more heat and try again.
Avoid metal blades on painted bumperspaint and clear coat don’t appreciate surprise surgery. -
Step 6: Peel slowly at a low angle
Pull the sticker back over itself (low angle), not straight outward. This reduces stress on the clear coat and helps
the adhesive release with the vinyl/paper. If it tears, stop, reheat, and continue. The “rip and yank” method is how
you create a sticky crime scene. -
Step 7: Handle leftover paper layers the smart way
Some stickers leave a paper film even after the top layer peels off. Don’t scrub aggressively. Warm it again, then
gently rub with a damp microfiber towel. If it still clings, move to an adhesive remover step rather than escalating
to sandpaper fantasies. -
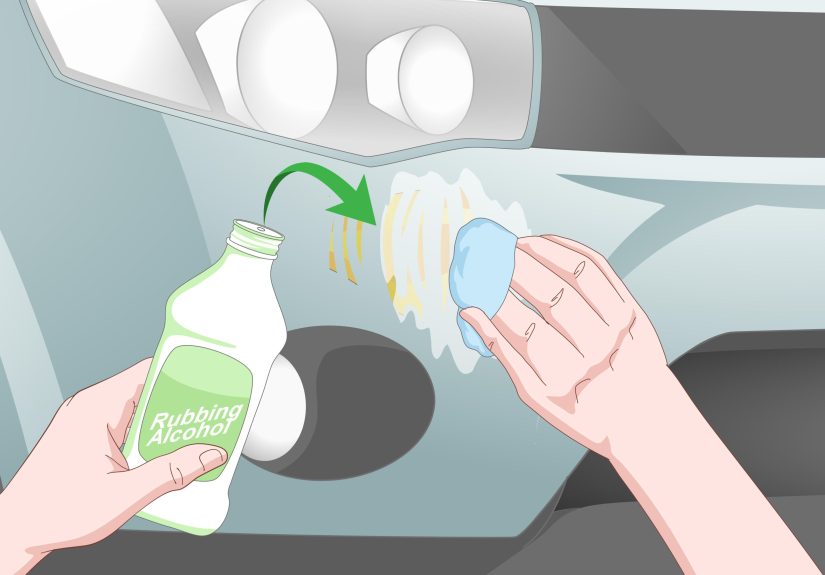
Step 8: Apply adhesive remover (test first)
Choose a paint-safe option and test it on a hidden area. Then apply it to a microfiber towel (or directly to the residue
if the product allows). Let it dwell brieflyjust long enough to soften the glue. The remover should do the work; your
arm shouldn’t have to.Tip: If you’re using rubbing alcohol, dampen a towel and work in small sections. Alcohol can evaporate
quickly, so reapply as needed rather than grinding harder. -
Step 9: Gently wipe and “roll” the residue off
Use a microfiber towel with light pressure. Often the adhesive will “roll” into little balls as it breaks down. That’s
a good sign. Keep flipping to a clean area of the towel so you’re not just redepositing glue like a sticky paint roller. -
Step 10: Use a lubricated plastic scraper only if needed
For stubborn spots, lightly use a plastic scraper while the area is lubricated with detailing spray or cleaner. The lubrication
helps reduce the chance of micro-scratches. Use short, gentle strokes and stop as soon as the residue lifts. -
Step 11: Wash again to remove chemical residue
Once the sticker and glue are gone, wash the area with car soap and water, then dry. This removes any leftover remover that
could interfere with wax, sealant, or simply collect dust like a magnet with commitment issues. -
Step 12: Restore shine and protect the paint
If the area looks slightly dull, apply a light polish by hand (optional), then add wax or a paint sealant. This helps even out
the finish and adds protection. If you notice a “ghost” outline, it’s often UV fade around the stickernot leftover glue.
Polishing can reduce it, but sometimes the only true fix is time or professional paint correction.
Special Cases and Troubleshooting
If the sticker is ancient and brittle
Old stickers often crack instead of peeling. Use more gentle heat, lift tiny sections, and work slowly. If it keeps snapping,
soften it, remove what you can, then switch to adhesive remover for the remaining layer. This is normalannoying, but normal.
If the residue smears instead of lifting
Smearing usually means the adhesive is softened but not fully broken downor your towel is saturated with glue. Apply remover,
let it dwell a bit longer, and use a fresh towel section. Sometimes switching from “wipe” to “dab and roll” makes a big difference.
If the bumper is plastic, textured, or matte
Textured plastics can trap adhesive. Avoid aggressive scrubbing that can polish shiny spots into a matte surface. Use minimal remover,
soft brushes only if recommended for that material, and test in an inconspicuous area. For matte wraps or specialty finishes, use products
specifically labeled safe for matte surfaces.
If there’s a visible outline after removal (“ghosting”)
Ghosting is often paint that aged differently because the sticker blocked sun and weather. Try a gentle polish and protection afterward.
If it’s severe, a detailing professional can assess whether paint correction is appropriate. Don’t keep scrubbing harderghosting doesn’t
respond to intimidation.
Common Questions
Will removing a bumper sticker damage my paint?
If you use gentle heat, plastic tools, and paint-safe removerplus you avoid harsh scrapingmost factory paint finishes handle sticker removal
just fine. The biggest risks come from metal blades, abrasive pads, and strong chemicals used without testing.
Can I use a razor blade?
On glass, a razor blade can work when used carefully and at the proper angle. On paint, it’s a risky move that can
scratch clear coat fast. For painted bumpers, stick with plastic razors/scrapers.
What’s better: hair dryer or heat gun?
A hair dryer is safer and usually enough. Heat guns can work faster, but they also increase the risk of overheating paint if used carelessly.
If you’re unsure, choose the hair dryer and patience.
How long does the whole process take?
Fresh stickers might take 10–20 minutes. Older, sun-baked stickers can take longer, especially if they tear. Your fastest “tool” is often taking
breaks so you don’t get impatient and start making… creative decisions.
Conclusion
Removing a bumper sticker is less about brute force and more about smart sequencing: clean first, warm the adhesive, peel slowly, dissolve residue,
then wash and protect the finish. Do it right, and your bumper won’t look like it survived a sticky-note apocalypse.
Real-World Experiences and Lessons Learned (Extra )
If you ask ten people how bumper sticker removal went, you’ll get ten versions of the same story: “It started fine… and then it became personal.”
That’s because stickers behave differently depending on age, sun exposure, and what kind of adhesive the manufacturer used. In real garages and
driveways, the first surprise is how much temperature changes everything. A sticker that peels like a dream on a mild afternoon can
turn into brittle crumbs on a cold morning. People who struggle the most usually try to “power through” without adjusting conditions. The biggest
upgrade isn’t a new chemicalit’s simply warming the area gently and staying consistent.
Another common experience: the moment you think “I’ll just pick at this corner real quick,” the sticker tears into a paper-thin layer that clings
like it signed a lease. That’s when many DIYers learn the value of a two-phase approach. Phase one is removing the bulkbig pieces, slow pull, low
angle. Phase two is residue cleanupshort dwell time with a paint-safe remover, then microfiber wiping. The mistake is mixing phases by scraping
aggressively while the adhesive is still semi-hard. That’s how you end up with faint scuffs that only show up under streetlights at night (the
universe’s favorite time to reveal your mistakes).
One lesson that comes up again and again is towel management. It sounds silly until you’ve tried wiping glue with the same small patch of cloth for
ten minutes and wondered why everything feels worse. Adhesive doesn’t vanishit transfers. Flipping the towel, switching to a clean one, or folding
it into quarters so you can rotate clean surfaces keeps the job moving forward. People also learn that “more product” isn’t always “more better.”
A thick layer of remover can spread loosened adhesive into a bigger area, especially if you wipe too soon. A controlled amount, worked in small
sections, usually finishes cleaner.
Then there’s the “ghosting” moment: sticker is gone, residue is gone, and yet there’s still a visible shape. Many assume that means they missed glue,
but often it’s UV differencepaint outside the sticker aged faster than paint under it. The practical takeaway is to manage expectations: you can remove
the sticker, but you can’t always rewind sunlight. Light polishing and protection can reduce the contrast, and over time the look may blend, but it’s not
always instant. This is also why people who plan ahead remove stickers sooner rather than latertoday’s funny joke becomes tomorrow’s permanent tan line.
Finally, experienced DIYers tend to adopt a simple rule: if you feel yourself getting impatient, stop and reset. Reheat gently, reapply remover, grab a
fresh towel, and slow down. The bumper will still be there in five minutes. And if you do it calmly, it won’t have to remember you forever.