Table of Contents >> Show >> Hide
- What Is a Bus Bar (and Which One Are You Replacing)?
- Should You Replace the Bus Bar or Replace the Whole Panel?
- Safety First: Electricity Is Not Impressed by Confidence
- Prep Work: Identify the Panel, Then Buy the Right Parts
- How to Replace a Neutral or Ground Bus Bar Kit
- 1) Shut Off Power and Verify De-Energization
- 2) Remove the Deadfront (Panel Cover) Carefully
- 3) Document the Existing Wiring Like You’re an Archaeologist
- 4) Install the New Bar Kit in the Approved Mounting Location
- 5) Move Conductors One at a Time
- 6) Torque Every Termination to Manufacturer Specs
- 7) Dress the Conductors and Reinstall the Deadfront
- 8) Restore Power and Test
- How to Replace a Main Breaker Bus / Panel Interior Assembly
- Why Bus Bars Fail: The “Heat + Time + Loose Stuff” Equation
- Troubleshooting After a Bus Bar Replacement
- When to Call a Licensed Electrician (No Shame, All Wisdom)
- FAQ
- Field Notes: of Real-World Bus Bar Replacement Lessons
- Conclusion
Replacing a bus bar is one of those home-electrical topics that sounds oddly like a public transit upgrade (“New bus bar on Route 5!”) but is actually about the metal backbone inside your electrical panel that helps deliver power to circuits safely and reliably. Done correctly, it can solve overheating, corrosion, or “mystery gremlins” like flickering lights and breakers that trip for no good reason. Done incorrectly… well, electricity doesn’t grade on a curve.
This guide explains what “bus bar replacement” usually means in a residential or light-commercial panel, when you should replace a neutral/ground bar kit versus the entire panel interior, how to plan the job safely, and what mistakes most often lead to crispy, toasted hardware. It’s written in standard American English, optimized for search, and built on real-world best practices and manufacturer/code guidancewithout turning into a boring robot manual.
What Is a Bus Bar (and Which One Are You Replacing)?
In an electrical panel, a bus bar is a solid conductorusually copper or aluminumdesigned to distribute electrical current to multiple circuits. In plain terms: it’s a heavy-duty “power highway” that feeds branch circuits through breakers and provides dedicated termination points for neutrals and grounds.
When homeowners say “bus bar,” they might mean one of three things:
- Neutral bar (grounded conductor bar): The strip with multiple screws where white (neutral) wires land. In service equipment, it’s bonded to the enclosure; in subpanels, it’s isolated.
- Ground bar (equipment grounding bar): The strip where bare/green grounding conductors land. In subpanels, this bonds to the metal enclosure; in service equipment, grounds and neutrals may share a bonded bar depending on design and listing.
- Main bus (breaker bus/stabs): The energized metal that breakers clip onto. If this is pitted, burned, or melted, you’re often looking at an interior replacement or a full panel replacementnot just a bar swap.
This article covers the common, practical scenarios: replacing or adding a neutral/ground bar kit, and the bigger movereplacing the panel interior assembly when the main bus is damaged. (If your panel is actually a commercial switchgear lineup, you’re probably not Googling this at midnight without a hard hat. Probably.)
Should You Replace the Bus Bar or Replace the Whole Panel?
Before buying parts, diagnose the problem. “Replace a bus bar” is sometimes the right fixand sometimes a bandage on a bigger issue.
Replace a Neutral or Ground Bar (Often the DIY-Adjacent Option)
Replacing (or adding) a neutral/ground bar kit is typically reasonable when:
- You need more termination points for grounds or neutrals (common after renovations).
- A bar’s screws are stripped, seized, or damaged.
- There’s surface corrosion on the bar but the panel’s main bus and breaker stabs are fine.
- You’re correcting an improper setup (like a missing ground bar kit in a subpanel).
Replace the Panel Interior or the Entire Panel (Often the Pro Option)
Consider replacing the interior assemblyor the entire panelwhen:
- The breaker stabs/main bus show pitting, overheating marks, melted plastic, or arcing damage. Damaged stabs can cause loose breaker contact, heat buildup, and repeat failures.
- A breaker has visibly “welded” itself to the bus, or you see deep corrosion where breakers clip on. That’s not “patina.” That’s danger glitter.
- The panel brand/model has no supported replacement bus partsin some cases you must replace the entire interior assembly to stay within listing/compatibility.
- The panel is old, recalled, or has a track record of breaker/bus connection problems (this is a “call a licensed electrician” moment).
Rule of thumb: If the damage is on the energized breaker bus (where breakers clip in), you’re usually beyond a simple bar replacement. If the damage is limited to the neutral/ground termination area and the rest of the panel is healthy, a bar kit or bar replacement may be appropriate.
Safety First: Electricity Is Not Impressed by Confidence
Working inside a panel can be lethal. Even with the main breaker off, some conductors may remain energized (for example, the line side of service equipment). Local codes, permits, and insurance requirements may also restrict who can perform this work. If you’re not 100% comfortable identifying what is energized, verifying de-energization, and torquing terminations correctly, hire a licensed electrician.
Build an “Electrically Safe” Work Plan
- De-energize properly: Shut off the correct upstream disconnect. For a subpanel, that may be a feeder breaker in the main panel. For service equipment, it may require pulling a meter or using a service disconnectoften not homeowner territory.
- Lockout/tagout when possible: Prevent someone from turning power back on while your hands are in the panel. (At minimum: a lock, a tag, and a very clear warning.)
- Verify absence of voltage: Test with a properly rated meter and confirm your tester works before and after. A non-contact tester is useful as a first pass, but not as your final proof.
- Use PPE and the right tools: Insulated drivers, eye protection, and a torque screwdriver/wrench matter. Loose connections are a leading cause of overheating and arcing.
Tools and Supplies You’ll Actually Use
- Insulated screwdrivers/nut drivers (and the patience to use them)
- Torque screwdriver or torque wrench (panel terminations have specified torque values)
- Multimeter (properly rated), plus a non-contact tester for quick checks
- Label maker or tape + marker (because “the white one” is not a wiring diagram)
- Flashlight/headlamp (panels are always in the darkest corner of your life)
- Approved replacement bar kit or interior assembly from the panel manufacturer
- Optional: anti-oxidant compound if manufacturer instructions call for it (common with aluminum terminations)
Prep Work: Identify the Panel, Then Buy the Right Parts
The most expensive mistake is buying a “close enough” part. Panels are listed as complete systems; mixing incompatible parts can create unsafe connections and may violate listing, inspection requirements, or both.
Step 1: Find the Panel Label (and the Series/Catalog Number)
Open the panel door (not the deadfront yet) and look for the manufacturer label. You’re hunting for: brand, model/cat. number, series, amperage rating, and the approved accessory kits. If you can’t find a clear label, don’t guessthis is exactly how “DIY” turns into “D-I-Why.”
Step 2: Decide Which “Bus Bar Replacement” You Need
- Ground bar kit: Often a bolt-in accessory that adds more ground terminals.
- Neutral bar replacement: Usually brand/model specific; sometimes integrated into the interior assembly.
- Interior assembly replacement: Replaces the guts (including breaker mounting structure and main bus) while keeping the enclosure. This is common when the enclosure is fine but the bus/breaker mounting is compromised.
- Full panel replacement: Required if the enclosure is damaged, rusted through, outdated beyond safe repair, or parts are not supported.
Important: Some manufacturers do not offer individual replacement bus bars for certain load centers; the intended repair is to replace the entire interior (or the entire panel) to maintain listing and compatibility. If your panel’s guidance points that way, follow it.
How to Replace a Neutral or Ground Bus Bar Kit
The workflow below is intentionally written at a “high-level but practical” detail: enough to understand the process and avoid common hazards, while still encouraging you to follow the specific instructions for your exact kit and panel.
1) Shut Off Power and Verify De-Energization
Turn off the upstream disconnect/breaker feeding the panel. Then verify with a meter: check hot-to-neutral and hot-to-ground where appropriate. Confirm your meter on a known live source before and after testing. If you cannot verify de-energization confidently, stop and call a licensed electrician.
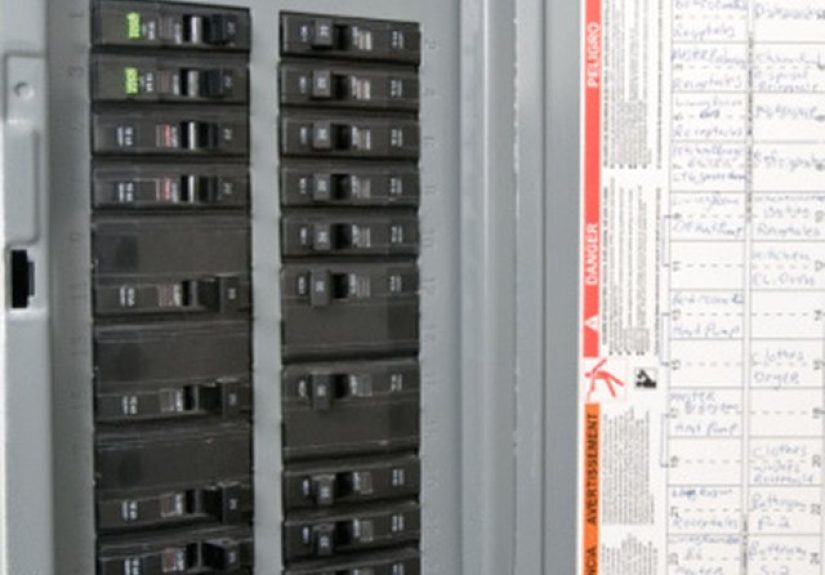
2) Remove the Deadfront (Panel Cover) Carefully
Remove the screws holding the deadfront and lift it off without bumping conductors. Don’t touch anything you don’t need to. If you notice scorched insulation, melted plastic, or a strong burnt odor, pause the project and consider professional evaluation.
3) Document the Existing Wiring Like You’re an Archaeologist
Take clear photos. Label conductors if necessary. You want a “before” record that can bail you out if something gets confusing later. (It will. Panels are excellent at becoming confusing.)
4) Install the New Bar Kit in the Approved Mounting Location
Most bar kits mount to pre-threaded holes or designated locations in the enclosure. Use the correct screws/hardware included with the kit. If you find yourself drilling random holes in a listed electrical enclosure, that’s your cue to stop and re-check instructions.
5) Move Conductors One at a Time
If you’re replacing a bar, move conductors one at a time from the old bar to the new bar. This reduces mis-landing risk and keeps neutrals and grounds organized.
- Neutrals: Generally, each neutral conductor should have its own terminal unless the panel labeling explicitly permits otherwise.
- Grounds: Some panels allow multiple grounds per terminal only if the label allows it and conductor sizes match what’s permitted.
6) Torque Every Termination to Manufacturer Specs
This step is the difference between a professional-grade result and a future overheating mystery. Tighten each conductor termination to the torque value specified on the panel labeling or in the instructions, using an approved torque tool. “Good’n’tight” is not a torque spec.
7) Dress the Conductors and Reinstall the Deadfront
Route conductors neatly. Avoid sharp bends and avoid putting mechanical stress on terminals. Reinstall the deadfront so no conductors are pinched. Make sure all knockouts and openings are properly closed.
8) Restore Power and Test
Turn the upstream disconnect back on. Verify that critical circuits operate normally. Watch for immediate warning signs: buzzing, sizzling, burning smell, repeated breaker trips, or hot spots. If anything seems off, turn power off and get professional help.
How to Replace a Main Breaker Bus / Panel Interior Assembly
Replacing the interior assembly (sometimes called “guts” or “chassis”) is a bigger job than swapping a ground bar kit. It typically involves transferring breakers and branch conductors onto a new listed interior that matches the enclosure’s catalog/series. In many jurisdictions, this may require a permit and inspection, and it may be best handled by a licensed electrician.
Conceptually, the process looks like this:
- Confirm the exact enclosure catalog/series so the replacement interior matches.
- De-energize upstream, verify absence of voltage, and secure lockout/tagout.
- Remove breakers and conductors with careful labeling and photos.
- Remove the damaged interior assembly and install the replacement interior per manufacturer instructions.
- Reinstall breakers approved for that panel, re-terminate conductors, and torque to spec.
- Reinstall deadfront, restore power, and function-test under normal load.
If you discover widespread corrosion, water intrusion, or heat damage beyond the interior (enclosure rust-through, compromised mounting points, damaged insulation, or questionable breaker fit), a full panel replacement is often the safer and more durable solution.
Why Bus Bars Fail: The “Heat + Time + Loose Stuff” Equation
Bus bars typically fail for a few predictable reasonsand understanding them helps you avoid repeating history after the replacement.
Loose or Under-Torqued Terminations
A loose connection increases electrical resistance. Resistance creates heat. Heat expands metals. Expansion can loosen the connection further. That vicious cycle can eventually lead to arcing, pitting, melted insulation, and that unmistakable “something’s cooking” smell.
Moisture and Corrosion
Panels in damp basements, coastal environments, or outdoor installations can develop corrosion. Corrosion increases resistance and can damage the contact surfaces where breakers connect to the bus. If moisture is a factor, address enclosure rating, sealing, and environmental conditionsnot just the damaged metal.
Improper Parts: “It Fits” Is Not “It’s Listed”
Breakers and accessories are designed and tested for specific panels. Using off-brand or “replacement style” components that aren’t approved by the panel manufacturer can lead to poor contact pressure and overheating at the bus connection.
Neutral/Ground Bonding Errors (Especially in Subpanels)
In a main service panel, the neutral is bonded to ground at the service disconnecting means (by design and code). In a subpanel, neutrals are typically isolated from the enclosure and grounds are bonded to it. Mixing these up can cause objectionable current on grounding conductors, nuisance trips, or worse.
Aluminum Conductors and Oxidation Management
Aluminum is common and code-accepted when used correctly, but it oxidizes differently than copper. Whether you use anti-oxidant compound depends on the connector and manufacturer instructions. The bigger point is to follow labeling, use the correct rated lugs, and torque terminations correctly.
Troubleshooting After a Bus Bar Replacement
- Breaker trips immediately: Confirm correct conductor landing, no neutral/ground mix-ups, and no pinched insulation under the deadfront.
- Lights flicker under load: Look for loose terminations (torque!), failing breakers, or upstream service issues.
- Warm spots or odor: Shut down and investigate. Heat is a symptom, not a personality trait.
- GFCI/AFCI nuisance trips: Check for shared neutrals, improper neutral/ground bonding in a subpanel, or miswired branch circuits.
When to Call a Licensed Electrician (No Shame, All Wisdom)
Call a pro if any of the following are true:
- You can’t confidently verify what is energized and what is not.
- The damage involves the breaker stabs/main bus or melted breaker connections.
- The panel is service equipment without an accessible upstream disconnect you can safely operate.
- There are signs of water intrusion, severe rust, or widespread heat damage.
- You need a permit, service upgrade, or utility involvement (meter pull/service disconnect work).
FAQ
Can I just clean a corroded bus bar?
Light surface corrosion on a ground bar might be addressed with replacement of the bar kit and environmental fixes, but corrosion or pitting where breakers connect is a different category. If the main bus or breaker stabs are pitted or overheated, replacement of the interior or panel is often the safer choice.
Do I need to torque every screw? Really?
Yes. Electrical terminations are engineered connections with specified torque values. Under-torque can cause arcing and overheating; over-torque can damage conductors or terminals. Torque tools exist because “feel” is not calibrated.
Can neutrals and grounds share the same bar?
It depends on whether the panel is service equipment or a subpanel, and on the panel’s design and labeling. The safe answer is: follow the panel instructions and local code requirements. In subpanels, neutrals are typically isolated and grounds are bonded to the enclosure via a ground bar.
Field Notes: of Real-World Bus Bar Replacement Lessons
If you want the most honest advice about replacing a bus bar, it’s this: the physical replacement is rarely the hard part. The hard part is everything around itidentifying the correct panel series, understanding what failure mode you’re actually dealing with, and doing the kind of tidy, torqued, label-following work that doesn’t show up in glamorous “before/after” photos.
One of the most common real-world patterns goes like this: someone notices a breaker that’s “kind of warm” and a faint buzzing that comes and goes. They swap the breaker, feel proud, and move on. A few months later the same circuit starts acting up again. When the deadfront comes off, the breaker stab area is pittedtiny craters where arcing has been doing its slow, patient destruction. That’s when it becomes clear the breaker was never the root cause. The bus connection was.
Another lesson: organization is safety. Panels that look like a bowl of electrical spaghetti are harder to troubleshoot and easier to miswire. When you move conductors one at a time and dress them neatly, you reduce the chance of landing a neutral in the wrong spot or accidentally mixing neutrals and grounds in a subpanel. This matters even more when AFCI/GFCI breakers are involved, because small wiring mistakes can create nuisance trips that feel like “the breaker is bad” when the wiring is actually the problem.
Torque is also the quiet hero of this story. In the field, overheating and bus damage often trace back to loose terminationssometimes from the original installation, sometimes from later work where conductors were moved and re-tightened “by feel.” The funny part is that many people assume “tighter is safer,” then over-torque and damage the conductor or terminal, creating a different failure that shows up later. The best outcomes come from doing the boring thing: reading the label, using a torque tool, and moving on with your life.
Here’s a practical example: a garage subpanel added during a remodel. It works fineuntil someone installs a new EV charger or space heater and suddenly breakers trip and lights flicker. The new load exposes older weaknesses: a slightly loose feeder neutral, grounds and neutrals landed together in the subpanel, and a ground bar kit that was never added even though the panel was stuffed with grounds. Fixing the bus bar situation isn’t just “add metal.” It’s correcting the system design so the current returns the way it’s supposed to and protective devices behave properly.
Finally, a candid truth: sometimes “replace a bus bar” is code for “this panel has lived a full life.” If you open the deadfront and see multiple signs of heat, corrosion, incompatible parts, and questionable modifications, the smartest long-term solution may be a full panel replacement. That’s not defeatit’s choosing reliability. Your future self will thank you the next time you plug something in and the lights don’t do the dramatic flicker thing like they’re auditioning for a horror movie.
Conclusion
Replacing a bus bar can be a clean, effective repairwhen it’s done with the right parts, the right safety process, and the right torque. Start by identifying which “bus bar” is actually involved, assess whether the damage is limited to neutral/ground terminations or extends to the breaker bus, and follow manufacturer instructions exactly. If the job touches service equipment, involves damaged breaker stabs, or requires work you can’t confidently de-energize and verify, bring in a licensed electrician. Electricity is a fantastic servant and a terrible teacher.