Table of Contents >> Show >> Hide
- Before You Touch a Screw: Is Your Sauna Actually “Movable”?
- Key Safety Idea: “Prep Yourself to Move Less Weight”
- Tools & Supplies Checklist
- Step 1: Plan the Move Like a Pro (Because the Sauna Won’t Forgive You)
- Step 2: Power Down, Cool Down, and Make It Electrically Safe
- Step 3: Document Everything (Photos Save Friendships)
- Step 4: Disassemble the Smart Way (A.K.A. Reverse the Assembly)
- Step 5: Protect Wood, Glass, and Electronics (Wood Is StrongUntil It’s Not)
- Step 6: Move Components Without “Hero Lifting”
- Step 7: Load and Secure the Sauna in the Vehicle
- Step 8: Weather, Humidity, and “Wood Movement”
- Step 9: Reassembly and Safety Checks at the New Location
- Common DIY Mistakes (So You Don’t Star in Your Own Cautionary Tale)
- FAQ
- DIY Experiences & Lessons Learned (500+ Words)
- Conclusion
Moving a sauna is a little like moving a giant wooden sandwich: it’s bulky, it’s expensive, and if you squeeze it wrong, things start cracking.
The good news is that many home saunas (especially kit and infrared models) are designed to be assembledand therefore disassembledwithout
summoning a construction crew or sacrificing your weekend to the moving gods.
This guide walks you through a safety-first DIY approach: planning, powering down, disassembly, protecting panels and electronics,
loading, securement, and reassembly. It’s written for real lifetight doorways, mystery screws, and that one friend who says “I can lift it”
right before reality says “No, you can’t.”
Before You Touch a Screw: Is Your Sauna Actually “Movable”?
Not all saunas are created equal. Some are basically adult-size LEGO sets. Others are “permanent structures that laugh at your plans.”
Take two minutes to identify what you’re dealing with:
- Infrared cabin saunas: Usually the most DIY-friendly to move. Panels often lock together with clips or screws and have plug-style connections.
- Indoor traditional sauna kits: Movable, but heavier. Expect a heater, control wiring, and solid wood panel sections.
- Outdoor barrel or cabin kits: Movable, but the base and curved staves can be awkward. Weather exposure adds extra “inspect everything” steps.
- Custom-built (framed-in) saunas: Often not worth DIY moving; it may be more practical to rebuild than relocate.
If your sauna is hardwired, tied into a special subpanel, or integrated into a tiled wet-room setup, the DIY part should shift toward
prep and protection while you bring in a licensed electrician and/or professional movers for disconnect and hauling.
Safety isn’t less “DIY”it’s just smarter DIY.
Key Safety Idea: “Prep Yourself to Move Less Weight”
The safest move is the one where you don’t try to deadlift a spa.
Your goal is to break the sauna down into lighter, flatter, clearly labeled pieces and protect them so they arrive ready to reassemble.
Tools & Supplies Checklist
Gather these before you start so you don’t end up wrapping cedar with last year’s holiday paper (we’ve all seen it):
For disassembly and organization
- Phone/camera (photos are your “future you” insurance)
- Painter’s tape + marker (label panels and cords)
- Zip-top bags + labels (hardware by section)
- Basic hand tools (screwdrivers, hex keys, socket set)
- Small bins or a lidded organizer (so screws don’t migrate)
For protection
- Moving blankets or thick quilts
- Stretch wrap (to keep blankets in placenot as the only protection)
- Cardboard corner protectors (or folded cardboard DIY)
- Bubble wrap for glass and control units
- Desiccant packs (optional, helpful for humid climates)
For transport and loading
- Dollies/hand truck (appliance dolly is great for bulky pieces)
- Moving straps (with a partner)
- Ratchet straps for tie-down
- Work gloves with grip
- Closed-toe shoes (non-negotiable)
Step 1: Plan the Move Like a Pro (Because the Sauna Won’t Forgive You)
Measure the “path of travel”
Measure doorways, hallway turns, stair width, and the tightest corner. Compare those measurements to your largest panel.
If the sauna currently lives in a basement, confirm you can get panels up the stairs without twisting them like a pretzel.
Pick the right vehicle
Flat, protected surfaces matter. A box truck or enclosed trailer is usually kinder to wood and electronics than an open trailer.
If you must use an open trailer, plan for weather protection that won’t trap moisture against the wood.
Build a simple “panel map”
Give each wall a letter (A, B, C, D) and label panels by position (A1, A2…). This feels nerdy until you’re reassembling and discover
two panels “look identical” in the same way twins look identicalright up until they don’t.
Step 2: Power Down, Cool Down, and Make It Electrically Safe
Start with the obvious: turn the sauna off and let everything cool completely. Then:
- Unplug if it’s plug-in.
- Shut off the breaker if it’s on a dedicated circuit.
- If hardwired: schedule a licensed electrician to disconnect and cap wires safely (and to reconnect later). This is not the moment to “learn electrical” on the fly.
Remove accessories and loose items: buckets, ladles, speakers, lighting covers (if removable), hygrometers, and anything that can rattle.
For traditional saunas, remove heater rocks and pack them separatelyrocks can shift and damage the heater or panels in transit.
Step 3: Document Everything (Photos Save Friendships)
Take photos of:
- How panels connect (corners, clips, brackets)
- Control box wiring routes and connectors
- Heater mounting points (traditional saunas)
- Bench supports and backrests
Put hardware from each step in its own labeled bag: “Bench hardware,” “Roof screws,” “Panel clips,” etc.
Tape the bag to the related part or store all bags in one “sauna hardware” bin. The key is one system, not a scavenger hunt.
Step 4: Disassemble the Smart Way (A.K.A. Reverse the Assembly)
Most manufacturers design kit saunas to go together in a specific sequenceso disassembly is typically the same sequence in reverse.
If you still have your manual, now is the time to treat it like sacred text.
General disassembly order
- Interior pieces first: benches, backrests, floor grids, heaters/guards, light shades.
- Roof/ceiling section: remove carefully; it can be awkward and heavier than it looks.
- Wall panels: work methodically around the room; don’t force tongue-and-groove joints.
- Base/floor frame: last, if your model has one.
Tip: If panels stick, don’t pry aggressively with a metal tool that will dent soft wood.
Instead, check for hidden screws, clips, or a panel that must slide upward before it releases.
Special notes by sauna type
- Infrared panels: Handle heating panels and control wiring gently. Coil cords looselyno tight bends that stress connectors.
- Traditional heaters: Follow manufacturer guidance for removal. Protect heating elements and controls from impact.
- Glass doors: Remove if recommended by your model’s instructions; wrap heavily and keep upright.
Step 5: Protect Wood, Glass, and Electronics (Wood Is StrongUntil It’s Not)
Wood panels: prevent dents, scratches, and warping
Cedar and other sauna woods are resilient, but they’re still wood. They can dent, gouge, or warp if stored improperly.
Protect panels with moving blankets, then use stretch wrap to keep the blankets from sliding.
Avoid trapping wet blankets against wooddry materials only.
- Keep panels flat and supported evenly (don’t let them bow over a gap).
- Elevate off the ground if storing overnight (wood + damp garage floor = bad romance).
- Use corner protection to prevent strap dents and edge chips.
Glass doors: treat like a big smartphone screen
Wrap glass in bubble wrap, add a cardboard “shell,” then blanket-wrap. Keep it upright and secured so it cannot flex.
Never place heavy panels on top of glass.
Controls, speakers, and sensors: anti-rattle packing
If removable, pack controls and delicate electronics in a padded box. If not removable, pad around them so they can’t be hit by shifting panels.
Step 6: Move Components Without “Hero Lifting”
Here’s the truth: most sauna-moving injuries come from rushing, twisting, or trying to carry too much at once.
The safest approach is to use mechanical help (dollies, hand trucks) and enough peoplewithout turning the move into a chaotic group hug.
Safer handling basics
- Keep loads close to your body; avoid reaching while carrying.
- Don’t twist while holding weightpivot your feet instead.
- Push beats pull when using carts and dollies (more control, less strain).
- Take breaksfatigue makes “oops” happen faster.
If stairs are involved, consider this your official permission slip to call in experienced help.
Stairs + bulky panels + gravity = a math problem that never ends well.
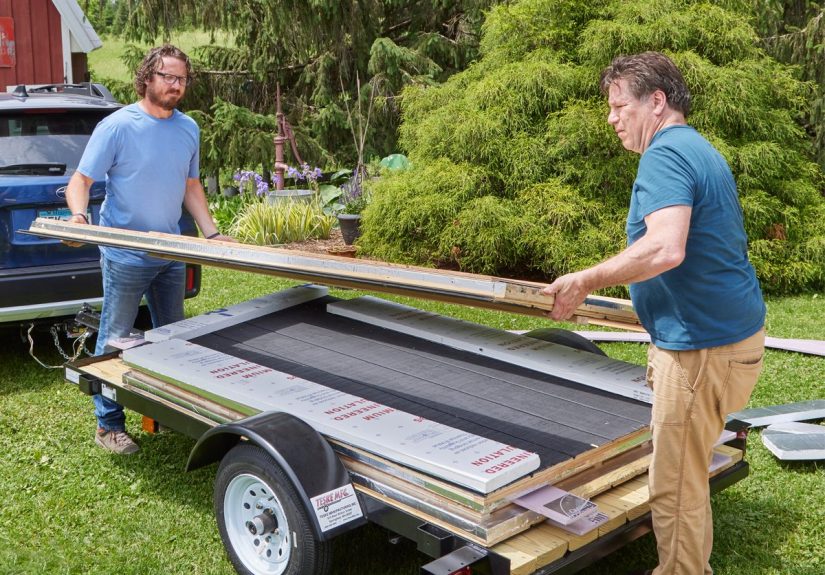
Step 7: Load and Secure the Sauna in the Vehicle
Your mission: nothing shifts, nothing rubs, nothing gets wet.
Load heavier, sturdier components first (base, thicker panels), then lighter/delicate components (glass, control units).
Best practices for a damage-free ride
- Build a flat “bed” of blankets or cardboard so panels aren’t riding on metal ridges.
- Keep panels vertical or evenly supportedavoid bending or bowing.
- Use ratchet straps to prevent shifting, but add cardboard/blanket buffer under straps so you don’t dent wood edges.
- Stop the rattle: fill gaps with blankets so panels can’t knock together.
If you’re towing a trailer or hauling a long distance, think like a pilot: do a pre-trip check, then re-check straps after the first 10–15 minutes.
Straps loosen. Loads settle. Roads have opinions.
Step 8: Weather, Humidity, and “Wood Movement”
Sauna wood is used to heat, moisture, and airflowbut during a move, it can get trapped in conditions that encourage warping or mildew.
Keep components dry and avoid long periods sealed in humid plastic without airflow.
If you must store the sauna before reassembly
- Choose a dry, moderate-temperature space when possible.
- Elevate panels off concrete floors.
- Leave a little airflow around wrapped components (blanket-wrap + loose outer wrap beats airtight “wood sauna burrito”).
Step 9: Reassembly and Safety Checks at the New Location
Reassembly is where your labeling and photos pay dividends.
Before you rebuild:
- Let wood acclimate if it experienced temperature/humidity swings (especially after long-distance transport).
- Check for damage: cracked tongues, loosened fasteners, bent brackets, pinched wires.
- Confirm the floor is level. A slightly uneven base can cause panel gaps and door misalignment.
Electrical reconnection
Plug-in infrared saunas are usually straightforward. For traditional heaters or hardwired systems, use a licensed electrician for reconnection and testing.
Then do a short test run:
- Verify controls power on normally.
- Check lights/speakers (if included).
- For traditional: confirm heater operation per manufacturer guidance and never operate without proper rock placement if required.
Common DIY Mistakes (So You Don’t Star in Your Own Cautionary Tale)
- Forgetting to label panels: turns reassembly into a wooden escape room.
- Leaving rocks in the heater: shifting weight can damage components.
- Over-tightening straps: dents edges and compresses wood.
- Wrapping wet wood or using damp blankets: invites mildew smells that no amount of eucalyptus can forgive.
- Trying to lift too much: the sauna is not impressed by bravado.
FAQ
Can I move a sauna without fully disassembling it?
Sometimesespecially small infrared units or certain indoor kitsbut it depends on the model, doorway size, and weight.
Partial disassembly may still be needed to prevent damage and make the load safe to handle.
Should I wrap cedar panels in plastic?
Plastic can protect against rain during a short move, but don’t trap moisture against wood for long periods.
A common approach is blanket-wrap first, then use stretch wrap as an outer layer to keep padding in place.
What if I lost my sauna manual?
Many manufacturers host manuals online. Search your sauna brand + model name + “manual” and match the photos to your unit.
If you’re unsure, contact the manufacturer before disconnecting electrical components.
DIY Experiences & Lessons Learned (500+ Words)
People who successfully DIY-move a sauna tend to share one surprisingly consistent lesson: the move itself is rarely the hard part.
The hard part is everything around itplanning the path, protecting the wood, keeping track of hardware, and resisting the urge to “just muscle it.”
Here are a few real-world-style scenarios and the practical takeaways they highlight.
Experience #1: The “Basement Sauna Escape” (Infrared Cabin)
A common story involves a two-person infrared sauna that was assembled in a basement because it seemed like the perfect, cozy spotright up until
the homeowner decided to renovate, sell the house, or simply reclaim the space for something that doesn’t make the laundry room smell like a spa.
The plan sounds simple: take it apart, carry it up, load it, done.
The surprise is usually the stairs. Even when individual panels aren’t outrageously heavy, they’re awkward: wide, tall, and easy to bump into
handrails or door frames. The best outcomes come from people who treat each panel like a piece of furniture, not a sheet of plywood.
They blanket-wrap first, label connections clearly, and assign one person to be the “spotter” on corners. Another helpful habit is doing a dry run:
carrying a panel (or even a cardboard template) through the stair turn before the whole sauna is disassembled. That quick test can prevent a
frustrating moment where you realize the panel fits everywhere except the one tight turn that matters.
Lesson learned: stairs punish improvisation. If the route is tight, reduce panel size (if your model allows it), protect edges aggressively,
and bring help that’s calmnot just strong.
Experience #2: The “It’s Just Across the Yard” Barrel Sauna Move
Outdoor barrel saunas trigger a specific kind of optimism: “It’s only going from the patio to the side yard. We can do that in an hour.”
Sometimes that’s trueif it’s disassembled correctly, the ground is level, and the base is handled thoughtfully.
But when things go wrong, it’s usually because the move crosses uneven ground and the base shifts or racks slightly. That can throw off alignment,
making reassembly harder and creating gaps that weren’t there before.
The smoother moves typically happen when the base is supported evenly during transport. People who do well also plan for the landing spot:
they level the new foundation area in advance, confirm drainage, and ensure the supports are placed so the sauna isn’t sitting in persistent dampness.
In humid climates, movers also learn to avoid leaving wood sealed tight in plastic overnight after a rainy movebecause that’s how you end up with
a “mysterious smell” that’s definitely not eucalyptus.
Lesson learned: “short distance” doesn’t mean “low risk.” Uneven ground and moisture can cause more trouble than miles on the highway.
Experience #3: The “Where Did These Screws Even Come From?” Reassembly Moment
Almost every DIY sauna move includes at least one dramatic pause during reassembly where someone holds a small pile of screws and whispers,
“Okay… but what are you for?” The difference between a one-day rebuild and a weekend-long puzzle is organization.
Movers who label bags by section, tape hardware to related parts, and take photos at every stage tend to reassemble with far less stress.
Others end up searching through mixed hardware like it’s a tiny metal thrift store.
A particularly useful habit is assigning one container as the “do not lose” kit: manual printout, labeled hardware bags, corner brackets,
special tools, and anything proprietary. That kit stays in the cab of the vehiclenot buried under panelsso it can’t disappear when you arrive.
Lesson learned: your best moving tool is documentation. Photos and labels reduce mistakes, speed up reassembly, and prevent damage caused by forcing parts that don’t belong together.
Experience #4: The “Everything Arrived… Except It Won’t Warm Up” Test Run
After a move, some people do a full-power first run immediately. The smarter pattern is a short, controlled test: confirm controls, lights, and
basic operation, then gradually bring the sauna back to normal use. This helps catch issues like a loosened connector, a pinched cable,
or a control unit that got bumped during loading. For traditional saunas, the best practice is to follow manufacturer guidance closely and avoid
operating the heater if required components (like rocks) aren’t properly placed.
Lesson learned: treat the first heat as a systems check, not a grand reopening.
Conclusion
Safely transporting a sauna DIY-style is absolutely doable for many kit and infrared modelsif you approach it like a careful project instead of a
powerlifting contest. Plan your route, power down properly, disassemble in reverse order, label everything, protect wood and electronics, and secure
the load so nothing shifts. Then reassemble patiently and test smart. Your reward is a sauna that arrives intact, smells like cedar (not chaos),
and is ready for its next chapterwithout the “why is there a leftover panel?” mystery.