Table of Contents >> Show >> Hide
- Why Drafty Windows Hit Your Wallet (and Your Mood)
- Quick Draft Check: Find Leaks Before You Buy Stuff
- Know What You’re Sealing: Window Anatomy in Plain English
- The Best Ways to Seal Windows (From Easiest to Most Effective)
- 1) Start with the free fix: lock, clean, and tighten
- 2) Weatherstrip moving parts (the “door gasket” idea, but for windows)
- 3) Caulk stationary gaps (trim, frame joints, and cracks that don’t move)
- 4) Temporary sealing for winter (fast, reversible, oddly satisfying)
- 5) Window insulation film (the “invisible storm window” vibe)
- 6) Add (or repair) storm windows and interior panels
- 7) The hidden leak: seal behind the interior trim
- Materials Checklist: What You’ll Actually Use
- A Practical Weekend Plan: Seal Windows Without Losing Your Mind
- Common Mistakes That Make Sealing Fail Faster
- When Sealing Isn’t Enough: Signs You Need Repair (or Replacement)
- How to Tell It’s Working (Besides “My Feet Are Warmer”)
- Real-World Experiences: What It Feels Like After You Seal Your Windows
- Conclusion: Seal the Leaks, Keep the Comfort, Pay Less for It
If your home feels like it has a secret hobby of gently breathing in outdoor air (and exhaling your paycheck),
your windows might be the culprits. Even “closed” windows can leak air through tiny gaps around the sash, frame, trim,
and the sneaky spaces you can’t see without getting nose-to-casing like a detective in a home-improvement mystery.
The good news: sealing windows is one of those rare adult tasks that can make your house more comfortable,
quieter, and cheaper to runwithout requiring a second mortgage or a reality show crew. The even better news:
you don’t have to do everything at once. A few targeted fixes can cut drafts, reduce HVAC run time, and help you
stop paying extra to heat (or cool) the great outdoors.
Why Drafty Windows Hit Your Wallet (and Your Mood)
When outside air sneaks in and conditioned air slips out, your heating and cooling system has to work harder to
keep the indoor temperature stable. That extra run time can show up on your energy billand you feel it as chilly
“cold spots,” rooms that never get comfortable, and the classic “Why is it colder next to the window than in the freezer aisle?”
experience.
Window leaks can also contribute to moisture issues. Warm indoor air can meet cold window surfaces and create condensation.
Sealing isn’t a magic wand for every condensation problem (humidity and ventilation matter), but stopping uncontrolled air
movement helps your home behave more predictablywhich is exactly what your HVAC system wants.
Quick Draft Check: Find Leaks Before You Buy Stuff
Before you start flinging caulk at every crack like it’s frosting on a chaotic cupcake, take 10 minutes to locate the worst leaks.
You’ll spend less, seal smarter, and avoid the heartbreak of sealing the wrong thing (like a drainage holemore on that later).
Simple ways to spot window air leaks
- The hand test: On a windy day, slowly move your hand around window edges and trim. You’ll often feel the draft.
- The light test: At night, have someone shine a flashlight around the frame while you look from the other side for gaps.
- The “paper slip” test: Close the window on a strip of paper. If it slides out easily, the seal is weak in that spot.
- Listen for rattles: If the sash rattles, it’s basically announcing, “Hello, I’m not sealed!”
- Lock the window: Many windows seal better when locked because the lock pulls sashes tighter together.
Know What You’re Sealing: Window Anatomy in Plain English
The easiest way to choose the right fix is to understand one rule:
caulk is for parts that don’t move; weatherstripping is for parts that do.
- Frame/jamb: The stationary structure around the window.
- Sash: The moving part that holds the glass (slides up/down, side-to-side, or swings out).
- Trim/casing: The decorative wood (or composite) around the window on the interior/exterior.
- Weep holes: Small openings (often on the exterior bottom of certain window frames) that let water drain out.
If you remember nothing else: don’t caulk shut anything designed to drain water.
Water always finds a way. You just don’t want it finding a way into your walls.
The Best Ways to Seal Windows (From Easiest to Most Effective)
1) Start with the free fix: lock, clean, and tighten
Lock your windows whenever possible. On many double-hung windows, locking helps pull the upper and lower sash together,
reducing air leakage at the meeting rail. Then clean the tracks and contact surfacesdirt and old adhesive can prevent a tight seal.
If hardware is loose, gently tighten screws on locks and handles (don’t overdo it; stripped screws are forever).
2) Weatherstrip moving parts (the “door gasket” idea, but for windows)
Weatherstripping is the MVP for leaky sashes. The goal is a snug seal when closed that still allows the window to operate
without feeling like you’re arm-wrestling it.
Common window weatherstripping options:
- V-seal (tension seal): Great for double-hung or sliding windows; it springs open to fill small gaps.
- Foam tape: Easy and inexpensive; works well for small, consistent gaps but can wear faster in high-friction areas.
- Felt strips: Budget-friendly; better for low-wear applications and mild gaps.
- Spring bronze: Durable, excellent for older wood windows; requires careful installation but lasts a long time.
- Bulb or tubular gaskets: Often used on casement/awning windows; compresses nicely when the window closes.
Pro tip: Buy weatherstripping based on the location and movement. A product that survives a sliding sash is different
from one that sits quietly in a corner like an introvert at a party.
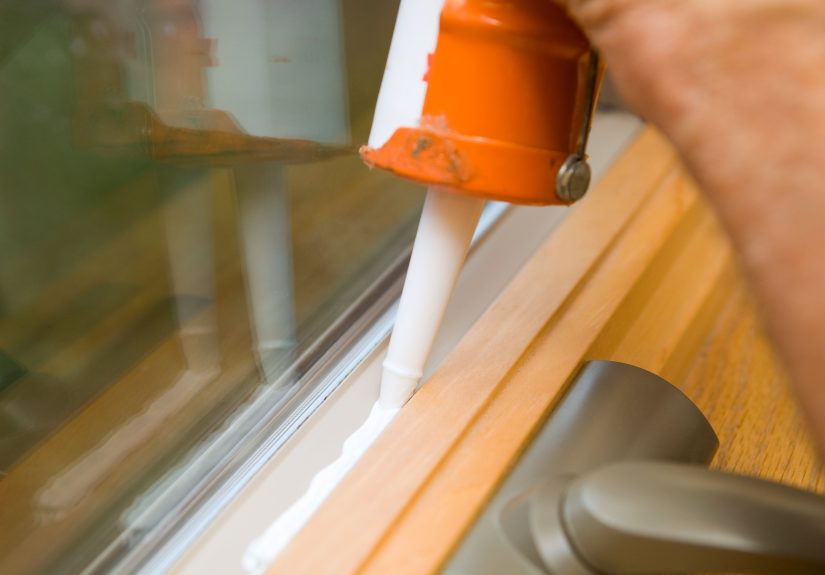
3) Caulk stationary gaps (trim, frame joints, and cracks that don’t move)
Caulk is for sealing cracks between stationary materialsthink where trim meets wall, or where the exterior frame meets siding.
It’s also great for sealing small joints in the window frame itself.
Caulk basics that actually matter:
- Prep wins: Remove loose/failed caulk, clean the surface, and let it dry. Caulk doesn’t bond well to grime or moisture.
- Choose the right type: Paintable acrylic latex (often “siliconized”) is common indoors. Exteriors usually need a more weather-resistant option rated for outdoor use.
- Use backer rod for big gaps: If a gap is too wide/deep, foam backer rod helps you get a clean seal without dumping in a whole tube.
- Smooth the bead: A consistent bead seals better and looks less like a third-grade glue project.
Where NOT to caulk around windows (seriously, protect future-you):
- Moving parts of the sash or tracks (you’ll glue the window shutor create a sticky grime magnet).
- Weep holes or drainage channels (you can trap water and invite rot/mold).
- Over old failing caulk (new caulk won’t bond well and will fail sooner).
4) Temporary sealing for winter (fast, reversible, oddly satisfying)
If you have older windows or you’re renting, temporary solutions can be lifesaversespecially for a single cold season.
Removable rope caulk (also called caulk cord) can be pressed into gaps around the sash or frame to block drafts.
It’s not pretty, but neither is paying extra to heat your curtains.
5) Window insulation film (the “invisible storm window” vibe)
Clear plastic window film kits create an additional air barrier on the interior. When installed correctly and tightened with gentle heat,
they reduce drafts and make the window feel less icy. They’re especially useful for older single-pane windows or windows you can’t
easily weatherstrip.
Film is also a good choice when you need a quick win across many windows without doing detailed carpentry. Just be careful:
good adhesion requires clean, dry surfaces, and you’ll want to keep at least one window operable in key areas for safety and egress.
6) Add (or repair) storm windows and interior panels
Exterior storm windows or interior storm panels add a protective layer that reduces air movement and improves comfort.
If you live in an older home with wood windows, storms can be a very cost-effective middle step between “do nothing”
and “replace every window and emotionally recover later.”
7) The hidden leak: seal behind the interior trim
Sometimes the draft isn’t coming through the sashit’s coming from the gap between the window frame and the wall framing.
If you remove interior trim, you may find thin or missing insulation around the window opening. Sealing and insulating this space
can have an outsized impact on comfort.
This is where low-expanding or non-expanding foam designed for windows/doors can help fill larger gaps without bowing the frame.
(High-expansion foam can distort window frames and cause operation problemsso use foam rated for windows/doors if you go this route.)
Materials Checklist: What You’ll Actually Use
- Weatherstripping (V-seal, foam tape, bulb gasket, or spring bronze depending on window type)
- Caulk (interior paintable + exterior weather-rated as needed)
- Caulk gun (a smooth-action one is worth it)
- Utility knife or scraper (for removing old caulk)
- Cleaning supplies (mild soap, rag, rubbing alcohol where appropriate)
- Backer rod (for larger gaps)
- Painter’s tape (for clean caulk lines if you like neat edges)
- Window film kit (optional)
A Practical Weekend Plan: Seal Windows Without Losing Your Mind
Step 1: Prioritize the worst offenders
Start with rooms you use most (bedroom, living room, home office) and windows that face prevailing wind or get direct sun.
If you can feel the draft from three feet away, congratulations: you’ve found your first target.
Step 2: Clean and prep
Remove loose caulk, clean the surfaces, and let everything dry. Adhesives and sealants need a clean bond.
If your home is older (especially pre-1978), be cautious when scraping old paintlead safety matters.
Step 3: Weatherstrip the moving parts
Install weatherstripping where the sash meets the frame or where panels slide. Close and open the window as you go.
The best seal is the one you’ll live withmeaning it seals well and the window still functions.
Step 4: Caulk the stationary gaps
Caulk the joints in the window frame and the seam where the frame meets wall/trim (as appropriate). Use backer rod where needed.
Smooth the bead for a consistent seal. Then let it cure according to the product directions before painting or heavy moisture exposure.
Step 5: Add film or temporary seals if needed
For stubborn drafts, add window film or rope caulk for the season. If you’re not ready for trim removal and foam, these can bridge
the gap (literally) and improve comfort quickly.
Common Mistakes That Make Sealing Fail Faster
- Caulking weep holes: Traps moisture and can cause rot or water damage.
- Caulking moving parts: Prevents operation and creates messy buildup.
- Skipping prep: Dirty surfaces = poor adhesion = early failure.
- Using the wrong sealant outdoors: Exterior conditions need exterior-rated products.
- Overdoing foam: High-expansion foam can warp frames. Use window/door-rated foam when appropriate.
- Ignoring bigger envelope leaks: Windows matter, but attic and basement air leaks can be huge too.
When Sealing Isn’t Enough: Signs You Need Repair (or Replacement)
Sealing helps air leakage, but it won’t fix structural problems. Consider repairs or professional help if you notice:
- Rotting wood, soft spots, or visible water damage around the frame
- Broken window hardware or sashes that won’t align
- Cracked panes, loose glazing, or significant rattling you can’t stabilize
- Fogging between double-pane glass (a sign the seal has failed)
If replacement is on the table, make sure installation quality is part of the plan. A great window installed poorly can still leak
like a sieve with a gym membership.
How to Tell It’s Working (Besides “My Feet Are Warmer”)
- Comfort: Fewer drafts and less “cold radiation” feeling near windows.
- HVAC behavior: System runs less often or for shorter cycles at similar outdoor temps.
- Consistent room temps: Bedrooms and corner rooms stop acting like they’re in a different climate zone.
- Noise reduction: Air leaks carry sound; sealing often makes a room noticeably quieter.
For a more data-driven approach, compare energy use month-to-month (adjusting for weather and occupancy) and track how often
your system runs. The goal isn’t perfectionit’s improvement you can feel and measure.
Real-World Experiences: What It Feels Like After You Seal Your Windows
Since every home is its own weird little ecosystem, results can varybut there are patterns homeowners commonly notice after sealing windows.
Think of these as “field notes” from the land of fewer drafts and less thermostat drama.
Experience #1: The “mysterious cold chair” disappears.
A common story is the living room chair nobody wants to sit in during winterthe one right next to the window that turns every movie night
into an arctic expedition. After weatherstripping the sash and sealing trim gaps, that same seat suddenly becomes… normal. Not magical.
Just normal. Which, in home comfort terms, is basically magical.
Experience #2: Bedrooms stop playing temperature roulette.
People often notice the biggest change in bedrooms because you’re still for hours at a time (and blankets can only negotiate so much).
After sealing leaks, the room feels less “spiky”meaning it doesn’t swing from cozy to chilly every time the wind gusts. Many folks also say
they stop cranking the thermostat at night because the room actually holds onto warmth.
Experience #3: The HVAC becomes less dramatic.
In drafty homes, HVAC systems can short-cycle or run frequently because the indoor temperature drops faster than it should.
After sealing, homeowners often report fewer constant “on/off” cycles and a more stable indoor feel. It’s not that the system became smarter;
it’s that the house stopped sabotaging it.
Experience #4: Quieter roomsespecially near busy streets.
Even without changing glass, sealing air gaps can noticeably reduce outdoor noise. Air leaks are like tiny sound tunnels.
When you close them up, traffic and neighborhood noise often get less sharp. It’s not studio silence, but it can be the difference between
“Is that car in my kitchen?” and “Oh, that’s outside. Where it belongs.”
Experience #5: Condensation changes (sometimes better, sometimes more obvious).
Some homeowners see reduced condensation because cold drafts are minimized and indoor air is less turbulent near the window.
Others notice condensation more clearly because the room is warmer while humidity remains highmeaning the real fix is also controlling indoor humidity
(bath fans, kitchen ventilation, and sometimes a dehumidifier). Sealing is still helpful; it just reveals the next bottleneck.
Experience #6: The “I should have done this sooner” moment.
This one is nearly universal: once a couple of windows are sealed, you notice the other drafty spots immediately. It’s like getting your hearing checked:
once one ear is fixed, you realize the other ear has been freeloading. The upside is that you get better at spotting leaks, choosing materials,
and doing quick touch-ups each season.
Experience #7: The savings feel incrementalbut the comfort feels immediate.
Energy savings can show up gradually and depend on weather, rates, and how your home is used. But comfort upgrades tend to be immediate:
fewer cold drafts, warmer floors, and rooms that feel more “even.” That comfort often leads to behavior changeslike lowering the thermostat a notch
which can amplify the savings. In other words, sealing windows doesn’t just improve your house; it can improve how you live in it.
Conclusion: Seal the Leaks, Keep the Comfort, Pay Less for It
Sealing windows is a practical way to reduce drafts, improve comfort, and help your HVAC system do its job without fighting constant air leaks.
Start with the easiest winslocking, cleaning, and weatherstrippingthen move up to caulking stationary gaps and addressing hidden leaks behind trim
when you’re ready. Focus on the worst offenders first, avoid sealing drainage features like weep holes, and choose materials that match how the window moves.
Your goal isn’t to “hermetically seal” your home like a spaceship. It’s to stop uncontrolled leaks so your home is comfortable on purpose,
not by accident. And yesyour energy bill will appreciate the new boundaries.