Table of Contents >> Show >> Hide
Starting sweet potato slips is a rewarding gardening task that allows you to grow your own sweet potatoes right from your kitchen. Whether you’re a seasoned gardener or just beginning your gardening journey, learning how to grow sweet potato slips can be an exciting process that leads to a delicious harvest. In this article, we’ll walk through the steps for starting sweet potato slips, tips for growing them, and common mistakes to avoid.
What Are Sweet Potato Slips?
Before we dive into the process, it’s important to understand what sweet potato slips are. Slips are essentially young plants that are grown from the sweet potato itself. When you start sweet potato slips, you’re essentially encouraging the sweet potato to sprout small shoots, which will eventually develop into full-grown plants. These slips are then transplanted into the soil once they are ready, where they will grow into the sweet potatoes that you’ll later harvest.
When to Start Sweet Potato Slips
Sweet potatoes are typically started indoors in the early spring, approximately 6-8 weeks before the last expected frost date. This gives the slips enough time to grow strong enough before being transplanted outdoors after the danger of frost has passed. Ideally, you’ll want to start your sweet potato slips around late winter to early spring, depending on your local growing zone.
How to Start Sweet Potato Slips: Step-by-Step Guide
Step 1: Choose Your Sweet Potatoes
The first step in growing sweet potato slips is selecting the right sweet potatoes. Opt for organic sweet potatoes, as they are less likely to be treated with chemicals that can inhibit sprouting. Choose firm, healthy sweet potatoes with no signs of rot or disease. The quality of the sweet potato is crucial for producing healthy slips.
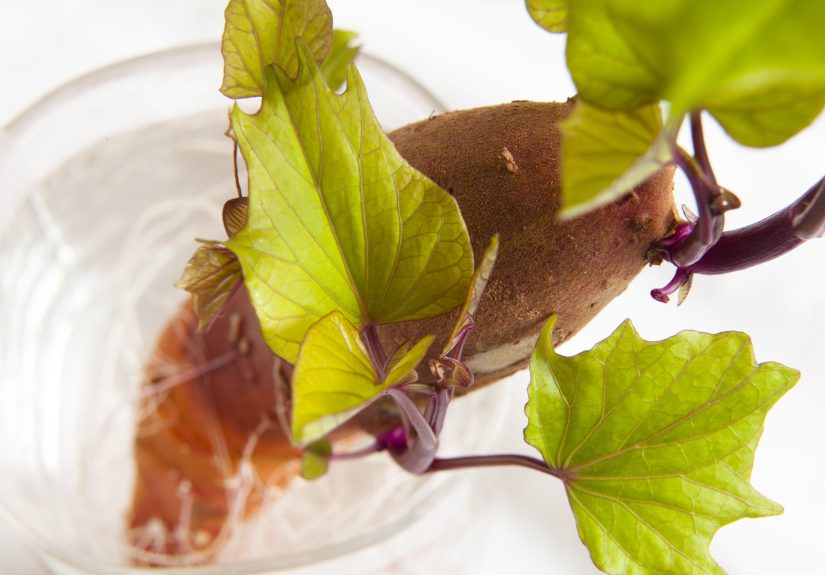
Step 2: Prepare the Sweet Potatoes for Sprouting
To begin sprouting, place the sweet potatoes in a container or jar with water. There are two common methods for setting them up:
- Toothpick Method: Insert four toothpicks into the sides of the sweet potato, creating a stand that will hold it in place over a jar or glass filled with water. The bottom of the sweet potato should be submerged in the water, while the top remains exposed.
- Directly in Water: Alternatively, you can place the sweet potato directly in a container of water, ensuring the bottom of the potato is submerged.
Step 3: Provide the Right Environment
Place the container with the sweet potato in a warm, sunny location. The ideal temperature for sprouting is around 75°F to 85°F (24°C to 29°C). In a few weeks, you should start to see small roots form at the bottom and slips (young sprouts) begin to emerge from the top of the sweet potato.
Step 4: Let the Slips Grow
Once the slips begin to grow to about 4-6 inches in length, it’s time to separate them from the sweet potato. You can carefully twist or cut the slips off the main tuber. It’s important to leave the slips attached to the sweet potato for as long as possible, as this allows them to grow strong enough to survive when planted in the garden.
Step 5: Root the Slips
Before planting the slips in the garden, you’ll need to root them. Place each slip in a glass of water, ensuring that the bottom portion is submerged. In about a week or two, the slips will develop roots that are ready for planting. Be sure to change the water every couple of days to prevent the growth of mold or bacteria.
Step 6: Transplant the Slips Outdoors
Once the weather warms up and the last frost has passed, it’s time to plant your rooted slips outside. Choose a sunny spot with well-drained soil. Sweet potatoes thrive in loose, sandy loam, but they can adapt to a variety of soil types. Plant the slips 12-18 inches apart in rows, making sure to bury the roots well, but keep the top portion of the slip exposed.
Tips for Growing Sweet Potatoes
1. Soil Preparation
Sweet potatoes grow best in loose, well-draining soil that is rich in organic matter. Prior to planting, amend your soil with compost or well-rotted manure. Sweet potatoes do not like soggy soil, so ensure that your garden area has good drainage.
2. Keep Them Warm
Sweet potatoes are sensitive to cold temperatures. Make sure to plant your slips only after the soil temperature has reached at least 60°F (15°C). If you live in a cooler climate, you can extend the growing season by using row covers or black plastic to warm the soil.
3. Watering and Fertilizing
Sweet potatoes require regular watering, especially during dry spells. However, be cautious not to overwater, as this can lead to rot. Use a balanced fertilizer or compost to feed the plants as they grow. Be careful not to use too much nitrogen, as this can encourage leaf growth at the expense of the tubers.
4. Control Weeds
Weeds can compete with your sweet potato plants for nutrients and water. Use mulch around the base of the plants to suppress weed growth and keep the soil moisture consistent.
Common Mistakes to Avoid
1. Starting Slips Too Late
If you wait too long to start your sweet potato slips, they may not have enough time to grow and mature before the first frost. Be sure to start them 6-8 weeks before your last expected frost date.
2. Overcrowding Plants
Sweet potato plants need room to spread out and grow. If you plant the slips too close together, they may become overcrowded, limiting the size of the tubers. Aim to space your plants at least 12-18 inches apart.
3. Neglecting the Soil
Sweet potatoes thrive in loose, well-draining soil. Make sure to prepare your soil properly by adding organic matter and ensuring adequate drainage. If the soil is too heavy, it may hinder the growth of the tubers.
Conclusion
Growing sweet potato slips is a relatively simple and rewarding process that can yield a bountiful harvest of sweet potatoes. By selecting healthy sweet potatoes, providing a warm and sunny environment, and following the proper planting techniques, you can grow your own delicious, homegrown sweet potatoes. Remember, patience is keystarting the slips early and giving them enough time to grow will set you up for success. Happy gardening!
Experience and Final Thoughts on Growing Sweet Potato Slips
Over the years, I’ve found that starting sweet potato slips is not only a fun gardening project but a practical one as well. The process can sometimes be tricky, especially if you don’t get the timing right, but with a little patience and attention to detail, the rewards are more than worth it. I’ve learned the hard way that overcrowding plants and neglecting water changes during the rooting process can lead to weaker slips, so these are things to watch out for. Another key takeaway is that sweet potatoes are very forgiving when it comes to soiljust make sure it’s loose, not too dense, and well-drained. This past season, I used raised beds with compost and had great success. One of the biggest joys of growing sweet potatoes is seeing those vines stretch out, knowing you’re only a few months away from digging up your harvest!
Take the time to experiment with different growing conditions, and don’t be discouraged if things don’t go perfectly at first. It’s all part of the learning experience, and once you master starting slips, you’ll be able to enjoy fresh sweet potatoes for years to come!