Table of Contents >> Show >> Hide
- Why Cedar Chests Make Surprisingly Great Entryway Tables
- Step Zero: Safety & “Don’t Skip This” Inspection
- Choose Your Transformation Style
- Tools & Materials
- DIY Steps: Antique Cedar Chest to Entryway/Side Table
- Step 1: Remove hardware and document everything
- Step 2: Deep clean (because paint hates grime)
- Step 3: Fix what’s broken before you make it pretty
- Step 4: Handle cedar bleed-through like a pro
- Step 5: Sand smart (you’re scuffing, not excavating)
- Step 6: Prime (this is where durability is born)
- Step 7: Paint or stainchoose your fighter
- Step 8: Protect the finish (especially the top)
- Step 9: Add legs or a base to make it “table,” not “trunk”
- Step 10: Upgrade the lid so it’s safer and more pleasant
- Step 11: Make it work in your entryway (the styling “formula”)
- Common Mistakes (and How to Avoid Them)
- Two Specific Makeover Examples You Can Copy
- FAQ
- Experiences You’ll Probably Have During This DIY (and What They Mean)
An antique cedar chest is basically a time capsule with legs… except it usually doesn’t have legs, it smells amazing,
and it’s been quietly judging your modern furniture choices since 1947. The good news: with a smart plan (and a tiny
bit of patience), you can transform that chest into a gorgeous entryway table or side table that looks intentional
not like you “ran out of nightstands and panic-bought paint.”
This DIY guide walks you through the full makeover: safety checks (important), prep that actually lasts, the best way
to stop cedar bleed-through, adding legs or a base, upgrading the lid so it doesn’t try to eat your fingers, and
finishing touches that make it look designer-level. No fluff, no weird “AI voice,” and no “just buy a new one.”
We’re doing this the satisfying way.
Why Cedar Chests Make Surprisingly Great Entryway Tables
Cedar chests have three things you want in entryway furniture: presence, storage, and a lid that hides your mess in
0.2 seconds. Used as an entryway/side table, a cedar chest can:
- Store shoes, hats, scarves, dog leashes, or seasonal chaos
- Act as a landing pad for keys, mail, and bags
- Anchor a hallway with a substantial “heirloom” silhouette
- Double as a side table in a living room (lamp + books + hidden storage = chef’s kiss)
Step Zero: Safety & “Don’t Skip This” Inspection
1) Check the latch/lock situation (seriously)
Some vintage cedar chests have latches or locks that can automatically lock when the lid closes. That’s not
quirky vintage charmit’s a safety hazard. Before you refinish anything, inspect the lid hardware:
- If it has an auto-locking latch, disable or remove it.
- If the chest brand is recognizable (Lane, Virginia Maid, Cavalier, etc.), research whether it’s part of a safety recall.
- For a furniture piece used in a home (especially with kids visiting), a non-locking setup is the goal.
Even if you plan to use it as an entryway table and never store a human inside (10/10 great plan), remove any
auto-locking mechanism. Then you can DIY in peace without feeling like a responsible adult is watching you.
2) Old finish? Assume it’s dusty and potentially nasty
Sanding and stripping create dust and residue. If your chest has old paint (especially multiple layers) or you don’t
know its finish history, treat the dust like it’s unwelcome: contain it, wear a proper respirator, and work in a
ventilated area. If you’re working indoors, protect floors and nearby items with plastic and clean thoroughly after.
3) Structural check: wiggles, gaps, and “mystery squeaks”
A cedar chest can be solid wood, veneer, or a mix. Before you start:
- Open/close the lid and look for racking (twist) or hinge wobble.
- Check corners for separation. If joints are loose, plan on wood glue + clamps.
- Look at the bottom panel and feet areathis is where legs/base upgrades will load weight.
- Sniff test: cedar odor is normal. Musty smell may mean it needs deeper cleaning and sealing.
Choose Your Transformation Style
Option A: Painted “Modern Heirloom” Entryway Table
This is the classic makeover: clean silhouette, updated hardware, legs added, and a durable painted finish. Great if
the exterior is scratched, blotchy, or just not your vibe.
Option B: Keep the Wood Look (Refinish + Seal)
If the wood grain is beautiful and the finish is salvageable, you can strip/refinish and keep a natural look.
Expect more sanding and more patience, but the payoff can be huge.
Tools & Materials
- Screwdriver set + labeled baggies (hardware “before” and “after”)
- Cleaner/degreaser (and a bucket of warm water)
- Sandpaper (120–220 grit) + sanding block or orbital sander
- Wood glue + clamps (optional but often needed)
- Wood filler (stainable or paintablechoose wisely)
- Stain-blocking primer (shellac-based is often the MVP for cedar)
- Paint (cabinet/trim enamel or furniture paint) or stain + clear coat
- Foam roller + quality brush (or a sprayer if you’re fancy)
- Legs/base materials: furniture legs, mounting plates, corner blocks, screws
- Lid stay/soft-close lid support (recommended)
- PPE: respirator, gloves, eye protection
DIY Steps: Antique Cedar Chest to Entryway/Side Table
Step 1: Remove hardware and document everything
Take photos from every angle like you’re about to list it online (but you’re not). Remove handles, lock plates, hinges,
and lid chains. Put screws in labeled bags. If you’re replacing hardware, keep the old pieces until the very endsometimes
you’ll reuse one part, or you’ll need them as a sizing template.
Step 2: Deep clean (because paint hates grime)
Cedar chests often have decades of wax, polish, hand oils, and “I stored perfume in here once” residue. Clean the exterior
thoroughly and let it dry completely. If it feels slick, it needs more cleaning. Paint sticks to clean, slightly scuffed
surfacesnot to mystery wax from 1983.
Step 3: Fix what’s broken before you make it pretty
Fill deep scratches, old hardware holes, and chips. Tighten loose joints with wood glue and clamps. If the lid doesn’t sit
square, address that nowadding legs later won’t magically straighten a twisted box.
Step 4: Handle cedar bleed-through like a pro
Cedar (and many other woods) can cause discoloration in paint finishes because natural compounds migrate through coatings.
Translation: you paint it white and it slowly turns into “vintage nicotine beige” in random patches. Not cute.
The fix is simple: use a strong stain-blocking primer designed to lock in stains/odors. Shellac-based primers are widely
used for stubborn bleed-through and odor sealing. Work in a well-ventilated area and follow the label directions.
- Best practice: Prime the whole exterior (not just knots) if you’re going light-colored.
- If bleed-through already happened: Spot prime the stained areas, then re-prime the whole surface.
- Odor bonus: The right primer can also reduce musty smells.
Step 5: Sand smart (you’re scuffing, not excavating)
If the finish is in decent shape and you’re painting, you usually don’t need to strip to bare wood. A thorough scuff sand
is often enough for adhesion. Focus on flattening shiny areas and smoothing repairs:
- Start around 120–150 grit if the surface is rough or you have repairs to feather.
- Finish with 220 grit for a smooth “ready for primer” surface.
- Sand with the grain when possible, especially on flat visible panels.
Vacuum dust, then wipe down. Dust left behind becomes texture trapped under your finish (and you will see it forever).
Step 6: Prime (this is where durability is born)
Apply primer in thin, even coats. Use a small roller for large panels and a brush for corners/trim. Let it dry as directed.
Lightly sand the primer coat with fine grit if it feels rough, then remove dust again. This is how you get that smooth,
“did you buy this?” finish.
Step 7: Paint or stainchoose your fighter
For an entryway/side table, durability matters. If painting, cabinet/trim enamel is a great choice because it levels well
and cures hard. Apply multiple thin coats rather than one thick coat (thick coats love to drip and stay tacky like bad
decisions).
If staining, strip the old finish first, sand evenly, then apply stain and seal with a clear coat suited to furniture
use. Natural finishes look incredible but tend to reveal every sanding inconsistencyso go slow and stay consistent.
Step 8: Protect the finish (especially the top)
If this will hold keys, bags, décor, and possibly a dramatic water glass ring, protect it. Options:
- Painted finish: a compatible clear topcoat can add scratch resistance (test first).
- Natural finish: polyurethane (water-based or oil-based) is common for furniture durability.
- Low-sheen lovers: choose matte/satin, but remember: matte shows scuffs more easily.
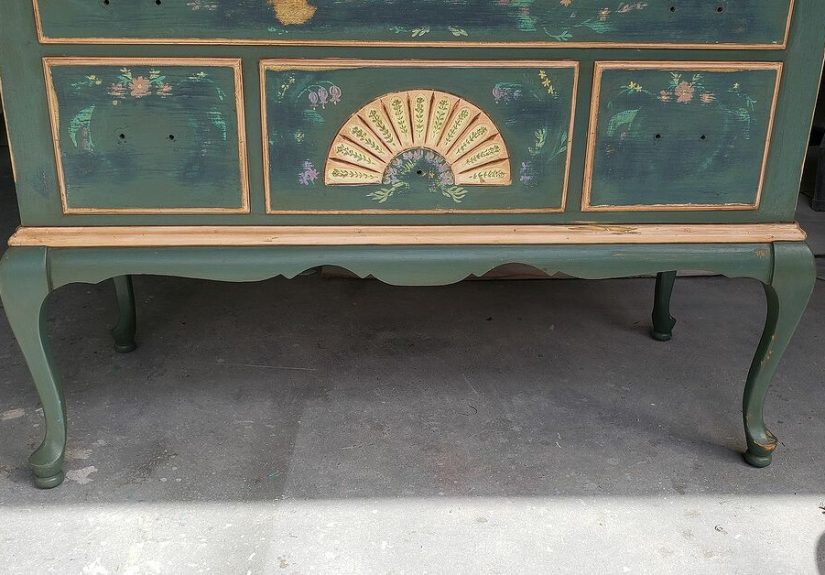
Step 9: Add legs or a base to make it “table,” not “trunk”
This is the glow-up moment. Raising the chest a few inches instantly modernizes it and makes it feel like intentional
furniture. Two common approaches:
Approach 1: Bolt-on furniture legs (easy + clean)
- Choose legs: 6–10 inches is a sweet spot for entryway/side table proportions.
- Install solid corner blocks inside the chest base if needed (so screws bite into real wood).
- Attach mounting plates, then screw in legs.
- Add a center support under the base if the chest is heavy and long (prevents sagging).
Approach 2: Build a simple plinth/base (great for stability)
- Build a rectangular frame slightly inset from the chest edges (looks cleaner).
- Secure the base to the chest bottom with screws from inside.
- Optionally add a toe-kick recess for a built-in look.
Pro tip: If your chest will live on tile or wood floors, add felt pads to legs. Your future self (and
your floor) will send you a thank-you note.
Step 10: Upgrade the lid so it’s safer and more pleasant
Heavy lids can slam shut and pinch fingers. A lid stay or soft-close support is an underrated upgrade that makes the piece
feel high-end and safer. Choose hardware rated for your lid weight and opening angle, and install according to the manufacturer’s
instructions.
Step 11: Make it work in your entryway (the styling “formula”)
Here’s a reliable setup that looks good in real life:
- Top surface: a tray for keys + a small catchall bowl
- Height: add a lamp or vase that brings vertical balance
- Above: hang a mirror (it reflects light and makes the space feel bigger)
- Inside: bins or baskets to keep storage organized
Common Mistakes (and How to Avoid Them)
- Skipping primer: leads to tannin/cedar bleed or poor adhesionespecially with light paint colors.
- Not cleaning first: paint can fisheye or peel when wax/oils are still on the surface.
- Over-sanding veneer: if it’s veneer, you can sand through fast. Light scuffing is safer.
- Legs installed into weak wood: reinforce with corner blocks and don’t trust thin bottom panels alone.
- Using it before it cures: paint can feel dry but still be soft. Treat it gently for the first week.
Two Specific Makeover Examples You Can Copy
Example 1: “Bright Entryway Classic”
- Color: warm white (satin)
- Hardware: brushed brass pulls
- Legs: 8″ tapered legs
- Top styling: woven tray + small lamp + eucalyptus stems
- Inside: 2 bins (shoes) + 1 basket (scarves/hats)
Example 2: “Moody Modern Side Table”
- Color: deep charcoal or near-black (matte)
- Hardware: black pulls or no hardware (push-to-open look)
- Legs: square block legs or metal hairpins
- Finish: extra protective topcoat for drink rings
- Inside: board games, throws, and the remote control graveyard
FAQ
Should I paint the inside of a cedar chest?
Usually, nounless you specifically want to block odor or the interior is damaged. The natural cedar lining is part of
the charm. Painting or sealing it heavily may reduce that cedar smell.
Do I have to strip the old finish?
Not always. If the finish is stable, scuff sanding + quality primer is often enough for paint. If you’re staining or the
old finish is failing (peeling, flaking, gummy), stripping is worth it.
How do I stop bleed-through for good?
Use a strong stain-blocking primer designed for tough stains/odors. Apply enough coverage, let it cure properly, and don’t
rush the topcoat. If bleed appears later, spot-prime and repaint.
Experiences You’ll Probably Have During This DIY (and What They Mean)
Here’s the honest, real-world part: transforming an antique cedar chest into an entryway/side table is rarely a straight
line. It’s more like a well-lit hiking trail with a few surprise raccoons. The first experience most DIYers have is the
“why is this still dirty?” phase. You clean it, it dries, and somehow it still feels slick. That’s often
old furniture polish or wax. When you finally remove it, your sandpaper suddenly works better, your primer lays down smoother,
and your mood improves by at least 40%.
Then comes the “cedar is spicy” momentusually right after the first coat of paint or primer. You step back,
expecting perfection, and you notice weird discoloration forming like a slow-motion plot twist. That’s when you learn (the
hard way) that wood chemistry is real. The good news is: this is not a failure. It’s a normal stage. The fix is almost
always the same: stain-blocking primer, applied correctly, and enough dry time.
Another common experience is the hardware identity crisis. You remove the original handles thinking you’ll
replace them with something modern… but then you see the “shadow” they leave behind (old finish lines, color differences,
tiny dents) and you realize your chest has a memory. This is where you either (a) choose new hardware that covers the old
footprint, (b) fill and repaint, or (c) embrace the original hardware because it suddenly looks charming again. No wrong
answersjust different aesthetics and different amounts of work.
If you add legs, you’ll likely have a brief “is this level?” spiral. Floors are rarely perfectly level,
vintage furniture is rarely perfectly square, and your eyes will notice a 1/16″ wobble like it’s a five-alarm emergency.
Adjustable leg levelers or simple felt pads can save your sanity. Also: adding internal corner blocks is one of those
boring steps that feels unnecessary until the piece feels rock-solidand then you’re weirdly proud of invisible engineering.
Finally, there’s the cure-time temptation. The paint feels dry, you want to decorate, and you’re one candle
away from placing a heavy lamp directly on fresh paint. Resist. Many durable finishes take days to fully harden. If you
baby it for a weekno dragging décor, no tape, no heavy frictionyou’ll end up with a finish that lasts for years instead
of a surface that collects dents like souvenirs.
The best experience is at the end: you put it in your entryway, drop your keys on top, open the lid, and realize you just
gave an old piece a new job. It’s functional, it has character, and it’s not another mass-produced rectangle. And yes,
it’s totally okay to casually mention, “Oh this? I refinished it,” every time someone comes over.