Table of Contents >> Show >> Hide
- First: A Reality Check (aka “Electricity Doesn’t Forgive”)
- Subpanel 101: What It Is (and What It Isn’t)
- The Big Rule: Keep Neutrals and Grounds Separate
- Plan It Like a Pro: Size, Location, and Load
- The Feeder: Where Most Subpanel Projects Win or Lose
- Step-by-Step Overview: Wiring a Subpanel (Concept-to-Execution)
- Step 1: Mount the subpanel securely
- Step 2: Configure the bars correctly (neutral isolated, ground bonded)
- Step 3: Run the feeder from the main panel to the subpanel
- Step 4: Terminate the feeder in the main panel
- Step 5: Terminate the feeder in the subpanel
- Step 6: Add and wire the branch circuits
- Step 7: Torque everything to spec
- Step 8: Label, test, and verify
- Top Tips That Prevent Headaches (and Help You Pass Inspection)
- Tip 1: Buy more spaces than you think you need
- Tip 2: Keep the neutral bar truly isolated
- Tip 3: Add a ground bar kit the right way
- Tip 4: Respect torque specs (yes, really)
- Tip 5: Balance loads like you’re balancing a budget
- Tip 6: Don’t confuse “subpanel has a main breaker” with “main service disconnect”
- Tip 7: Make it serviceable
- Common Mistakes (aka “Why Is This Breaker Tripping?”)
- Quick Subpanel Wiring Checklist
- Conclusion: Do It Once, Do It Right
- Real-World Experiences & Lessons (The 500-Word Add-On)
A subpanel is basically your home’s electrical system saying, “I’m expanding my team.” You add one when your main panel is out of space (or out of patience), when you’re building out a garage/shop, finishing a basement, adding a hot tub, or you just want shorter circuit runs and cleaner organization. Done right, a subpanel is a beautiful thing: tidy breakers, balanced loads, and a future-you who doesn’t have to play “which breaker kills the lights?” every time you hang a ceiling fan.
Done wrong, it’s a fast pass to nuisance trips, weird voltage issues, failed inspections, and genuine safety hazards. So let’s talk about how to wire a subpanel the smart way: code-minded concepts, practical tips, and the mistakes that make electricians sigh loudly enough to move dust.
First: A Reality Check (aka “Electricity Doesn’t Forgive”)
Working inside panels can be dangerous even for experienced folks. If you’re not comfortable identifying energized parts, verifying power is off, or following manufacturer instructions and local code requirements, hire a licensed electrician. In many areas, subpanel work requires a permit and inspectionthink of it as your project’s built-in “second opinion,” not a punishment.
Safety rules that aren’t negotiable
- De-energize before you work. Turn off the correct disconnect, and verify with a properly rated tester/meter.
- Assume parts are live until proven otherwise. Treat every conductor like it’s plotting against you.
- Wear PPE and keep your workspace dry and clear. Panels are not the place for “close enough.”
- If you see aluminum conductors, corrosion, water intrusion, or scorched insulation: stop and get a pro involved.
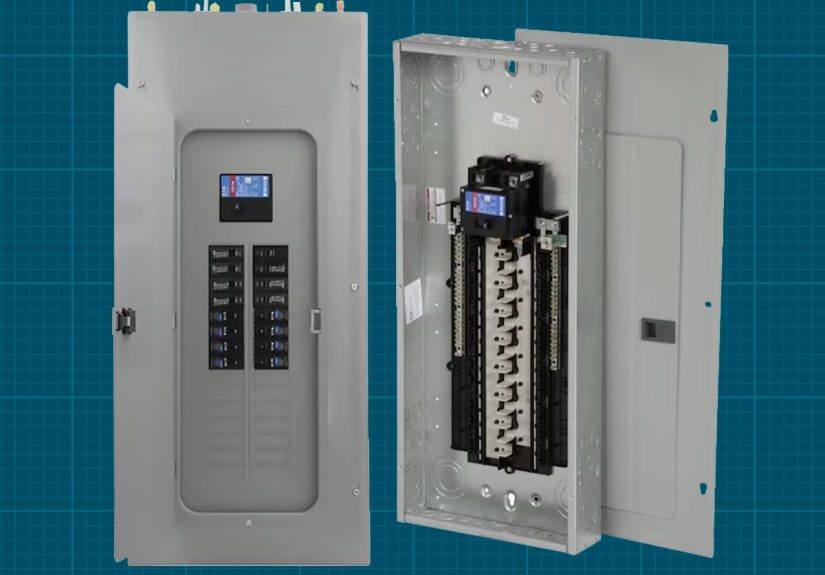
Subpanel 101: What It Is (and What It Isn’t)
A subpanel is a downstream distribution panel fed from your main service equipment. It is not a “second service.” In plain English: it’s not where your home gets its “bonding moment.” Your main service disconnect is where neutral and equipment grounding are bonded. In a subpanel, neutral and ground must be separated.
Why? Because if you bond neutral and ground in more than one place, neutral return current can end up traveling on metal parts and grounding paths you can touch. That’s the opposite of the safety system doing its job.
The Big Rule: Keep Neutrals and Grounds Separate
If you only remember one thing, remember this: In a subpanel, the neutral bus must be isolated from the metal enclosure, and the ground bar must be bonded to the enclosure. That means the bonding screw/strap that ties neutral to the can does not belong in a typical subpanel setup.
What “separate” actually looks like
- Neutral conductors (white/gray) land on an isolated neutral bar (insulated from the panel can).
- Equipment grounding conductors (bare/green) land on a ground bar bonded to the enclosure.
- The feeder equipment ground lands on the ground bar.
- The feeder neutral lands on the neutral bar.
This separation helps prevent “objectionable current” on grounding paths and improves fault-clearing reliability. Translation: breakers trip when they should, and metal boxes don’t become surprise science experiments.
Plan It Like a Pro: Size, Location, and Load
1) Do a real load plan (not vibes)
Subpanel sizing isn’t determined by the size of your main panel. It’s determined by the load you intend to serve and the feeder you install. Make a circuit list (lighting, receptacles, tools, HVAC equipment, EV charger, etc.), note voltage (120V vs. 240V), and estimate demand. When in doubt, oversize the panel spaces (not necessarily the feeder) so you have room to expand without cramming tandem breakers everywhere.
2) Choose enough spacesfuture-you will thank you
A common regret is buying a tiny subpanel to “save a few bucks” and then running out of breaker spaces a year later. A larger panel with more spaces often costs only a bit more, and it saves you from playing electrical Tetris later.
3) Pick a location with code-required working clearance
Panels need dedicated working spaceno closets full of paint cans, no behind-the-water-heater surprises, and no “I’ll just squeeze past it.” Choose a spot with good access, adequate lighting, and a straightforward feeder route from the main panel.
The Feeder: Where Most Subpanel Projects Win or Lose
Use a 4-wire feeder (two hots, neutral, equipment ground)
Modern best practice is a 4-wire feeder: Hot A, Hot B, Neutral, and Equipment Ground. The equipment grounding conductor provides a low-impedance fault path back to the source so protective devices trip fast during faults.
Breaker size must match feeder conductor ampacity
The feeder breaker in the main panel protects the feeder conductors. That means you don’t pick a breaker based on “what the subpanel label says.” You pick it based on the feeder conductor size/material/temperature rating and the planned load (and local code requirements). If you’re not confident here, this is an excellent place to hire a prowrong sizing can be dangerous or fail inspection.
Conduit vs. cable vs. SER: pick what fits the run and the environment
- Indoors: you may use approved cable methods (where permitted) or conduit with individual conductors.
- Outdoors/detached buildings: you may need specific rated wiring methods and burial depths, plus a disconnecting means and grounding electrode system.
- Long runs: consider voltage drop and upsizing conductors for performance (especially in workshops and garages).
Step-by-Step Overview: Wiring a Subpanel (Concept-to-Execution)
This is a practical overview, not a substitute for local code, permits, and manufacturer instructions. Always follow the panel’s labeling, torque specs, and listed accessories.
Step 1: Mount the subpanel securely
- Mount plumb and solidno “floating drywall anchors.”
- Plan knockouts and cable/conduit entry so conductors route cleanly without sharp bends.
- Keep the cover accessibleyour inspector (and future electrician) will appreciate it.
Step 2: Configure the bars correctly (neutral isolated, ground bonded)
- Remove the neutral bonding screw/strap if this panel is being used as a subpanel.
- Install an approved ground bar kit if the panel doesn’t already have a separate bonded ground bar.
- Confirm the neutral bar is insulated from the panel can (no accidental bonding through a strap or screw).
Step 3: Run the feeder from the main panel to the subpanel
- Route and support the wiring method properly (protect from physical damage).
- For conduit: size it correctly and avoid overstuffing (pulling large conductors is not a workout plan).
- Label both ends of feeder conductors and keep the path logical and serviceable.
Step 4: Terminate the feeder in the main panel
- Install a properly sized 2-pole breaker for the feeder (or follow your service equipment’s approved feeder provisions).
- Land the two hot conductors on the feeder breaker.
- Land the feeder neutral on the main panel neutral bar (as configured for your service equipment).
- Land the feeder equipment ground on the equipment grounding bar (or combined bar, depending on the service equipment configuration).
Step 5: Terminate the feeder in the subpanel
- Land the two hot conductors on the subpanel’s main lugs or main breaker (depending on subpanel type).
- Land the feeder neutral on the isolated neutral bar.
- Land the feeder equipment ground on the bonded ground bar.
Step 6: Add and wire the branch circuits
- Install breakers listed for your panel model (brand/type matters here).
- Route branch circuit conductors neatly along the sides, not across the middle like spaghetti.
- Grounds to the ground bar; neutrals to the neutral bar; hots to breakers.
- Balance 120V circuits across the two hot legs to reduce neutral load and keep things running smoothly.
Step 7: Torque everything to spec
Loose terminations can overheat. Over-torquing can damage lugs and conductors. Use a torque screwdriver/wrench when required and follow the manufacturer’s markings and instructions. This is one of the most boring stepsand one of the most important.
Step 8: Label, test, and verify
- Label every breaker clearly (room + function beats “misc.” every time).
- Verify correct voltage at the subpanel and correct operation of branch circuits.
- Confirm no neutral/ground bonding in the subpanel, and that equipment grounds have continuity to the enclosure.
Top Tips That Prevent Headaches (and Help You Pass Inspection)
Tip 1: Buy more spaces than you think you need
A roomy panel makes neat wiring easier and leaves space for future circuits like a compressor, EV charger, or dedicated freezer.
Tip 2: Keep the neutral bar truly isolated
Don’t assume it’s isolated because it “looks isolated.” Make sure the bonding screw/strap is removed when appropriate and that neutrals are not touching the can.
Tip 3: Add a ground bar kit the right way
Use the manufacturer-approved ground bar kit (not a random bar that “kinda fits”). The bar must bond to the enclosure and accept the conductor sizes you’re landing.
Tip 4: Respect torque specs (yes, really)
If a connection is marked with torque values or the instructions require a torque tool, follow it. Heat damage often starts at bad terminationsand it doesn’t announce itself politely.
Tip 5: Balance loads like you’re balancing a budget
Splitting 120V circuits across both legs helps reduce neutral current and improves performance. It’s the electrical version of “don’t put every expense on one card.”
Tip 6: Don’t confuse “subpanel has a main breaker” with “main service disconnect”
Some subpanels include a main breaker as a disconnecting means, which can be required in certain situations (like detached structures). That does not change the neutral/ground separation rule for typical subpanel configurations.
Tip 7: Make it serviceable
Leave enough conductor length for clean routing, keep bends gentle, avoid overfilling, and don’t bury your panel behind shelving. Your future troubleshooting self will send you a thank-you note.
Common Mistakes (aka “Why Is This Breaker Tripping?”)
- Bonding neutral and ground in the subpanel (the #1 classic).
- Using the wrong breaker type for the panel (it fits ≠ it’s listed).
- Feeder breaker too large for the conductors (unsafe and fails inspection).
- Aluminum conductors landed without proper prep (oxidation and heat are not your friends).
- Messy routing across breaker faces (hard to inspect, hard to service, easy to damage).
- No clear circuit labeling (future you will not be amused).
Quick Subpanel Wiring Checklist
- Permit/inspection requirements checked
- Subpanel location meets working clearance requirements
- Feeder is 4-wire (hot/hot/neutral/ground)
- Feeder breaker sized to conductor ampacity
- Neutral bonding screw/strap removed (for subpanel use)
- Ground bar installed and bonded to enclosure
- Neutrals only on neutral bar; grounds only on ground bar
- Breakers listed for the panel
- Connections torqued to spec
- Circuits balanced and labeled
- Functional testing completed
Conclusion: Do It Once, Do It Right
Wiring a subpanel isn’t hard because it’s mysteriousit’s hard because it demands discipline. The system works when every part has a job: neutrals carry return current, grounds carry fault current, and bonding happens where it’s supposed to. If you plan your loads, run a proper 4-wire feeder, isolate neutral from ground in the subpanel, and torque connections correctly, you’ll end up with a clean installation that’s safer, easier to expand, and less likely to cause problems later.
And if any of this made you think, “I should probably call someone,” that’s not failurethat’s wisdom with good lighting.
Real-World Experiences & Lessons (The 500-Word Add-On)
If you hang around enough electricians, inspectors, or seasoned DIYers, you’ll hear the same subpanel stories repeated like campfire legendsbecause the mistakes repeat. One common theme: the project starts as “I just need a couple more breakers,” and ends with someone discovering a neutral bonded where it shouldn’t be, a ground bar held on by optimism, and labeling that reads like a mystery novel (“Lights??”).
A frequent real-world scenario is the “workshop upgrade.” Someone adds a table saw, dust collector, mini-split, and a few extra receptacles. The subpanel goes in, the circuits run, and everything seems fineuntil the dust collector starts and the lights flicker, or a breaker trips during the exact moment you’re making the cut that requires you to be calm and steady. The fix often isn’t exotic: better load planning, balancing the 120V circuits across both legs, and verifying the feeder and terminations are sized and torqued correctly. The lesson? Power tools love consistency, and loose connections love heat.
Another classic is the “detached garage surprise.” The subpanel is out in the garage, the neutrals and grounds are tied together “because that’s how it was before,” and then someone installs a new metal water line or an ethernet cable with a shield, creating an unintended metallic path between buildings. Now you’ve got parallel return paths, weird readings, and sometimes a tingle on metal parts that should never feel spicy. That’s why modern practice leans hard on a proper 4-wire feeder, correct bonding only at the service equipment, and grounding electrode requirements where applicable. When everything is arranged correctly, faults clear the way they’re supposed to and the system stays predictable.
Inspectors also see the “breaker that fits” mistake. Homeowners (and, yes, some handymen) assume any breaker of the same size will work in any panel. But panels and breakers are listed as systems. The wrong breaker can lead to poor contact, overheating, and a failed inspection. The practical takeaway: match the breaker type to the panel labeling, even if another brand looks like it wants to move in.
Finally, there’s the least glamorous lesson that saves the most headaches: labeling and neatness. People underestimate how much better a subpanel behaves when conductors are routed cleanly, neutrals and grounds are correctly separated, and every circuit is labeled. Troubleshooting becomes faster, expansions are easier, and you’re less likely to accidentally disconnect the wrong neutral while adding a circuit. In the real world, the “pretty panel” is often the “safe panel,” because neat work usually means the installer understood what each conductor was doing.
If you take nothing else from these experiences: most subpanel problems aren’t bad luck. They’re predictable results of a few common shortcuts. Skip the shortcuts, keep neutral and ground in their lanes, and your subpanel will quietly do its job for decadeswithout drama.