Table of Contents >> Show >> Hide
- What “Double Exposure” Really Does (And Why It’s So Addictive)
- What I Mean by “Yuxt of Layers”
- The Concept Stage: I Start With a Sentence, Not a Filter
- Picking Images That Actually Blend (Instead of Fighting)
- Workflow Option A: In-Camera Double Exposure (For the Bold and the Curious)
- Workflow Option B: Photoshop-Style Double Exposure (For Control Freaks, a.k.a. Artists)
- Color, Tone, and the Secret Sauce of “Cohesion”
- Specific Example: A Portrait + City + Paper + Handwritten Marks
- Common Problems (And the Fixes That Don’t Involve Screaming)
- How I Know It’s Finished
- Conclusion: The Point Isn’t the TechniqueIt’s the Meaning
- My 500-Word Experience Add-On: What This Process Felt Like (For Real)
Confession: I didn’t “just make a picture.” I made a polite argument between two images… then invited a third, fourth, and fifth layer to show up unannounced and eat all the snacks. The result? A piece that looks like a dream, reads like a memory, and edits like a Choose-Your-Own-Adventure book where every page is a layer mask.
This article breaks down how I built an artwork by mixing double exposure (in-camera or in post) with what I call “Yuxt of Layers”my shorthand for juxtaposition through layering: stacking textures, symbols, and tonal shapes so they clash (politely), blend (strategically), and land (emotionally).
What “Double Exposure” Really Does (And Why It’s So Addictive)
Double exposure is the art of combining two images so they share a single frame. Historically, film photographers stumbled into it (sometimes by accident, sometimes by mischief). Today, we can do it:
- In-camera (if your camera supports multiple exposure modes or overlays)
- In editing (Photoshop-style layer blending, masking, and tonal control)
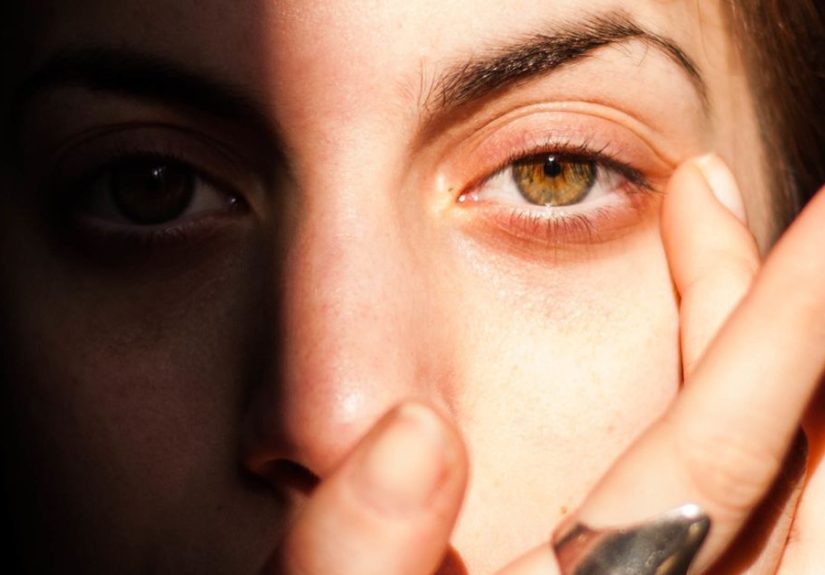
What makes it powerful isn’t the trick. It’s the meaning you can create when two unrelated subjects suddenly become roommates. A portrait filled with forest texture says “rooted.” A city skyline inside a silhouette says “I never really left work.” Clouds over hands say “I’m holding it together… mostly.”
What I Mean by “Yuxt of Layers”
“Yuxt of Layers” is not a sacred museum term. It’s a studio nicknamelike calling your favorite brush “Ol’ Reliable.” By “Yuxt,” I mean juxtaposition: placing elements together so the viewer feels tension, contrast, or surprise. By “of layers,” I mean the physical/digital stack that makes that juxtaposition possible.
In practice, Yuxt of Layers looks like:
- Layering a texture (paper grain, paint scuffs, scanned fabric) over a photo to add “age” or “memory.”
- Using transparency so two colors visually mix, like stained paper over watercoloronly the digital version doesn’t leave glue on your elbows.
- Stacking symbols (maps, botanicals, typography fragments) to create a narrative you can’t say in one image alone.
- Choosing clashes on purpose: soft portrait + hard architecture, organic leaves + geometric grids, calm sky + chaotic scribbles.
The Concept Stage: I Start With a Sentence, Not a Filter
Before I open any software, I write one sentence:
“What should this image feel like?”
Here are a few concept sentences that work well for double exposure + layered juxtaposition:
- “I look calm, but my mind is a thunderstorm.”
- “Home is a place and a person… and sometimes neither.”
- “Growth is messy, but it’s still growth.”
- “I’m made of places I’ve been.”
That sentence becomes my compass. When I’m 47 layers deep and I can’t remember what reality looks like, I ask: Does this still match the sentence?
Picking Images That Actually Blend (Instead of Fighting)
1) Choose a strong “container” image
This is usually a portrait or silhouettesomething with a clear subject and readable shape. High contrast helps because the double exposure needs a clean “stage” for the second image to perform on.
2) Choose a “filler” image with texture + story
Landscapes, clouds, trees, city lights, water, and architecture work beautifully because they have natural patterns and gradients. They also provide symbolic language: forests feel alive, skylines feel ambitious, oceans feel endless, etc.
3) Choose supporting layers that solve problems
My supporting layers are like backup dancers: they make the lead look better without stealing the show. Examples:
- Paper grain to unify two different photos
- Dust/scratch texture to add “time”
- Soft light leaks to guide attention
- Subtle typography or handwritten marks for human warmth
Pro tip: If the two main images don’t “talk” immediately, don’t force it. Pick a different pairing. Great double exposures often start with great matchmaking.
Workflow Option A: In-Camera Double Exposure (For the Bold and the Curious)
If your camera supports multiple exposures, you can combine frames directly in-camera. This approach feels magical because you’re committing earlierlike cooking without measuring cups (fun until it’s not).
How I approach in-camera exposures
- I plan the tones: dark areas often “hold” detail from the next exposure better than bright areas.
- I simplify: fewer competing elements makes the final image readable.
- I underthink it a little: happy accidents are part of the charm.
Many cameras also let you choose an overlay or blending approach (the “math” of how the exposures combine). If you’ve ever wondered why one double exposure looks airy and another looks like it got hit by a brightness truckthis is often why.
When I choose in-camera: When I want organic imperfections, or when the concept benefits from spontaneity. (Also when I want to feel like a wizard.)
Workflow Option B: Photoshop-Style Double Exposure (For Control Freaks, a.k.a. Artists)
This is my favorite route for “double exposure + Yuxt of Layers,” because it lets me sculpt the blend with precision while keeping things non-destructive. Translation: I can change my mind without crying.
Step 1: Build a non-destructive foundation
- Place images as Smart Objects when possible (so scaling and filters stay editable).
- Use Adjustment Layers (Curves, Levels, Hue/Saturation) instead of directly altering the image.
- Rely on Layer Masks to reveal/hide areas cleanly.
Step 2: Establish the double exposure blend
I stack the “filler” image above the portrait and test blend modes like I’m trying on outfits in a fitting room with terrible lighting:
- Screen / Lighten often creates an airy, luminous blend (great for clouds, highlights, city lights).
- Multiply / Darken often deepens the mood (great for trees, ink textures, shadows).
- Overlay / Soft Light can unify texture and contrast in a subtle way.
I don’t marry the first blend mode I date. I audition them. Ruthlessly. Kindly. With snacks.
Step 3: Use masks like you mean it
Layer masks are where the art stops being “an effect” and becomes your image. I paint on masks to:
- Protect key facial features (eyes, nose bridge, lips) so the subject stays human
- Clean up distracting edges
- Let textures live in the “right” places (hair, shadows, negative space)
My rule: If the viewer can’t find a focal point in 2 seconds, it’s too busy. If they find it immediately and then discover details over time, it’s working.
Step 4: Add the Yuxt layers (the story stack)
Once the base double exposure reads well, I start building the juxtaposition layers:
- Texture layer: paper grain or scanned paint strokes to unify the composite.
- Symbol layer: botanicals, map fragments, typography scraps, or geometric shapes.
- Light layer: subtle gradient or “glow” to guide the eye.
- Noise layer: gentle noise helps everything live in the same “world.”
Each added layer has a job. If a layer doesn’t solve a problem (tone, depth, unity, meaning), it gets removed. I’m an artist, not a hoarder. (Okay, I’m recovering.)
Color, Tone, and the Secret Sauce of “Cohesion”
Double exposure composites fail for one main reason: the layers look like they were introduced at a party and refused to speak to each other.
To create cohesion, I do three things:
1) I choose a limited palette
Even if the sources are colorful, I push the final piece toward a consistent set of tones (cool moody blues, warm sepia, monochrome with one accent color, etc.). A consistent palette makes complex layering feel intentional.
2) I unify contrast
I use Curves/Levels on groups of layers so blacks feel like the same “black” and highlights feel like the same “light.” When contrast doesn’t match across layers, the composite looks pasted.
3) I create one “hero” highlight
One area should be brighter or clearer than everything else. It’s visual leadership. Without it, your piece becomes a democracy of pixels where nothing gets done.
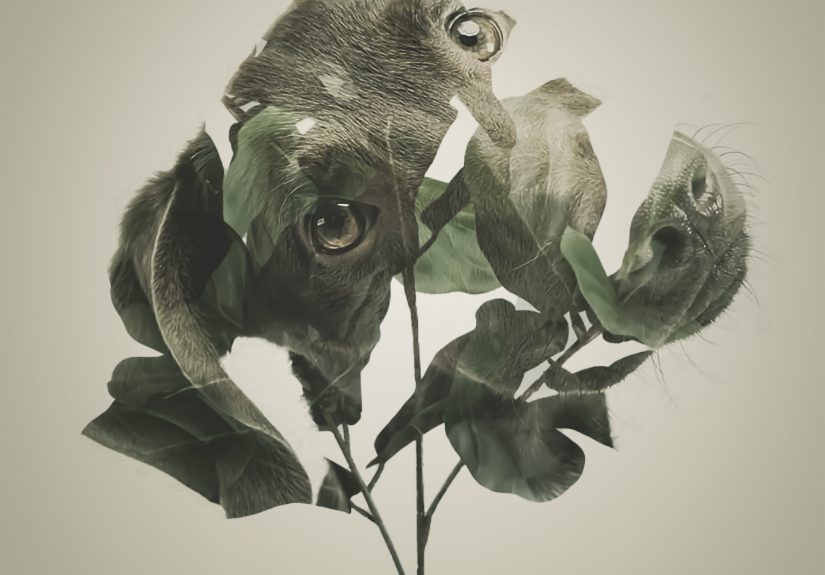
Specific Example: A Portrait + City + Paper + Handwritten Marks
Here’s a real build I often use (and remix):
- Base: a clean side-profile portrait with a simple background.
- Exposure layer: a nighttime skyline with bright windows and strong shapes.
- Blend mode: Screen (to let the city lights “bloom” inside the silhouette).
- Masking: protect the eye and cheekbone so the face stays readable.
- Yuxt layer 1: warm paper grain on Soft Light at low opacity for cohesion.
- Yuxt layer 2: subtle handwritten marks (like notes from a journal) placed where the skyline gets too uniform.
- Final polish: a gentle vignette and a small tonal lift around the focal point.
The story becomes: a person filled with a city. Add handwriting and paper texture, and it becomes: a person carrying memories of that city. Same base. Different emotional weight.
Common Problems (And the Fixes That Don’t Involve Screaming)
Problem: The image looks muddy
- Try a lighter blend mode (Screen/Lighten) or reduce opacity.
- Use Curves to separate midtones: deepen shadows, lift highlights.
- Remove one texture layer. Yes, that one you love. I’m sorry.
Problem: The subject disappears
- Mask back facial features or key edges.
- Add local contrast to the face area using a targeted adjustment layer.
- Introduce a clean area of negative space to give the eye a rest.
Problem: It looks “too effect-y”
- Add a unifying grain/texture across the whole piece (subtle).
- Harmonize color temperature with one global adjustment.
- Reduce the number of competing “special” elements. One magic trick at a time.
How I Know It’s Finished
I stop when:
- The focal point is obvious within 2 seconds.
- There are “discoverable” details after 10 seconds.
- The layers feel like one world, not a stack of unrelated postcards.
- The piece still matches my original concept sentence.
And also when my file has more layers than my patience has pixels left.
Conclusion: The Point Isn’t the TechniqueIt’s the Meaning
Double exposure gives you the initial spark: two images fused into one idea. Yuxt of Layers is how you turn that spark into a full narrativeby stacking contrast, texture, and symbolism with intention.
If you take nothing else from this: don’t chase “cool.” Chase clear. A clear story with restrained layering will beat a chaotic masterpiece-in-progress every single time.
My 500-Word Experience Add-On: What This Process Felt Like (For Real)
The first time I tried mixing double exposure with heavy layering, I learned a valuable truth: the Layers panel is not a personality substitute. I had a gorgeous portrait, a dramatic forest, and a texture pack that looked like it had survived three warsand I thought, “If I stack all of this, surely I will accidentally create genius.”
What I created was a very artistic fog bank. It had vibes. It had mystery. It also had no subject, no story, and absolutely no mercy. The face disappeared into the trees like it owed the forest money.
So I restarted with one rule: every layer must have a job. I kept the portrait. I chose a second image with clearer shapes (a skyline instead of a dense forest). Instantly, the double exposure read better because the interior shapes were simpler. Then I used masking like it was my day job. I protected the eye area firstbecause humans are biologically wired to look for eyes, and if the eyes are gone, the brain starts filing a missing-person report.
Next, I added what I now call the “Yuxt layers,” but I made them earn their rent. A paper grain layer unified the composite, which surprised me: it didn’t just add texture, it made the whole piece feel like it belonged on the same page. After that, I added handwritten marksnot because handwriting is trendy, but because it makes an image feel lived-in, like someone cared enough to leave evidence of being human.
The funniest part of this process is how often the “best” improvement is subtracting. I’d add a gorgeous paint smear, zoom out, and realize it was basically shouting over the focal point. Delete. I’d add a second texture and suddenly the image looked like a sandwich wrapper. Delete again. There’s a moment in layered artwork where restraint becomes the most advanced technique you have. It’s like cooking: garlic is wonderful until you’ve used enough to keep vampires away for three counties.
Now when I build these pieces, I work in passes. First pass: make the double exposure readable. Second pass: add one or two Yuxt layers for meaning. Third pass: unify tone and color so everything feels intentional. Final pass: walk away, come back, and ask, “If I saw this online for the first time, would I understand itor would I just admire it politely and keep scrolling?”
When the answer is “I get it,” that’s when I stop. Not when it’s perfectwhen it’s communicating. And yes, sometimes I still make a fog bank. But now it’s an intentional fog bank. Big growth.