Table of Contents >> Show >> Hide
- Why Pet Embroidery Hits Different Than “Just a Cute Craft”
- The First Pet Portrait: What I Did Right (and Wrong) in 2018
- How I Make Pet Embroidery Look Like Them (Not “A Dog”)
- Tools, Materials, and the Unsexy Secret: Stabilizer
- The Memorial Side: Making Room for Grief Without Getting Cheesy
- From One Gift to a Real Business: How I Went Professional
- Shipping Pet Embroidery Without Crushing Someone’s Feelings (or the Hoop)
- Common Pet Embroidery Mistakes (So You Don’t Learn Them the Hard Way)
- FAQ: Pet Portrait Embroidery (Quick Answers People Actually Want)
- Conclusion: The Strange Gift of Stitching Love Into Something You Can Hold
- Bonus: of Real Experience From the Pet-Embroidery Trenches
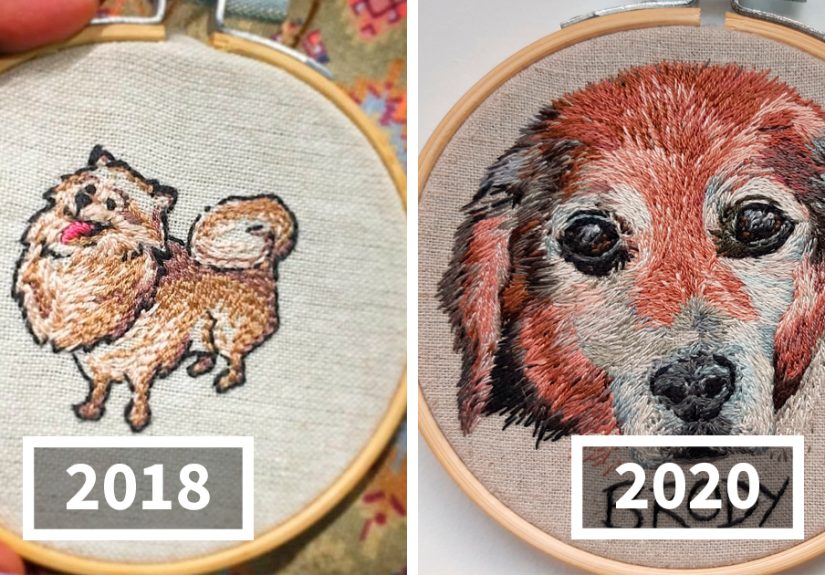
In 2018, our family dog diedone of those quietly-earthquake moments where the house is suddenly too quiet and the vacuum suddenly feels like it’s mocking you. My mom did what moms do: she held it together in public, then fell apart the second nobody was looking.
I wanted to give her something that didn’t try to “replace” him (because… no), but still let her feel him around. I didn’t have the budget for a museum-quality portrait, and I’m not exactly blessed with the kind of drawing talent that makes people say, “Wow!” Instead, I had needles, thread, and a stubborn belief that if I just stitched long enough, grief might loosen its grip.
So I made my first embroidered pet portrait. It took forever. I stabbed myself enough times to qualify as a human pincushion. And when I finally handed it to my mom, she cried in that specific way that says, “This is exactly what I needed.”
Fast-forward: today I make pet embroidery professionally. I still cry sometimes while stitching. I still occasionally swear at thread tangles like they personally insulted my family. But now I also have systems, pricing, policies, and a workflow that lets me create keepsakes that feel like love you can hang on a wall.
Why Pet Embroidery Hits Different Than “Just a Cute Craft”
Let’s be honest: a lot of gifts are nice for five minutes. Pet embroidery is different because it’s tactile, slow, and personal. It’s made stitch by stitch, the way memories show upone detail at a time. That “slow-made” feeling is part of why it’s such a meaningful pet loss gift.
Many veterinary and animal-welfare organizations acknowledge that losing a pet can feel like losing a close family member, and that memorializing your pet can help you cope. That’s not “being dramatic.” That’s just love with fur on it.
What people are really buying
- Recognition: “You loved this animal. That mattered.”
- Specificity: The wonky ear. The white blaze. The eyebrow dots that made them look permanently surprised.
- A place for grief to land: Something to hold onto when “time heals” feels like a lie your calendar told you.
The First Pet Portrait: What I Did Right (and Wrong) in 2018
My first piece was a hand-embroidered portrait in a hoop. I chose a photo where our dog was looking slightly off-camera, like he had places to be and business to sniff. It was perfectuntil I realized perfection is not an embroidery setting.
Choosing the right reference photo
If you want an embroidered pet portrait to look like the pet, the photo matters more than the brand of floss. Here’s what works best:
- Good lighting: Natural light beats yellow indoor bulbs every time.
- Sharp eyes: If the eyes are blurry, the embroidery will look like “generic cute dog,” not your dog.
- Clear markings: Unique patterns (spots, stripes, facial masks) are your best friend.
- Simple background: You’re embroidering a pet, not an entire backyard.
My biggest beginner mistake: trying to stitch every hair
Fur is a trap. If you attempt to stitch every single hair, you’ll end up with a fuzzy blob and emotional damage. What you want is the illusion of fur: direction, highlights, shadows, and a few strategic texture stitches.
In other words: embroidery is less “photocopy” and more “tiny thread painting.”
How I Make Pet Embroidery Look Like Them (Not “A Dog”)
When customers send me photos, I’m not just looking at color. I’m looking for identitythe little design cues that make the pet instantly recognizable.
1) I start with three “anchor features”
- Eyes: shape, highlight placement, and eyelid angle
- Nose & muzzle: size, curve, and contrast (especially around the mouth)
- One signature quirk: an ear fold, a spot, a scar, a snaggle-tooth, a “why are you like this?” expression
2) I simplify the palette on purpose
More colors don’t automatically mean “more realistic.” Too many thread colors can muddy the portrait and slow production without improving results. I aim for a small set of core shades plus a highlight and shadow thread for depth.
3) Stitch selection is basically storytelling
- Long-and-short stitch: great for fur shading and smooth gradients
- Satin stitch: clean edges, collars, name tags, and crisp shapes
- Split stitch / stem stitch: outlines that don’t look harsh
- French knots: sparkle points, texture accents, and the occasional “freckle”
If I’m doing machine embroidery, stitch logic gets even more technicalhooping, stabilizer choice, sequencing, and density decisions become everything. If I’m doing hand embroidery, my “density” is basically how patient I am that day.
Tools, Materials, and the Unsexy Secret: Stabilizer
Here’s the truth nobody wants to hear when they’re excited to start: the boring parts matter.
Stabilizer is what keeps your fabric from shifting, puckering, or doing that wavy thing that makes your portrait look like it was stitched during an earthquake. Different fabrics behave differently, and stabilizing correctly can make satin stitches look crisp and keep detail from sinking into lofty materials.
My go-to setup (hand embroidery portraits)
- Fabric: tightly woven cotton or cotton-linen blends
- Hoop: sturdy wood or flexi hoop (whatever keeps tension consistent)
- Transfer method: water-soluble pen or printable stabilizer for complex outlines
- Thread: cotton floss for a classic look; specialty threads sparingly
My go-to setup (machine embroidery portraits)
- Design prep: simplified photo-to-stitch approach (often requiring digitizing decisions)
- Hooping: fabric + stabilizer hooped firmly (drum-tight, not stretched into distortion)
- Stabilizer pairing: cut-away for stability; wash-away topper for high-pile textures when needed
- Test stitchouts: always, because thread has opinions
Whether you stitch by hand or machine, this is the part that makes the difference between “gift-worthy” and “why does my dog look like a potato.”
The Memorial Side: Making Room for Grief Without Getting Cheesy
When I stitch memorial pieces, I’m careful about tone. People want comfort, not clichés. So instead of “They’re in a better place,” I focus on what’s true:
- Love stays. The pet is gone, but the bond doesn’t evaporate.
- Ritual helps. Having a keepsake can be a gentle anchor on hard days.
- Support matters. Grief can be isolating, and it helps to talk with people who understand.
I’ve also learned that memorial embroidery isn’t always about sadness. Sometimes it’s about celebrating a goofy gremlin of a dog who stole socks, barked at absolutely nothing, and still managed to be the best part of someone’s day for 13 years.
From One Gift to a Real Business: How I Went Professional
After that 2018 portrait, friends started asking, “Can you do one of my dog?” Then a friend-of-a-friend asked. Then a stranger did. Then suddenly I had a weekend where I realized I was basically running a tiny pet-portrait factory… with thread.
Step 1: I built a repeatable process
Professional custom embroidery isn’t just skillit’s consistency. Here’s the workflow I now use:
- Inquiry + photo review: I confirm the photo will translate well to thread.
- Style selection: minimalist linework vs. detailed thread-painting vs. machine-stitched texture
- Proof/mockup: a simplified preview so expectations match reality
- Stitching phase: progress updates (because people love seeing it come to life)
- Finishing: backing, framing/hoop finish, trimming, pressing
- Packaging + shipping: protective layers so it arrives looking like art, not a crumpled napkin
Step 2: I learned pricing without apologizing
The fastest way to burn out is to price like you’re doing everyone a favor. You’re not. You’re providing a skilled, time-intensive, personalized product.
Pricing basics that changed everything for me:
- Track costs: thread, fabric, hoops/frames, needles, stabilizer, packaging
- Include labor: yes, even if you enjoy it (especially if you enjoy itjoy is not a discount code)
- Account for overhead: tools, software, machine maintenance, listing fees, payment processing
- Know your break-even: the number where you stop paying to work
A realistic example pricing breakdown
Let’s say a detailed 6-inch hoop portrait takes 6 hours.
- Materials (fabric, floss, hoop, backing): $12
- Packaging + inserts: $4
- Fees/overhead allocation: $8
- Labor (6 hours × $25/hr): $150
- Base price: $174
Then I may adjust based on complexity (multiple pets, detailed markings), deadlines (rush), and finishing (frame upgrade). This isn’t “expensive.” This is honest.
Step 3: I wrote policies like an adult (begrudgingly)
Custom pet embroidery is emotional, which means boundaries matter. Policies protect both sides:
- Photo requirements: what I need to work accurately
- Revision limits: small tweaks vs. full redesign
- Lead times: what’s realistic (and what’s fantasy)
- Rush fees: because urgency costs energy
- Memorial sensitivity: confirming spelling for names/dates and placement decisions
Shipping Pet Embroidery Without Crushing Someone’s Feelings (or the Hoop)
Mailing embroidered art is not hard, but it does require care. The goal is: no bending, no moisture, no “why does my dog have a dent now?”
My packaging checklist
- Protect the surface with clean tissue or a sleeve (so nothing snags stitches)
- Add rigid support (chipboard or a stiff mailer insert)
- Use a box for framed/hooped pieces (pads the corners and prevents crushing)
- Choose a shipping service that matches the item’s value and urgency
If you’re shipping within the U.S., it’s also worth understanding common options like Priority Mail and Flat Rate packaging rules so you don’t end up wrestling a box that refuses to close.
Common Pet Embroidery Mistakes (So You Don’t Learn Them the Hard Way)
1) Starting with the wrong fabric
Loose weave = distortion. Pick a stable fabric if you want clean detail.
2) Over-outlining everything
Heavy outlines can make a pet look cartoonish when you were aiming for tender realism. Use softer outlines or let color blocks define edges.
3) Ignoring stitch direction
Fur “flows.” If your stitches fight that flow, the portrait looks offeven if the colors are right.
4) Not testing (especially for machine embroidery)
Test stitchouts save you from heartbreak. Thread tension, density, and stabilizer choices can change the entire outcome.
FAQ: Pet Portrait Embroidery (Quick Answers People Actually Want)
How long does a custom pet embroidery portrait take?
Hand embroidery can take several hours to many days depending on detail. Machine embroidery can be faster once the design is prepared, but prep and testing still take time.
What’s the best photo for an embroidered pet portrait?
Bright, sharp, close-up photos with clear eyes and visible markings. Simple backgrounds help.
Can you include names, dates, or a collar tag?
Absolutely. Simple text and small icon details often make memorial pieces feel more personal without overpowering the portrait.
Is pet memorial embroidery a good gift?
Yesespecially when you choose a photo that captures the pet’s personality and you keep the message simple and sincere.
Conclusion: The Strange Gift of Stitching Love Into Something You Can Hold
I started making pet embroidery because I didn’t know what else to do with grief. I just knew my mom needed something realsomething that didn’t pretend loss is easy, but also didn’t reduce love to a sad quote on a mug.
Now, as a professional, I still approach every embroidered pet portrait the same way: with care, patience, and the understanding that I’m not just stitching a dog or cat. I’m stitching a storymorning routines, couch cuddles, road trips, the sound of nails on the floor, the quiet comfort of a friend who never judged a bad day.
If you’re thinking about commissioning (or learning to make) a custom pet embroidery portrait, remember this: perfection isn’t the goal. Recognition is. When someone looks at the finished piece and says, “That’s them,” you’ve done it.
Bonus: of Real Experience From the Pet-Embroidery Trenches
After hundreds of portraits, I’ve learned that the “hard part” isn’t the stitching. It’s the emotion managementmine and the customer’s. People will send you photos with messages like, “This is the last picture we took before the vet,” and suddenly you’re not just an embroiderer. You’re a temporary keeper of someone else’s heartbreak. The responsibility is heavy, and I treat it like it’s fragile glass.
I also learned that customers don’t always want realism. Sometimes they want their version of the pet: the sweeter expression, the fluffier ears, the slightly brighter eyes. At first, I thought that was “wrong.” Now I understand it’s a form of care. Memory is allowed to soften edges. When someone asks me to remove a medical cone from the reference photo or hide a shaved IV patch, I’m not “editing reality.” I’m honoring the way they want to remember their friend.
One of the most practical lessons: set photo guidelines early. I used to accept anythingdark photos, far-away shots, pets facing away like they were avoiding the paparazzi. Then I’d spend hours guessing markings and trying to invent detail that didn’t exist. Now I politely ask for better references, and my work improved overnight. Clear input creates clean output, and that’s true in embroidery and in life (unfortunately).
Another lesson: thread color is a liar. Not always, but often. Two browns can look identical on a spool and completely different under daylight. I now test tiny stitches on scrap fabric beside the photo before committing. It takes five minutes and saves me from ripping out an hour of work while whispering, “Why are you like this?” at a piece of floss.
Finishing matters more than beginners think. A portrait can be beautifully stitched and still look “unfinished” if the hoop back is messy or the fabric is puckered. I started taking finishing seriouslyclean backing, neatly wrapped hoops, pressed fabric, tidy edgesand customers immediately perceived the work as more professional (because it was). The sewing isn’t the only craftsmanship; presentation is part of the product.
Finally, I learned that this work changes you. You start noticing how people talk about their pets like family, because they are. You see how grief shows up as love with nowhere to go. And you realize that a small embroidered portrait can be a landing pad for that love. That’s why I still do this. Not because it’s trendy (it’s not), but because it’s human. And because, every now and then, someone opens a package, sees their pet in thread, and feels a little less alone.