Table of Contents >> Show >> Hide
- What Are “Melting Candle Cupcakes,” Exactly?
- What You’ll Need (And What I Wish I’d Had)
- Step 1: Bake Cupcakes That Can Handle the Drama
- Step 2: Build the “Candle” (Stack, Anchor, Chill)
- Step 3: Frost Like You’re Making a Tiny Haunted Sculpture
- Step 4: Make the “Melted Wax” Drips
- Step 5: Add the Candle (And Keep It Safe)
- Troubleshooting: What I’d Do Differently Next Time
- Flavor Ideas That Make These Even Better
- Make-Ahead and Storage Tips
- My Final Verdict: Worth It for the “Wow” Moment
- Bonus: of My Real-Life “Melting Candle Cupcake” Experience
- SEO Tags
Every Halloween, my kitchen turns into a tiny haunted house: the lights are dim, the music is spooky, and something is always (mysteriously)
missingusually my common sense. This year, I fell for the “melting candle cupcake” trend: cupcakes stacked into little pillar candles, frosted smooth,
and topped with drips that look like hot wax mid-melt. The final touch? A real candle you can actually light.
Sounds simple, right? Bake cupcakes. Frost them. Make them look like a candle that’s been crying dramatic wax tears since 1692.
What could go wrong?
A lot, actually. But also: it worked. And the results were so charmingly creepy that I’d absolutely do it againjust with a few smarter choices,
cleaner shortcuts, and slightly less buttercream on my elbow.
What Are “Melting Candle Cupcakes,” Exactly?
Melting candle cupcakes are a Halloween decorating illusion: two cupcakes become one tall “pillar candle,” thanks to stacking, trimming, and a smooth
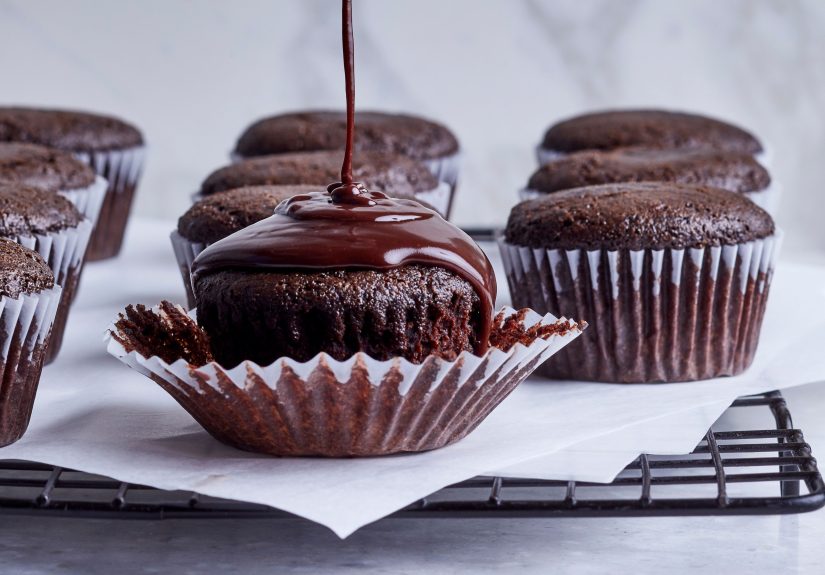
coat of frosting. Then you add a “melted wax” effectusually a drip made from white chocolate ganache, candy melts, or tinted icingand finish with a
candle in the center. The vibe is equal parts spooky and fancy, like a gothic bakery opened inside a Victorian novel.
The best part is that you can customize the look: black candles with bone-white drips, pastel “witchy” candles with glittery wax (edible glitter only,
please), or bright orange-and-yellow drips that look like a candle flame froze in time.
What You’ll Need (And What I Wish I’d Had)
Core ingredients
- Cupcakes: Any flavor workschocolate, vanilla, red velvet, spice cake. Dense-ish cupcakes are easiest to stack.
- Frosting: A sturdy buttercream is your best friend for smoothing and stacking.
- Drip “wax”: White chocolate ganache, candy melts, or a thick vanilla glaze tinted with gel food coloring.
- Candles: Real birthday candles for lighting (remove before eating), or edible candle toppers if you can find them.
Helpful tools
- Small offset spatula or butter knife (for smoothing)
- Piping bag (optional but helpful)
- Cooling rack + sheet pan (for mess control)
- Small cake boards or cardboard circles (optional, but they make handling easier)
- Toothpicks or a thick straw/bamboo skewer (for temporary structure while frosting)
- Bench scraper (if you want that “perfect cylinder” look)
My biggest “wish I’d known” item: parchment paper under everything. It turns a frosting crime scene into a five-second cleanup.
Step 1: Bake Cupcakes That Can Handle the Drama
Since you’re stacking two cupcakes into a taller shape, you want cupcakes that are fully baked and not too airy. A super delicate cupcake can compress
and tilt when stacked, like a tiny dessert version of a leaning tower. I used a chocolate cupcake base because Halloween demands chocolate on principle.
Tips that saved me
- Let them cool completely. Warm cupcakes + buttercream = frosting slump city.
- Trim domes if needed. Flat surfaces stack better. A serrated knife works well.
- Make extras. You will sacrifice at least one cupcake to “testing.” (Testing means eating it.)
Step 2: Build the “Candle” (Stack, Anchor, Chill)
Here’s the trick: two cupcakes become one candle by stacking them base-to-base. Think of it as building a frosting totem pole that’s adorable and
slightly concerning.
- Choose two similar-sized cupcakes. Matching cupcakes make a straighter candle.
- Add frosting to glue them together. Pipe or spread a layer of buttercream on the flat surface of cupcake #1.
- Invert cupcake #2 and stack it on top. Press gently so it’s stable.
- Optional: add a support. For extra stability, insert a thick straw or skewer through the center while frosting, then remove later.
- Chill for 10–20 minutes. This firms everything up so you’re not frosting a wobbly dessert Jenga tower.
I learned fast that “eyeballing it” is not a structural engineering strategy. Chilling between steps turns this from frustrating to fun.
Step 3: Frost Like You’re Making a Tiny Haunted Sculpture
This is the part that separates “wow, that’s a candle!” from “why is your cupcake wearing a sweater?” You want a smooth, even buttercream layer.
My smoothing method (no fancy spinner required)
- Crumb coat first. Add a thin layer of buttercream to trap crumbs. It will look messy. That’s correct.
- Chill again. 10–15 minutes in the fridge makes a huge difference.
- Apply the final coat. Thicker and smoother. Use an offset spatula and rotate the cupcake stack as you go.
- Heat trick (carefully). If your frosting looks rough, warming a knife under hot water, drying it, and lightly smoothing can help.
The key is patience. Not “wait three hours” patiencemore like “pause, chill, smooth, repeat” patience. It’s basically skincare, but for cake.
Step 4: Make the “Melted Wax” Drips
The drips are what sell the illusion. You want a drip that sets, looks glossy (or softly matte), and doesn’t run all the way down like it’s escaping.
Option A: White chocolate ganache “wax” (my favorite look)
White chocolate ganache makes beautiful candle drips because it can be tinted with gel food coloring and sets with a realistic “wax” thickness.
The big secret is temperature: too hot and it floods; too cool and it clumps.
- Heat cream until hot (not boiling).
- Pour over chopped white chocolate or chips. Let sit briefly, then stir until smooth.
- Cool to drip consistency. It should fall from a spoon in a thick ribbon, not splash like soup.
- Drip around the top edge first. Use a spoon, squeeze bottle, or piping bag. Let gravity do the spooky work.
- Add a little pooling on top. Real candles “melt” at the crown, so a bit of drip puddle sells the illusion.
Option B: Candy melts (fast and beginner-friendly)
Candy melts set quickly and are easy to tint, which is why they’re popular for Halloween decorating. The flavor is “sweet coating,” but visually,
they’re very reliable. If you’re going for bold orange/yellow flame-drips, candy melts can be your easiest route.
Option C: Thick vanilla glaze (quick, but less candle-realistic)
A powdered sugar glaze can work in a pinch, but it tends to dry shinier and thinner than “wax.” It’s still cutejust more “ghostly icing drizzle”
than “melted candle.”
Step 5: Add the Candle (And Keep It Safe)
I used standard birthday candles because the whole point was the “wait…that actually lights?” moment. If you do that, a few safety notes matter:
- Insert the candle right before serving. Frosting can soften a candle’s base if it sits too long.
- Light briefly for the reveal. This is dessert theater, not a campfire.
- Blow out, remove, then serve. Don’t hand someone a cupcake with a candle still inside like it’s a surprise obstacle course.
- Avoid non-edible decorations. If you add shimmer, make sure it’s labeled ediblenot just “non-toxic.”
If you want a no-flame version, you can make a “wick” from a chocolate stick or a dark sprinkle rod, and a flame shape from candy melts.
Still magicaljust less “fire marshal side-eye.”
Troubleshooting: What I’d Do Differently Next Time
Problem: My candle looked lumpy
Fix: Chill between coats and smooth with a cleaner tool. Also, don’t fight buttercream that’s too softpop it in the fridge for a few
minutes and come back like a calm, frosting-focused adult.
Problem: My drips ran too far
Fix: Let the ganache/candy melts cool longer. Do a test drip on the inside of a bowl first. If it waterfalls, it’s too warm.
Problem: My cupcake stack leaned
Fix: Trim the cupcake tops flatter and use a temporary support straw while frosting. Also, choose cupcakes that are similar in height and diameter.
Problem: The candle hole made the top crack
Fix: Don’t force it. Twist the candle gently, or make a pilot hole with a skewer first.
Flavor Ideas That Make These Even Better
The outside is spooky, but the inside can be anything you want. Here are combinations that feel especially Halloween-friendly without tasting like a costume store:
- Chocolate + salted caramel: Rich cupcake, caramel center, vanilla buttercream “wax.”
- Pumpkin spice + cream cheese frosting: Cozy fall flavor with candle-core drama.
- Black cocoa cupcake + vanilla buttercream: Deep, dark color that makes light drips pop.
- Red velvet + marshmallow frosting: A little “vampire cake,” but make it cute.
Make-Ahead and Storage Tips
- Best timeline: Bake cupcakes a day ahead, decorate the next day.
- Chill for clean decorating: Cold buttercream is easier to smooth and drip over.
- Store finished cupcakes: In a covered container in the fridge. Bring to room temp before serving for best texture.
- Add candles last minute: For the cleanest look and best stability.
My Final Verdict: Worth It for the “Wow” Moment
These are not “quick weeknight cupcakes.” They’re a project. But they’re also a Halloween centerpiece disguised as dessert, and people react to them
like you just casually summoned a bakery spell.
If you like decorating, love a theatrical reveal, or simply enjoy making food that looks suspiciously like something from a haunted mansion dining hall,
melting candle cupcakes are 100% worth a try. Just plan for chilling time, keep your drips under control, and remember: buttercream is washable, but pride
is harder to launder.
Bonus: of My Real-Life “Melting Candle Cupcake” Experience
Let me tell you how this actually went, in the messy, hilarious, very-human way recipes never admit. I started confidentlylike someone who had watched
exactly two videos and therefore believed I had mastered structural dessert architecture. I baked my cupcakes, lined them up on the counter, and thought,
“This is going to be easy.” The cupcakes, of course, heard me say that and immediately began plotting.
The first surprise: stacking. In my head, two cupcakes would become a perfect cylinder like a cartoon candle. In reality, I stacked two cupcakes and
created something that looked like a tiny, delicious dumbbell. The sides bulged. The top leaned. I stared at it the way you stare at a piece of IKEA
furniture when you realize the “extra” screw was not extra.
My second surprise was buttercream mood swings. At first, it was too stiff and tore the cake, dragging crumbs into my frosting like confetti at the
world’s worst party. Then it got too warm and started sliding, which made my “candle” look less like a spooky masterpiece and more like it was melting
from emotional stress. I finally understood why bakers are always chilling things: the fridge is basically a therapist for frosting.
The drip stage was the most dramatic. I made a white chocolate ganache “wax” and thought it looked perfectuntil I did my first drip and it raced
down the side like it was late for an appointment. I panicked, grabbed the cupcake, and tried to rotate it faster (which is not how gravity works).
The fix was simple: cool the ganache. But in that moment, I learned a deep truth: Halloween baking is just a series of small negotiations with
physics.
Once I got the ganache to a thicker, slower drip, everything clicked. The drips looked realisticlike candle wax that froze mid-melt. I added a little
pooling on top, stepped back, and finally saw “candle” instead of “cupcake tower.” It felt like winning a tiny culinary boss battle.
The grand finale was lighting the candle. I called someone into the kitchen (because a reveal without an audience is just regular stress), lit the wick,
and watched their face do the exact reaction I wanted: confusion, then delight, then, “WAITthat’s a cupcake?” That moment made every lopsided first attempt
worth it. I blew the candle out quickly, pulled it out, and served the cupcake. And yes, I ate one too. Purely for quality control. Definitely not because
I deserved it after surviving the drip phase.
Next time, I’ll chill more, test-drip sooner, and make peace with the fact that my “perfect candle cylinder” will always be slightly haunted. But honestly?
That’s kind of the point.